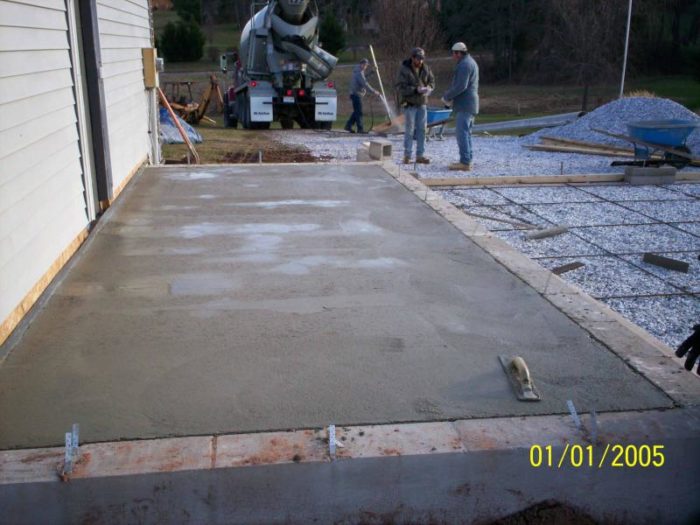
The Background: Concrete block walls bearing on Concrete footer. Slab then poured with expansion gap so that top of slab is flush with the top of cap blocks. (See attached pic) The work was done in Jan 2007- two years ago.
I laid a ceramic tile floor on top of all of this and the floor has been down for two years with no problems. Last week we had overnight lows of 11 degrees. Now there are cracks in some of the tiles- centered on the short walls (front and back)in the photo. The cracks seem to be located over the expansion joint and are right in the area of the center strap shown in the picture. Only the first row along the perimeter was affected. All of the field tiles are fine.
Obviously something moved. My questions are:
1) What is the best way to remove the old tiles (in thinset) and grout so as to replace them?
2) I’m not sure if it’s the slab or the block walls. I assume the slab. Is there some way to provide a little flexibility when I put down new tiles so that this does not happen again?
3) Any other thoughts as to if the 11 degree low contributed to my problem? The room is unheated but stays above freezing due to being open to the rest of the house.
4) Other advice or words of wisdom?
Edited 2/7/2009 3:34 pm ET by frontiercc2


Replies
There is a ton of info missing or unclear here.
For instance, was there mineral soil tightly compacted within that block wall? if not, the slab probably did settle over time.
Second, are you really saying that the tiles span across the expansion joint so that they seat on the two different materials - slab and block?
If so, that is just plain wrong! I would expect them to displace sooner than this.
Third, I was going to ask what sort of heat and perimeter insulation you have, but the text and photo seem to indicate none, so the cold probably did shrink the block somewhat, and possibly heave it up, but don't know what depth your footer is or what is required there.
Welcome to the
Taunton University of Knowledge FHB Campus at Breaktime.
where ...
Excellence is its own reward!
1) What is the best way to remove the old tiles (in thinset) and grout so as to replace them?
1. Air hammer with a bent chisel.
2) I'm not sure if it's the slab or the block walls. I assume the slab. Is there some way to provide a little flexibility when I put down new tiles so that this does not happen again?
2. The slab should be frost-protected. Failing that, there is no guarantee, but see #4 below.
3) Any other thoughts as to if the 11 degree low contributed to my problem? The room is unheated but stays above freezing due to being open to the rest of the house.
3. 11ºF is balmy by my standards, but then again, the frost line here is between 48 and 60 inches below grade. This slab is on grade and you say you are providing no heat but passive air circulation. IMO, it's surprising that it took this long for things to go south.
4) Other advice or words of wisdom?
4. Ditra.
Dinosaur
How now, Mighty Sauron, that thou art not brought
low by this? For thine evil pales before that which
foolish men call Justice....
Thanks for the input gentlemen. . . . DIY mistakes. I knew I was taking a chance when I did it though. But the materials were free. So I have nothing more than a few hours some thinset and grout in the job. Some more info:The foundation is not insulated. The slab is frost protected and the substrate was compacted prior to the slab being poured. Whether that compaction is sufficient is really up to the contractor that I had do the job. The block walls bear on footers 36" below grade which is per local code. There is one electric baseboard in the room that I keep turned off. The air temperature in the room stays at 60 or above due to the protected nature of the room (to the left is the heated house and to the right in the picture is an insulated garage that has never gone below freezing) and the passive heat from the main house. Even that night it was 11 degrees the room was above 55. Now on to plan B~ to figure out to fix or replace with different material. Thanks for the input though. If both of you are shocked that it lasted this long, breaking out the cracked tiles and replacing won't work long term.
Before you take the hammer to the tiles, use a grout saw to remove the grout between the good tile and the bad ones. That keeps from putting pressure on the good tiles when you chip out the bad ones."Put your creed in your deed." Emerson
"When asked if you can do something, tell'em "Why certainly I can", then get busy and find a way to do it." T. Roosevelt
You never answered clearly about the situ.
Are the tiles bridging the control joint. If so, then they will continue to break if you secure them to both sides.
If you only thinset one side down, and let the other side float, they might hold up if you don't drop anything on them (need to have them set down snug but not adhered so they can move with slab and not foundation)
Or run some box trim around the edge to the point of the control joint to hide the area where it will move
Jeff, tiles are set across joints between dissimilar substrates all the time; that's one of the things Ditra membrane addresses: it's a bond-breaker that allows a certain amount of substrate expansion/contraction to occur without affecting the tile. I use it extensively in remods of older places where I have to bridge the floor of the original part of a house into a bump-out or new wing.
In this poster's case, I'm not sure just using Ditra would be sufficient to avoid future problems; it depends on the width of the expansion joint and how much movement is going to occur. He might have to put a control joint in the tile itself. In any case, I think it's worth his checking with the Schlüter rep to find out. I don't know of any other solution that holds out any hope to him.
Dinosaur
How now, Mighty Sauron, that thou art not broughtlow by this? For thine evil pales before that whichfoolish men call Justice....
Grout joint at the expansion joint.....Probably the best idea yet!Then you could tell your friends that you saw that as a future problem area and addressed it early on. We won't tell!Edited 2/8/2009 11:55 am ET by back2work
Edited 2/8/2009 12:08 pm ET by back2work
Sorry Jeff- It was clear to me because I am familiar with the situation. The tiles do indeed bridge the two surfaces. The expansion joint is about 3/8" wide . The plan at this point is to
1) wait till spring when the temps stabilize a little warmer. 2) remove the first row of tiles and replace with control joint (grout line) lined up over the expansion joint. That way the tiles won't be bridging two surfaces with the potential to move independently. 3)In the meantime, investigate the Ditra option. I'm not sure it will give enough flexibility though. And the cut tiles with grout lines won't look too bad I don't think. Again I have the tiles for nothing. The only costs would be my time and some thinset and grout. Thanks everyone for their input.
Your grout line, if evenly spaced on all walls, will look like an edge detail.
Could look like you did a nice little upgrade.
You could put a diamond blade in your wet saw and cut the tiles all the way around right at the crack if it is reasonably straight and then not have to take out the inside strip of tile and just remove and redo the border.
I like that idea too- nobody will even notice. And the only one that notices (me) is the only one that will think something is amiss.
You might want to consider using a control joint instead of just grout. Grout alone will crack even more easily than the tile did (don't ask me how I know that, LOL).
View Image
Dinosaur
How now, Mighty Sauron, that thou art not broughtlow by this? For thine evil pales before that whichfoolish men call Justice....
Learn me something I dont know
I have heard about the Shulter systems for shower pans etc but know nothing about ditra.
I recon it is time I go learn more about something else
Tilers always taught me to bridge the crack by securing to one side only. (never had a call back but that doesnt mean it was done right)
we just removed about 500+ feet of tile..I used a wet towel..lay it over the tile and pound it with a hammer..no flying pieces and the tile gives up..a 4-5 inch thin blade hammered under the tile lifts some from the thinset as well..but do use the towel the pieces are sharp that otherwise would fly around.. pilgrim
Ditra is a specialised membrane that looks rather like an orange plastic waffle with a white J-cloth bonded to the bottom. It's waterproof, so it can be used in wet areas, but more importantly, it's a 'bond-breaker' or 'uncoupling' membrane which manages to allow you to glue the tile to the substrate without glueing the tile to the substrate.
The fleece 'j-cloth' bonded to the bottom of the plastic waffle is what's actually glued to the subfloor. That fleece can stretch and give as the subfloor moves due to thermal expansion or whatever...but when it moves, it does not transmit the movement to the 'waffle', the top of which is what the tile is actually attached to.
The recesses in the waffle are trapezoidal when viewed in section (in plan view, they're square) and that allows you to fill each dimple with thinset which, when it hardens, is kept in the dimple by the shape. The tile is adhered by the top of the thinset dimple.
The stuff is a breeze to work with...but it's costly. You use 3 times as much thinset as usual, and the membrane itself is about $2 a square foot. Plus you have to figure about 1½ to 2 times more labour.
Dinosaur
How now, Mighty Sauron, that thou art not broughtlow by this? For thine evil pales before that whichfoolish men call Justice....
It's one of the Schluter products, eh.
I just demo'd a shower yesterday for sis and bro in law. Contractor used Kerdi system but put it in all wrong and the entire shower (1 1/2 yrs old) is shot.
Really ugly. Had to seal the area, neg pressure it, and clean the dickens out of it. Mold was horrendous. (masks and everything)
Now I gotta decide if I re-use Kerdi or use vinyl like I am used to.
Gonna start a post re. it right now.
Schlüter products are top-of-the-line stuff, Jeff. They also have very good customer support people to help contractors put the stuff in properly. Obviously, if some yahoo just buys the stuff and doesn't bother to ask how to do it right, the job is gonna go south. But that's not the product's fault.
Check with your tile supplier; I'd be very surprised if he doesn't have (or can't get) the 'how-to' CD-ROM for any Schlüter products you're interested in using.
Dinosaur
How now, Mighty Sauron, that thou art not broughtlow by this? For thine evil pales before that whichfoolish men call Justice....
Thanks Dino
Thats the info I need.
This shower makes me sick. They spent a ton of money and the A**Ho** did an aweful job.
Just pulled base. 2" plus of cement totally soaked. I could ring out the 3/4" plywood underneath.
Used the Schluter drain, used all the products, but it was crystal clear he did not do it right. Spent all the money and crapped it up.
I just dont understand people sometimes!
amen to that....
Dinosaur
How now, Mighty Sauron, that thou art not broughtlow by this? For thine evil pales before that whichfoolish men call Justice....
I see what was an exterior door which I guess is now the laundry room door from the house. Is the new slab flush with the existing slab or more importantly what is the interior floor height compared to the addition floor height?I guess what I'm getting at is could you put down pressure treated plywood on the new slab, leaving a little space in height between the stem wall and plywood (thin sleepers on slab only), then finish floor on that. Maybe going with vinyl flooring and a threshold at the door.Should only end up with a 1/4"-1/2" difference in floor height. Not sure about the integrity of the tile where it spans over the joint, but it's not like anyones going to be walking over there.Knowhatimean?No telling how much that slab is going to move (vertically) over time though.
Do you have a grade or downspout issue. I'm suspecting serious water control issues. Slabs will crack, but not after they are through curing.
it is not his slab cracking, but the tiles spanning the joint.
Welcome to the Taunton University of Knowledge FHB Campus at Breaktime. where ... Excellence is its own reward!
He wont know until the tile is up...........
No way is the slab cracked. I cannot visually confirm that yet, but I am sure the slab is intact. Thanks to everyone for their help. I have a solution` an expansion joint product over the transition. I will remove the old tiles and turn the problem into a decorative band separated by an expansion joint. Should look just fine when finished.
But its sinking? Slabs aren't built to move. I'm out................good luck with the tile.
I just broke out 150 sq ft of 3/8 ceramic tile using just a hammer, 3" cold chisel and a stiff floor scraper. Whenever my hammer blows were angled away from or parallel to adjacent tiles the adjacent tiles did not break even when impact point was very close to the next tile.
There is a very good product called "RedGard" for bridging slab cracks and cold joints.
http://www.custombuildingproducts.com/ProductCatalog/SurfacePrep/WaterproofingAntiFractureMembranes/RedGard.aspx
Comes in a snotty consistency that can be rolled on with a high nap roller. Dries stretchy, enabling substrate to move a little without breaking tiles.