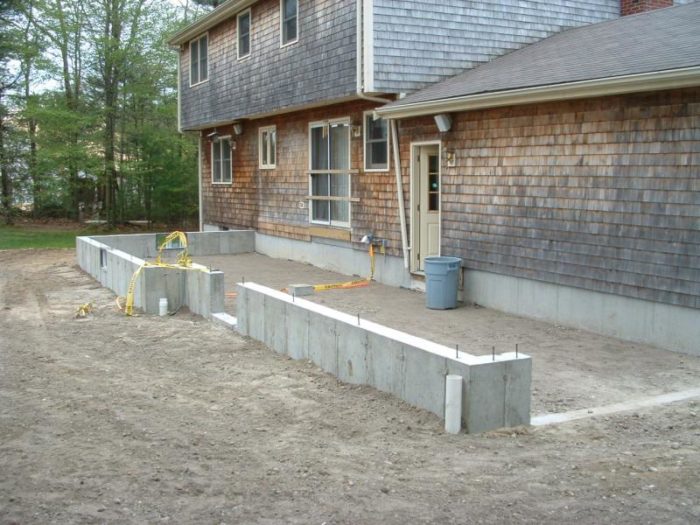
I am in the process of completing a ~1,300 sqFt addition to my home (typical 15 yr old spec New Eng Colonial). 24×24 above the existing garage and ~12×48 Wookshop/Mud Room/Sun Room on a new foundation along the back. The back addition has a slab on grade that serves as the floor (sub-Floor) for the WS/MR and the crawl space under the SR. The SR is 3 steps up from the MR at the same level as the existing 1st Flr (the to be removed slider is the entrance to the new SR). The attached picture shows the foundation/slab base prior to slab/frame.
Problem is the slab has settled 0-3″ tapering from the center of the MR to the middle of the WS. I was planning on installing a Tile floor in the MR.
Possibilities I am considering:
– Use floor leveler to correct the MR Floor (0 – 1 1/2″ taper) and installing ? flooring.
– Slab Jacking – Can’t seem to find anyone in my area who knows about this or does this.
– Rip out and replace – Rather not…
Any recomendations/comments would be appreciated


Replies
Where are you?
Andy Engel
Senior editor, Fine Woodworking magazine
Other people can talk about how to expand the destiny of mankind. I just want to talk about how to fix a motorcycle. I think that what I have to say has more lasting value. --Robert M. Pirsig
Sorry, Southeastern MA (Easton, Near Brockton/Foxboro)
If you had the work done by a licensed contractor, I would contact him and ask how he planned on making it right.
I'm sorry, I thought you wanted it done the right way.
Looks like a nice neat job being performed by a knowledgeable contractor.
Either the fill/base beneath the slab was not properly compacted, or possiblt there is water undermining the slab??
This is just a guess, and does not take into account improper rebar and mesh placement in the slab.
I would just tear it out and redo it. It's not that big. I cant imagine jacking it is gonna save much on a slab that small.
Assuming that the crawlspace slab is just a rat slab, are you sure that you asked for and received a proprer slab in the mr/ws area??
Eric
I Love A Hand That Meets My Own,
With A Hold That Causes Some Sensation.
[email protected]
Re jacking, search for "mud jacking". I'd be surprised if there wasn't someone in your area who does it. Usually it's a smaller specialty contractor.
But under the circumstances it seems like it would make more sense to tear out the slab, go over the area with a jumping jack, then pour fresh. This is the only way to assure that you don't continue to have subsidence.
Normally this would be the contractor's responsibility, if the same guy did the fill and the floor.
If I understand correctly, the slab on grade is outside of the concrete wall foundation wall in the photo and that is where the settling has occured.
Was the grade excavated to virgin ground, or was it tilled out to level, or was the ground left untouched and enough concrete poured so it leveled itselfm meaning the slab thickness isn't uniform?
Was 4"-6" of gravel laid and conpacted prior to pouring slab?
Basically the failure or problem is located under the slab. Therefore the extent of the problem is undeterminable as is whether or not it has reached its limit. If you proceed by addressing the symptom rather than the problem, as you build and load the slab with wieght (framing, gwb, flooring, shop tools and machinery, etc.) you may aggrivate the problem. At that time it will be $$$$ to correct. It may even cause the new framing to pull away from the existing structure, possibly with some of that structure attatched.
Break it out and start over. It is the fastest and cheapest remedy. It's a hard pill to swallow, but the risk is well worth it.
Frankie
Frankie,
If you look at the pic; to the left is the mud/work area where the slab has settled I think. You see the opening for a garage door or slider...........the area to the right of the picture is a framed floor over for the sun room.
Read the post again, I could be wrong.
EricI Love A Hand That Meets My Own,
With A Hold That Causes Some Sensation.
[email protected]
Thanks guys... I my heart I knew the right way to fix this is to rip it out and fix it right. I will also contact the excavation/foundation contractor who did the foundation/floor. He was well aware of the plans for the space and we discussed the type of concrete that needed to be used.
This is a problem (?typical?) in our area due to a high water table and clay sub-soils. My neighbor had to have his garage floor replaced due to a similar issue.
Someone I spoke to recommended inserting pins into the foundation wall prior to re-pour to "support" the new slab and protect against any future problems.
Any thoughts here?
Thanks Frank
In houses I've built or work on, often the slab would end up resting on the top of the footing.
Regardless, we always punched a hole on the block about every 2' and inserted rebar with a j bend in there, and tied it to the rest of the grid. Worked a good amount of concrete into the holes during the pour. But that alone will not prevent settleing.
From other info I have read and seen, many consider doing so bad practice.
Compaction of proper materials is key. I have no experience with clay, but I would say you need to remove it and replace it with gravel or some material that drains well. It is likely that it dried out and shrunk, causing your settling.
I have read stories of home that have built in ground moisture meters that trigger systems capable of maintaing a certain moisture content in the soil, I think in the Mid West or someplace with LOTS of clay.
EricI Love A Hand That Meets My Own,
With A Hold That Causes Some Sensation.
[email protected]
Yeah, if they have no confidence of successfully compacting the fill (or if it's expansive clay) then pins and extra slab reenforcement would be the way to go. In that case you'd like to have 2-3 reenforced beams cast as a part of the slab, running across the short dimension.
I hope you are rreading your other thread on the same subject.http://forums.taunton.com/tp-breaktime/messages/?msg=57514.1try to tie these together and fill in some missing pieces, please, before my brain fractures and half of it falls into the Pacific ocean and the other half into the Atlantic. I Don't think that the poor folks in the Indian Ocean can stand another tsunamii
Welcome to the Taunton University of Knowledge FHB Campus at Breaktime. where ... Excellence is its own reward!
I'm going to throw another one atcha.
If this is still open to the elements, what was done all winter to protect this from the elements? Did you reinstall that downspout to keep water from being dumped right there in the middle? Did you do anything to keep the frost from settling down into the ground under it? It is possible that your contractor ( I originally assumed that you were a DIY on this) did nothing wrong and that you left it open to water and freezing all winter? If the water from that downspout was getting trapped under the center of the slab and freezing, and ice lense could be the reason you have a slab slope. Are you sure that the low spot has settled - or is it possible that the high spot has raised by ice? Or a combination of both? What I am able to see is only based on fifteen percent of what I would need to know, the one photo posted, and some assumptions. See you around tomorrow after you've checked back in.
Welcome to the
Taunton University of Knowledge FHB Campus at Breaktime.
where ...
Excellence is its own reward!
Sorry about all the confusion but I do appreciate the spirited discussion. Let me clear up a couple of things. The sequence of events was pit excavated to ~5' below grade, all material removed, footing/foundation set on undisturbed soil. Inside foundation was backfilled with gravel and compacted with bucket of excavator and walkbehing compactor (while not done specifically in lifts there was some intermediate compacting with the bucket). The frame and roof went up within a week after the slab was poured. The picture was taken before the slab was poured. I have a lot of pictures of the progress of the construction the one I included was intended to provide the best overview of the foundation/backfill. I took this picture last night to show the slab settlement. This is the lowesr spot which is in the middle of the foor in the Workshop area. The slab to the left and right pitch to this low spot. As you can see this is ~2" below the level that the slab was originally at.
Thanks Again
Could you post a photo showing more of the slab? The slab photo I am looking at appears to have a deliberate 2 inch step. I can't see any settlement. The workmanship appears to be very nice as well. Thanks.
Attached is a photo of the slab before frame. I marked up the areas where the problem is. I know some people are having a problem visualizing so I may post some more pictures.<!----><!---->
<!----> <!---->
Thanks
Project Pictures. These are ~6 Mos Old. The project is much further along now. Currently, hanging bluebd.
For those of us on dial up connections to keep up, you'll need to learn to resize your photos to about a third as large of a file or less. Aim for 75 to 100KB
In the time I typed that half of one of your photos has down loaded. I appreciate the effort, But I'll stop at the first two. I had thought the high spot was where you show the low spot to be.Thanks for trying to clear things up more. What was first reported as three inches now looks more like 1-3/4" or so as I see that tape. Going back to my Q about water fromt eh downspout - can you remember if it was raining and draining into the backfill as work progressed? That could have left the underlying soil and backfill wetter right there during coonstruction than the rest of the soil. if so, It would have settled more than the rest after drying out with a structure over it now. If all those suppositions are right, then you could probably do fine by floating this off with a skim coat to level it out.
Welcome to the Taunton University of Knowledge FHB Campus at Breaktime. where ... Excellence is its own reward!
I noticed the picture of your garage door. Is your dumpster 2wd or 4wd?
Most likely the slab settled due to poor compaction. What to do? I would wait and see if there was further movement. If there is you need to fill the voids under the slab. If there is no further movement you can skim coat it as suggested by another poster.
I think I would just pour two inches of a pea gravel concrete mix on top of it and forget about it.
Edited 4/28/2005 7:58 pm ET by BROWNBAGG
Ah, I see your problem!! All that heavy sheetrock stacked there. That'll make any floor sag. ;)
For your information:footing/foundation set on undisturbed soil. That doesnt really proved that undisturbed soil is compacted enough to support a load. All soil should be compacted. But this doesnt have anything to do with your question