Soffit Corners: Miter or Butt Joint
Hi all,
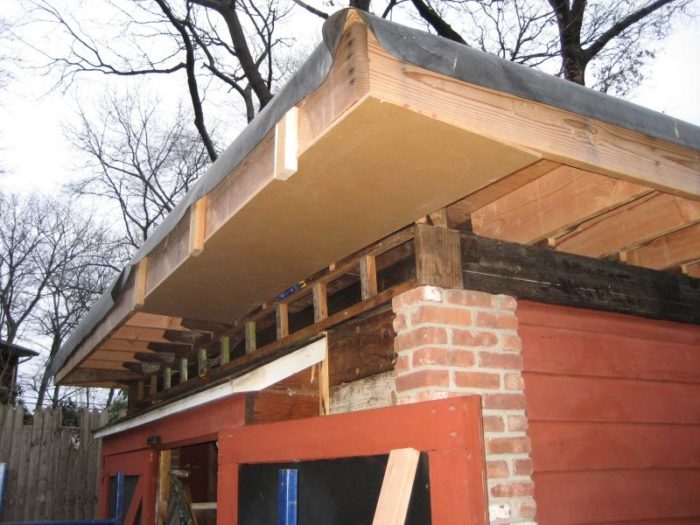
Installing new soffits on my flat roof garage and can’t decide whether to butt or miter the the corner joints. Soffit material is 1/2″ MDO, soffit depth is about 20″. MDO is dimensionally stable but that is a long miter joint and even if I do a good job cutting the miter, I’m a little concerned about it eventually opening. The other consideration is I am working solo – handling, aligning and fastening a tight miter with a 20″x8’x1/2″ board flopping around is something I’m not exactly looking forward to.
I know that a mitered joint will look “right” to me, but is a butt joint acceptable? Also, would you biscuit the joint – either the butt or the miter? Any advice would be appreciated.
Thanks,
Sean
– not sure if the pic makes a difference but thought it might help


Replies
A good miter would look best, but I would just butt it myself, without biscuits. If you're set on a miter, go ahead and try it.
Realistically, it's hard to get a miter that will remain tight in such circumstances -- too many materials involved, all going different directions with the weather and age. I'd go for a butt joint, with the lapping piece cut just a hair (maybe 1/4") long, so there's a reveal at the joint.
Dan, what do you mean with this?
I'd go for a butt joint, with the lapping piece cut just a hair (maybe 1/4") long, so there's a reveal at the joint.
Butt joint -- the butt of piece A meets the back face of piece B. I'd make piece B about 1/4" long to produce a "reveal".
If the piece is long and there's a reveal it looks intentional. If it's short then it looks accidental/sloppy. And the shadow line of the reveal hides the joint if it opens up a tad.
Dan
What shadow line?
He's laying the edge of one right up to the edge of the other. They are in the same plane. This is the soffit (underside), not the fascia.
There's a third option
You probably like the miter because it treats both the sides and front/backs equally whereas the butt joint does not. So a third option would be to use a square piece right in the corner and butt both sides and fronts/back to it. The corner square could be 3/4" material to set it off a bit more. And there are other ways to play with adding contrast.
Yeah, a thicker piece would do the "reveal" thing and help hide any minor problems. OTOH, you'll have plenty of butt joints in the length, so one more isn't that big a deal.
One might (depending on structure style and personal taste) fasten pieces of lattice molding over the joints and at regular intervals along the length, to turn the joints into a "feature".
Thanks to all
First off, thank you all for your well thought ideas - there were a lot of good points that I actually had not considered. To a point that its almost a problem - I usually consider the most difficult option to be the correct one, hence my first inclination to miter the joints.
I think my plan of approach will be to borrow from several of the suggestions you have made. I really like the idea (thanks sapwood) of using a square corner piece and the butting the ends up to that so at least I have a seam in both directions (I really don't like when this is done for door casings - but I think its a perfect solution for this situation). This will also allow me to set my corners, than easily divide the distance and install equal length boards in between - making the inevitable seems look intentional.
And Dan H - even though it was unintentional, you reminded me that when butting material together sometimes a reveal goes a long way - so I think I'll do a quirk reveal at the joint on each side of the corner square and make it look like an intentional detail. Even though I don't like exposing the plys, I can't see how a 1/8" reveal joint that is painted and will likely see very little moisture will be an issue. Also Dan H - when I was considering the miter joint I had thought about covering that with lattice to hide any future opening of the joint.
Lastly, thanks Calvin for the tip - I have blocks attached to the fascia with a dado to support the piece on the outside edge and then I am able to just throw a clamp on the joists to support the inside edge as I position the board. What I like about this method is the dado on the outside edge block keeps me a consistent 3/8" proud of the framing - I will then rout a 3/8" dado into my finished fascia board so I end up with a nice clean joint.
Unfortunately the weather is not cooperating today, hopefully be able to get to it this week - I'll let you know how it goes.
- SD
Since you're working alone.
You've got blocks applied to the sub fascia. Shorten one of them so it's just a bit longer than the ohang and soffit material. Screw a block to the bottom of it, so you can swing the block around to "hold" the soffit mat after you get it up there. Along the wall, screw some blocks or a continuous pc that you can slip the soffit into. A couple blocks on the fascia and the ledger along the wall and you've found your helper. Get it up in there and on the blocks and now you can fit the ends. Unscrew the blocks and use them down the line.
Another handy thing is to use a third hand or two to press the soffit mat. snug. You can make one of your own if need be or cheat with a 2x4 prop-friction fit. Remember that it can fall over.
Third hand
Used my DW lift for postioning and the third hand. Used a scrape sheet of 1/2" OSB to set it on for each lift..
To old to run up and down ladders all day moving blocks.
Didn't the DW get tired and cranky after awhile?