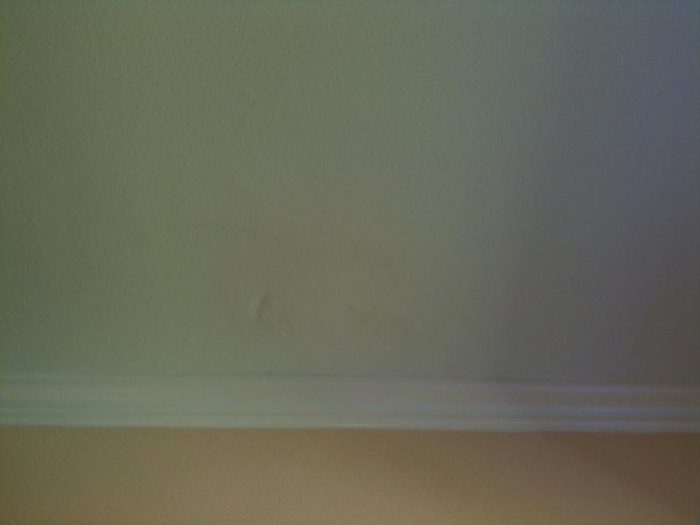
some water stain on the ceiling. Should I open the ceiling or not?
Recently 1 week when we have stopped to use the shower room and were re-sealing the shower room, we found there is some water stain on the ceiling of first floor and just under the shower room.. (we painted the ceiling 1 year ago). The water stain is dry since we have stopped using the shower room for 1 week. But in the middle of the stain there is a 1 inch size place which is soft when pushing it by finger.
Don’t know where is the leak. I guess maybe leakage come from the failure of sealing in the shower room or the crack in the grout between the tile. We plan to fix the sealing and the crack by ourselves to see whether the leakage can be stopped.
How do you think about the reason of the leakage source?
The other problem is should we open the ceiling to remove the possible mold?(we don’t know whether there is mold. However the leakage happened for at least several months). Someone told us if the leakage stop, there is no need to open the ceiling becasue the mold will die without water. But someone told us it is necessary to open the ceiling to remove the mold.


Replies
we are removing the sealing in the shower room
We plan to re sealing in the shower room becasue we found some dark stuff on the sealing.
we also are removing the tiles because some cracks in the grout
we guess the water can leak from the crack in the grout to the ceiling. so we are removing the tiles. And we found there are some dark area under the tiles....we plan to put the tile back with adding new grout.
here are some pictures about the tiles and the crack in grout
any suggestion about how to deal with the dark area under the tiles?
shower leak
What do you mean by "sealing"?
The tiles and grout on the shower floor is not what keeps the shower from leaking. I don' t know where you are, but most areas of the country require some waterproofing system under the tile. The black you are seeing under the tiles may be the waterproofing system and not mold etc.
Even on the walls, there is a water barrier behind the tile that directs moisture the gets past the tiles to the drain in the floor.
I'm sure that someone will come along that knows a lot more than I about shower construction and can better advise you.
Thanks.
I guess "sealling" mean we use "sealant" to close the gap.
The black area under the tiles are wood which should not be black color. It looks like the black area in the wood is mold.
And we didn't find any waterproofing stuff under the tile except the wood. I am some kind of worry that under the tiles there is no waterproof system...
more close pic about the black area in the corner
it looks there are wood under the tiles and the black area are mold on the wood surface.
Don't know whether there are some waterproof stuff. don't know how to deal with the black area before we put the tiles back...?
It looks like you have a shower with a manufactured one-piece pan, and the pan itself should be water-tight unless cracked.
Your problem is no doubt with the tile, either that lining the walls of the shower, or the tile outside the shower (where water no doubt leaks through the shower door).
If it's the tile lining the shower that's failed then that needs to be torn off and redone properly -- a separate discussion.
If the tile outside the shower is leaking, that requires a combined effort of fixing the shower door leaks, teaching people to not leave the door ajar while showering or track water out, and sealing the tile floor. In particular, the joint between the floor tile and the shower pan needs to be carefully caulked -- grout should not be used for that joint. Worst case you may need to take up the tile floor and redo it properly, with thinset mortar vs mastic.
The darkened area of the tile undelayment that I see in one of the pictures is ordinary water staining and probably not serious mildew or rot.
(There should be no need to tear out the ceiling below -- the hazards of possible mold growth there are way overblown.)
Problem is not the tile.
The problem is not the tile. It's glaxed surface is moisture proof and performing just as glazed tile should.
The problem, rather is the tile substrate. Moisture moves from wet to dry. In this case the 'highway' it is traveling on is the porous grout joints. Apparently your substrate and/or setting material is a material that "cares" about getting wet and is being used as a food source leading to mold and mildew propogation. Same goes for your wood underlayment outside the tub/shower.
In my opinion, your tile will have to be removed and installed with a properly waterproofed tile subtrate. I would recommend Schluter's kerdi surface waterproofing membrane. It can be installed over properly installed drywall. I would remove the floor tile, make sure your plywood substrate is sound and meets min. TCA requirements, and install new tile over kerdi membrane or ditra decoupling membrane. Turn the kerdi membrane up the wall 4" if you can and seal it to your tub with kerdi-fix. It will waterproof your plywood substrate. Then, you won't have to worry about "teaching" the end user how to use the shower because it won't matter. IMO, a house shouldn't have to come with operating instructions.
Thanks. I guess you and DanH both found very important reasons..
Thank you both help finding the leakage reasons, like "shower door leaks", "sealing the tile floor", "lack of the waterproofing membrane", etc.
I am confused whether in MANY OLD house (like my house was built in 1990's), there is NO waterproofing membrane under the tiles in the bath room according to their old code? (I don't open the shower base, so I don't know whether some waterproofing stuff is under the shower base. I only opened the tiles out side of the shower room, and found there is no waterproofing stuff.)
the location of leakage on the ceiling is just below the showerbase and it made me very worried whether there is no waterproofing stuff under the shower base too??
In most parts of the country there is no real code about how a bathroom floor is constructed. What you have is fairly typical for a lower-end contractor home or a DIY rework of the bath.
There is no need for a waterproof membrane under the shower since the shower pan is waterproof. The weak point of the shower itself would be the shower walls. (Though of course there is always the chance that the drain line is leaking, but that would be a plain old plumbing leak. And you can have water leaking into the wall around the shower control or, especially, behind the shower head, if the shower head is spraying back towards the wall due to a poorly fitting joint.)
The darkened wood is due to a combination of dirt, soap, the simple fact that wood darkens in contact with water, and, yes, a little bit of mold. But it's nothing to worry about -- most forms of mold are not a hazard, and there's not enough mold there to be a hazard anyway. If it worries you you can dab it with some 50/50 chlorine bleach solution. The only reason you'd need to replace the wood would be if the water has caused it to seriously delaminate, and that seems unlikely from the pictures.
Likewise the ceiling -- the darkness is mainly due to dirt that was carried by the water through the drywall. Most homes develop several such dark spots over the years, due to roof leaks, plumbing leaks, rain blowing into the walls, etc. A coat of paint will generally fix it, or, if the drywall has gone too punk, you may need to dig out the spot and patch before painting.
Thanks a lot. your suggestions gave me much knowledge...
You mentioned the shower wall could be the weak for the leakage problem, e.g., the shower control or the shower head. So I guess what I need to do more thing:
1:To check the caulking around the shower control
2: To check whether the water spray back towards the wall from the shower head.
3:To give a sealing to the shower wall to protect the water into the wall.
Do you agree with my plan or do you have any suggestion for what need to be done to protect the shower wall?
Thanks ~~~
You mentioned the possibility -tile lining the shower that fail
You mentioned before -"If it's the tile lining the shower that's failed then that needs to be torn off and redone properly -- a separate discussion."
But how can I know whether the "tile lining the shower that's failed"...? Thanks.
If the tile lining the shower has failed it will generally be fairly obvious in that there will be places where the tile is buckling or where the grout is cracking.
But even if the tile has not "failed", a fair amount of water can still get through it. Most "modern" showers are built with some sort of waterproof membrane behind the tile (several different schemes for this), but if such a membrane is not present then water can "wick" through the grout and thinset behind and into the wall. While there are folks here who will cringe at this suggestion, you can apply a clear waterproof coating (been so long I don't know any brands to suggest -- but NOT THOMPSONS) that will be reasonably effective. The must be reapplied once or twice a year, though.
Cringe.
Thanks.
After looking through your suggestion, I remembered my inspector once mentioned the similar potential issue about the bath wall.
I guess it is possible for me to update the bathroom in future since the possible problems you and others all mentioned. Now, we just try to fix the caulking and the grout for tiles by ourselves to make it still work for normal usage. When there is an opptunity, we possibly need to hire someone professional to update the bathroom.
Thanks
Thanks. about the ceiling...
Why do you think no need to worry about the mold problem in the ceiling?
Do you think when the leakage is stopped, the mold will stop growing too?
about the darkened area of the tile underlayment...
We have stopped use water in the shower room for more than 7 days and when we opened the tiles, we found the darkened area of the tile underlayment. So I am in worry this is mold and the wood got some damage from the water. How do you think about it? should I do some special things to deal with the darkend wood?
Thing surprising me is the area in the ceiling is still soft...
We have stopped using the bathroom for about one month. Today I found the middle area (like a thumb size) is still soft. (I thought it would become dry and hard after one month, but not like I thought...). At the same time, the other area around it is still dry and hard.
Does it mean there still is some active leaking when the middle area is still soft and area around it is stilldry and hard?
Once drywall had been wet it generally remains soft (especially if you were poking at it while it was wet). If it worries you you can always cut a small hole to inspect.
For a problem I was having I purchased an inexpensive (under $20 on Amazon) USB inspection camera that consists of a small (3/4" diameter) camera on a cable that plugs into a laptop. The thing includes a light, but that was inadequate, so I taped on a penlight, taped the whole assembly to a length of stiff wire, and poked it through a roughly 1.5" hole in the ceiling. Not amazing, but I was able to see what I wanted to see.
do you mean drywall cannot become back hard even without leakage
If drywall cannot become back hard even without leakage for long time, I can accept what it is now - keeping soft when touch it.
BTW, the idea of the camera is amazing. ..
In order to patch and repair this damaged area, you will have to remove the soft stuff. So you might as well cut a hole and take a look. Cut a fair sized hole, at least 4 to 6 inches in diameter. If you then see extensive damage, you can make the hole bigger and fix it.
Patching drywall is not a difficult job. So cutting a hole out and looking will give you more information then 1000 experts might guess on the internet.
Thanks.
I will transfer the information to my family and discuss how to deal with it. The around 1 sqft stain on the ceiling is not obvious and is dry. Only the middle area(one thumb size) in the stain is still soft.
Thanks.
Thanks for the information. I will keep the website you suggested and I guess it will help much too.
This forum(breaktime) has already given me many help since I met problems about house.
I have purchased some tools and material from homedepot and prepare to fix the caulking and the grout of tiles firstly to see whether the leakage can be stoped or not. In the future., some one professional could possibly be hired to update our bath room to completely fix all the potential problems that every one mentioned.......
I completely understand that undertaking a total fix of this shower would be a big disruption to your household and would cost more than might be comfortable for you. However, I still encourage you to visit the John Bride website and tell them of your shower troubles. Be honest and tell them that it is difficult to do a proper fix now. Ask for ideas on a temporary fix. The regular posters at that site are professional tile guys and have seen many many jobs. Their advice might save you some trouble.
Again, I mean this advice as no insult to anyone here at Breaktime. But this is a general purpose sort of forum. It does not specialize in tile. Your problem deserves the best advice, you are more likely to find it at http://www.johnbridge.com.
The tile is fine.
I don't see a single crack in the tile. You'd probably have to drop a bowling ball on the floor to crack a tile of this size. What you're seeing is a dirty bathing area with human hair scattered about. Usually people that don't maintain their homes cleanliness aren't that interested in installing a quality job. The latest responses from the OP reinforces a "bandaid" approach to the problem that won't solve the problem which is most likely lack of subsurface waterproofing. Typical.
You are correct that it looks like there could be a crack in that corner (or there might not be -- can't tell with any certainty). But that picture does not show any problems with the tile inside the shower other than the caulk that needs to be redone at the bottom.
The other pictures show the floor outside the shower, which is admittedly in worse condition but which should in theory (if the door doesn't leak too much) not need to be bathtub-tight.
There's lots of stuff that could be improved but nothing that's screaming "Fix me now!"
Hair; not hairline
You're seeing hair. Long, black hair strands that may appear to be cracks; but my money says they're not..
It's a bigger problem than replacing caulk. Mildewed grout joints are a sign of water penetration of the substrate. It may not be "screaming", but I'm hearing the steady drum beat of undelying decay.
I will update the bathroom possibly in next year...
My parents are living in my house now so that I cannot begin a big project recently.
Every one's suggestion has given me much help and make me decide to let someone to do the project for the bathroom in the future...