FHB Logo Facebook LinkedIn Email Pinterest Twitter X Instagram Tiktok YouTube Plus Icon Close Icon Navigation Search Icon Navigation Search Icon Arrow Down Icon Video Guide Icon Article Guide Icon Modal Close Icon Guide Search Icon Skip to content
Subscribe
Log In
  • How-To
  • Design
  • Tools & Materials
  • Restoration
  • Videos
  • Blogs
  • Forum
  • Magazine
  • Members
  • FHB House
  • Podcast
Log In

Discussion Forum

Discussion Forum

Spiral rail glueup

StanFoster | Posted in Photo Gallery on October 10, 2003 02:48am

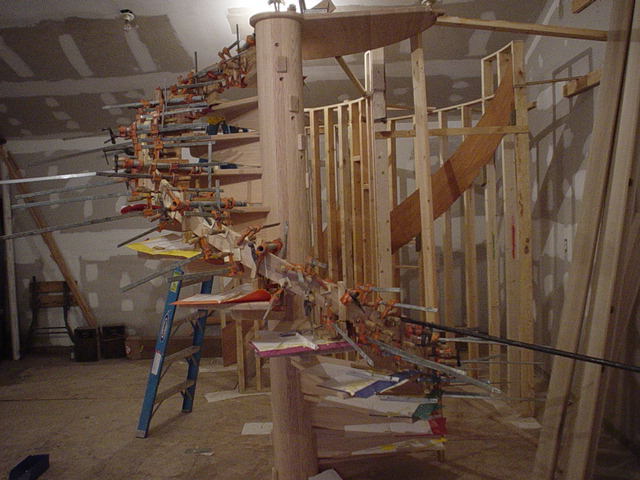
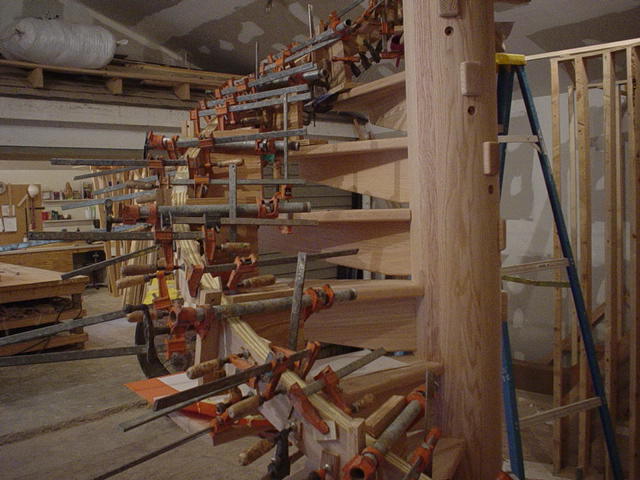
This is the spiral railing that I just glued up today. It took every clamp I had in the shop..abut 120 of them.

Reply
  • X
  • facebook
  • linkedin
  • pinterest
  • email
  • add to favorites Log in or Sign up to save your favorite articles

Replies

  1. StanFoster | Oct 10, 2003 03:17am | #1

    Here are some of the newels that go with this stairway. I have mortised them to receive the handrail. I much prefer mortised in handrails.

    1. stefs3 | Oct 10, 2003 03:28am | #2

      Holy smokes, Stan,

      How do you sequence that monster?

      Do you glue all the treads and risers, and then glue the skirt?

      What an engineering marvel.

      We are not worthy.

      STef

      1. StanFoster | Oct 10, 2003 04:00am | #4

        stef:  I am confused.  There are no risers or skirtboards on this spiral stairs.  Maybe you were referring to the other curved stairway post I have?

        1. geonc | Oct 10, 2003 04:05am | #5

          Stan, we have a curbed spiral comming together. The center posts {risers} were being turned today.

           Sad thing is some archetict only wanted a 4' dia spiral.......gonna be a small/busy stair!

           Need to get some pics.........

           GEO

          1. StanFoster | Oct 10, 2003 04:22am | #6

            geo...4 foot is awfully small. I built one several years ago and now will only consider a 4 ft. 6 in. as the smallest I will build. I will do my best to talk the client into at least a five ft. size. The one I have posted here is 5 ft. 6.  and is very comfortable.

            Edited 10/10/2003 6:47:31 AM ET by Stan Foster

    2. TLJ | Oct 11, 2003 12:17am | #7

      Thanks for posting your pix, Stan. I can't see how you fastened your temporary clamp blocks to the treads.

      1. StanFoster | Oct 11, 2003 04:21am | #10

        Tim:  The rail jigs are just clamped to each tread with two clamps. I have a little over correction calculated into this rail...about 1/2 inch tighter radius.  It should be real close once its released. I still have the option of adjusting the curvature with either tension or compressin on the rail by means of the top and bottom newels.

        1. Philter | Oct 11, 2003 06:03pm | #11

          Sir, I have FINALLY one-upped you...I have one hundred twenty ONE clamps, now...to work on the skill.....fine fine work as usual...cheers,Phil.If it is to be.... 'twil be done by me.

          1. StanFoster | Oct 15, 2003 01:33am | #12

            I just took the rail out of the forms today.  Now I have to make a silks purse out of a sows ear the way it looked.  I had a lot of power planing followed by handplaning,then beltsanding.  Next I had to roundover the four corners.  I then placed it back on the stairs to see how my springback came out. I put 1/2 inch of over correction into the forms..and this was just about right. It sprung back very close to the ideal path.  Had it not..I could have either tensioned or put some compression on it between the top and bottom newels. Here are some pictures in sequence from rough to almost finished.

          2. TLJ | Oct 15, 2003 01:55am | #13

            Thanks, Stan for the pix. It's really fun to watch.

          3. CAGIV | Oct 15, 2003 02:04am | #14

            How hard is it to run a router on a cork screw?

          4. StanFoster | Oct 15, 2003 02:40am | #15

            Cag:     I just ran a bearing guided 3/8 inch radius roundover bit up and down the rail.  The hardest part was keeping the router in a comfortable attitude to run it.

          5. CAGIV | Oct 15, 2003 07:02am | #20

            that's what I wondering about, seems like it would be an awkward job, and I don't like being awkward with a bit spinning at 20k RPM that will turn me to hamburger.

            but then you like those "safe" gyrocopters ;)....

            Yeah yeah, I know they are  safe, but it would scare the bejeebers out of me.

          6. User avater
            larryscabnuts | Oct 15, 2003 02:43am | #16

            Very good work Stan... Your reputation is one of the best in our area.

          7. StanFoster | Oct 15, 2003 03:16am | #17

            Larry:   Thanks for the compliment...but excuse my ignorance.  Are you from the central Illinois area...and if so..may I ask who you heard from about my work?  Just curious.  :)

            I generally work in Champaign-Bloomington-Springfield-Peoria areas...

          8. caseyr | Oct 15, 2003 05:53am | #18

            In the first set of pictures with the clamps on, it looks like alternating colors of wood strips.  In the bottom set, the rail looks pretty uniform.  Magic or optical illusion?  Were all the strips the same or did you "cheat" and put some cheaper wood in the middle?  Standard yellow glue? 

            Thanks

          9. StanFoster | Oct 15, 2003 06:24am | #19

            Casey:    The handrail is made up of 8 oak laminates 3/16 of an inch.   I used Titebond glue.  What you are seeing in the first photos are the laminates not all perfectly aligned in height and the glue is running down onto the lower laminates giving the striped effect.

          10. User avater
            larryscabnuts | Oct 15, 2003 07:37am | #21

            Stan,

            I live in Urbana and have a shop in Mahomet . I have heard of your stair building from others.

          11. StanFoster | Oct 15, 2003 02:07pm | #22

            Larry:   I think we have talked before. I remember a cabinet shop in Mahomet.  My sister used to live there. Hows your cabinet business?   

          12. User avater
            larryscabnuts | Oct 16, 2003 04:20am | #23

            Yep.... We have talked before. I have all the work I want. But that ain't sayn much. I am trying to retire... <wink>

          13. caseyr | Oct 17, 2003 02:16am | #24

            Just got to thinkin about your 8 strips of oak.  Seems like getting those into the clamps while coating them with glue could be sort of like trying to dance with an octopus.  Do you pin any of the strips or do you just have lots of extra hands to keep everything in place when you lay the next strip into the clamps? 

          14. StanFoster | Oct 17, 2003 03:51am | #25

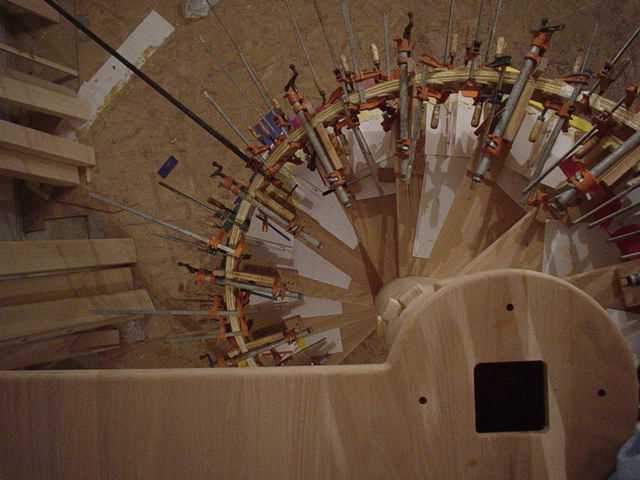
            Casey:    I use a 4 inch paint roller and roll on titebond glue on all the laminates. I then wrap the laminates with that wrapping plastic about every three feet.  My son and I had no problems laying it in the forms.  I clamped the bottom as he guided and twisted the laminates. I just then clamped all the way to the top.  Laminates are interesting.  They have to be twisted  the same inclination angle of the railing for every 90 degrees that they go around.  In other words...if the rail is inclined at 44 degrees....then the laminates have to be twisted 44 degrees for every quarter circle of floor that they turn over.

          15. caseyr | Oct 17, 2003 04:44am | #26

            So, you're saying that you basically lay all 8 strips into the "forms" at the same time as a unit? 

          16. StanFoster | Oct 17, 2003 04:59am | #27

            Casey:  Yep...the laminates are 3/16 of an inch thick and are very pliable.  It is a very busy 20 minutes.....lots of clamps.

          17. StanFoster | Oct 18, 2003 04:07am | #28

            Here are the balusters that will go on this spiral stairway and the second floor railing. There are 90 of these to install. They are 1.25 inches square...rounded tops and bottoms..and all the corners have been rounded over with a 3/16 inch radius bit.

          18. StanFoster | Oct 18, 2003 04:15am | #29

            Here is a view at the top showing the curved handrail transitioning to level..then making a quarter turn.  This stub will fit into a mortised socket in the newel post that will hold the top of the rail. I like to do all the fitting in my shop as this greatly reduces my jobsite time.  It basically will be a bolt together kit which I should be able to full install including all the second floor railing in two days.

          19. StanFoster | Oct 18, 2003 04:25am | #30

            Couple more views...the first is looking up showing the tread bottoms and tread supports that are tenoned throught the ten inch column.

          20. DougU | Oct 18, 2003 05:17am | #31

            Stan

            Nice pictures.

            How much of that will be asembled for transport, I know that you get a lot of help carrying those in but it seams like it would be difficult with the length of the thing.

            Doug

          21. StanFoster | Oct 18, 2003 05:26am | #32

            Doug:  I can knock that stairs down to just the column in two minutes.  Those treads just pull out of the mortised column.

    3. DaveHeinlein | Oct 11, 2003 01:41am | #8

      Awesome, Stan. That looks like really interesting work. I hope I have the chance to do that someday.

      Have you ever read any books on what you are doing, or did you learn it the hard way? Any books in particular you would recomend?

      1. StanFoster | Oct 11, 2003 04:00am | #9

        Dave:   I just became obsessed with curved stairways years ago while working as a  trim carpenter. I read every thing I could get my hands on.  The math part was the easiest as I have always had a basic grasp of trigonometry.  It is just learning what it takes to make the wood do what is required.  I just have built on experience.  I may have different methods than others..and that may be because I basically taught myself and never worked under anyone else. I am sure I have some methods that are not the fastest..but they work for me and thats all that counts.

  2. geonc | Oct 10, 2003 03:58am | #3

    Stan, uh could you borrow me about 18 bar clamps................

    It's always amazing just how many clamps get used for glue ups.

    For those contemporary rails, your bar clamps are the best.

     I've welded up some steel with a triangle profile that clamps to the tread for bender rail.

     We make easings from solid stock and profile on an obscene looking router table. Will try and get some pics, mebee you do yours similiar?

    I've gotten used to 10" C clamps for glue ups. Weld a 3/4" nut on the sliding bar end and race em down with an electric/air impact.

     Makes "the dance" a little easier!

    Don't you just love making wood "bend" to your will!

    GEO

Log in or create an account to post a comment.

Sign up Log in

Become a member and get full access to FineHomebuilding.com

Video Shorts

Categories

  • Business
  • Code Questions
  • Construction Techniques
  • Energy, Heating & Insulation
  • General Discussion
  • Help/Work Wanted
  • Photo Gallery
  • Reader Classified
  • Tools for Home Building

Discussion Forum

Recent Posts and Replies

  • |
  • |
  • |
  • |
  • |
  • |
View More Create Post

Up Next

Video Shorts

Featured Story

Picture-Perfect Pergola

Built from locally sawn hemlock, this functional outdoor feature uses structural screws and metal connectors for fast, sturdy construction.

Featured Video

Builder’s Advocate: An Interview With Viewrail

Learn more about affordable, modern floating stairs, from design to manufacturing to installation.

Related Stories

  • Design and Build a Pergola
  • Podcast Episode 689: Basement Garages, Compact ERVs, and Safer Paint Stripper
  • FHB Podcast Segment: Are Single-Room ERVs the Answer?
  • Fire-Resistant Landscaping and Home Design Details

Highlights

Fine Homebuilding All Access
Fine Homebuilding Podcast
Tool Tech
Plus, get an extra 20% off with code GIFT20

"I have learned so much thanks to the searchable articles on the FHB website. I can confidently say that I expect to be a life-long subscriber." - M.K.

Get home building tips, offers, and expert advice in your inbox

Signing you up...

This site is protected by reCAPTCHA and the Google Privacy Policy and Terms of Service apply.
See all newsletters
See all newsletters

Fine Homebuilding Magazine

  • Issue 332 - July 2025
    • Custom Built-ins With Job-Site Tools
    • Fight House Fires Through Design
    • Making the Move to Multifamily
  • Issue 331 - June 2025
    • A More Resilient Roof
    • Tool Test: You Need a Drywall Sander
    • Ducted vs. Ductless Heat Pumps
  • Issue 330 - April/May 2025
    • Deck Details for Durability
    • FAQs on HPWHs
    • 10 Tips for a Long-Lasting Paint Job
  • Issue 329 - Feb/Mar 2025
    • Smart Foundation for a Small Addition
    • A Kominka Comes West
    • Making Small Kitchens Work
  • Issue 328 - Dec/Jan 2024
    • How a Pro Replaces Columns
    • Passive House 3.0
    • Tool Test: Compact Line Lasers

Fine Home Building

Newsletter Sign-up

  • Fine Homebuilding

    Home building tips, offers, and expert advice in your inbox.

  • Green Building Advisor

    Building science and energy efficiency advice, plus special offers, in your inbox.

  • Old House Journal

    Repair, renovation, and restoration tips, plus special offers, in your inbox.

Signing you up...

This site is protected by reCAPTCHA and the Google Privacy Policy and Terms of Service apply.
See all newsletters

Follow

  • Fine Homebuilding

    Dig into cutting-edge approaches and decades of proven solutions with total access to our experts and tradespeople.

    Start Free Trial Now
    • Facebook
    • Instagram
    • X
    • LinkedIn
  • GBA Prime

    Get instant access to the latest developments in green building, research, and reports from the field.

    Start Free Trial Now
    • Facebook
    • YouTube
  • Old House Journal

    Learn how to restore, repair, update, and decorate your home.

    Subscribe Now
    • Facebook
    • Instagram
    • X

Membership & Magazine

  • Online Archive
  • Start Free Trial
  • Magazine Subscription
  • Magazine Renewal
  • Gift a Subscription
  • Customer Support
  • Privacy Preferences
  • About
  • Contact
  • Advertise
  • Careers
  • Terms of Use
  • Site Map
  • Do not sell or share my information
  • Privacy Policy
  • Accessibility
  • California Privacy Rights

© 2025 Active Interest Media. All rights reserved.

Fine Homebuilding receives a commission for items purchased through links on this site, including Amazon Associates and other affiliate advertising programs.

  • Home Group
  • Antique Trader
  • Arts & Crafts Homes
  • Bank Note Reporter
  • Cabin Life
  • Cuisine at Home
  • Fine Gardening
  • Fine Woodworking
  • Green Building Advisor
  • Garden Gate
  • Horticulture
  • Keep Craft Alive
  • Log Home Living
  • Military Trader/Vehicles
  • Numismatic News
  • Numismaster
  • Old Cars Weekly
  • Old House Journal
  • Period Homes
  • Popular Woodworking
  • Script
  • ShopNotes
  • Sports Collectors Digest
  • Threads
  • Timber Home Living
  • Traditional Building
  • Woodsmith
  • World Coin News
  • Writer's Digest
Active Interest Media logo
X
X
This is a dialog window which overlays the main content of the page. The modal window is a 'site map' of the most critical areas of the site. Pressing the Escape (ESC) button will close the modal and bring you back to where you were on the page.

Main Menu

  • How-To
  • Design
  • Tools & Materials
  • Video
  • Blogs
  • Forum
  • Project Guides
  • Reader Projects
  • Magazine
  • Members
  • FHB House

Podcasts

  • FHB Podcast
  • ProTalk

Webinars

  • Upcoming and On-Demand

Podcasts

  • FHB Podcast
  • ProTalk

Webinars

  • Upcoming and On-Demand

Popular Topics

  • Kitchens
  • Business
  • Bedrooms
  • Roofs
  • Architecture and Design
  • Green Building
  • Decks
  • Framing
  • Safety
  • Remodeling
  • Bathrooms
  • Windows
  • Tilework
  • Ceilings
  • HVAC

Magazine

  • Current Issue
  • Past Issues
  • Magazine Index
  • Subscribe
  • Online Archive
  • Author Guidelines

All Access

  • Member Home
  • Start Free Trial
  • Gift Membership

Online Learning

  • Courses
  • Project Guides
  • Reader Projects
  • Podcast

More

  • FHB Ambassadors
  • FHB House
  • Customer Support

Account

  • Log In
  • Join

Newsletter

Get home building tips, offers, and expert advice in your inbox

Signing you up...

This site is protected by reCAPTCHA and the Google Privacy Policy and Terms of Service apply.
See all newsletters
See all newsletters

Follow

  • X
  • YouTube
  • instagram
  • facebook
  • pinterest
  • Tiktok

Join All Access

Become a member and get instant access to thousands of videos, how-tos, tool reviews, and design features.

Start Your Free Trial

Subscribe

FHB Magazine

Start your subscription today and save up to 70%

Subscribe

Enjoy unlimited access to Fine Homebuilding. Join Now

Already a member? Log in

We hope you’ve enjoyed your free articles. To keep reading, become a member today.

Get complete site access to expert advice, how-to videos, Code Check, and more, plus the print magazine.

Start your FREE trial

Already a member? Log in

Privacy Policy Update

We use cookies, pixels, script and other tracking technologies to analyze and improve our service, to improve and personalize content, and for advertising to you. We also share information about your use of our site with third-party social media, advertising and analytics partners. You can view our Privacy Policy here and our Terms of Use here.

Cookies

Analytics

These cookies help us track site metrics to improve our sites and provide a better user experience.

Advertising/Social Media

These cookies are used to serve advertisements aligned with your interests.

Essential

These cookies are required to provide basic functions like page navigation and access to secure areas of the website.

Delete My Data

Delete all cookies and associated data