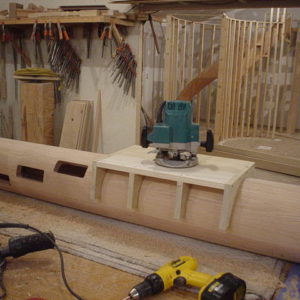
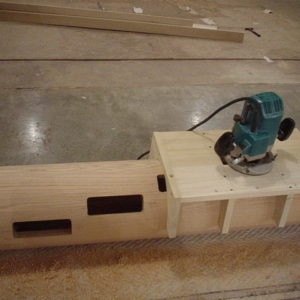
I am presently working on another spiral stairway. This design was cloned from a FHB article years ag. I love building this style. This one has a ten inch column and is a 66 inch diameter. I have attached some pictures showing the mortises being routed through the column with a mortising sled I made that very accurately mortises for my through tenons.
Discussion Forum
Discussion Forum
Up Next
Video Shorts
Featured Story
Simple air-sealing measures and spray-applied sealant lower energy bills and increase comfort without the need to tear the house apart.
Featured Video
How to Install Cable Rail Around Wood-Post CornersHighlights
"I have learned so much thanks to the searchable articles on the FHB website. I can confidently say that I expect to be a life-long subscriber." - M.K.
Fine Homebuilding Magazine
- Home Group
- Antique Trader
- Arts & Crafts Homes
- Bank Note Reporter
- Cabin Life
- Cuisine at Home
- Fine Gardening
- Fine Woodworking
- Green Building Advisor
- Garden Gate
- Horticulture
- Keep Craft Alive
- Log Home Living
- Military Trader/Vehicles
- Numismatic News
- Numismaster
- Old Cars Weekly
- Old House Journal
- Period Homes
- Popular Woodworking
- Script
- ShopNotes
- Sports Collectors Digest
- Threads
- Timber Home Living
- Traditional Building
- Woodsmith
- World Coin News
- Writer's Digest








Replies
Cool as usual, I'm bidding it's sister here in Vancouver.......cherry and black walnut,can't wait, cheers,Phil.
same thing I said in your other thread, very sweet indeed.
2 questions if I may.
I assume you make the column yourself? or no?
and two, ever messed up and not had the mortise in the exact spot you need it and have to scrap the column?
Probably not, If I were even capable of doing such a thing, I'd probably triple check it before plunging in, then check it one or two more times.
Cag: I used to make the columns with rope clamps. Now I just buy them and it saves a lot of tedius hand planing and sanding. I did indeed mess up on my last spiral stairway. I misread my layout line and mortised one inch too high. LUCKILY it was the top mortise so I was able to patch the column from the top with no hint of a mistake.. WHEW..... I lucked out. When I mortise for the tenon on the opposite of the column...I lower the layout 1/32 of an inch. This makes the tread support settle in at near dead level. I used to mortise them exactly level and the slight bit of play in the mortises always made the tread a tad bit low on the outside...but not much. This 1/32 allowance fixes that.
I have the spiral all assembled in my shop now. Next step is to laminate the handrail. Here are a few more pictures.
Here is the top landing. It has a 90 degree arc to it that goes over the curved stairwell. The second picture shows how the bottom of the landing is rabbeted out to fit right against the drywall. The lip then is just like a normal landing tread and will be glued and nailed to the second level subfloor.
Stan
How tall is that, cant see it all at once and trying to figure how many treads?
Whats that going into, I assume it isnt the main stairway in the place?
Oh one other thing, where do you buy the pole?
Doug
Doug: It is 107.25 inches tall. 12 treads with 8.25 inches rise. The 12 treads turn 315 degrees, or 26.25 degrees per tread. I have 1.75 inches of front and rear nosing overlap. The column came from Pacific Columns in California.
lovely
how do you make sure the motrices are exactly opposite???
aleks
Aleks: I took a strip of paper and wrapped it around the circumference of the cylinder. I layed out the centerline for each 26.25 degree tread layout. The centerlines for the tenons were then just advanced one half the circumference on this strip of paper. I had one vertical bench mark line that I indexed this paper to. I checked the circumference all the way up and down the cylinder and did notice a variance of 3/16 of an inch. I just adjusted each tread mortise a tad so the centerlines of both mortises were exactly 180 degrees apart.