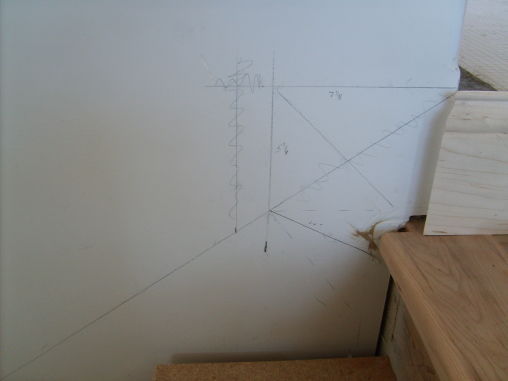
Today the skirtboard on the stairs I was working on ran out of wall before it reached the height of the baseboard. Here is a solution to that situation. I have just two pics one of the layout lines and one of the base and transition piece that meets the skirt.
The vertical transition to skirt is a 128* angle, bisect that angle and you have the miter for the transition to skirt.
I’ll get the miter tighter, when I put the skirt in tomorrow.
Hope this helps someone in some future situation:
Cheers,
Basswood


Replies
Never saw anyone do that I've always cut the skirt level even with the bottom of the base and ran the base to the end with a return. base cap on skirt dies in to edge of return.
Edited 5/21/2008 9:06 pm ET by shellbuilder
This base and skirt are the same thickness and have the same profile. Tomorrow I can post photos of the other skirt to base situations, where a simple, but odd angle miter, blends base with skirt.Don't know if that makes sense.
I like to rip the top 1 1/2" or so profile and carry it down the stringer.
Heres one around a register.
That works too.Here the stringer already has the same profile. I'll see if I can post pics after work today.
Dang you're three days late posting that idea. Really enjoy your trim ideas.
I knew running 3 days behind on this job was going to get me in trouble! ;o)Glad you like the idea. Stair trim and adjoining base often present an awkward situation.No inventiveness would have been needed if the wall was longer by just 6" or if the base was shorter (this is 6" base) or some combination of the two.I'll post the normal transition later.Have a good day,Brian
Here are some photos that show a more complete picture of how the elements go together:
Thanks for sharing that. I know the top miter is 45 and the bottom is 1/2 of the stair angle, but how do you go about figuring WHERE the make the cut?
Don,I think the answer lies in sketching it out to make sure of the layout. I pencil all the layout lines on the wall (as shown in this photo).I knotched the top nosing so the base could turn and run right down the riser. The line of the vertical edge of the base running down intersects the slope of the skirt...that is where the odd angled miter is.I measure to make my cuts right off the drawing on the wall.
Thanks, drawing it on the wall never occurred to me. It's elegant in it's simplicity.
I'm one of those who could definitely benefit from an "apprenticeship with Basswood", but the demands of life will keep me here for a while.
Thanks Don,I'll keep posting this kind of thing...not that it anything too special...but, these little details may be useful at some point for someone. I hope that offer to take on apprentice/journeyman does not make me seem "too big for my britches." I do make the assumption that I have something to offer...not even that the approach I use is so great, but it is often different than the standard method. Sometimes that different way to do the same thing could make the job go smoother.Back to the thread, here is one more pic:
I think I might have joined a piece of flat stock to the bottom of the skirt & made the rake-to -flat-to horizontal transition only at the sticking portion of the skirt. That would make to transition only about 1 1/2". I'd have to play around with it first before I could say for sure.
I ran the skirt as high as possible. If the skirt were any taller, it would run into the stairway lights that are just above the skirt.Does that nix your idea?
Withholding key information, wait till I tell mom.
Here is a pic showing the information previously withheld:
that's a good look.
it is very similar to what was done in my mother's traditional home built in 1932.
the difference was that the base wasn't one piece, it was two.
as a result, the detail which shows you cutting the down mitre on the base was instead done with a solid unmitred block wrapped by the mitred base cap. i think it looked a little cleaner.
imho.
thanks for another good thread.
carpenter in transition
Thanks Tim,Interesting to hear of your mothers house and the two piece approach.Have a good weekend,Brian
Seeing those lights I'd say that is most likely the best solution to be found. Bet you wish they had consulted you before they choose both the style of light as well as the placement. Nice solution to having been dealt a awkward situation.Also nice to see the miters both top & bottom in the correct manner & not on the plumb line.
Edited 5/23/2008 6:56 pm ET by mathewson
There are always going to be issues to resolve with some creative carpentry...I try to point out improvements in the design that allow the creative energy to be put into more important areas.Enjoy the weekend,Brian
THanks. You know, I've been looking forward to those pics all day. I don't know if that's good, or just sad.
Thanks again for showcasing your work.
"I am the master of my fate, I am the captain of my soul." Invictus, by Henley.
Nick,I hope you weren't too disappointed. ;o)What must I do to top this effort?G'nite,BC
Not at all. I have a possible project on the horizon of taking a set of basement stairs and dressing them up after the basement remodel, so this has given me ideas. Thanks, and keep 'em coming.
"I am the master of my fate, I am the captain of my soul." Invictus, by Henley.
Nick,What I did in the original post was really just a solution to a problem (not enough wall for the simple transition I normally use).Yesterday, the builder tells me he likes this transition better. He thought it makes the start of the stairs more pronounced (which it does). Personally, I like simpler, cleaner lines--when possible.The paint job will make it all one, uniform, trim detail--I'll probably like it then.This line of work keeps me always working out soultions...that is one of my favorite things about it.More later,Basswood
Yea, I don't think I like it either. Maybe the paint will help.
Could you explain how you cut the skirt?
"It is what it is."
Do you mean how I figured the angle of the cut on the skirt?Anyway, the vertical to stair "rake" line creates a 128* angle IIRC. Bisecting that produced a 64* angle. On my SCMS, this is a 26* cut (90*-64*).I could be completely missing what you are after. BC
I was talking about how the skirt was cut to the profile of the treads. Are the treads and risers mortised into the skirt or did you cut the skirt to match the treads and risers. Thanks.
"It is what it is."
Neither. I left 3/4" on either side of the treads and risers and the skirt slips into that space and carpet will cover any small gaps.If the treads and risers were stain-grade, I would put the skirt in first and fit all the treads and risers in tight.
Thank you. Pretty slick. So did you hold the stringer off the wall the 3/4? Or just the treads?
"It is what it is."
I nail 1x4's to the outside of the stringers to maintain that gap.
Got it! Thank you. I feel like an idiot for not coming up with that on my own. Thanks again.
"It is what it is."
You probably would have...BT often offers up ideas faster than we can think of them ourselves. ;o)
BTW, congrats on the article. It was deja vu all over again!
"I am the master of my fate, I am the captain of my soul." Invictus, by Henley.
Thanks Nick, It would be rather redundant, for anyone who read the thread here at BT.Cheers,BC
View Image
I like that look, to achive it I'd have to rip the profile off the base to get it, its nice that your skirt board already has it.
Doug
Doug
Doug,The builder ordered the skirt on the same mill run as the base, the base is 6" tall and the skirt stock is just like the base, but 10" tall.It is nice to have it already milled, but making your own base (skirt) cap is a good option too.G'day,BC