FHB Logo Facebook LinkedIn Email Pinterest Twitter X Instagram Tiktok YouTube Plus Icon Close Icon Navigation Search Icon Navigation Search Icon Arrow Down Icon Video Guide Icon Article Guide Icon Modal Close Icon Guide Search Icon Skip to content
Subscribe
Log In
  • How-To
  • Design
  • Tools & Materials
  • Restoration
  • Videos
  • Blogs
  • Forum
  • Magazine
  • Members
  • FHB House
  • Podcast
Log In

Discussion Forum

Discussion Forum

Stair Tread Around Newel Post Advice

jimmiem | Posted in Construction Techniques on January 21, 2014 01:02am

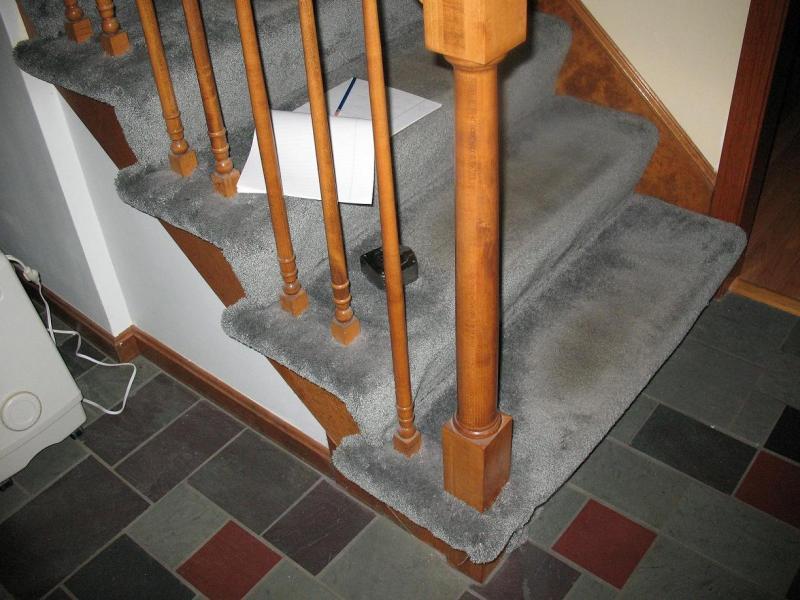
I’ll be replacing the carpeting on the stairs in the attached photo with hardwood treads and I’m  wrestling with how to do the tread on the first step that has the newel post running through it.  I have a one piece pre-finished solid tread that is bullnosed.  My plan is to measure from the closed end skirt to the nearest edge of the newel post and crosscut the tread from its back edge to the front corner of the newel post leaving the front edge of the tread uncut.  Then rip the tread from its open end to the same front corner of the newel post which would leave the nosing area intact along the entire length of the tread.  The tread is now notched around 2 sides of the newel post. I would miter the end of the tread nosing and make a wide bull nosed return that would be mitered to match the tread nosing and be notched around the other 2 sides of the newel  newel post.   Yah or Nah?      

Reply
  • X
  • facebook
  • linkedin
  • pinterest
  • email
  • add to favorites Log in or Sign up to save your favorite articles

Replies

  1. User avater
    Mike_Mahan | Jan 21, 2014 01:31pm | #1

    No picture attached.

    I couldn't quite follow what you want to do from your post with no picture. I would cut the tread length wise with a band saw, being careful to follow the grain. Cut a notch for the post. Install the two pieces of the tread and glue them together. The cut following the grain should be almost invisible.

    1. jimmiem | Jan 21, 2014 02:26pm | #2

      Stair tread Around Newel Post

      I see the picture in the body of the post.  Not visible to you?

    2. jimmiem | Jan 21, 2014 02:40pm | #3

      Stair tread Around Newel Post

      First time uploading a picture.  I'll try again.

    3. User avater
      Mike_Mahan | Jan 21, 2014 06:39pm | #4

      I can see it now.

      The bandsaw with the grain technique should work great for the newl. I don't mean just cut in the direction of the grain, I mean follow the lines of the grain. I have a sculpted wooden box that was made from a single piece of wood that was cut apart on a band saw with the grain hollowed out and reassembled as parts, drawers, lid etc. that doesn't show any seams at all. How are you going to handle the balusters?

      1. jimmiem | Jan 21, 2014 08:01pm | #5

        Stair tread Around Newel Post

        The balusters appear to be toe nailed top and bottom.  I've seen videos where the balusters can be slid out but mine don't seem to be like that so what I was planning to do is undercut them with a multi tool....same process that I used for undercutting door jambs when I removed wall to wall carpeting throughout my house and installed hardwood flooring. Slide the tread under the balusters and toe nail.

        I don't have a bandsaw and I saw this stair tread install method in a video.  It leaves the walking area of the tread including the entire length of the nosing uncut (no joints).  It is done on a table saw and scms (both of which I have) and a short cut with a hand saw or jig saw.  


  2. jimmiem | Jan 21, 2014 08:46pm | #6

    Stair tread Around Newel Post

    No plugs in newel.  Must be attached from inside.  Would have to remove subtread to be able to remove newel.  Also, newel has grout around its base. 

  3. finefinish | Jan 29, 2014 06:34am | #7

    Stair Treads

    Hey Jimmien,

         The best/easiest way to do this job is to remove all the balusters first.  Flush cutting all those baluster ends and sliding treads under and re-attaching won't be as fast or finished as pulling them and chopping them to size on a miter saw.  Since the balusters should all come off anyway it would be nice to remove the handrail.  The newell would be the one thing I wouldn't remove.  Now you are back to the regular order of operations for finishing a set of stairs.  With careful math and maybe a template you can cut a square hole in the starting tread and drop it over the newell.  Finish all the treads, and with the handrail off now you can properly install the balusters with dowels glued at the bottom and the tops let into the underside of the top rail - no more toe nails.  Best of luck. 

    1. jimmiem | Jan 29, 2014 09:19am | #8

      stair treads

      I'll definitely do the blasters as you suggest.  If you notice in the picture their is a door casing at the opposite end of the tread from the newell post.  The casing is tapered and has a profile. Also, the skirt board is slightly proud of the casing.  My neighbor had the same situation and the installer just did an angle cut at the front of the tread to run along the casing which left gaps along the profile and I did not think it looked good.  I want to notch the casing the same way I undercut door jambs for flooring and let the stair tread go into the casing.  If I do this then I would not be able to slide the tread over the newell assuming that the hand rail had been removed.  Also, just looking at the hand rail it would probably be a throwaway if I removed it. Also, while I'm cutting the casing what about cutting the skirt too? This would make it  lot easier to fit the first tread which will be notched to fit around the newell and give a bit of wiggle room on the skirt and casing end.

  4. skong76 | Aug 08, 2015 04:04pm | #9

    how did you do

    It has been a year since you posted this.

    How did you install with the  wood tread around the newel post? Did you remove the newel post and then make a square hole on your wood stair tread or do you cut the stair tread on three sides and then install another piece and the nose on the front?

    I'm having the stair structural plan exactly like your stair. I want to know how to put wood tread on the 1st step, but there is the newel post. 

    1. jimmiem | Aug 08, 2015 05:06pm | #10

      skong76 Newel Post

      Hello skong76,

      I'm attaching a few pictures.  I did not remove the newel post.  I notched the tread to butt up against the post.  I cut into the skirt on the opposite end of the tread so I could slide the tread into it and then slide it out tight against the newel. I left the bullnose on the entire length of the tread and then cut the end cap piece to fit the backside and outside of the newel post.  The pictures should show you the joint lines.  Take a look and then reply back with more questions.  You can PM me if you would like. 

      Also, I did remove the ballusters.  I cut them off flush at the bottom after removing the carpeting.  I reattached them with hanger type bolts that screw into the bottom of the balluster and screw into a threaded insert that is installed in the tread.  I found them on-line.  Not expensive and easy to do.  The only tricky part was drilling into the underside of the hand rail so that the ballusters could slide up to allow the screw on the bottom to clear the tread.

  5. skong76 | Aug 11, 2015 01:20am | #11

    Your stair is pretty. what an excellent job!!!

    The oak stair tread looks like 1" thick wood tread.

    Did you take out all the existing stair tread and put the new Oak tread in?

    Did you Glue and the staple them? I'm just curious it must be a difficult and time consuming job to take out the exist stair tread.

  6. skong76 | Aug 11, 2015 01:20am | #12

    Your stair is pretty. what an excellent job!!!

    The oak stair tread looks like 1" thick wood tread.

    Did you take out all the existing stair tread and put the new Oak tread in?

    Did you Glue and the staple them? I'm just curious it must be a difficult and time consuming job to take out the exist stair tread.

    1. jimmiem | Aug 11, 2015 08:16am | #13

      Stair Treads

      The stair treads you see are 3/4" thick red oak.  The treads that were under the carpet were 3/4" plywood.  I left the plywood subtreads in place, cut their noses off so that they would be flush with the risers, which were also plywood.  I then covered the risers with my finished risers which I made from cabinet grade red oak. I then put on the 3/4" read oak treads.  I glued both the treads and risers with PL Premium Adhesive and nailed them with 15 gauge finish nails.  Some people remove the treads which are under the carpet and install the treads directly to the stringers.  This type of tread would usually be a little more than 1" thick.  When deciding which way to do it you need to make sure that all dimensions conform to building codes for safety reasons.  I bought my treads and risers unfinished and did the finishing myself.  It's not too difficult to do this work.  The cuts need to be accurate in order to avoid gaps between the joints.  Also, having the correct tools will make the work a lot easier. 

Log in or create an account to post a comment.

Sign up Log in

Become a member and get full access to FineHomebuilding.com

Video Shorts

Categories

  • Business
  • Code Questions
  • Construction Techniques
  • Energy, Heating & Insulation
  • General Discussion
  • Help/Work Wanted
  • Photo Gallery
  • Reader Classified
  • Tools for Home Building

Discussion Forum

Recent Posts and Replies

  • |
  • |
  • |
  • |
  • |
  • |
View More Create Post

Up Next

Video Shorts

Featured Story

Podcast Episode 684: Masonry Heaters, Whole-House Ventilation, and Porch Flooring

Listeners write in about fireplaces and ask questions about whole-house ventilation, traditional porch flooring, and gutter sealants.

Featured Video

Micro-Adjust Deck-Baluster Spacing for an Eye-Deceiving Layout

No math, no measuring—just a simple jig made from an elastic band is all you need to lay out a good-looking deck railing.

Related Stories

  • Podcast Episode 684: Masonry Heaters, Whole-House Ventilation, and Porch Flooring
  • FHB Podcast Segment: Repairing an Old Home While Maintaining Its Integrity
  • Tools and Gear for the Moms Who Get it Done
  • An Easier Method for Mitered Head Casings

Highlights

Fine Homebuilding All Access
Fine Homebuilding Podcast
Tool Tech
Plus, get an extra 20% off with code GIFT20

"I have learned so much thanks to the searchable articles on the FHB website. I can confidently say that I expect to be a life-long subscriber." - M.K.

Get home building tips, offers, and expert advice in your inbox

Signing you up...

This site is protected by reCAPTCHA and the Google Privacy Policy and Terms of Service apply.
See all newsletters
See all newsletters

Fine Homebuilding Magazine

  • Issue 331 - June 2025
    • A More Resilient Roof
    • Tool Test: You Need a Drywall Sander
    • Ducted vs. Ductless Heat Pumps
  • Issue 330 - April/May 2025
    • Deck Details for Durability
    • FAQs on HPWHs
    • 10 Tips for a Long-Lasting Paint Job
  • Issue 329 - Feb/Mar 2025
    • Smart Foundation for a Small Addition
    • A Kominka Comes West
    • Making Small Kitchens Work
  • Issue 328 - Dec/Jan 2024
    • How a Pro Replaces Columns
    • Passive House 3.0
    • Tool Test: Compact Line Lasers
  • Issue 327 - November 2024
    • Repairing Damaged Walls and Ceilings
    • Plumbing Protection
    • Talking Shop

Fine Home Building

Newsletter Sign-up

  • Fine Homebuilding

    Home building tips, offers, and expert advice in your inbox.

  • Green Building Advisor

    Building science and energy efficiency advice, plus special offers, in your inbox.

  • Old House Journal

    Repair, renovation, and restoration tips, plus special offers, in your inbox.

Signing you up...

This site is protected by reCAPTCHA and the Google Privacy Policy and Terms of Service apply.
See all newsletters

Follow

  • Fine Homebuilding

    Dig into cutting-edge approaches and decades of proven solutions with total access to our experts and tradespeople.

    Start Free Trial Now
    • Facebook
    • Instagram
    • X
    • LinkedIn
  • GBA Prime

    Get instant access to the latest developments in green building, research, and reports from the field.

    Start Free Trial Now
    • Facebook
    • YouTube
  • Old House Journal

    Learn how to restore, repair, update, and decorate your home.

    Subscribe Now
    • Facebook
    • Instagram
    • X

Membership & Magazine

  • Online Archive
  • Start Free Trial
  • Magazine Subscription
  • Magazine Renewal
  • Gift a Subscription
  • Customer Support
  • Privacy Preferences
  • About
  • Contact
  • Advertise
  • Careers
  • Terms of Use
  • Site Map
  • Do not sell or share my information
  • Privacy Policy
  • Accessibility
  • California Privacy Rights

© 2025 Active Interest Media. All rights reserved.

Fine Homebuilding receives a commission for items purchased through links on this site, including Amazon Associates and other affiliate advertising programs.

  • Home Group
  • Antique Trader
  • Arts & Crafts Homes
  • Bank Note Reporter
  • Cabin Life
  • Cuisine at Home
  • Fine Gardening
  • Fine Woodworking
  • Green Building Advisor
  • Garden Gate
  • Horticulture
  • Keep Craft Alive
  • Log Home Living
  • Military Trader/Vehicles
  • Numismatic News
  • Numismaster
  • Old Cars Weekly
  • Old House Journal
  • Period Homes
  • Popular Woodworking
  • Script
  • ShopNotes
  • Sports Collectors Digest
  • Threads
  • Timber Home Living
  • Traditional Building
  • Woodsmith
  • World Coin News
  • Writer's Digest
Active Interest Media logo
X
X
This is a dialog window which overlays the main content of the page. The modal window is a 'site map' of the most critical areas of the site. Pressing the Escape (ESC) button will close the modal and bring you back to where you were on the page.

Main Menu

  • How-To
  • Design
  • Tools & Materials
  • Video
  • Blogs
  • Forum
  • Project Guides
  • Reader Projects
  • Magazine
  • Members
  • FHB House

Podcasts

  • FHB Podcast
  • ProTalk

Webinars

  • Upcoming and On-Demand

Podcasts

  • FHB Podcast
  • ProTalk

Webinars

  • Upcoming and On-Demand

Popular Topics

  • Kitchens
  • Business
  • Bedrooms
  • Roofs
  • Architecture and Design
  • Green Building
  • Decks
  • Framing
  • Safety
  • Remodeling
  • Bathrooms
  • Windows
  • Tilework
  • Ceilings
  • HVAC

Magazine

  • Current Issue
  • Past Issues
  • Magazine Index
  • Subscribe
  • Online Archive
  • Author Guidelines

All Access

  • Member Home
  • Start Free Trial
  • Gift Membership

Online Learning

  • Courses
  • Project Guides
  • Reader Projects
  • Podcast

More

  • FHB Ambassadors
  • FHB House
  • Customer Support

Account

  • Log In
  • Join

Newsletter

Get home building tips, offers, and expert advice in your inbox

Signing you up...

This site is protected by reCAPTCHA and the Google Privacy Policy and Terms of Service apply.
See all newsletters
See all newsletters

Follow

  • X
  • YouTube
  • instagram
  • facebook
  • pinterest
  • Tiktok

Join All Access

Become a member and get instant access to thousands of videos, how-tos, tool reviews, and design features.

Start Your Free Trial

Subscribe

FHB Magazine

Start your subscription today and save up to 81%

Subscribe

Enjoy unlimited access to Fine Homebuilding. Join Now

Already a member? Log in

We hope you’ve enjoyed your free articles. To keep reading, become a member today.

Get complete site access to expert advice, how-to videos, Code Check, and more, plus the print magazine.

Start your FREE trial

Already a member? Log in

Privacy Policy Update

We use cookies, pixels, script and other tracking technologies to analyze and improve our service, to improve and personalize content, and for advertising to you. We also share information about your use of our site with third-party social media, advertising and analytics partners. You can view our Privacy Policy here and our Terms of Use here.

Cookies

Analytics

These cookies help us track site metrics to improve our sites and provide a better user experience.

Advertising/Social Media

These cookies are used to serve advertisements aligned with your interests.

Essential

These cookies are required to provide basic functions like page navigation and access to secure areas of the website.

Delete My Data

Delete all cookies and associated data