Stairbldrs-Whats the best way to cut…
I am building a Stain-grade Maple stairscase using LJSmith’s False Tread and riser system with carpet running down the middle.
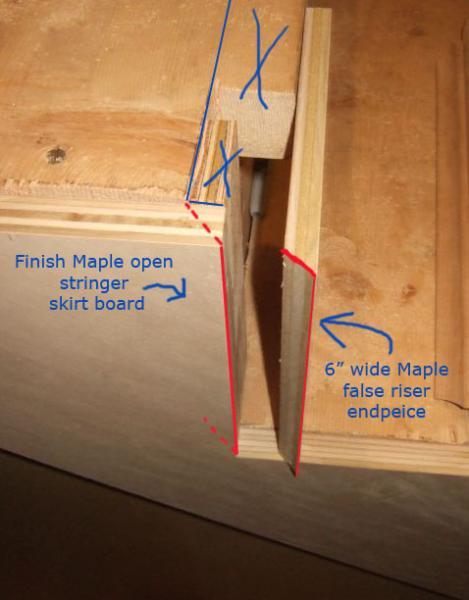
We are do an open stringer/skirtboard with 3/4 Maple plywood. The false treads have a molding nose that overlaps the Maple skirt board run edge – the riser on the open Maple skirtboard is supposed to be mitered to match up with the false 6″ riser – which is 1/2″ thick and will have a 45 degree miter on it’s edge.
I have the skirtboard cut and it’s perfect – I’m still scratching my head as to how to cut each riser on it at a 45 angle.
Can’t do it with the miter saw – (as it was the stringer had to be cut from each edge with the miter saw and then finish cut with the jigsaw.)
I don’t trust a jigsaw at 45 degree cuts for such (having to be ) perfect work. Circ saw will only go 4″ in and might be wiggy too.
I’m almost thinking of using a 45 degree guide block with a flush blade on the multimaster
Had I thought about it – I guess the way to achieve this is with a bandsaw – that would do it nicely – but I didn’t brig the piece home with me…
Any suggestions or tips for what seems to be a tricky procedure?
Thanks,
Julian


Replies
Sharp handsaw?
I think you may be right - never sure what type of handsaw is the best when I look at them - have a couple of fexible japenese style ones - but this seems like a job for a more ridgid model.JT
J.T.
use a skilsaw with a wide base plate to start the cut, then finish with a hand saw, using the saw kerf to guide the handsaw,12 pt. crosscut, nice and sharp, will give you good results and sharpen your handsaw skills as well (pun intended). Cut your miters @ 46-47 degrees and just a hair back from the outside point(long point of the miter cut), this will allow you to "touch up" the joint, if needed, until you get comfortable cutting "right on" with the skilsaw.
Good mitering,
Geoff
Geoff,
If memory serves me well, you have quite a bit of experience with open stairs like this, right?
In what sequence do you execute the skirts/treads/risers?
And how do you typically secure the treads?
Thanks in advance!
Ragnar17, How are ya?,
Well, it's been a while since I've done one but if memory serves me (and it sometimes doesn't), I would install open stringer first to rough stringer, making sure everything is cut right and fitting properly, then install risers, then install treads last with returns already installed, scribing and fitting as needed. If you start at the bottom and work to the top you would install the open stringer, then the first riser, then the next riser, then install the first tread, butting the last riser installed, continue on to the top, always butting the tread to the riser.
Treads would be screwed, glued, and plugged. screws we used were always panheads , no wood screw heads, or bugle heads, as some call them. I noticed you're using veneered ply, so I would be sure to use panheads over woodscrew type screws.
Must say I'm not familiar with this "false" riser and tread system, looks intereasting though, If I read things correctly, the carpet will "fill" the space between the false treads and risers and end up flush with said risers and treads?, is that right?
TIA
Geoff
I noticed you're using veneered ply...
Geoff,
Actually, the photos were posted by the OP. I'm just asking out of general curiosity and to try to improve my methods.
Thanks for the reply -- that was the order I was expecting.
When doing closed stringers, I've installed the risers and treads in pairs, as opposed to doing all the risers, and then all the treads. With this approach, each riser would trap the back end of the tread beneath it. I figured this might help in the overall rigidity of the assembly, but who knows? ;) I haven't tried this approach yet with open stringers.
When you face screw the treads, how many do you put in per tread? Four or six?
Regards,
Ragnar
<When you face screw the treads, how many do you put in per tread? Four or six?>
I would typically use two screws on each stringer, countersunk and plugged, if I didn't already say that.
But you could use three if you prefered.
Geoff
Julian,
The stringer's not nailed in yet, right? (I'm assuming the picture was just staged for illustrative purposes.)
I think the easiest way is with a compound slider.
If you don't have one of those, you could set up a guide fence and cut each miter with a circular saw. Clamp the guide fence to the skirt so that there's no chance for error and have at it. If you need more of an explanation, let me know.
That's why I own both left and right hand bladed saws. Start the cut with the circular saw and finish it by hand using the saw kerf as a guide.
I also own a Bosch in-line jig saw (not sure if they make it anymore) for occasions such as this.
How about using a router with a 45 bit attached? Ride the bearing along a guide block clamped to the stringer. Will have a little to trim by hand at the corner. You're really not looking for an exact 45 to 45 matched miter since the top will be covered by the tread, just need a sharp clean edge for the riser to mate to.
I'm off to get it done today - will try and start the cut with the slider, then clamp on a 45 degree guide block to align a handsaw to finish.Thanks for the tips - was having a mental road block last night at the end of a late day trying to figure out how to do it without screwing it up.Funny thing is - I have every power tool in the world - and end up forgetting about the manual ways to do things....JT
Well it's too late for me to throw my vote into the ring since your off to give this a try with with your SCMS but like john7g said in his post we use router with a router with a 45º bearing bit and run it along a template guide we attach to the stringer and it makes short work of the job. You can very quickly make all you cuts on the stringer and then spend just a few seconds cleaning out the corners and your done. I'll bet that next time out you'll probably want to try the router method.
View Image
i probably would cut them freehand with a circular saw and finish them with a hand saw.
your method is probably quicker. i'll have to remember that.
arnemckinley - "your method is probably quicker. i'll have to remember that."
Ya know it's not just that the router-45º bit-template method is going to be faster it's also that it going to be a Pokayoke. It helps error proof the process. You set it up once and make all the cuts whereas with any of the saw methods each cut is in essence a new set up where something could go wrong so on a typical stair carriage you might have 11 to 13 chances for something to go wrong.
View Image
Jerrald...
Excellent suggestion with the router! I personally think a router is easily the most under-utilized tool in most carpenter's arsenals.
And Thank you for teaching me a new word. " If I were a carpenter"
...so on a typical stair carriage you might have 11 to 13 chances for something to go wrong.
Jerrald,
Do you have a picture handy of the jig you use for the router set up?
I imagine that you build it to reference the long line of the stringer, but I'm having a hard time visualizing how you don't need to keep moving it and setting up 11 or 13 times (or whatever).
Also, do you "precut" the riser locations with a saw (like the OP here ended up doing), or do you just skip using the saw and handle it exclusively with the router?
Ragnar I took my camera with me this morning to shoot our templates but the card in it gave me an error so I apologize that I don't have any photos for you. But our templates are just 8' long stair carriages we cut out of 3/8" and 1/2" plexiglass that we had lying around (although they could be of any solid material stock) and they are precut for a range of riser heights around the typical 7-5/8". We just clamp or pin them to the work (through some holes we have drilled in them). That's all they are. I always use the template to mark out the stringer and then cut it out and then reattach the template for routing the miter but I think the guys have on occasion also used the templates to rout out the the whole carriage too.
View Image
our templates are just 8' long stair carriages we cut out of 3/8" and 1/2" plexiglass that we had lying around
Sounds pretty cool, Jerrald. I didnt' think it would work to have ready-made templates since each set of stairs varies from job to job. Now that I think about it, however, the run is pretty much always the same, and the rise is typically going to be somewhere between 7" and 7-5/8" or so. So do you have about 10 of these (to represent each 1/16" interval)?
You guys have definitely invested some time to be prepared and I'm sure it pays off for you!
Regards,
Ragnar
Ragnar17 - "You guys have definitely invested some time to be prepared and I'm sure it pays off for you!"
Well not really. You're giving us way too much credit. To the best of my knowledge we have six or seven templates that were original cut for whatever stair job first required them. The only thing we really did was not throw them away when we got done using them that initial time. We never sat down and said 'lets make a bunch of stair templates'. We would never know if we would ever need one for a 7-1/4" rise so why make it ahead of time?
The 7-5/8" one is in pieces right now but working with a piece that has only three steps in it is still no real problem just to move it along along as you have your registration points confidently set. It's essentially like stepping off a stair carriage with a framing square set up with angle buttons on it.
View Image
You're giving us way too much credit... ...The only thing we really did was not throw them away when we got done using them
OK, I guess you guys fly by the seat of your pants after all. ;)
Still a very neat idea, though.
So while I got you here, did you see my comment about "trapping" treads with the riser directly above them? Do you see any merit in this?
What's your preferred method of securing the treads?
Regards,
Ragnar
So why won't a SCMS work? Haven't run into one yet that it wouldn't work on...so what did you do? Outside of the gates the trucks were unloadin',
The weather was hot, a-nearly 90 degrees.
The man standin' next to me, his head was exploding,
Well, I was prayin' the pieces wouldn't fall on me.
I feel a little silly for asking - that's what I get for working till 10PM and trying to think too hard.As it turned out - no problem getting 95% of the cut with the Dewalt slider and then finishing the bevel cut with a multimaster flush blade.Got the rough stairs prepped for the false tread installation and all of the open stringer false treads and risers cut, assembled and installed.Tomorrow I install the wall skirt board and then the risers and treads on that side and then the newels mounted and ....Not too bad for my second staircase - the first was the basement stairway in the same house.JT
Julian:
I'm at a loss as to why you want to handle the skirtboards so many times. In practice, you don't need to cut the skirtboard twice, or use a router. You temp. put it in position, mark the miter cut with a jig ( called a close-pin or hair-pin jig, made out of same material as riser--1/2 or 3/4" ). Then cut to line with a cir. saw or I use a 12" SCMS, and finish the cut with a jap saw. Then it's just cut the tread cut with a cir. saw. I make my miter cut at about a 45 1/2 degree to ashure a tight joint at the point. From the picture, it turned out good the way you did it. But as you do more, you'll find the shortcuts, and jigs, that save time.
Roger
Looks good...and thanks for that multi-master tip...gotta make it pay for itself<G> Outside of the gates the trucks were unloadin',
The weather was hot, a-nearly 90 degrees.
The man standin' next to me, his head was exploding,
Well, I was prayin' the pieces wouldn't fall on me.