FHB Logo Facebook LinkedIn Email Pinterest Twitter X Instagram Tiktok YouTube Plus Icon Close Icon Navigation Search Icon Navigation Search Icon Arrow Down Icon Video Guide Icon Article Guide Icon Modal Close Icon Guide Search Icon Skip to content
Subscribe
Log In
  • How-To
  • Design
  • Tools & Materials
  • Restoration
  • Videos
  • Blogs
  • Forum
  • Magazine
  • Members
  • FHB House
  • Podcast
Log In

Discussion Forum

Discussion Forum

Started wreath handrail class today

mathewson | Posted in Construction Techniques on January 17, 2009 06:43am

Today I started the first class on wreath handrails. The difference between reading the books and having someone explaining the process is quite a gap.

First class is on how to make a 90 degree turn at a landing.

Edited 1/16/2009 10:48 pm ET by mathewson


Edited 1/16/2009 10:49 pm ET by mathewson

Reply
  • X
  • facebook
  • linkedin
  • pinterest
  • email
  • add to favorites Log in or Sign up to save your favorite articles

Replies

  1. mathewson | Jan 17, 2009 06:52am | #1

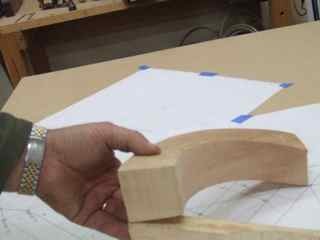
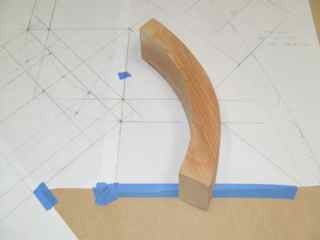
    Here are the pics of the wreath

    1. User avater
      jagwah | Jan 17, 2009 07:47am | #2

      Wow, I'm envious. There is nothing like that here in Oklahoma.

      Did you have to do the layout as part of the course? What books if any is the class using for the work?

      Sometimes courses are also offered by internet although this might be to difficult to be done.

      Any way keep the photos coming I for one am very interested. 

      Just A Guy With A Hammer

      1. mathewson | Jan 17, 2009 06:32pm | #3

        Jagwah,I hired a local designer/stairbuilder to teach me wreath handrail construction. The scope of the class is of my own choosing. For the progression of projects I am following George Ellis's book on handrailing.The way things work, I present a situation for a wreathed turn. In this case a simple 90 degree turn. I outline what the rise/run might be, size of landing, etc. as if this were a job I was looking to build. He draws it up on an auto-cad program to look at. Boy I've got to learn Auto-cad!We then go to the table and draw it out full size as if the auto-cad drawing didn't exist. From there it is to the bandsaw & make to piece.Everything at the moment is done out of chunks of cedar I had laying around. So it is left just as it came off the bandsaw. As things progress and it is time to dress up the faces I'll move to popular

        1. User avater
          jagwah | Jan 17, 2009 07:10pm | #4

          Very interesting, I have a local millshop that does such. The person who owns this shop and I have talked many times. I never thought to commission my own class. For that matter maybe offer to work a week or so for learnin'. Maybe trade a bit of labor for the lessons.

          Thanks for the info. 

          Just A Guy With A Hammer

          1. DCCarpenter | Jan 17, 2009 07:53pm | #5

            I'm usually just lurking but always enjoy your threads, I'm doing more and more stair work and am enjoying this one so far, I've been studying the Audel's Carpenter's book synopsis of making these wreaths and bends for years but never had a job to attempt it on yet..maybe this will inspire me to just start making them up on the bench as practice. Keep up with the pictures if possible.

    2. User avater
      Timuhler | Jan 18, 2009 02:17am | #6

      I just took a class on laying out eyebrow roofs.  Same feeling you had, it is much different being instructed vs using the net or a book. 


      View Image

      Billy's eyebrow class

      1. User avater
        Huck | Jan 18, 2009 02:55am | #7

        that was cool - I have it in my favorites now"...craftsmanship is first & foremost an expression of the human spirit." - P. Korn

        bakersfieldremodel.com

        1. User avater
          Timuhler | Jan 18, 2009 03:01am | #8

          The class was very cool.  Pretty intense, but Billy did an amazing job teaching.  I feel that I can lay one out and cut it w/out too many issues.

          He taught us how to draw the eyebrow, develop the layover valley and backing bevel, and also the inner valley for the ceiling line. 

          Now if we just had a customer I could talk into letting me do this . . . .


          Thing about it is that it would be easier in "real life" because you can snap out and transfer isn't as tedious.  Plus you can use power tools like a chainsaw instead of a draw knife. :-)

      2. mathewson | Jan 18, 2009 04:45am | #9

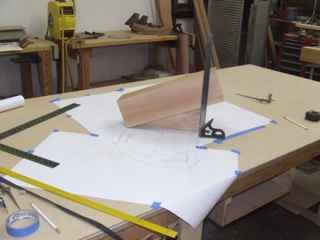
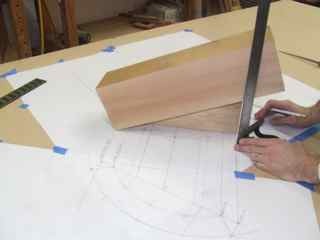
        I will attempt to explain the process as we do these classes. The method which is used is slightly different than what I've seen in the books I have, basic info seem to be very similar.The biggest difference in this approach seems to be that the inside & outside lines of the handrail are used instead of the centerline.A right angle is drawn, this corresponds to the inside of the handrail. The angle is bisected into a 45 °, this becomes the center line and a arc is drawn at 7 1/2". From there each 45 is bisected into 22.5°'s and lines drawn.The inside radius of this turn is 7 1/2"
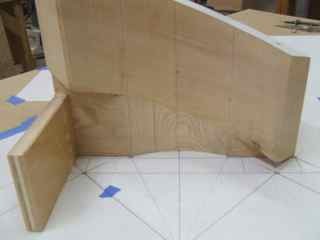
        The handrail is 2" wide making the outside radius 9 1/2"A line is drawn from the 2 tangent points of the arc connecting them. This line is perpendicular to the first 45° bisector. It is from this line that perpendicular lines are drawn to the next drawing.To begin the second drawing a line is drawn perpendicular to the center line . The triangle which can be seen is formed by raising on side the height of the riser. Lines are now drawn perpendicular to what is now the Hypotenuse.The pic attached if poor and I don't know if the lines will show up well. The distance that the points are made along these perpendicular lines are the same distance as the radius line is from the line connecting the 2 tangents in the first drawing. It may be easier to see along the center line. The distance from the inside radius (7 1/2") and the perpendicular line connecting the tangents is the same as from the hyp of in the lower drawing and the inside of the handrail.When all the points are drawn for the inside & outside of the handrail a thin piece of fiberglass stick is bent to touch on all the marks and lines drawn. That is now the shape to be drawn on the blank. The blank is mounted on a pitch block for bandsawing. The pitch block is NOT a standard pitch block. It is not the rise and run of the stair. It is the rise and the stretch out of the radius. In this case it is 1/4 of the circumference of the outside of the handrail. That is 9 1/2" x2πr= 14 15/16"Mount the blank to that pitch block and you will now have the correct twist with 90° sides as well as the plumb cuts for joining to the straight handrails.Leave the blank mounted to the pitch block & use a large disk sander for the outside sanding and a spindle sander for the inside. From there gauge handrail thickness & bandsaw.Clean up bandsaw marks. You are now ready to profile the piece- or so I'm told, I haven't done that part yet.

        Edited 1/17/2009 8:47 pm ET by mathewson

        1. User avater
          Joe | Jan 24, 2009 05:17am | #10

          Keith,I had to look around for those drawings. Here is one that's like the one you are doing. This is for a quarter turn stringer.http://www.josephfusco.org
          http://www.constructionforumsonline.com

          1. mathewson | Jan 24, 2009 05:38am | #11

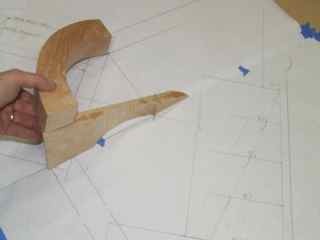
            Great info Joe- thanks.Today was the second day of layout. It is a 4 step winder with a wreathed stringer and wreathed handrail. The wreathing of the stringer makes for a very compact yet graceful alternative to a 3 step straight winder.Today I started the cutting of the handrail tomorrow will be doing the stringer. If time permits I may be able to profile the faces of the rail as well.Even though this has been extremely enjoyable to learn, nobody is building anything to put it to use on. I feel somewhat like a kid who gets a battery operated toy for christmas and no batteries, and being christmas no stores are open. pics attached

          2. User avater
            Joe | Jan 24, 2009 07:07am | #12

            Keith,The work looks excellent. I know what you mean about having no batteries. Once you start this it's like you want to make about fifty of them ;-).http://www.josephfusco.org
            http://www.constructionforumsonline.com

          3. User avater
            Joe | Jan 25, 2009 12:11am | #13

            Keith,One question I had but didn't ask it, was what technique did you use to layout the face mould.

            Did you plot the points and use a batten or find the major and minor axis's and use a trammel?http://www.josephfusco.org
            http://www.constructionforumsonline.com

          4. mathewson | Jan 25, 2009 03:09am | #14

            Joe,I used a batten to bend to the riser corners.A standard rise/run, stretch out of curve/run and a standard rise/run. From that measure up off a perpendicular line to get the measurements to transfer to the handrail blank on the pitchblock.This gave the bevel cuts as well as the curve.As a side note- I'm somewhat surprised that there wasn't more interest in this thread. There were a few key things which once they were explained, the rest became fairly straight forward. With the pic of the drawing you posted yesterday, some work in process pics containing explainations of the steps I feel anybody on this site could readily produce one.

          5. mathewson | Feb 04, 2009 04:45am | #15

            Sold a wreathed handrail job with a wreathed stringer today. It is for a builder I've done work for before so he trusts me, lets hope he still trusts me after this one.As I was practicing laying out & cutting blanks it occurred to me that most applications are circular in plan view. Given that it would seem that when the blank to be cut was placed on a pitch board the cutting & sanding could be done with a circle jig. The person who is instructing me had never tried it, but when we looked at it, it seemed plausible. Tomorrow I will try cutting on using that method. If it works I'll try to make one for an ellipse jig as well.The other thing which seems possible is that the bevel cuts, once the fall-line is laid out can be accurately cut by pinning the face of the wreathed blank to the table of the bandsaw. Since both faces are parallel from the circle jig on the bandsaw it now needs squaring for the bevel cuts. I'll make a jig using a skateboard wheel to hold the face mold to the table. Has anyone tried this before and does it work?

          6. User avater
            Joe | Feb 07, 2009 06:14pm | #16

            Keith,That good news. I'm sure you'll do an excellent job.http://www.josephfusco.org
            http://www.constructionforumsonline.com

          7. mathewson | Feb 08, 2009 04:07am | #17

            Thanks for the encouragement Joe.I found that if the pitch block is glued to a piece of plywood a circle jig works well for both cutting & sanding. It gives very true sides without flat spots. In addition since the plywood represents the plan view it can be placed back on the drawing to check accuracy and draw in the plumb cuts.When making the bevel cuts the plywood base greatly helps to keep the blank 90° to the bandsaw blade. As long as attention is paid to staying on the tangent point it is quite easy to cut the bevel square to the faces.This reduces the overall time to make the piece considerably. The drawing only needs to be in plan view and there is very little handwork as well.

Log in or create an account to post a comment.

Sign up Log in

Become a member and get full access to FineHomebuilding.com

Video Shorts

Categories

  • Business
  • Code Questions
  • Construction Techniques
  • Energy, Heating & Insulation
  • General Discussion
  • Help/Work Wanted
  • Photo Gallery
  • Reader Classified
  • Tools for Home Building

Discussion Forum

Recent Posts and Replies

  • |
  • |
  • |
  • |
  • |
  • |
View More Create Post

Up Next

Video Shorts

Featured Story

Picture-Perfect Pergola

Built from locally sawn hemlock, this functional outdoor feature uses structural screws and metal connectors for fast, sturdy construction.

Featured Video

Micro-Adjust Deck-Baluster Spacing for an Eye-Deceiving Layout

No math, no measuring—just a simple jig made from an elastic band is all you need to lay out a good-looking deck railing.

Related Stories

  • Design and Build a Pergola
  • Podcast Episode 689: Basement Garages, Compact ERVs, and Safer Paint Stripper
  • FHB Podcast Segment: Are Single-Room ERVs the Answer?
  • Fire-Resistant Landscaping and Home Design Details

Highlights

Fine Homebuilding All Access
Fine Homebuilding Podcast
Tool Tech
Plus, get an extra 20% off with code GIFT20

"I have learned so much thanks to the searchable articles on the FHB website. I can confidently say that I expect to be a life-long subscriber." - M.K.

Get home building tips, offers, and expert advice in your inbox

Signing you up...

This site is protected by reCAPTCHA and the Google Privacy Policy and Terms of Service apply.
See all newsletters
See all newsletters

Fine Homebuilding Magazine

  • Issue 332 - July 2025
    • Custom Built-ins With Job-Site Tools
    • Fight House Fires Through Design
    • Making the Move to Multifamily
  • Issue 331 - June 2025
    • A More Resilient Roof
    • Tool Test: You Need a Drywall Sander
    • Ducted vs. Ductless Heat Pumps
  • Issue 330 - April/May 2025
    • Deck Details for Durability
    • FAQs on HPWHs
    • 10 Tips for a Long-Lasting Paint Job
  • Issue 329 - Feb/Mar 2025
    • Smart Foundation for a Small Addition
    • A Kominka Comes West
    • Making Small Kitchens Work
  • Issue 328 - Dec/Jan 2024
    • How a Pro Replaces Columns
    • Passive House 3.0
    • Tool Test: Compact Line Lasers

Fine Home Building

Newsletter Sign-up

  • Fine Homebuilding

    Home building tips, offers, and expert advice in your inbox.

  • Green Building Advisor

    Building science and energy efficiency advice, plus special offers, in your inbox.

  • Old House Journal

    Repair, renovation, and restoration tips, plus special offers, in your inbox.

Signing you up...

This site is protected by reCAPTCHA and the Google Privacy Policy and Terms of Service apply.
See all newsletters

Follow

  • Fine Homebuilding

    Dig into cutting-edge approaches and decades of proven solutions with total access to our experts and tradespeople.

    Start Free Trial Now
    • Facebook
    • Instagram
    • X
    • LinkedIn
  • GBA Prime

    Get instant access to the latest developments in green building, research, and reports from the field.

    Start Free Trial Now
    • Facebook
    • YouTube
  • Old House Journal

    Learn how to restore, repair, update, and decorate your home.

    Subscribe Now
    • Facebook
    • Instagram
    • X

Membership & Magazine

  • Online Archive
  • Start Free Trial
  • Magazine Subscription
  • Magazine Renewal
  • Gift a Subscription
  • Customer Support
  • Privacy Preferences
  • About
  • Contact
  • Advertise
  • Careers
  • Terms of Use
  • Site Map
  • Do not sell or share my information
  • Privacy Policy
  • Accessibility
  • California Privacy Rights

© 2025 Active Interest Media. All rights reserved.

Fine Homebuilding receives a commission for items purchased through links on this site, including Amazon Associates and other affiliate advertising programs.

  • Home Group
  • Antique Trader
  • Arts & Crafts Homes
  • Bank Note Reporter
  • Cabin Life
  • Cuisine at Home
  • Fine Gardening
  • Fine Woodworking
  • Green Building Advisor
  • Garden Gate
  • Horticulture
  • Keep Craft Alive
  • Log Home Living
  • Military Trader/Vehicles
  • Numismatic News
  • Numismaster
  • Old Cars Weekly
  • Old House Journal
  • Period Homes
  • Popular Woodworking
  • Script
  • ShopNotes
  • Sports Collectors Digest
  • Threads
  • Timber Home Living
  • Traditional Building
  • Woodsmith
  • World Coin News
  • Writer's Digest
Active Interest Media logo
X
X
This is a dialog window which overlays the main content of the page. The modal window is a 'site map' of the most critical areas of the site. Pressing the Escape (ESC) button will close the modal and bring you back to where you were on the page.

Main Menu

  • How-To
  • Design
  • Tools & Materials
  • Video
  • Blogs
  • Forum
  • Project Guides
  • Reader Projects
  • Magazine
  • Members
  • FHB House

Podcasts

  • FHB Podcast
  • ProTalk

Webinars

  • Upcoming and On-Demand

Podcasts

  • FHB Podcast
  • ProTalk

Webinars

  • Upcoming and On-Demand

Popular Topics

  • Kitchens
  • Business
  • Bedrooms
  • Roofs
  • Architecture and Design
  • Green Building
  • Decks
  • Framing
  • Safety
  • Remodeling
  • Bathrooms
  • Windows
  • Tilework
  • Ceilings
  • HVAC

Magazine

  • Current Issue
  • Past Issues
  • Magazine Index
  • Subscribe
  • Online Archive
  • Author Guidelines

All Access

  • Member Home
  • Start Free Trial
  • Gift Membership

Online Learning

  • Courses
  • Project Guides
  • Reader Projects
  • Podcast

More

  • FHB Ambassadors
  • FHB House
  • Customer Support

Account

  • Log In
  • Join

Newsletter

Get home building tips, offers, and expert advice in your inbox

Signing you up...

This site is protected by reCAPTCHA and the Google Privacy Policy and Terms of Service apply.
See all newsletters
See all newsletters

Follow

  • X
  • YouTube
  • instagram
  • facebook
  • pinterest
  • Tiktok

Join All Access

Become a member and get instant access to thousands of videos, how-tos, tool reviews, and design features.

Start Your Free Trial

Subscribe

FHB Magazine

Start your subscription today and save up to 70%

Subscribe

Enjoy unlimited access to Fine Homebuilding. Join Now

Already a member? Log in

We hope you’ve enjoyed your free articles. To keep reading, become a member today.

Get complete site access to expert advice, how-to videos, Code Check, and more, plus the print magazine.

Start your FREE trial

Already a member? Log in

Privacy Policy Update

We use cookies, pixels, script and other tracking technologies to analyze and improve our service, to improve and personalize content, and for advertising to you. We also share information about your use of our site with third-party social media, advertising and analytics partners. You can view our Privacy Policy here and our Terms of Use here.

Cookies

Analytics

These cookies help us track site metrics to improve our sites and provide a better user experience.

Advertising/Social Media

These cookies are used to serve advertisements aligned with your interests.

Essential

These cookies are required to provide basic functions like page navigation and access to secure areas of the website.

Delete My Data

Delete all cookies and associated data