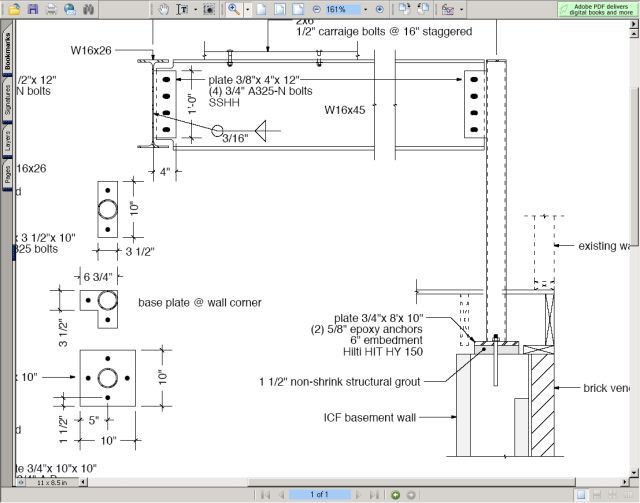
The attached is a steel detail for my flooring system (trusses will be hung off the steel beam). I’m curious about the use of a tab plate with bolts to attach the beam to the pipe (right hand side of the drawing). The tab plate weld on the pipe will be in sheer, which seems like a less desirable condition then putting the pipe under the steel and eliminating the potential for catastrophic house failure at that weld joint (this steel carries floor and ridge/valley loads).
I was hoping to gather some other opinions before I asked the drawing engineer about it.
Thanks -MERC


Replies
What size is the pipe?
If the beam sat on top of the pipe, there would not be anything to resist the beam from rolling over.
Whenever you are asked if you can do a job, tell'em "Certainly, I can!" Then get busy and find out how to do it. T. Roosevelt
YOu can see the left side of the beam is hung off a header so the beam won't roll. And once it is smashed between lots of floor trusses and ply is nailed off, it won't be going anywhere.
But yes I can see that beam torsion may be a consideration depending on how we hang the trusses.
Seems to me that would be a pain in the neck. I'd very much prefer to have an adjustable steel post UNDER the beam. Sure would make life easier for the installer.
One other thing - Don't know how you were figuring on "hanging" the trusses on the beam. But you can do a top chord bearing floor truss if you have the depth.
See the attached pic to see what a top chord bearing floor looks like if you're not familiar with them.
The game of love is never called off on account of darkness.
Yep, I'd love to do that, but don't have the height. w16x45 steel = 16.13" tall. Trusses 18" tall. Were going to have to use some kind of hangers, either packing out the steel web or top flange hangers.
BTW, the archy says the beam connection is to resist torsion failure.
Boss, as I see it the post as designed has 7/8" adjustment in it.
The 1 1/2" structural grout is the maximum thickness of grout.
The unshown 5/8" thick nuts under the plate 3/4" x 8" x 10" is the minimum grout thickness.
There is no post adjusting mechanism to add to the cost or complexity (failure modes.)
This is the standard method I have seen in assembling steel, so there is nothing different for the steel men to learn (and make errors with.)
Like Ed said, much better rollover resistance. And the webbing( load carrying member) is attached to the point support, rather than the flanges (stiffeners.)
An experienced steel crew should take no more than 5 minutes to set the post, attach the beam, and plumb & level/elevate the assembly to the point of final torqueing all bolts.
SamT
I guess we all look at things based on our own experience.
The posts we sell with our steel beams have 4" of adjustment in them. That way we can send them out with the beams and don't have to worry about welding anything on site.
In this area the only steel fabricators you can get are from the big cities, and they're big $$$ union outfits. I've never seen welded steel in a house.
I didn't notice the structural grout in the picture. Never have seen anything like that. But that would definitely help with the field adjustments.How many people thought of the Post-It note before it was invented but just didn't have anything to jot it down on?
Actually Sam, the nuts under and above the base plate are the leveling & adjusting features. Once the post is adjusted to height and plumb, it gets grouted and then it's solid.Whenever you are asked if you can do a job, tell'em "Certainly, I can!" Then get busy and find out how to do it. T. Roosevelt
"Once the post is adjusted to height and plumb, it gets grouted and then it's solid."
I've heard of doing that before, but never understood the purpose.
Whay would you not want to keep the ability to adjust the beam height?
Not trying to be smart - just curious.Sex is hereditary. If your parents never had it, chances are you won't either.
I've heard of doing that before, but never understood the purpose. Why would you not want to keep the ability to adjust the beam height?
May just be that way from the way the "big boys" do it. The column goes up and a shim pack goes in under the baseplate until it is the right height. The shim pack is a set of plastic squares, color coded for thickness (they'll bear something like 3kip until you get the NC grout in underneath for support).
The structural engineers will tell you that they have provided for any movement or the like already, so there's no adjustment needed. Which probably has as much to do with the forces traveling down the column being applied over the entire baseplate and not just the fasteners on the anchor bolts.Occupational hazard of my occupation not being around (sorry Bubba)
"The structural engineers will tell you that they have provided for any movement or the like already, so there's no adjustment needed. "
I guess that's why I was questioning it. Seems to me there's ALWAYS the possibility of needing some adjustment.
Like if the conmcrete floor/footings move, or if you have some lumber shrinkage.
I like to keep my options open.When the going gets tough, philosophers equivocate. They bury their heads in the sands of analogy. [John Knasas]
Like if the conmcrete floor/footings move,
why would a footer/ floor move?
Thanks all for the responses. You have helped assuage my fears of the design. My engineer has been great to this point, so I sort of figured I was missing something. I think the critical part I was missing is the beam wanting to roll over or fail in torsion. So the plate would keep the beam from rolling.
Since this is part of a remodel job, I was hoping to set the posts before the roof comes off, which would eliminate the structural grout as an adjustment mechanism. That's the reason I was thinking I could have my welding guy here on site to weld the tab plate to the post after bolting the plate to beam. But if it only takes an experienced crew five minutes, maybe the thing to do is just hire out the whole thing to a steel fabricator.
Thanks again for all the great help -MERC
Edited 6/16/2004 9:30 pm ET by DJ Merc
" why would a footer/ floor move?"
Poor compaction, expansive soils with changes in moisture.The longest journeys start with the first step... and continue one step at a time.
I guess that's why I was questioning it. Seems to me there's ALWAYS the possibility of needing some adjustment.
Like if the conmcrete floor/footings move, or if you have some lumber shrinkage
That right. When I see the concrete poured into the column bases to level up the floor, I always wonder about the joint between the steel and the concrete (and about the concrete-to-concrete joint to, truth to tell). But then, I'm also picturing something in my mind that neither the concrete guys nor the steel engineer really do: The drywallers using a hilti gun to shoot down the bottom track for the column surround. Bang, in the main pour; bang, in the new pour; bang, through a thin spot onto the end of an anchor bolt . . .
It may, in the larger sense, be about houses. With enough experience, in old enough houses, a person get a mind set that things move in the lifetime of a structure. That makes the ability to adjust seem imperative. Just a matter of experience.
I kind of think that is what the ultimate tragedy of the mchouses out there will be: Who will want to renovate one in only 20-25 years? And, why bother?Occupational hazard of my occupation not being around (sorry Bubba)
bang, through a thin spot onto the end of an anchor bolt . . .
Well I don't think that will rever happen. 6" - 8" embedment under a steel plate? One looooooooooooooooooooooooooong hilti nail.
I had to "adjust" the height of a steel column/beam in a house under construction. Ripped wood shims 13/16" (or so, IIRC) 6"wide random lengths. I used 2 @ 3" wide and staggered the end joints. Jack up the floor and slip the shims under. Before all sub trades, fortunately.
You never know what yer gonna find follerin an idiot.
SamT
don't think that will rever happen. 6" - 8" embedment under a steel plate
I was thinking of a more common column bed, a 2x4 with 3/4" CDX, for a lovely 4 1/4" deep spot, with anchor bolts comming 3 - 3 1/2" up into it . . .
A proper embedment, now that's a different story . . .Occupational hazard of my occupation not being around (sorry Bubba)
Hunh?
What the hell did I just say?
(|:>)
SamT
What the hell did I just say Without going back and reading the post in question, you said something about there not being any adjusting mechanism, with keeps things simple and less to fail. I was pointing ouit that you're right, there is no "mechanism", but the designed-in gap between the plate and the pier is the means to adjust the height, one time, and then it gets grouted solid.
Boss - engineers like to think that contractors should be able to build to the tolerances that they draw, but they have enough common sense to realize that doesn't always happen. So they provide for a little bit of adjustment. Same thing with really large motors and equipment, like chillers and feed water pumps. There is a 4" high housekeeping pad poured in the mechanocal room, the equipemt is installed, adjusted and bolted in place, then the base plates are grouted solid. Sort-of. Usually there is vibration isolation pad in there somehwere to be considered.
Whenever you are asked if you can do a job, tell'em "Certainly, I can!" Then get busy and find out how to do it. T. Roosevelt
that first picture is a typical method of installment, nothing wrong with it, we do it this way everyday. seems like the engineer took some time in the plans, pretty complete. all the welding will be done at the fabicator shop, just bolt, plumb, elevate, grout. like somebody said, five meinute job.
Ed,
Just so you don't have to click the "show all messages" button
Boss, as I see it the post as designed has 7/8" adjustment in it.
The 1 1/2" structural grout is the maximum thickness of grout.
The unshown 5/8" thick nuts under the plate 3/4" x 8" x 10" is the minimum grout thickness.
I didn't see any need to explain to BOSS HOGG exactly how the details worked.
SamT
People have mentioned most of the reasons. It's a standard detail that fab shops are familiar with, and it adds stability from rollover. A structural engineering professor in college said to the class that more structural failures occur from failure of stability rather than strength, in other words, members move out of place or fall over more often than give way from too weak a design. You'd probably be fine with the other end held the way it is, nevertheless, it's the standard design.
Structural welding is amazingly strong. If I remember correctly (I don't have my books with me) a 1/8" weld can support about 1800 pounds per lineal inch. You have 24 inches at each end (12 on each side), and yours are 3/16". So you have about 50,000 to 60,000 pounds or so of capacity in shear.
The reason this is the standard detail is that, in a beam, all the stress at midspan is in tension and compression of the upper and lower faces, and all the stress at the ends is in shear. So, in an I-beam, the midspan stress is all in the flanges (and you could cut some very large holes in the web if you had to save weight), while the end stress is all in the web (and you could cut away the flanges if you wished, though they do resist side loading). That's why it's the web that's fastened to the support by the method shown, and why the flanges at the ends are never connected to anything.
In this area (Chicago) the plate is typically a thru plate. The column is slotted and the plate gets welded at both faces of the column.