FHB Logo Facebook LinkedIn Email Pinterest Twitter X Instagram Tiktok YouTube Plus Icon Close Icon Navigation Search Icon Navigation Search Icon Arrow Down Icon Video Guide Icon Article Guide Icon Modal Close Icon Guide Search Icon Skip to content
Subscribe
Log In
  • How-To
  • Design
  • Tools & Materials
  • Restoration
  • Videos
  • Blogs
  • Forum
  • Magazine
  • Members
  • FHB House
  • Podcast
Log In

Discussion Forum

Discussion Forum

still going in circles

StanFoster | Posted in Photo Gallery on October 3, 2003 01:22am

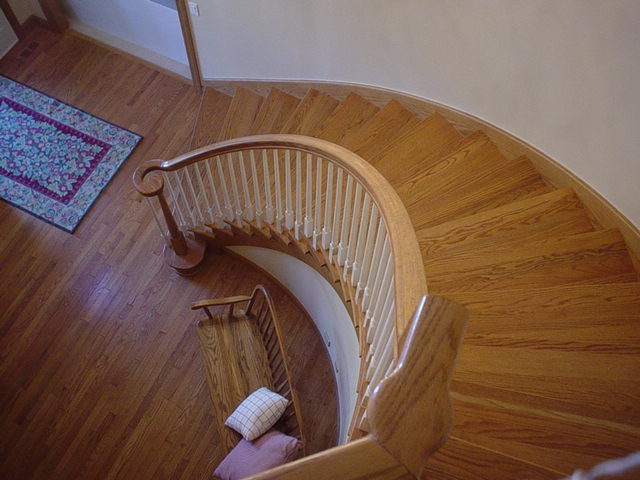
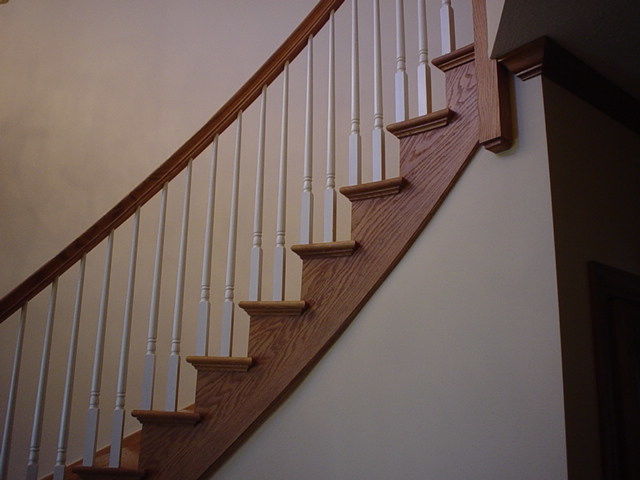
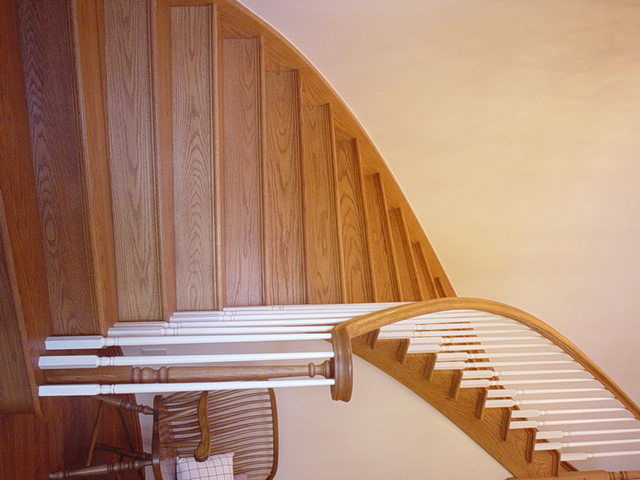
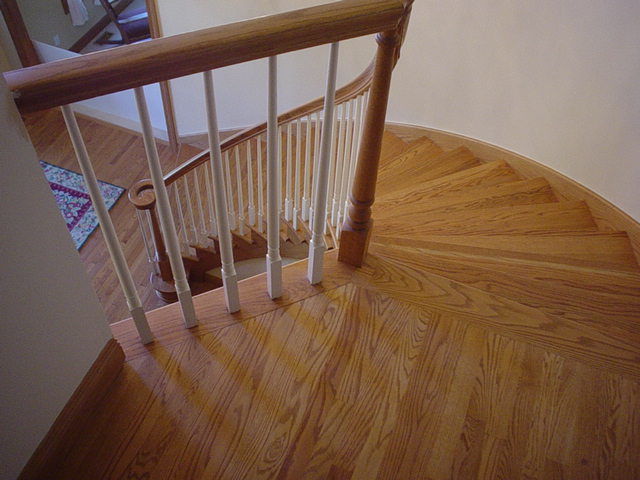
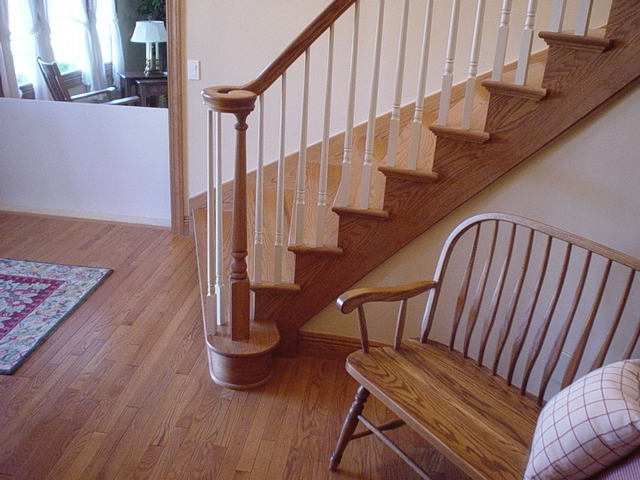
This is a stairway I finished not too long ago. The owner invited me over and I had never taken pictures of it. This particular stairway has a small sized handrail and 1.25 inch balusters. I prefer the larger look..but its just what they wanted.

Reply
  • X
  • facebook
  • linkedin
  • pinterest
  • email
  • add to favorites Log in or Sign up to save your favorite articles

Replies

  1. WayneL5 | Oct 03, 2003 01:26am | #1

    Beautiful.  I'll bet your head is still spinning.  Not many can do what you do.

    1. StanFoster | Oct 03, 2003 01:38am | #3

      Wayn:   Thanks..  Actually I cant build anything straight....so curved stairways are just a natural for me....:)

  2. andybuildz | Oct 03, 2003 01:33am | #2

    I like that base/shoe molding detail around the first step.....Super nice job Stan

    Be well

               andy

    My life is my practice!

    http://CLIFFORDRENOVATIONS.COM

    1. StanFoster | Oct 03, 2003 01:54am | #4

      Andy:   Thanks for the compliment.

      1. User avater
        GJR | Oct 03, 2003 04:49am | #5

        Stan,  beautiful job as always.   I also like that detail around the base of the starting bullnose step.  How did you make it?  Did you make a template of the radius and then transfer it to a oak board,   cutting it out with a jig saw and then finishing it with a router? "Don't take life too seriously, you are not getting out of it alive"

      2. User avater
        GJR | Oct 03, 2003 04:58am | #6

        Stan,

           Beautiful job as always.   I also noticed that base/shoe around the starting bullnose step..  How did you make it?  Did you transfer the radius to an Oak board,  cut it out and finish the edge with a router, then cut out the piece with a jig saw?  "Don't take life too seriously, you are not getting out of it alive"

        1. StanFoster | Oct 03, 2003 11:12pm | #8

          Gary:   I glued up some oak that was wide enough to make the baseshoe.  Then I drew the radius of the outside of the baseshoe and set up a tramel jig and routed it out. I then just took a roundover bit and did the edge.  All that was left to do was cut out to the radius of the riser face and out comes a piece of trim that just had to be sanded a little to fit.

  3. jmo2 | Oct 03, 2003 05:57pm | #7

    Good grief!  That's fantastic!!!!

  4. DaveHeinlein | Oct 04, 2003 01:34am | #9

    Very,very nice, Stan. Your work is exceptional. That last photo(sch4) had me for a second.

    1. DavidxDoud | Oct 04, 2003 04:32am | #10

      thanks for the picts,  Stan - - nice clean job,  as always - - your work is inspiring...

      1. User avater
        GJR | Oct 04, 2003 04:38am | #11

        thanks stan,  I have to make something like that for a base kitchen cabinet.  I have made them before but I think your way will result in a cleaner and more accurate piece.  Thanks again."Don't take life too seriously, you are not getting out of it alive"

      2. DavidxDoud | Oct 04, 2003 04:55am | #12

        ...but just to keep ya humble,  here's three picts from 'Colonial Interiors' by  Leigh French Jr. - -

        offered in a spirit of comraderie - keep up the good work! - DOUD

        1. StanFoster | Oct 04, 2003 01:34pm | #14

          David:  Awesome stairwork!      All I have to do is look at beautiful stairways like that one and the ones I visit in Chicago and elsewheres......and I always feel intimidated.    I have a long..long way to go. Even all the stunning stairways I have seen...I always keep coming across stairways that are at higher level.

  5. User avater
    goldhiller | Oct 04, 2003 05:40am | #13

    As always...........very nice, very clean and very sweet.

    Thanks for posting those pics.

    Knowledge is power, but only if applied in a timely fashion.
  6. Plumbline | Oct 04, 2003 01:59pm | #15

    Nice looking job, been in the building business 35 years, and I am still amazed at the level of some woodworkers abilities.

    Thanks for the pictures.

    1. User avater
      GJR | Oct 04, 2003 02:45pm | #16

      Stan,

         I have been doing it a little different, but I think your way will result in a more accurate piece and seems it my be a little easier.  I have to makeup a radius piece of shoe for a kitchen base cabinet next week,  I will try your technique.  Thanks."Don't take life too seriously, you are not getting out of it alive"

    2. Snort | Oct 04, 2003 06:22pm | #17

      Another beaut, Stan. I like the smaller rail and balusters on this particular set. I also really like the way you stopped the balusters short of making a full birdcage at the volute. Hope you don't mind if I "borrow" that little detail. EliphIno!

      1. gbwood | Oct 04, 2003 11:05pm | #18

        beauty as always, Stan

        greg

  7. TLJ | Oct 05, 2003 08:24pm | #19

    Nice work, Stan.

    I build one set of curved stairs on a form similarly to your procedure. When removed from the form, the radius opened up a bit. During installation, do you force the stringer back to the intended radius, or just build your wall under it to its natural curve?

    1. StanFoster | Oct 05, 2003 08:47pm | #20

      Tim:    I leave the outside stringer in the forms.  I layout and route the tread and risers mortises into the outside stringer as it lays in the forms. It never leaves the forms until the stairs is fully assembled.  The inside stringer is taken to the workbench..mitered and pocket screwed..then I reposition it onto the inside forms.  The treads and risers are wedged and glued starting from the top down. The forms are slowly stripped away AFTER the tread and riser is secured. This GUARANTEES no springback and I can rest assured that this stairway will fit the curved wall awaiting it 100 miles away.

      1. Theodora | Oct 05, 2003 09:02pm | #21

        Stan, I have to go visit historic houses or museums, or look in books to see things as lovely as you do. What a real privilege to have a beautiful staircase like the ones you make. You have a real gift, and lucky clients!"Our whole American way of life is a great war of ideas, and librarians are the arms dealers selling weapons to both sides."-James Quinn

        1. StanFoster | Oct 05, 2003 09:33pm | #22

          Theodora:  Thanks so much for the nice compliment...but in all reality I HONESTLY dont believe my curved work is anything special.  It just takes longer is all.   

      2. TLJ | Oct 06, 2003 04:03am | #23

        Thanks for the explanation, Stan. Another question: what about curved handrails? How do you control for springback?

        While I'm at it: What type of glue for laminating? I've heard of creep with some types of glue. (Sorry if you've already addressed this earlier.)

        1. StanFoster | Oct 06, 2003 05:03am | #24

          Tim:    I use Titebond glue and have had excellent results for many years with it.  I over correct just a little to allow for springback.  One important thing is to get bending rail with a high number of laminates..usually around 9.  These have less springback than say one with five laminates.  A good rule of thumb on springback is to square the number of laminates you are using and compare these numbers.  For example....lets say you are using 6 laminates compared to 10 laminates.  Square  6 and 10.   Then compare their squares.....36 to 100.  The 10 laminate will springback about a third as much  as a 6 laminate glue up.

          1. TLJ | Oct 07, 2003 05:39am | #27

            Interesting, Stan. Thanks. Where do you get such arcane bits of knowledge? Apparently you have access to the experience of generations of "crooked" builders!

  8. Don | Oct 06, 2003 05:25am | #25

    Stan: You do magnificent work! Only wish I'd seen your photos earlier in the construction of my house. I now think I have junk! Alao appreciate seeing good work and know when I am looking at it. Son bought a 27 yr old house in St Louis area w/ MASSIVE railing and pilasters - all black walnut. He had no idea whatsoever what he had. I was able to tell him.

    Thanks for the education.

    Don

    The GlassMasterworks - If it scratches, I etch it!
    1. donpapenburg | Oct 06, 2003 05:57am | #26

      Don , you need to post some pictures of your glass etching.

  9. geonc | Oct 07, 2003 07:15am | #28

    Stan and the other stair gurus...........

     I haven't been here for some time due to loss of 'pooter.

     Gotta lot of catching up to do!

    Here's a project I finished up last month.

    I had the opportunity to get these pics when I had to re-veneer the serpentine lower panel due to a underlaymet joint---my fault--OOPS!


    Edited 10/7/2003 6:43:01 PM ET by geonc

    1. DougU | Oct 08, 2003 06:57am | #31

      geonc

      You lost your pics too.

      1. geonc | Oct 08, 2003 11:56am | #32

        GRRRRRRRR!

        I'm gonna try again........per screen prompts--browse--upload--finished........

        1. User avater
          IMERC | Oct 08, 2003 04:13pm | #33

          Make sure you wait for the up load button to green again. The completed up load will be in red saying what the upload is above the browse button than hit done.  

          Who ever invented work didn't know how to fish....

          1. geonc | Oct 09, 2003 04:51am | #34

            OKYDOKEY!

            ONE MORE TIME.............

            Let's try again!

            OK they posted but were too big. Gonna try and reduce them.

             Funny, they post fine elsewhere?????????

            Edited 10/8/2003 10:04:28 PM ET by geonc

          2. geonc | Oct 09, 2003 05:43am | #35

            See if this works..........

          3. geonc | Oct 09, 2003 05:50am | #36

            OK, now I'm gettin' flusterbated.......

             Can I just post a link?

            HELP!!

             I can make wood do what I need but not this 'pooter!

          4. geonc | Oct 09, 2003 06:03am | #37

            Look here for pics..........http://photos.thedieselstop.com/showgallery.php?ppuser=10043&cat=500&thumb=1

            Gonna try it.......

          5. geonc | Oct 09, 2003 06:15am | #38

            OK that works , you just have to copy and paste.

             Sorry for the cornfustication!

            I had to cut back the stone with a 9" diamond wheel using the outside curb as a guide for the 1/4" oak cap to appear "buried" in the stone.

            Mebee some day I will get the hang of posting proper hyperlinks or getting the pics to fit this program.

          6. Framer | Oct 09, 2003 07:30am | #39

            Very impressive work Geonc. Post more of your work.

            I shrunk your picture a little bit.

            Joe Carola

          7. geonc | Oct 09, 2003 12:05pm | #40

            Thanx Joe! A case of your favorite cyber cold drink is on the way!

            A few more, same job..........

          8. Framer | Oct 09, 2003 01:11pm | #41

            Your Welcome. You do some beautiful work. Keep the pictures coming.

            I shrunk your other pictures also.

            Joe Carola

          9. User avater
            deadmanmike | Oct 09, 2003 07:13pm | #42

            Stan, keep 'em coming! Looking at your work makes me want to put on an addition just to have you build me a stunning staircase to put in it.

            geonc, beautiful work also! I love the curved rail n stile 2nd floor edge.

            Mike

          10. johnharkins | Oct 09, 2003 09:25pm | #43

            Stan & geonc  fantastic work!  geonc  can you tell us where this residence or lodge edifice is    I want to see it live     also can you say something about the floor

            Carry On

          11. geonc | Oct 10, 2003 03:24am | #44

            Joe, thanx again!

            John, That job was done for a private residence and in respect for the clients

             all I can say is the house is on Smith Mtn Lake VA.

            The slate floor just has a sealer coat, but WHAT a difference it made!

            Here's a pic before finish.......

             The other balcony pic was the orig design, however the client asked if we could cover the entire balc and tie the undersie stair trim into the ceiling trim as part of the paneld look.

             A few biscuited/ panel adhesive sections later.........plus lots of flush trim router work later......the finished product. The solid balc panels look 100 percent better!

            That serpentine balcony was a toughie!

            As most here can relate, sustom work definatley has some communication barriers between the builder/framer/ and in this case the stair builder.

            Just because CAD is used, doesen't nesc mean allowences are properly allotted.

            I'm new to digital cameras and the 35mm to disc just doesn't do it.

             Hope to post some more and will TRY and stay up to date on this site!

             Thanx for all the positive comments!

            GEO

          12. StanFoster | Oct 10, 2003 03:47am | #45

            GEO:  Awesome stairwork.  I am glad to see I am not the only one going in circles..    :)

  10. geonc | Oct 07, 2003 07:49am | #29

    Stan, Sometimes those 5015 ballusters make a nice touch!

     Awesome work !

    Making the bullnose shoe and cove gives a finished look.

    GEO

    1. geonc | Oct 08, 2003 01:46am | #30

      Gonna try those pics again! If this one makes it I"ll post the rest.

Log in or create an account to post a comment.

Sign up Log in

Become a member and get full access to FineHomebuilding.com

Video Shorts

Categories

  • Business
  • Code Questions
  • Construction Techniques
  • Energy, Heating & Insulation
  • General Discussion
  • Help/Work Wanted
  • Photo Gallery
  • Reader Classified
  • Tools for Home Building

Discussion Forum

Recent Posts and Replies

  • |
  • |
  • |
  • |
  • |
  • |
View More Create Post

Up Next

Video Shorts

Featured Story

Picture-Perfect Pergola

Built from locally sawn hemlock, this functional outdoor feature uses structural screws and metal connectors for fast, sturdy construction.

Featured Video

SawStop's Portable Tablesaw is Bigger and Better Than Before

The 10-in. Jobsite Saw PRO has a wider table, a new dust-control port, and a more versatile fence, along with the same reliable safety mechanism included in all SawStop tablesaws.

Related Stories

  • Design and Build a Pergola
  • Podcast Episode 689: Basement Garages, Compact ERVs, and Safer Paint Stripper
  • FHB Podcast Segment: Are Single-Room ERVs the Answer?
  • Fire-Resistant Landscaping and Home Design Details

Highlights

Fine Homebuilding All Access
Fine Homebuilding Podcast
Tool Tech
Plus, get an extra 20% off with code GIFT20

"I have learned so much thanks to the searchable articles on the FHB website. I can confidently say that I expect to be a life-long subscriber." - M.K.

Get home building tips, offers, and expert advice in your inbox

Signing you up...

This site is protected by reCAPTCHA and the Google Privacy Policy and Terms of Service apply.
See all newsletters
See all newsletters

Fine Homebuilding Magazine

  • Issue 332 - July 2025
    • Custom Built-ins With Job-Site Tools
    • Fight House Fires Through Design
    • Making the Move to Multifamily
  • Issue 331 - June 2025
    • A More Resilient Roof
    • Tool Test: You Need a Drywall Sander
    • Ducted vs. Ductless Heat Pumps
  • Issue 330 - April/May 2025
    • Deck Details for Durability
    • FAQs on HPWHs
    • 10 Tips for a Long-Lasting Paint Job
  • Issue 329 - Feb/Mar 2025
    • Smart Foundation for a Small Addition
    • A Kominka Comes West
    • Making Small Kitchens Work
  • Issue 328 - Dec/Jan 2024
    • How a Pro Replaces Columns
    • Passive House 3.0
    • Tool Test: Compact Line Lasers

Fine Home Building

Newsletter Sign-up

  • Fine Homebuilding

    Home building tips, offers, and expert advice in your inbox.

  • Green Building Advisor

    Building science and energy efficiency advice, plus special offers, in your inbox.

  • Old House Journal

    Repair, renovation, and restoration tips, plus special offers, in your inbox.

Signing you up...

This site is protected by reCAPTCHA and the Google Privacy Policy and Terms of Service apply.
See all newsletters

Follow

  • Fine Homebuilding

    Dig into cutting-edge approaches and decades of proven solutions with total access to our experts and tradespeople.

    Start Free Trial Now
    • Facebook
    • Instagram
    • X
    • LinkedIn
  • GBA Prime

    Get instant access to the latest developments in green building, research, and reports from the field.

    Start Free Trial Now
    • Facebook
    • YouTube
  • Old House Journal

    Learn how to restore, repair, update, and decorate your home.

    Subscribe Now
    • Facebook
    • Instagram
    • X

Membership & Magazine

  • Online Archive
  • Start Free Trial
  • Magazine Subscription
  • Magazine Renewal
  • Gift a Subscription
  • Customer Support
  • Privacy Preferences
  • About
  • Contact
  • Advertise
  • Careers
  • Terms of Use
  • Site Map
  • Do not sell or share my information
  • Privacy Policy
  • Accessibility
  • California Privacy Rights

© 2025 Active Interest Media. All rights reserved.

Fine Homebuilding receives a commission for items purchased through links on this site, including Amazon Associates and other affiliate advertising programs.

  • Home Group
  • Antique Trader
  • Arts & Crafts Homes
  • Bank Note Reporter
  • Cabin Life
  • Cuisine at Home
  • Fine Gardening
  • Fine Woodworking
  • Green Building Advisor
  • Garden Gate
  • Horticulture
  • Keep Craft Alive
  • Log Home Living
  • Military Trader/Vehicles
  • Numismatic News
  • Numismaster
  • Old Cars Weekly
  • Old House Journal
  • Period Homes
  • Popular Woodworking
  • Script
  • ShopNotes
  • Sports Collectors Digest
  • Threads
  • Timber Home Living
  • Traditional Building
  • Woodsmith
  • World Coin News
  • Writer's Digest
Active Interest Media logo
X
X
This is a dialog window which overlays the main content of the page. The modal window is a 'site map' of the most critical areas of the site. Pressing the Escape (ESC) button will close the modal and bring you back to where you were on the page.

Main Menu

  • How-To
  • Design
  • Tools & Materials
  • Video
  • Blogs
  • Forum
  • Project Guides
  • Reader Projects
  • Magazine
  • Members
  • FHB House

Podcasts

  • FHB Podcast
  • ProTalk

Webinars

  • Upcoming and On-Demand

Podcasts

  • FHB Podcast
  • ProTalk

Webinars

  • Upcoming and On-Demand

Popular Topics

  • Kitchens
  • Business
  • Bedrooms
  • Roofs
  • Architecture and Design
  • Green Building
  • Decks
  • Framing
  • Safety
  • Remodeling
  • Bathrooms
  • Windows
  • Tilework
  • Ceilings
  • HVAC

Magazine

  • Current Issue
  • Past Issues
  • Magazine Index
  • Subscribe
  • Online Archive
  • Author Guidelines

All Access

  • Member Home
  • Start Free Trial
  • Gift Membership

Online Learning

  • Courses
  • Project Guides
  • Reader Projects
  • Podcast

More

  • FHB Ambassadors
  • FHB House
  • Customer Support

Account

  • Log In
  • Join

Newsletter

Get home building tips, offers, and expert advice in your inbox

Signing you up...

This site is protected by reCAPTCHA and the Google Privacy Policy and Terms of Service apply.
See all newsletters
See all newsletters

Follow

  • X
  • YouTube
  • instagram
  • facebook
  • pinterest
  • Tiktok

Join All Access

Become a member and get instant access to thousands of videos, how-tos, tool reviews, and design features.

Start Your Free Trial

Subscribe

FHB Magazine

Start your subscription today and save up to 70%

Subscribe

Enjoy unlimited access to Fine Homebuilding. Join Now

Already a member? Log in

We hope you’ve enjoyed your free articles. To keep reading, become a member today.

Get complete site access to expert advice, how-to videos, Code Check, and more, plus the print magazine.

Start your FREE trial

Already a member? Log in

Privacy Policy Update

We use cookies, pixels, script and other tracking technologies to analyze and improve our service, to improve and personalize content, and for advertising to you. We also share information about your use of our site with third-party social media, advertising and analytics partners. You can view our Privacy Policy here and our Terms of Use here.

Cookies

Analytics

These cookies help us track site metrics to improve our sites and provide a better user experience.

Advertising/Social Media

These cookies are used to serve advertisements aligned with your interests.

Essential

These cookies are required to provide basic functions like page navigation and access to secure areas of the website.

Delete My Data

Delete all cookies and associated data