FHB Logo Facebook LinkedIn Email Pinterest Twitter X Instagram Tiktok YouTube Plus Icon Close Icon Navigation Search Icon Navigation Search Icon Arrow Down Icon Video Guide Icon Article Guide Icon Modal Close Icon Guide Search Icon Skip to content
Subscribe
Log In
  • How-To
  • Design
  • Tools & Materials
  • Restoration
  • Videos
  • Blogs
  • Forum
  • Magazine
  • Members
  • FHB House
  • Podcast
Log In

Discussion Forum

Discussion Forum

Suggestions for Crown Molding Around Dormer?

304065 | Posted in General Discussion on March 18, 2010 12:54pm

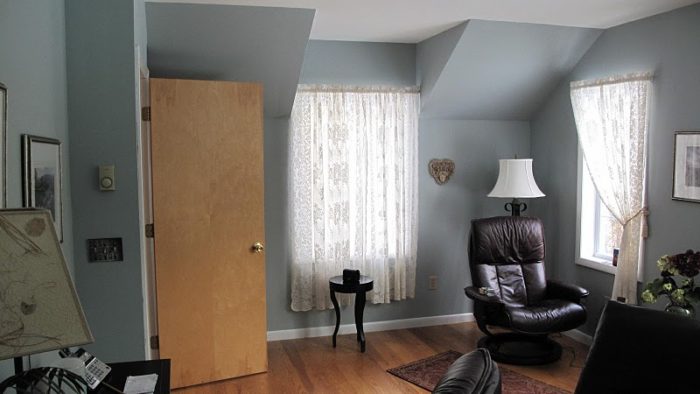
Wondering if some of the experienced trim carpenters can help me out here– we’re updating the room shown in the attached photo- one of my ideas was to add a crown around the ceiling.  But what should I do about the dormer?  

The spring angle of most crown means that it’s impossible to bridge 135 degrees where the wall angles downward– should I stop the crown where the angle begins and call it a day?  

Should I frame the dormer with molding?

Should I use a different molding to go across the 135 degree gap and resume the crown where the wall goes vertical again?

Should I build a box-section drywall soffit and run the crown across that?

I guess I could give up on Crown Molding entirely in this room but I didn’t want to give up without asking for expert advice.

Any advice on the topic would be much appreciated.

John

Reply
  • X
  • facebook
  • linkedin
  • pinterest
  • email
  • add to favorites Log in or Sign up to save your favorite articles

Replies

  1. User avater
    Gene_Davis | Mar 18, 2010 02:02pm | #1

    Since you are prepared to box down . . .

    . . . and all that entails with framing, rocking, mud-tape-finish-prime, and more . . .

    . . . then consider a perimeter soffit with a face you can trim conventionally.

    Just plastering a wood detail around the existing ceiling line ain't gonna do it for you, IMHO.

    In the room view attached here, I put a perimeter soffit around your whole room, dropped about 9 inches from your 8' ceiling, with edges positioned to hide your roof frame drops at their ceiling intersects, and brought wide at your alcove.

    I just plastered a simple edge molding around the edge of your new tray ceiling, but there are plenty of options for that, including cove lighting details.

  2. User avater
    Gene_Davis | Mar 18, 2010 04:27pm | #2

    Another view

    John, in this camera view of my soffit treatment, you can look back at the door entry, and see how the soffit in the "alcove" area to the L of the door is wider.

    I changed the edge molding to something cherry-colored, and made it smaller, about 1 1/4" w x 1" h.

  3. calvin | Mar 18, 2010 06:28pm | #3

    One possibilty

    You could place a crown backer on the wall first, which would effectively kick out the crown enough to clear the angled ceiling either side of the window.  You could use 5/4 ripped to the correct width for the angle ceiling and continue that size around the room.  In effect a mini soffit, smaller than gene shows.  You'll place it edge out, with the backside ripped to the angle to fit the sloped ceiling.  The rest would be square edged.  Screw and glue to studs and rafters.

    You could of course use 3/4 but you might limit your bottom nailing for the crown.  However if 5/4 is unavailable or too $'s,  I'm sure you could make it work.

  4. User avater
    Gene_Davis | Mar 18, 2010 07:34pm | #4

    Or, with a few sticks and some rock and mud,

     . . . you can create little triangular gypboard-faced "drops" out at the top leading edges of your sloped rafter ceiling sections, just deep enough for the height of the crown you want to do, and it will look like the pic, attached.  I painted them orange just to highlight them.

    Cal's suggestion would have you boxing out away from all the other walls as well, but this is simpler.

    It all really depends on you, and how much of a room "upgrade" you want. 

    Dropped soffit perimeter as shown in my earlier hallucinations, would afford you the easy option of doing some can lights around the perimeter, for a nice wall-washing lighting effect.

    To my design sense, for what it is worth, and that's probably nothing to you, just slapping a crownmold around at ceiling height, in an upper-floor under-roof room like this one, is not the right thing to do.

    Note to Calvin:  Let's hope some other contributors chime in here and offer John some advice.  You and I are going to get tired arms, with just us holding up a big piece of this here forum.

    1. calvin | Mar 18, 2010 07:56pm | #5

      There's others pulling answers out of the hat too Gene.  Admittedly our group is thinner than b/4.  Hopefully I'm answering only questions on which I might have a good answer or opinion.  And besides, constantly blowing my top at TauntonWeb is getting old.  I'm sure it's got to bother all the wrong people and for that I am sorry.  Since I get no answers to anything anymore from Ed or Matt I know it can't be aggravating them in the least.

      And Gene, I like that last idea you pictured.  Looks like it would have been there and is certainly an simpler method to do what he wants to do.

      Now that I think about it-even simpler would be to die it into the slopes, pick it up again over the window.  It'd have purpose-the roof "cuts" into the ceiling/wall  finish.

      Shoot, nobody looks up anyway........ 

      1. User avater
        Gene_Davis | Mar 18, 2010 08:18pm | #6

        " . . . nobody looks up anyway."

        You're right, Calvin. 

        I don't.  Most times my eyes are casting down, looking to see if I remembered to tie my shoes and zip my fly.

        So here is the look, attached, of doing a crownmold job in the easiest most expedient way.  It'll take longer to pick it out at the store, than to put up these few pieces.

        Crown molding, in my humble opinion, is one of the most overrated pieces of decor in all of residential house design.  All too often, it is just slapped up there in the cove, with little or no thought given to the composition of the room as a whole, molding-wise. 

        Hey, look at my crown molding up there.  Ignore my cheap mitered ranch casing and matching ranch baseboard.

        Look at all the silly real estate listings that call it out in whatever mini-McMansion is being described, as if it is a major upgrade.  Consider all those jackleg "remodelers" that get hired to poke it up in existing houses, just the crown, please, as if it will make all the difference.

        Overrated.  Like other things.  School, for instance.  Twelve-inch sliding compound miter saws.  The list is a long one.

        Sorry for the rant, John.  Your room looks good, and will really be a standout after you get done.  Please post some "after" photos.

  5. MikeSmith | Mar 18, 2010 08:23pm | #7

    john... don't listen to those bozos

    i'd pick a crown  that aproximates the slanted  ceiling areas..... then just carry it right around the room

    o wait.... calvin finally backed into that 1

    1. User avater
      Gene_Davis | Mar 18, 2010 08:56pm | #8

      Less is more.

      Here ya go, Mike.  X3 makes it easier than ever.

      Unless you want it elled around each rafter boxdown.  Or brought out the straight sides of the dormer, then doodled with little self-returns to match into the sloped ceiling corner adjacent.

      Whew!  I'm worn out thinking of the possibilities.

      1. MikeSmith | Mar 18, 2010 09:19pm | #9

        gene...

        did you go straight from 10 to betaX3?

        i got a new computer with multi-core & winn 7-64 .... but i don't notice any "lightning speed"

        1. User avater
          Gene_Davis | Mar 18, 2010 09:28pm | #10

          Mike:

          I did 10, then new PC (specs in signature line @ Chieftalk), then X2, now X3 beta.  It is not the speed, it is the features, most noticeably for construction docs.  That is where the time savings is.

          Program loads much quicker due to the new way libraries are handled, if that matters.  Otherwise, camera views, overviews, about the same.  Don't know much about Windows 7.  I'm going to stick with Vista for now.

          Maybe I'll ride my bike down to Saratoga.  Play the part of a piñata, guys like Holly can take a swing with the bat.

          1. calvin | Mar 18, 2010 09:32pm | #11

            Ride your bike?

            Hope it's downhill all the way.  You can always take the train home, no?

  6. 304065 | Mar 24, 2010 09:35am | #12

    wow. . .unbelievably helpful

    Wow. . . thank you Gentlemen for the advice.  It is going WAY beyond the call of duty to generate CAD renderings of the room and try out the alternatives.  Do you guys do that for a living, probably so?  Anyway, it is one thing to receive advice in the form of text so you can visualize it, it's entirely another to be able to see it.  Thank you very much for going the extra mile.

    So my plan is, I'm going to stop the crown where the box begins and see how it looks-- much like the final illustration.  

    I hear you on the "upgrade" mentality-- crown molding is one of those basics of trim that has been used for centuries, and yet it gets talked about in the context of otherwise undistinguished McMansions like it's the Rosetta Stone that's been discovered.  I'm actually tempted to do a build-up with regard to the room above, just to get away from the basic single piece of crown molding, poked up there like it's the Palace of Versailles or something. . . the project is a rambling two story cedar shingle house in Upstate New York, not like it's Greek Revival or anything, so maintaining some BALANCE is critical, but doing slightly better than stock probably works and will be more visually interesting.

    I will certainly post some "after" photos in a few weeks, it is the least I can do given the time and trouble you fellows went to.

    Best,

    John

    1. calvin | Mar 24, 2010 05:27pm | #13

      John

      it is the least I can do given the time and trouble you fellows went to

      Bull shit john.  there's so much more you can do.

      You can show up at this July's Fest in Saratoga Springs (See Fest 2010-1&2 threads in the fest folder) with the pictures and a case of the premier lager from 'upstate' NY.

      You can't be far away.

      And Gene, he's from up there-you could thank him in person.....................

      If the conservative right winger has the balls to show up.

      Best of luck.

      1. 304065 | Apr 19, 2010 03:30pm | #14

        Well here is the "after"-- I

        Well here is the "after"-- I still have some drywall sanding and finish coating to do around the crawl space entrance at lower left.  

        I think it came out fine-- it's one of those things you don't really notice.  I suppose I could put a piece over the windows cut square at both ends.  That would tie it all together.

        MANY thanks to the nice people here who rendered assistance.

        Best,

        John

        1. calvin | Apr 19, 2010 07:13pm | #15

          John,

          Thanks alot for coming back and showing us the after.  I think it looks killer.  The brown really accentuates that crown.  Way to go!

        2. User avater
          Gene_Davis | Apr 19, 2010 10:58pm | #16

          Well! Isn't that nice!

          You must be pleased.

          Thanks for showing us the end result. 

        3. brucet9 | Apr 25, 2010 02:45pm | #17

          Definitely put crown over the window.

          While you're at it, why don't you cope a couple of pieces to mock up what Gene Davis' earlier suggestion (his 3rd post) for a "mini-soffet" solution at the roof slope would look like.  Bring one piece from the crown on the right wall across the roof slope section and another from there back to the over-window piece.  

          I think you might like that even better than what you have done.

Log in or create an account to post a comment.

Sign up Log in

Become a member and get full access to FineHomebuilding.com

Video Shorts

Categories

  • Business
  • Code Questions
  • Construction Techniques
  • Energy, Heating & Insulation
  • General Discussion
  • Help/Work Wanted
  • Photo Gallery
  • Reader Classified
  • Tools for Home Building

Discussion Forum

Recent Posts and Replies

  • |
  • |
  • |
  • |
  • |
  • |
View More Create Post

Up Next

Video Shorts

Featured Story

Podcast Episode 693: Old-House Hazards, Building Larsen Trusses, AI in Construction

The crew talks about work start times, fire-resistant construction, fixer-uppers, building Larsen trusses, and AI for construction.

Featured Video

How to Install Cable Rail Around Wood-Post Corners

Use these tips to keep cables tight and straight for a professional-looking deck-railing job.

Related Stories

  • Podcast Episode 693: Old-House Hazards, Building Larsen Trusses, AI in Construction
  • FHB Podcast Segment: Finding Hazardous Materials in a Fixer-Upper
  • A Classic Paint Sprayer Gets a Thoughtful Refresh
  • Podcast Episode 692: Introduction to Trade Work, Embodied Carbon, and Envelope Improvements

Highlights

Fine Homebuilding All Access
Fine Homebuilding Podcast
Tool Tech
Plus, get an extra 20% off with code GIFT20

"I have learned so much thanks to the searchable articles on the FHB website. I can confidently say that I expect to be a life-long subscriber." - M.K.

Get home building tips, offers, and expert advice in your inbox

Signing you up...

This site is protected by reCAPTCHA and the Google Privacy Policy and Terms of Service apply.
See all newsletters
See all newsletters

Fine Homebuilding Magazine

  • Issue 332 - July 2025
    • Custom Built-ins With Job-Site Tools
    • Fight House Fires Through Design
    • Making the Move to Multifamily
  • Issue 331 - June 2025
    • A More Resilient Roof
    • Tool Test: You Need a Drywall Sander
    • Ducted vs. Ductless Heat Pumps
  • Issue 330 - April/May 2025
    • Deck Details for Durability
    • FAQs on HPWHs
    • 10 Tips for a Long-Lasting Paint Job
  • Issue 329 - Feb/Mar 2025
    • Smart Foundation for a Small Addition
    • A Kominka Comes West
    • Making Small Kitchens Work
  • Issue 328 - Dec/Jan 2025
    • How a Pro Replaces Columns
    • Passive House 3.0
    • Tool Test: Compact Line Lasers

Fine Home Building

Newsletter Sign-up

  • Fine Homebuilding

    Home building tips, offers, and expert advice in your inbox.

  • Green Building Advisor

    Building science and energy efficiency advice, plus special offers, in your inbox.

  • Old House Journal

    Repair, renovation, and restoration tips, plus special offers, in your inbox.

Signing you up...

This site is protected by reCAPTCHA and the Google Privacy Policy and Terms of Service apply.
See all newsletters

Follow

  • Fine Homebuilding

    Dig into cutting-edge approaches and decades of proven solutions with total access to our experts and tradespeople.

    Start Free Trial Now
    • Facebook
    • Instagram
    • X
    • LinkedIn
  • GBA Prime

    Get instant access to the latest developments in green building, research, and reports from the field.

    Start Free Trial Now
    • Facebook
    • YouTube
  • Old House Journal

    Learn how to restore, repair, update, and decorate your home.

    Subscribe Now
    • Facebook
    • Instagram
    • X

Membership & Magazine

  • Online Archive
  • Start Free Trial
  • Magazine Subscription
  • Magazine Renewal
  • Gift a Subscription
  • Customer Support
  • Privacy Preferences
  • About
  • Contact
  • Advertise
  • Careers
  • Terms of Use
  • Site Map
  • Do not sell or share my information
  • Privacy Policy
  • Accessibility
  • California Privacy Rights

© 2025 Active Interest Media. All rights reserved.

Fine Homebuilding receives a commission for items purchased through links on this site, including Amazon Associates and other affiliate advertising programs.

  • Home Group
  • Antique Trader
  • Arts & Crafts Homes
  • Bank Note Reporter
  • Cabin Life
  • Cuisine at Home
  • Fine Gardening
  • Fine Woodworking
  • Green Building Advisor
  • Garden Gate
  • Horticulture
  • Keep Craft Alive
  • Log Home Living
  • Military Trader/Vehicles
  • Numismatic News
  • Numismaster
  • Old Cars Weekly
  • Old House Journal
  • Period Homes
  • Popular Woodworking
  • Script
  • ShopNotes
  • Sports Collectors Digest
  • Threads
  • Timber Home Living
  • Traditional Building
  • Woodsmith
  • World Coin News
  • Writer's Digest
Active Interest Media logo
X
X
This is a dialog window which overlays the main content of the page. The modal window is a 'site map' of the most critical areas of the site. Pressing the Escape (ESC) button will close the modal and bring you back to where you were on the page.

Main Menu

  • How-To
  • Design
  • Tools & Materials
  • Video
  • Blogs
  • Forum
  • Project Guides
  • Reader Projects
  • Magazine
  • Members
  • FHB House

Podcasts

  • FHB Podcast
  • ProTalk

Webinars

  • Upcoming and On-Demand

Podcasts

  • FHB Podcast
  • ProTalk

Webinars

  • Upcoming and On-Demand

Popular Topics

  • Kitchens
  • Business
  • Bedrooms
  • Roofs
  • Architecture and Design
  • Green Building
  • Decks
  • Framing
  • Safety
  • Remodeling
  • Bathrooms
  • Windows
  • Tilework
  • Ceilings
  • HVAC

Magazine

  • Current Issue
  • Past Issues
  • Magazine Index
  • Subscribe
  • Online Archive
  • Author Guidelines

All Access

  • Member Home
  • Start Free Trial
  • Gift Membership

Online Learning

  • Courses
  • Project Guides
  • Reader Projects
  • Podcast

More

  • FHB Ambassadors
  • FHB House
  • Customer Support

Account

  • Log In
  • Join

Newsletter

Get home building tips, offers, and expert advice in your inbox

Signing you up...

This site is protected by reCAPTCHA and the Google Privacy Policy and Terms of Service apply.
See all newsletters
See all newsletters

Follow

  • X
  • YouTube
  • instagram
  • facebook
  • pinterest
  • Tiktok

Join All Access

Become a member and get instant access to thousands of videos, how-tos, tool reviews, and design features.

Start Your Free Trial

Subscribe

FHB Magazine

Start your subscription today and save up to 70%

Subscribe

Enjoy unlimited access to Fine Homebuilding. Join Now

Already a member? Log in

We hope you’ve enjoyed your free articles. To keep reading, become a member today.

Get complete site access to expert advice, how-to videos, Code Check, and more, plus the print magazine.

Start your FREE trial

Already a member? Log in

Privacy Policy Update

We use cookies, pixels, script and other tracking technologies to analyze and improve our service, to improve and personalize content, and for advertising to you. We also share information about your use of our site with third-party social media, advertising and analytics partners. You can view our Privacy Policy here and our Terms of Use here.

Cookies

Analytics

These cookies help us track site metrics to improve our sites and provide a better user experience.

Advertising/Social Media

These cookies are used to serve advertisements aligned with your interests.

Essential

These cookies are required to provide basic functions like page navigation and access to secure areas of the website.

Delete My Data

Delete all cookies and associated data