This casing was made with one pass on the table saw, followed by a router table pass, and then 3 passes through the table saw on edge. I eased the step edges with a sanding and made relief cuts on the backs with a dado head.
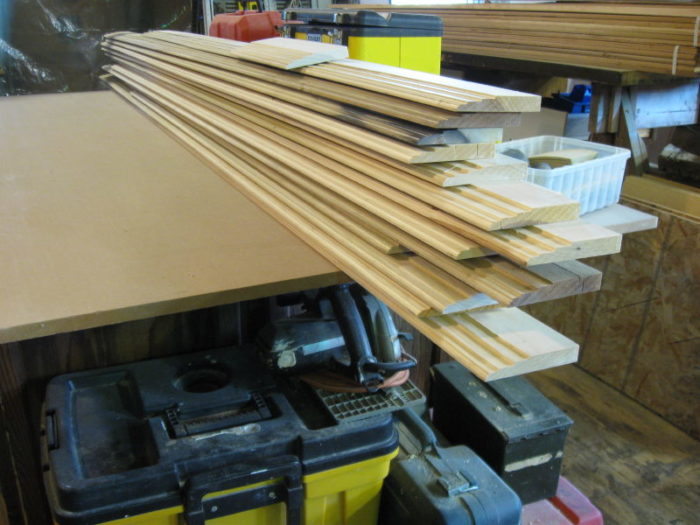


This casing was made with one pass on the table saw, followed by a router table pass, and then 3 passes through the table saw on edge. I eased the step edges with a sanding and made relief cuts on the backs with a dado head.

Built from locally sawn hemlock, this functional outdoor feature uses structural screws and metal connectors for fast, sturdy construction.


"I have learned so much thanks to the searchable articles on the FHB website. I can confidently say that I expect to be a life-long subscriber." - M.K.
Dig into cutting-edge approaches and decades of proven solutions with total access to our experts and tradespeople.
Start Free Trial NowGet instant access to the latest developments in green building, research, and reports from the field.
Start Free Trial Now


Replies
I gotta say, your hand looks cleaner than Huck's.
Very cool, are you replicating something or why go through all the effort. I like doing things like that but when budgets are involved its hard to justify. How much time and is that all of the pieces? Nice work as always.
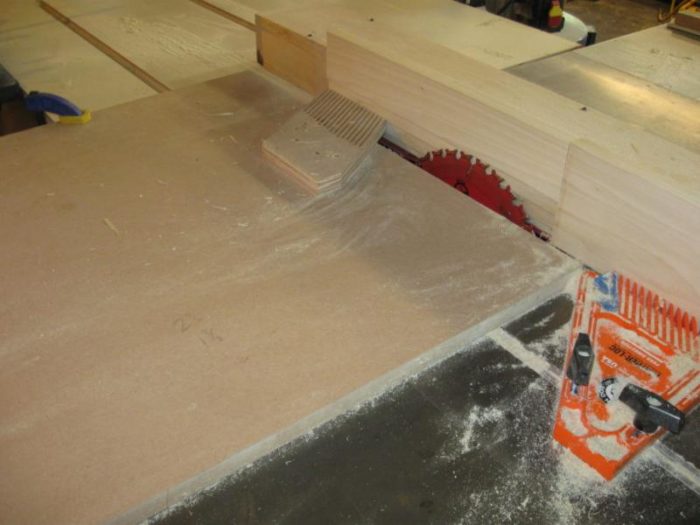
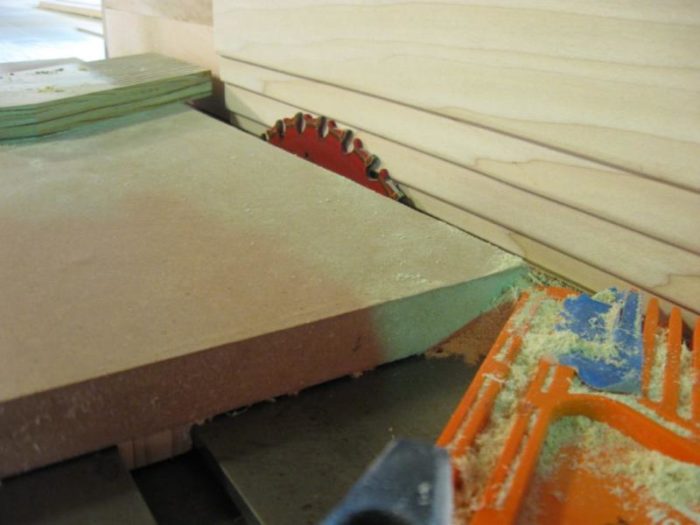
Thanks Danno, This was an attempt to come as close as possible to the profile in the adjacent room (1890 Victorian--see photo). A milled backband and cabinet head crown will be added to the casing too.1 hour ripping random lumber to 4-3/4"
1 hour set-up
4 hours milling faces
1 hour plowing out backs
3 hours sanding, etc.10 hours total x $60/hr = $600 labor
Material: = $150 wood
Total: $750 or 5.95/lf for custom 5" casing... seems fair to me.I think the mill wanted a couple hundred for knives and set up and it was going the be a wash so I just did it... work being scarce and all... or so I hear. For any larger run than this a shaper and power feed or W&H would be nice... but you know me... I still used a folding rule today. ;o)
Thanks for the response, when you break it down to the l/f it dosent seem too bad. Its good to have a customer who appricates the details. Jack miter? How do you do those? Never had reason to try that, but I see it a lot in older homes I figured it kept big miters from opening up as most I see are 5" casing or better
A jack miter is a combination of a butt joint (of the flat portion of a molding) and a miter (of the profiled portion of a molding). As you suggested, they are used to avoid very large miters (the miter of a 5" casing is 7"... a very large miter joint) which tend to open up with seasonal changes (especially the inside corners during winter). In this day of conditioned spaces it is less important, however it is still a good idea in my area (Minnesota) due to radical differences in humidity between summer and winter.In the age of hand saws jack miters were rather easy to do... with power tools, not so much (the inside corner cut of the head casing has to be finished with a hand saw like cutting stair stringers). Now they are considered difficult to do well, and time consuming. I made a jig to make them easier to do. It is a Hand Saw Miter Box with two bevel settings... something not often seen these days:
You know I have nothing to add to this thread except to say that you are one bad #### mofo. And it's an honor to say I have met you. Man I love your work.
Carry on.
Expert. Since 10:00 A.M.
you are one bad #### mofo
stick to the topic and keep the personal attacks out of it - a word to the wise
...just kidding. =)
View Image bakersfieldremodel.com
Edited 8/2/2009 6:24 pm by Huck
Snork. Pretty good.
Expert. Since 10:00 A.M.
Why Gunner, sir, that is the nicest thing anyone has said about me in a long time. :o)I think most people that look at a thread like this just say... uh..., yeah sure..., right! Like that will ever happen! For those few who can manage to get a kick out of this stuff... I will carry on.Cheers,Brian
I can never get enough of that stuff.
Expert. Since 10:00 A.M.
We do do Jack miters upon occasion. your jig is an excellence idea! I'll be
using it soon. Thanks for sharing.
Honestly things like that are why I keep coming back.
Glad you can use it. Not an everyday driver, for sure.
maybe this is a dumb question - but why the jig? Wouldnt' a compound miter saw do the same thing?View Image bakersfieldremodel.com
Huck there are a few 12" CMS that can make the 45* bevel cut with 5" casing standing on edge but they all leave some hand cutting to be done in the inside corner and many models have motors that hit the casing before the cut is finished on one side. They are mostly made to bevel cut flat material or 5-1/4" crown nested, etc.If you have to finish a cut with a hand saw, I figure why switch saws... just cut the whole miter with a hand saw.
Excellent. Besides the jig (which makes it perfect) I was thinking to cut them like that. The only other way I saw was some guy who made a jig for doing it with a router. The whole thing seemed fussy, overblown and ridiculous. I was thinking I could cut that with a coping saw (which besides a pruning saw is the only handsaw I own) and table saw just as well and fast.
Its a lost art, the use of handtools, now we need a 500.00 saw just to make a simple joint. And we're lost without it. Thanks for the excellent responses.
Also I wanted to say the article you did on bullnose corner crown was the best technical article I've seen written in that magazine. The mag is taking on a feeling of DIY with a lot of useless info that isn't need for professionals. The subject matter and the way it was addressed and layed out was top notch and enjoyable, and I had already seen that fully here and I still enjoyed it!
Thanks Danno,The router jig I saw would only "cut" jack miters the length of a 45* chamfer bit... maybe 3/4". They were just jack mitering a bead detail. I would think my jig would make that cut just as fast and can cut much larger jack miters. Good point about the loss of hand tool skills. I would like to be more skilled in traditional methods. I've started collecting old handsaws at garage sales and someday plan to restore some of them.The bullnose crown piece was fun to put together. Glad you liked it.Regards,Brian
Excellent stuff Brian!
I always called them Mason's miters, dunno where I picked that phrase up, but it stuck with me.
You know, hand tools are addictive and next thing ya know, you start making them.
just a warning (G)
Keep up the great work.Spheramid Enterprises Architectural Woodworks
Repairs, Remodeling, Restorations
"If Brains was lard, you couldn't grease much of a pan"Jed Clampitt
View Image
Thanks Man,This casing is smart pattern. The step passes are just a 3/4" drop of the blade and 1/8" over each time. It took making a sample to realize that I needed to do the edge bead before the step cutting eroded the stability of the board, if you know what I mean. Kinda cool figuring that stuff out.Hand tools rock!... and er,... well, so does the Unisaw. :o)
Yeah, about the routed part. Wait till ya get into plane moldings, or sticking. You really have some head scratching to figure out what order to plane with, and how to reference the profiles. Molding planes have no fences, so the sky is the limit and you can tilt some profiles.
It's mind boggling sometimes. like having a tilting arbor shaper, man, you can do some seriously complex cuts.
I make blank blades for the "Multi-plane" a Stanley 55 copy from craftsman, and grind my own when I get stumped. Done the same with HSS router bits ( use a rabbet bit and grind what ya want) but a lot less scary pushing a plane instead of a 22K rpm bit ya ruined (G)Spheramid Enterprises Architectural Woodworks
Repairs, Remodeling, Restorations
"If Brains was lard, you couldn't grease much of a pan"Jed Clampitt
View Image
I like it. I have made some casing no pic's sorry. were I live I can usually make something faster than driving to the store.What kind of miter saw.? a friend gave me a box full of a mitre saw parts that I have yet to clean and assemble and it looks a lot like the on you are using.
a friend gave me a box full of a mitre saw parts
I have friends like that, too. Ought'a see my garage sometime!View Image bakersfieldremodel.com
...
I didn't hear you creep into my shop with a camera.!!
I sent a crew of shop cleaning gnomes on over, now you'll never be able to find anything ;o)
After seeing the first shop pic I thought, Hmmmm, now I don't feel like a solo shop slob.
Then I saw the after and thought Hmmmm, I hate him.Spheramid Enterprises Architectural Woodworks
Repairs, Remodeling, Restorations
"If Brains was lard, you couldn't grease much of a pan"Jed Clampitt
View Image
Well... it's been a whole week since that "after" pic... so the place is back to having a nice "lived in" look. Hey, did you see my tricked out trailer in the curved brace bracket thread. Seems like some stuff you would dig. Later man,Bass
Yeaaaaaahh, I saw it.
I can't even find a Step bumper for my van so I can haul a SMALL trailer. So I'm jealous. I don't want a real class 3 hitch cuz I'll kill the van trying to tow too much. And a step bumped would give me a place to step when I crank down my ladder ratchet tie downs. Without slipping off the curved bumper and bustin my chops on the roof drip rail.
Thems was cool brackets, I have patterns from every one I ever made, save yours, when ya get old and grey you may have to reproduce some. (G)
I'm back rebuilding windows for the "forever job" ( it'll take me forever at one window a month, all they can afford) and you know how it is switching set ups all the time from one task to totally different one..makes for a mess everywhere OR a total clean out and start over day.
Anyway, I hate ya less now you say it's slopped up again..LOLSpheramid Enterprises Architectural Woodworks
Repairs, Remodeling, Restorations
"If Brains was lard, you couldn't grease much of a pan"Jed Clampitt
View Image
I avoided the trailer thing for a couple of decades... finally caved in a couple of years ago. I keep adding more stuff to the list of stuff I think I have to schlep around... still wish I was still in just a van sometimes... never did like working out of a pickup. Anywho... I just ramblin'Good to hear the window gig kicked back in. All those set-ups can be a bummer.I got rained out yesterday and had a whole shop set up in the yard of a customer... packed it in. Took a bunch of measurements and I'm pre-cutting a bunch of stuff in the shop and hoping it fits.All the best,Brian
Ramblin here too..thats fine. we finally got HOT again , had a really nice July. I was still stripping paint and cleaning out 200 yr old putty and checking in on the fest pics.
Time for my icecream fix and some AC soon, still 90 in the shop. Might mow with the headlights on tonite, got pickin and canning all day tomorrow...we grew a HUGE garden and man, covered up with beans and peppers and maters and corn.
Got some rogue watermelons going on, took over a big area, come next month I'll be trying to preserve them somehow, or sick of eating them. I guess drying ain't such a good idea? LOLSpheramid Enterprises Architectural Woodworks
Repairs, Remodeling, Restorations
"If Brains was lard, you couldn't grease much of a pan"Jed Clampitt
View Image
Got rained out last week (jobsite shop in the yard) so I took the measurements to the shop and precut as much as I could. Each doorway has 15 pieces of trim and 24 cuts (compared to 3 pieces of trim and 4 cuts for a basic door casing set).Two of the doorways met at an inside corner and the casings had to be ripped down. One of the doorways was not plumb so the rip was tapered... and the heights were 3/4" different. I cheated the head reveal up on the low door (to the garage) and made up the rest on the flat of the casing.Even with the trim mostly precut, I only managed to trim 4 doorways in a day.
I love it. It looks like it grew there. Gotta get me some o dem clamps you got going on.I called in my glass sizes to my supplier and one of us can't read a tape measure.
I got 12 pcs of 10 1/8 x 20 1/8 and I need 10x20, you ever try to cut an 1/8" of glass off? Grrrrrrr.Hope to install the sash today if the gods are willing, the next one coming out to the shop is 3o' in the air. Been painted shut for 100 yrs, I LOVE removing them and the stops...not.Spheramid Enterprises Architectural Woodworks
Repairs, Remodeling, Restorations
"If Brains was lard, you couldn't grease much of a pan"Jed Clampitt
View Image
The saw is a Jorgensen. Decent saw on a miter box that is too small for most serious work.
hey basswood,
I finally got some pictures of the jack miter jig I built for storm windows this last winter. Sorry about the picture quality, maybe time for a new camera. Here goes:
This is a shot of a stile and rail. I ran a door profile on the shaper and cut out the back in order to put glass in with stops.
View Image
This is the 45 chamfer bit that I removed the rub bearing and ground the top down flat:View Image
The jig. The toggle clamps hold the piece in place, and the router is guided betreen the rails.View Image
http://www.rdwoodworks.com
http://www.freewebs.com/glenndalepedalplane/
Edited 8/11/2009 9:39 pm ET by MRockwell
A pic of the stile in the jig
View Image
Here is a close-up of the stile in the jig, with the reference mark lined up with the edge of the chamferView Image
reference mark, the width of the face of the railView Image
http://www.rdwoodworks.comhttp://www.freewebs.com/glenndalepedalplane/
A pic of the router in the slotView Image
Here is after I cut a few passesView Image
A shot of the stile out of the jigView Image
http://www.rdwoodworks.comhttp://www.freewebs.com/glenndalepedalplane/
This is the rail, which I have cut off the profile at 45 on the miter sawView Image
To join the stiles and rails, I used a 10x50 dominoView Image
A picture of the finished jointView Image
A little better picture of the joint opened up...love the domino!View Image
http://www.rdwoodworks.comhttp://www.freewebs.com/glenndalepedalplane/
Most Excellent Mitch!It looks like it works very well, nicely done.The Domino is on my list... unfortunately someone keeps putting the list under a pile of bills.Cheers,Brian
unfortunately someone keeps putting the list under a pile of bills
ROFLMAO!! that's it! You've solved the mystery - I wondered where my list (with the domino, the band saw, the drill press, the...) went. There it is, on the bottom of my big stack of bills!
View Image bakersfieldremodel.com
Uh... Yep. I won't be buying any tools for a while. Unless a job both demands it and pays for it. Today I axed our land line and switch to basic cable... will save $60/mo. Cutting deep. ;o)
I must have been posting as you were.
The jack mitres look real good.
BTW, I only use a bench rule for shop work.
Chuck Slive, work, build, ...better with wood
Thanks Chuck,I bring a bunch of bad carpenter habits into the shop with me... still use all sorts of crude tools and methods from the jobsite. I'm a late arrival in the woodshop. ;o)Cheers,Brian
Interesting design and nice work. I make some casing, usually for older homes, or where an architectural feature needs to be dealt with. Most people don't appreciate it around here where I am. They want the least expensive and that's about it.
I did decide last week that I'm going to start making more of my own stop molding. I needed a set for a door, and that stuff's expensive! It cost me about $20/set for clear SYP. I didn't pay much more than that for the 1x6 that was used for the jamb. It's also pretty easy to make.
By the way, what kind of router table do you use? Custom or store bought? I've been working with a borrowed one - can't recall the name. It's a greyish mica box, pretty heavy and stable. But I have 2 or 3 different plans for others. I keep saying I'm going to build one...someday.
Don K.
EJG Homes Renovations - New Construction - Rentals
Thanks Don,I don't have a great router table, but I do use featherboards and I've developed a "human powerfeed" technique (smooth, continuous, hand-over-hand feeding). I also do a beveled rip to remove all the stock possible on the table saw first. If the router has little work to do the results are better.
That's an attractive profile (the wood's not yours).
Are you replicating and old one or is it your design?
Got pretty close to the photo in my reply to Danno.Cheers,Bass
Brian
Thanks for the pics.
I used to build alot of my own profiles with a table saw and a molding head. It's really fun.
But as others have said bottom dollar and people don't care too much anymore.
I do get an occasional old profile that has to be replicated.
It's hard for me to find wood that matches the old pine or the old oak.
Rich
It is interesting how we have done away with adding any detail to homes. They are all cookie cutter homes. If we can't buy ready made then you don't need it. Awesome work though. I looked at some molding for a coffered ceiling and for me it is cheaper to make my own than buy it.
I built all the trim for our living room myself. Used some ones article out of FHB.. Beaded with a butt-miter joint casing, beveled backband and chair rail.
Thanks, I like the challenge of figuring out how to mill a nice profile with my limited tooling.
This is paint-grade (Yellow-poplar), so fortunately I just had to worry about the profile...grain and stain is another kettle of fish.
Brian,
That looks really good.
Did you have to do a bunch of hand sanding? When I mill moulding I usually spend more time sanding than cutting.
Chuck S
About 3 hours sanding (see post to Danno). One tip is that if the steps are equal, the "noses" are in a straight line and can be eased slightly with a 1/4 sheet sander... this leaves less hand sanding. I used a thin 3M sanding sponge and squished a finger into each of the three steps and hand sanded all the steps at the same time.
Nice work. I like doing things like that.
Family.....They're always there when they need you.
Thanks, you probably see some of this kind of thing in your area too.
nice work and a good looking molding.
Thanks for the kind words.Bass
Painters finished today... so I took a few pics:
Nice! Love that quatersawn oak door, too. Unusual panel configuration.View Image bakersfieldremodel.com
I wish I had a before pic of the 60's ranch casing that was on that opening. This suits the door mo betta.
I wish I had a before pic of the 60's ranch casing that was on that opening
mmm, you're making me hungry for cobb salad!View Image bakersfieldremodel.com