Temporary Bracing for a Vaulted Ceiling…A NEW REPLY For CALVIN!!!
Marc_B
| Posted in Construction Techniques on
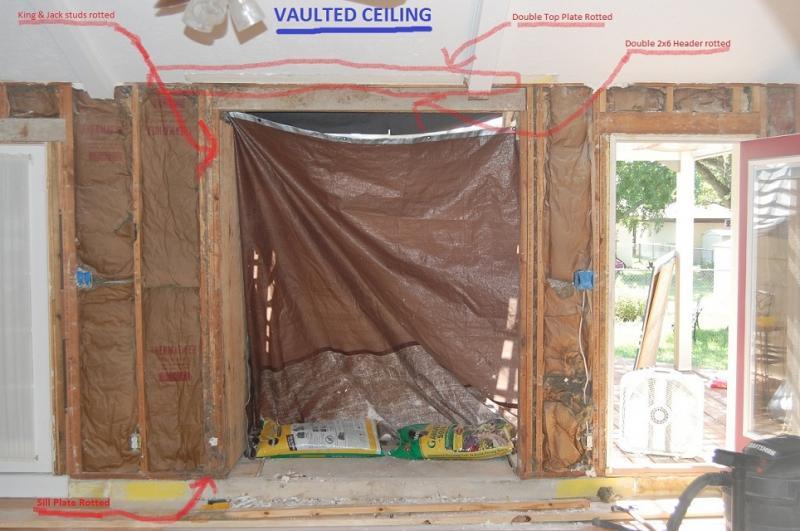
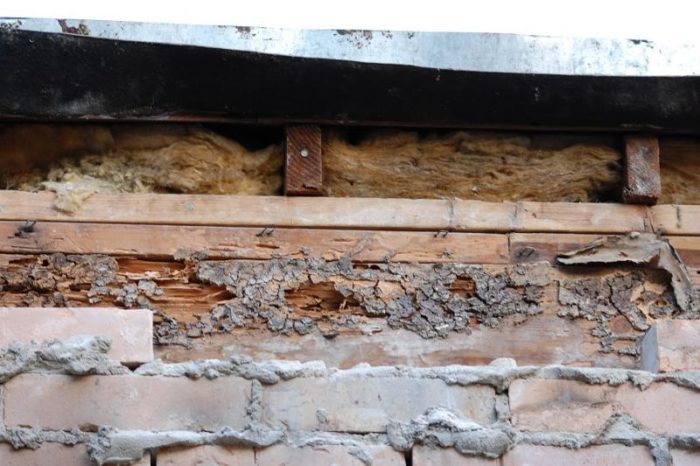
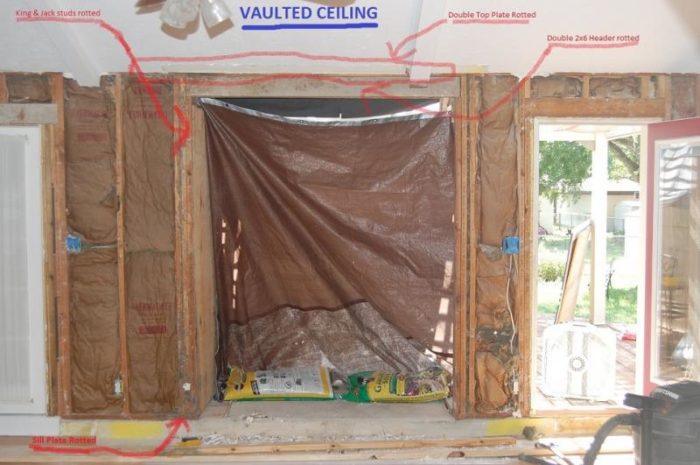
I recently removed a 6′ wide fireplace and chimney on an exterior wall to make room for a 6/0 window and 5/0 French doors. After removing the brick veneer inside I discovered a double 2×6 header(w/o a plywood spacer)sitting above the firebox and directly below a double 2×4 top plate. After removing the remainder of the entire fireplace and chimney I discovered that the roof flashing around the chimney had been leaking for quite some time. This resulted in severe water and termite damage to the double top plates, the 2×6 header, the adjacent king and jack studs and a portion of the sill plate.
It is a slab foundation with a 5″ sunken room. It is all 2×4 stud wall construction.
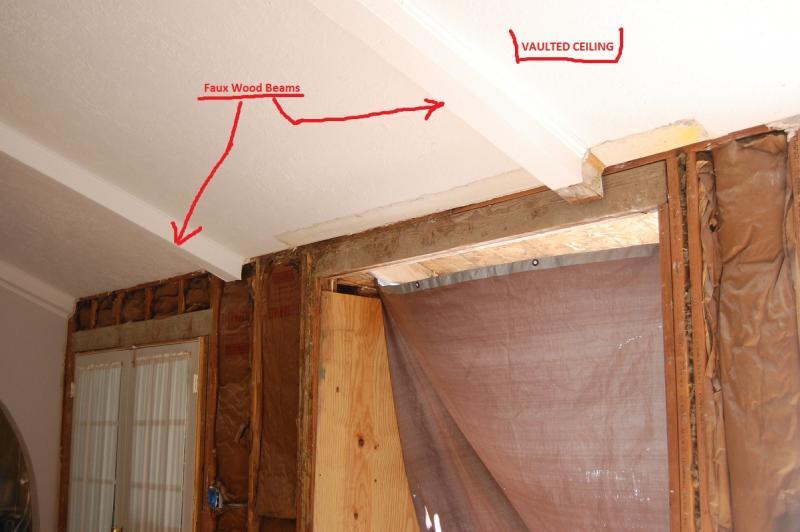
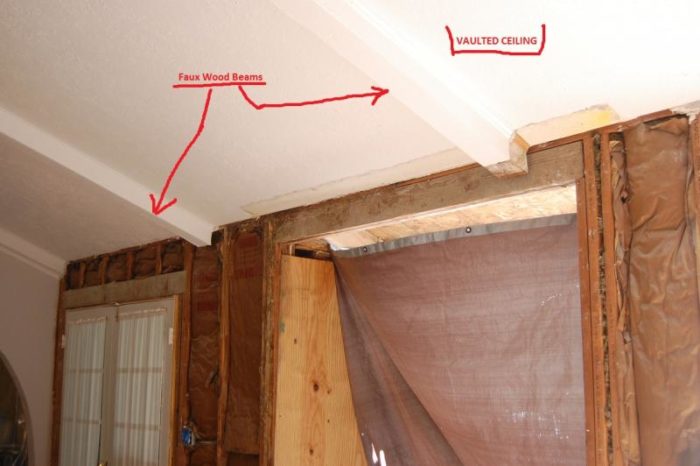
I need to replace all of the affected framing and to add additional framing for new winows and patio doors, but I am not certain how to best provide temporary bracing to the vaulted ceiling(see the attached pics).
Any advice would be appreciated.


Replies
temp bracing
You could build a temporay wall parallel to the existing wall leaving enough space work. Install a wide top plate (2x6 or wider) flat against the sloped ceiling to destribute the load so as not to damage the existing ceiling.
Cut the studs to the same pitch as the ceiling. Make sure you are supporting all of the joist/rafters that are now bearing on the area you will be repairing. From the pics, you may have to make it in more than one piece. You would need only to have enough screws to keep the plate in place until you installed the studs.
I don't know what the existing finish floor is, but you would not have to anchor the bottom plate to the floor. If it is carpet, no problem. If wood, then put carpets remnants or something under the plate to protect the floor.
Marc
I'll agree with the temp wall plan, but would firmly attach that plate to each rafter. With the ceiling angle it would be easy to "kick out" the wall with either you and the material or perhaps even the weight of what you are trying to support. Much less critical on the floor, but if concerned, run a flat kicker back to your existing plate at each end. Don't trip over it.
Figure your header size, you just might want to increase the depth according to the opening size and load. Better now than later.
Don't use drywall screws
_________________________________________________________________________________
Temporary Bracing for a Vaulted Ceiling
OOPS & Calvin thanks for the feedback. I am considering removing the two Faux beams that are currently in the way of having an uninterrupted temporary support wall. Since I will be reframing the entire wall for new doors and window, as well as repairing the rotted framing pieces, I am thinking or supporting the entire width of the ceiling. It is 22' wide so I am thinking of attaching a 2x10 to the ceiling about 2' back from the exterior wall and anchoring it to each and every rafter(no drywall screws...lol). I think I'll add a 3/4" plywood scab along the entire temp plate on the back side in order to further secure the temp studs and make sure that they do not "kick out" at the top and flat kickers against the bottom plate over to the existing wall plate to anchor the bottom(See attached drawing).
Please let me know what you think.
Mark
That shouldn't go anywhere.
I would perhaps use something thinner and less apt to squash down when weight is applied, to protect your wood floor.
Here's what I do to protect hardwood.
I use a construction paper (whose name escapes me now-thick paper, in a roll available from my drywall supply (not RED rosin paper as I've seen that bleed when wet. I tape it down to the floor (release tape) tight to the walls so nothing gets down under it to scratch the floor.
Then I place 1/8" masonite on top and tape the seams on that. Now I've got a broom ready, vac. available surface. I'll put drops down also if trying to catch debris.
I'd work in sections rather than tear the whole side of the house off. Reframe with headers and move over. I assume you'll do the work from inside and leave the exterior? or is the replacement you're doing too extensive?
Best of luck.
Calvin,
Thanks again for the feedback. The 6' wide open portion(where the fireplace was and contains the damaged header and top plates) is open on both sides and will be framed for a 6/0-6/0 double casement window. Then I'll put in additional headers on both sides of that two 5/0-6/0 double patio doors. The part that I am most concerned about is removing and replacing the rotted top plates over the now opened rotted 6' wide header. I am not sure at this point where best to cut out the rotted sections and splice in the new replacement pieces.
What do you think?
SEE PICS BELOW
Marc
Why don't you see if you can leave the top most plate-if it's just a bit cosmetic-leave it there. Saw off the nails of the lower top plate and get it out. Make your header bigger-run it up to the upper most top plate.
When framing, I'll stagger the joints in the two plates-I'd like to do it in your case also.
if you can.
For all your headers, set the top of the window height and run solid header up to a single plate-it has to symplify the reconstruction.
In stud areas, stack frame. Put a stud under each rafter, single plate then allowed. Double if you don't stack frame...............
I think.
That's the way I was taught but they might have closed the school.
Calvin...again, Thanks for all of the valuable advice. Great idea about leaving the upper-most top plate. I took a closer look at it just now and it is a little"punky" in one spot, about 8" wide and about a 1/2" deep, but it is mostly sound. It is near a butt joint, which is only about 30" from the joint in the lower top plate. I really like your idea of removing, but not replacing the lower top plate. I had planed on using a SYP KD doubled up 2x12 with a 1/2" OSB spacer for the header anyway. One question though: if I do that, after the new header is in and situated right below the somewhat damaged uppermost top plate, should I then remove about a 4' section of the plate(including the somewhat damaged area)which would give me two butt joints in the plate over the 6' wide header or should I just leave well enough alone? See Pic Below
Marc
Let me tell you that you have to be the best at giving initial information and the followup is even better.
Thank you.
and sorry for the prior mispellings-last game of the year for my ball team-couldn't take my eyes off it for long, for fear we might score a run.................
For the rot:
I would leave it I believe, you are losing almost zip in structural integrity. Most I would do would be to use my multimaster and carve out the half inch and let in a pc........................but probably not. It might play havoc later if you forget when you hang your wall board. You could take an inch and a half boring bit-put a pc of tape at the proper depth and drill it out to solid. Then chisel the thing square and let in a pc.........................
It'd be more important to leave the straight-rafter attached to it top plate as is I think, than to cut out a full width section of the top plate..
Are there existing studs sitting right under the rafters? If not, when you reframe-put 'em there.
In the last picture, what side of the wall is that ? and what is the thing with the footprint and what is that horizontal member?
How bad is the lower portion of that wall?
Thanks Calvin
I appreciate the compliment. I always try to make my questions as clear as possible and to lay out the facts and details as best I can. I know that it sure helps me to have as much info as possible when trying to answer someones question. Truth be told, I think it is really just my OCD kicking in...lol. And don't worry about the mispellings, the only thing that saves me from them is SpellCheck..lol.
I agree with your thinking about leaving the uppermost top plate alone. I would say that in that area the plate is about 80% solid. You make a good point that I might do more harm than good in trying to remove it.
Now, to answer your questions: In the last pic I posted, the view is from the outside, where the old chimney stood. The footprint piece to the right and the horizontal member across the top are both temp pieces that are currently holding up a temporary piece of decking with felt in order to close in the top temporarily. We had quite a bit of rain here over the weekend and might be getting more. Along that entire wall(22') I would say that only about half of the studs are positioned directly below the rafters. Yes, I will be changing that as I completly reframe the wall. Fortunately, there is only a small 12" or so section of the sill plate(right under the king and jack studs supporting the left hand inside corner of the header)that is in need of being replaced.
Marc
Marc
Where's your location-if it's in NW Ohio, call me and I'll come over. My fingers are starting to stiff'n up.
Boy...I wish I was close to you. I would really like to meet you and could certainly use your help and expertise, and we are about the same age..62 here. Unfortunately, I am a bit south of you...in TEXAS...lol.
BTW...another thing. As I said before, on the outside of that wall, where the fireplace/chimney was, is now a 6' x 2 1/2' hole in the roof where I need to extend out the rafter tails and create a new soffit that matches the existing one on the house. QUESTION: should I just cut rafter tail extensions and then tack them to the sides of the rafters that terminate at the header or should I just build an entire section with rafter tailsconnected to a 2x6 running across the back and then fasten that directly to the header?
Marc
The header is there for cut rafters, correct? I'm assuming at this point that the cutout goes back up the roof 2' and is 6' long?
You just need to frame what's necessary to fill in the hole. You'll use the same size extensions as your rafter.
I would keep the layout for these extensions the same as the existing rafters-place hangers up at the header if you feel it is necessary, at the subfascia nail it off. Cut the birsdmouth and fasten to the plate as are the other full sized rafters.
If you can, take back the roofing to an original plywood longside seam-presumably 4' up. You've removed a cricket already as well so you'll need to patch in the shingles higher than that 2'. I would bridge the new plywood over your rafter fill-in, connecting and over the existing rafters-staggering the end of sheet seams.
comprende'?
If the hole in the roof is oriented the other way, patch in the plywood like an inverted T so you stagger the joints in the two pcs of plywood to cover the hole.
Bridging across your fill-in framing to existing rafters with new plywood is what I'm getting at.
Where in Texas?
one other thing
Is this getting inspected? If so, best run all these changes past your inspector. Regional differences as well as the expertise of both me and various imspectors might just possibly not jive.
The key to remodeling is to come up with the most sensible and best method to do the job while also passing your framing inspection.
Removing & replacing the rotted double top plate
After erecting the temporary bracing, what should be the next steps in removing the rotted double top plates & the header?
I just did this exact project on our house. Lots of water damage and rot. Had to replace a lot of the sill plates in the back of the house. My den is almost the same. We attached a 2x6 to the rafters about 2feet from outside wall, then one on the slab floor. Cut 2x4 studs at the ceiling angle and nailed to both 2x6s. Removed the entire wall, reframed and sheathed. We started at 4pm, finished at almost 2am. Took much longer because when we lookd at the king and jack studs on one side of the slider there was no foundation there so off to home depot for quickset!!!
my issue was caused by bad gutters rotting facia and I was amazed at how the header was rotting from he outside just like yours. I was only able to remove up to my fireplace since I wasn't rebuilding that. I wish I hadn't just had the roof done the week before because I would have added rafter tails and a soffit. Can't understand why they built houses without them.