FHB Logo Facebook LinkedIn Email Pinterest Twitter X Instagram Tiktok YouTube Plus Icon Close Icon Navigation Search Icon Navigation Search Icon Arrow Down Icon Video Guide Icon Article Guide Icon Modal Close Icon Guide Search Icon Skip to content
Subscribe
Log In
  • How-To
  • Design
  • Tools & Materials
  • Restoration
  • Videos
  • Blogs
  • Forum
  • Magazine
  • Members
  • FHB House
  • Podcast
Log In

Discussion Forum

Discussion Forum

Thicken the pocket walls

Gene_Davis | Posted in Construction Techniques on July 8, 2007 05:58am

I like using pocket doors as solutions for doors with no good place for a swing, but I don’t like the flimsy feel of one done in a 2×4 framed RO, with only those sheetmetal-wrapped sticks as wall frame for the pocket.

Having used a couple techniques for beefing up the pocket walls, I thought I would solicit ideas for more ways.

Shown here are two ways I’ve done it, and one that I have considered.

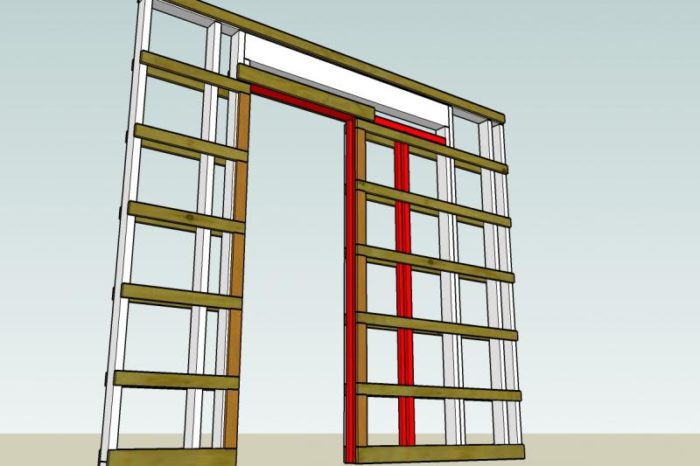
The pic “pocket 5Q” has a 2×6 frame for the wall, and 5/4 boards are used to fur out the pocket to the face of the studs. Pretty easy, pretty fast, and no ripping of any material required. In lieu of buying 5/4 stock, you can just rip some stuff out of framing lumber on your tablesaw.

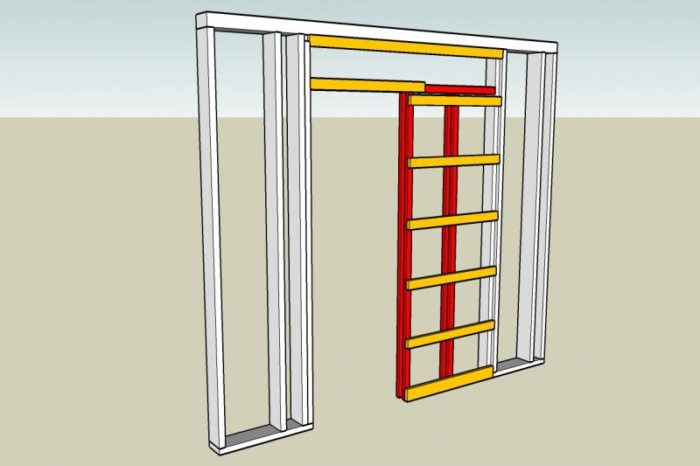
“Pocket ply” shows how I’ve done it using plywood over the pocket panel, but to use 3/4 CDX, you first need to rip your 2×6 framing to 5″, taking about as much time as if you didn’t rip the framing, but cut twice the ply panels, sheeting the pockets with two layers of 1/2″ sheet material.

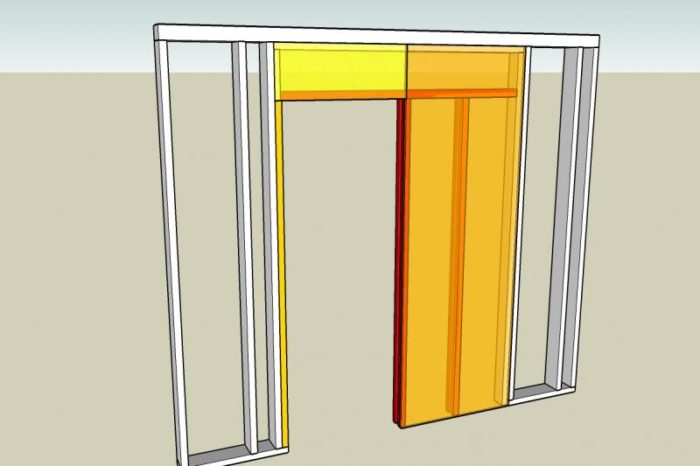
Then there is the use of 2×4 for the whole wallframe, then strapping the whole thing with 1x strips, shown in the pic “pocket frame.” I haven’t done this, but it may have some appeal to the New England crowd, who seem to strap everything. Everything.

What do you do?


Edited 7/8/2007 7:34 am ET by Gene_Davis

Reply
  • X
  • facebook
  • linkedin
  • pinterest
  • email
  • add to favorites Log in or Sign up to save your favorite articles

Replies

  1. davidmeiland | Jul 08, 2007 07:43pm | #1

    Gene, the last pocket door I framed was a double 3/0 opening. I had the room to go to a 2x6 wall, so I did, and installed 2x4 studs on the flat in the pocket area. This was a 16' long wall so there were a few 2x6 studs at either end, but most of the length was consumed by the flat framed opening area. It worked very well. You get a pocket that is plenty wide and if you choose studs carefully it is flat. We rocked with 5/8" both sides. The feel is very solid.

    Never did the math but I guess you could shave it down to a 5" plate if you wanted to rip framing lumber, and if I could get appropriate 5/4 I might try that too. The 5/4 here is VG fir.

    Did a typical Johnson pocket door with the cheesy metal-wrapped "studs" on the same job, a water closet door. Very flimsy stuff by comparison, barely even tract house quality.

  2. shellbuilder | Jul 08, 2007 09:18pm | #2

    I like doing it whatever way I can get electrical boxes near the  jambs. Sucks when double pocketdoors get installed and you walk 3 and 1/2 feet tryig to find a switch


  3. woodway | Jul 08, 2007 10:54pm | #3

    We had problems with pocket door frame bowing inward toward the door. It was finished wall and when the frame made contact with the slider, it left marks on the door. What a pain. To solve our problem, we tried to frame all pocket door walls with 2 X 6 lumber then we did what you did in your first example or covered with plywood and fur out the plywood flush to the rest of the wall. When we furred out the frame with 5/4 material, like you suggest in your first example, we did it vertically from floor to ceiling and we always added 3/4 plywood between to ease addition of TP holder or whatever. Never had problems with frame contacting slider after that. We also used trim head screws on one side in the overhead trim above the opening to allow later access to the door if it needed adjustment.

    The whole thing was a pain to do and required a lot of extra time but the extra time was more than made up if we had to fix problems later.

  4. User avater
    Joe | Jul 08, 2007 11:14pm | #4

    Gene,

    this is what it would look like in real life.

    http://joes-stuff1960.blogspot.com/
    http://www.josephfusco.org
  5. Piffin | Jul 09, 2007 12:28am | #5

    I am not sure what all the extra strapping would add for strength there.

    Using studs turned sideways to gives plenty room for a work box and wireing

    I have never really had much trouble getting solid walls with Johnson stuff. Every now and then there is a poor steel wrapped stud, but I have done so many of them where I need to use my own studding or plywood instead, I always have some of those left over. Probably 5 or 6 six in the shop attic right now.

    But when it has to be a 2x4 wall thickness I use their wrapped studs.I do some things that does make it work out stronger though.

    Sometimes I use an extra pair so the layout is closer.
    But the main thing is that when we hang the SR, we rip a couple of shims that are about 1/4" wider than the door space is supposed to be - about 2-1/4" We fit them in where the door pocket is betweeen the kit studs. Then we use PL premium on the studs.

    What this does is to introduce a lamination bow out slightly to the assembly that makes it somewhat stronger against lateral loading in the way that crown ups on floor joists resists loading better. It also gives insurance that it is less likely that the kit studs will ever warp the wrong way.

    I work in a lot of older homes where the old studs are full 4" or 3-7/8" + lathe. So my favorite trick there is to use the Johnson door frame and then go over that whole assembly with 3/8" up to 3/4" plywood, glued with the introduced crown/bow. Thickness of the plywood depends on what I need to make up the wall thickness flush to the existing. Then the SR or plaster board over that.


    Welcome to the
    Taunton University of
    Knowledge FHB Campus at Breaktime.
     where ...
    Excellence is its own reward!

  6. IdahoDon | Jul 09, 2007 01:28am | #6

    For a 2x6 wall I'll have roughly 3 verticle 2x6's on edge on each side of the pocket roughly 10" to 12" oc.

    The 4 studs closest to the opening are ripped down the middle, on side is turned 180 degrees and they are glued and screwed back together. As the stud dries the reversed grain counteracts much of the crowning.

    Any structural header is installed as high as possible and the studs are run full height to the bottom of the header or top plate.  Full height studs will be twice as stiff compared to those cut the height of the opening.

    A center floating door track header is ripped to 2-1/2" (5-1/2" minus 3" for the studs) and long enough to span from back of pocket completely to other side of door opening and doubled up for stiffness.   It's fancier to cut it wider at the door opening so it serves as a sheetrock and door trim nailer, but that can be added as scrap 2x as well.

    The key to this system is the floating track header.  When all the studs are screwed into it they lock the whole works together into a door opening that's very stiff.  This type of header is also extreamly easy to level.  Since the floating header also spans the entire pocket opening it counteracts any bending on the studs so the studs are locked in at top bottom and sorta close to the top. 

    It takes about as long to frame this way as it does to write it up and in 10 years of custom building I have yet to see a faster and stiffer method for 2x6 construction.

    Best


    Beer was created so carpenters wouldn't rule the world.

  7. User avater
    xxPaulCPxx | Jul 09, 2007 02:39am | #7

    You could get 3/4" wide 16ga. cold rolled steel channel, glue and screw it to the edges of the existing pieces.  Stiffness without adding size,

    Rebuilding my home in Cypress, CA

    Also a CRX fanatic!

    Parenting has always been a mix of sage life advice and inexcusable laziness.

Log in or create an account to post a comment.

Sign up Log in

Become a member and get full access to FineHomebuilding.com

Video Shorts

Categories

  • Business
  • Code Questions
  • Construction Techniques
  • Energy, Heating & Insulation
  • General Discussion
  • Help/Work Wanted
  • Photo Gallery
  • Reader Classified
  • Tools for Home Building

Discussion Forum

Recent Posts and Replies

  • |
  • |
  • |
  • |
  • |
  • |
View More Create Post

Up Next

Video Shorts

Featured Story

Two Ways to Test Windows

New devices showcased at the Builders' Show make it easy to measure glass performance, u-factor, SHGC, window thickness, and more.

Featured Video

A Modern California Home Wrapped in Rockwool Insulation for Energy Efficiency and Fire Resistance

The designer and builder of the 2018 Fine Homebuilding House detail why they chose mineral-wool batts and high-density boards for all of their insulation needs.

Related Stories

  • Midcentury Home for a Modern Family
  • The New Old Colonial
  • Modern and Minimal in the Woods
  • Bryce Hollingsworth, Dry-Stone Waller

Highlights

Fine Homebuilding All Access
Fine Homebuilding Podcast
Tool Tech
Plus, get an extra 20% off with code GIFT20

"I have learned so much thanks to the searchable articles on the FHB website. I can confidently say that I expect to be a life-long subscriber." - M.K.

Get home building tips, offers, and expert advice in your inbox

Signing you up...

This site is protected by reCAPTCHA and the Google Privacy Policy and Terms of Service apply.
See all newsletters
See all newsletters

Fine Homebuilding Magazine

  • Issue 333 - August/September 2025
    • A Practical Perfect Wall
    • Landscape Lighting Essentials
    • Repairing a Modern Window Sash
  • Issue 332 - July 2025
    • Custom Built-ins With Job-Site Tools
    • Fight House Fires Through Design
    • Making the Move to Multifamily
  • Issue 331 - June 2025
    • A More Resilient Roof
    • Tool Test: You Need a Drywall Sander
    • Ducted vs. Ductless Heat Pumps
  • Issue 330 - April/May 2025
    • Deck Details for Durability
    • FAQs on HPWHs
    • 10 Tips for a Long-Lasting Paint Job
  • Issue 329 - Feb/Mar 2025
    • Smart Foundation for a Small Addition
    • A Kominka Comes West
    • Making Small Kitchens Work

Fine Home Building

Newsletter Sign-up

  • Fine Homebuilding

    Home building tips, offers, and expert advice in your inbox.

  • Green Building Advisor

    Building science and energy efficiency advice, plus special offers, in your inbox.

  • Old House Journal

    Repair, renovation, and restoration tips, plus special offers, in your inbox.

Signing you up...

This site is protected by reCAPTCHA and the Google Privacy Policy and Terms of Service apply.
See all newsletters

Follow

  • Fine Homebuilding

    Dig into cutting-edge approaches and decades of proven solutions with total access to our experts and tradespeople.

    Start Free Trial Now
    • Facebook
    • Instagram
    • X
    • LinkedIn
  • GBA Prime

    Get instant access to the latest developments in green building, research, and reports from the field.

    Start Free Trial Now
    • Facebook
    • YouTube
  • Old House Journal

    Learn how to restore, repair, update, and decorate your home.

    Subscribe Now
    • Facebook
    • Instagram
    • X

Membership & Magazine

  • Online Archive
  • Start Free Trial
  • Magazine Subscription
  • Magazine Renewal
  • Gift a Subscription
  • Customer Support
  • Privacy Preferences
  • About
  • Contact
  • Advertise
  • Careers
  • Terms of Use
  • Site Map
  • Do not sell or share my information
  • Privacy Policy
  • Accessibility
  • California Privacy Rights

© 2025 Active Interest Media. All rights reserved.

Fine Homebuilding receives a commission for items purchased through links on this site, including Amazon Associates and other affiliate advertising programs.

  • Home Group
  • Antique Trader
  • Arts & Crafts Homes
  • Bank Note Reporter
  • Cabin Life
  • Cuisine at Home
  • Fine Gardening
  • Fine Woodworking
  • Green Building Advisor
  • Garden Gate
  • Horticulture
  • Keep Craft Alive
  • Log Home Living
  • Military Trader/Vehicles
  • Numismatic News
  • Numismaster
  • Old Cars Weekly
  • Old House Journal
  • Period Homes
  • Popular Woodworking
  • Script
  • ShopNotes
  • Sports Collectors Digest
  • Threads
  • Timber Home Living
  • Traditional Building
  • Woodsmith
  • World Coin News
  • Writer's Digest
Active Interest Media logo
X
X
This is a dialog window which overlays the main content of the page. The modal window is a 'site map' of the most critical areas of the site. Pressing the Escape (ESC) button will close the modal and bring you back to where you were on the page.

Main Menu

  • How-To
  • Design
  • Tools & Materials
  • Video
  • Blogs
  • Forum
  • Project Guides
  • Reader Projects
  • Magazine
  • Members
  • FHB House

Podcasts

  • FHB Podcast
  • ProTalk

Webinars

  • Upcoming and On-Demand

Podcasts

  • FHB Podcast
  • ProTalk

Webinars

  • Upcoming and On-Demand

Popular Topics

  • Kitchens
  • Business
  • Bedrooms
  • Roofs
  • Architecture and Design
  • Green Building
  • Decks
  • Framing
  • Safety
  • Remodeling
  • Bathrooms
  • Windows
  • Tilework
  • Ceilings
  • HVAC

Magazine

  • Current Issue
  • Past Issues
  • Magazine Index
  • Subscribe
  • Online Archive
  • Author Guidelines

All Access

  • Member Home
  • Start Free Trial
  • Gift Membership

Online Learning

  • Courses
  • Project Guides
  • Reader Projects
  • Podcast

More

  • FHB Ambassadors
  • FHB House
  • Customer Support

Account

  • Log In
  • Join

Newsletter

Get home building tips, offers, and expert advice in your inbox

Signing you up...

This site is protected by reCAPTCHA and the Google Privacy Policy and Terms of Service apply.
See all newsletters
See all newsletters

Follow

  • X
  • YouTube
  • instagram
  • facebook
  • pinterest
  • Tiktok

Join All Access

Become a member and get instant access to thousands of videos, how-tos, tool reviews, and design features.

Start Your Free Trial

Subscribe

FHB Magazine

Start your subscription today and save up to 70%

Subscribe

Enjoy unlimited access to Fine Homebuilding. Join Now

Already a member? Log in

We hope you’ve enjoyed your free articles. To keep reading, become a member today.

Get complete site access to expert advice, how-to videos, Code Check, and more, plus the print magazine.

Start your FREE trial

Already a member? Log in

Privacy Policy Update

We use cookies, pixels, script and other tracking technologies to analyze and improve our service, to improve and personalize content, and for advertising to you. We also share information about your use of our site with third-party social media, advertising and analytics partners. You can view our Privacy Policy here and our Terms of Use here.

Cookies

Analytics

These cookies help us track site metrics to improve our sites and provide a better user experience.

Advertising/Social Media

These cookies are used to serve advertisements aligned with your interests.

Essential

These cookies are required to provide basic functions like page navigation and access to secure areas of the website.

Delete My Data

Delete all cookies and associated data