I will be tiling my Jacuzzi deck with DalTile “keystones” mosaic tile, in 2×2 size. Around the curved turns, I will be needing to make some angled cuts on these small tiles. What is the best tool and technique for this cutting?
Discussion Forum
Discussion Forum
Up Next
Video Shorts
Featured Story
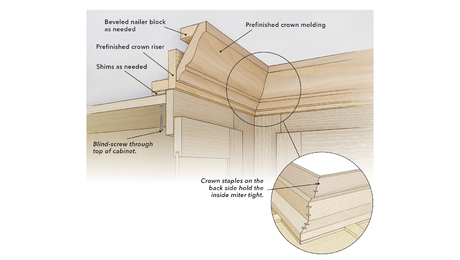
Use these assembly techniques when installing crown risers and molding to minimize visible gaps and nail holes.
Featured Video


Highlights


"I have learned so much thanks to the searchable articles on the FHB website. I can confidently say that I expect to be a life-long subscriber." - M.K.
Fine Homebuilding Magazine


Fine Home Building
Follow
-
Fine Homebuilding
Dig into cutting-edge approaches and decades of proven solutions with total access to our experts and tradespeople.
Start Free Trial Now -
GBA Prime
Get instant access to the latest developments in green building, research, and reports from the field.
Start Free Trial Now
- Home Group
- Antique Trader
- Arts & Crafts Homes
- Bank Note Reporter
- Cabin Life
- Cuisine at Home
- Fine Gardening
- Fine Woodworking
- Green Building Advisor
- Garden Gate
- Horticulture
- Keep Craft Alive
- Log Home Living
- Military Trader/Vehicles
- Numismatic News
- Numismaster
- Old Cars Weekly
- Old House Journal
- Period Homes
- Popular Woodworking
- Script
- ShopNotes
- Sports Collectors Digest
- Threads
- Timber Home Living
- Traditional Building
- Woodsmith
- World Coin News
- Writer's Digest

Replies
If you make a template out of cardboard, scribed to the exact radius required, you can trace the line onto the tiles.
Depending on the type of tile, degree of rad, etc., you might need to nibble the curve out. I like to use an angle grinder with a diamond blade. It might be tough to clamp the pieces down enough to handle the vibration of the grinder.
Some guys swear by the rotozip/ rotary tool, but I don't like it.
Good Luck rg
I have some diamond drum grinders I bought from harbor freight for seven dollars. The set came with a 3/4 and 1 inch drum and even though they are poorly balanced I have run them in my drywall cut out tool with great results (it will take its toll on the bearings I know). They last surprisingly long, even dry grinding granite so they should do fine on ceramic tile.
You can also get 3" silicon carbide sanding drums but you would be looking at a lot more money for a product that isn't any better than the diamond drums. Actually for tile you could probably get by with aluminum oxide drums from your local hdwe store.
Braxton Bragg (look up online) has silicon carbide grinding stones in 2", 4" and 5" in a variety of grits. I would recommend sixty or eighty grit. You will need a tool with a 5/8-11 spindle and slower speed than 5000 rpm. It takes some practice with a wheel dressing tool to balance a brand new grinding stone so I don't strongly recommend these grind stones. If you don't balance them first they will bounce against the edge of the tile/stone like a hammer and drive you nuts with the resulting chips.
Look up diamond drum on Harbor freights webpage. Rough out the curves with a diamond blade on your tilesaw or angle grinder and clean them up with the drum.
karl
I may have misinterpreted your question. I thought you wanted curves but upon second reading it sounds like you want to cut angles. If so disregard the above suggestions and just use a diamond blade. If you haven't seen one, look into the flush mounting diamond blades for angle grinders. They make getting into difficult corners much easier.
Edited 10/4/2003 9:54:24 AM ET by karl
The tub shape is a big oval, and the tiles will tuck under the tub flange lip so that the cut edges will not be seen. A tooled white silicone caulk will dress the joint between the tiled surface and the acrylic tub lip.
I expect none of the cuts will need to be curved. I am just wondering what is the easy way to cut (parallel or angled) these little 2x2 tiles. I can borrow a big wet saw, but how to jig and hold these little guys for the cuts, is something I don't know about.
If you are using 1/4" ceramic, almost any cut can be made with a standard score and snap tool; just set the tile at the angle you need against the breaker bar. Or score the piece freehand with a carbide scoring tool. If the smoothness of the cut doesn't matter, just nibble the extra off.
rg
Micro, if I understand correctly, you have several 2x2's on a mesh sheet. If so, water likes to dissolve the adhesive on the mesh therefore you should cut out of the sheet those tiles you need to cut and free hand set the cut pcs into their place. Set the uncut meshed tiles b/4 or after, whatever is easier. After you cut away the ones you are cutting, peel them off the mesh and cut separately.Remodeling Contractor just outside the Glass City.
Quittin' Time
I don't do much tile work but I used Dal hexagonal mosaic tile for my bathroom floor. They were porcelain ie very hard so I cut the sheets of mosaic tile on my wet tile saw. You could also lay the tile so they overhang the edge and after the thinset and grout cure use an angle grinder or 4" circular saw with a diamond blade to cut the overhanging tile back to the desired line. If the mosaic are glued to mesh backing you could even cut the sheets of tile in curves, angles or whatever prior to setting. I would probably use the small handheld diamond circular saw just because that is what I use more often in my work.
There is a lot of ways to skin this cat.
Karl
hand nipper.
then a quick touch up on the wet saw ....
sometimes for around a shower drain the pieces get so small you'll burn your fingertips as you dress the tiles ... but that's the price of near perfection.
I have pretty good luck .. for straight cuts .... but running the whole sheet thru the small wet saw ... slowly and surely. That only works for glue dabs .. not paper backed.
Either way .. I hate cutting small tiles.
Jeff
Buck Construction Pittsburgh,PA
Fine Carpentery.....While U Waite
I've had luck using an angle grinder with diamond blade. You seen those "router/sanding mats" ?
I took an old one, cut it, glued it up to a 1x6 to hold the tile sheet down,
draw your line across the sheet and place the board padded side down near the cut line.
Put the sheet on a scrap of piece 3/4 ply for a backing
you can hold the tiles in place and cut your line. with out having your fingers get to close to the business end.
least it worked for me.
never tried it on a real tight radius though....
good idea.
JeffBuck Construction Pittsburgh,PA
Fine Carpentery.....While U Waite
Jeff
This is interesting to me, because I just started a full basement finish job this week and one part of it is a new bathroom with an oversized tiled shower. I've done a lot of tile work 90% working with small tiles (1x1 and 2x2's and 1¼ octagons)--but this'll be the first tiled shower. So I've got a few points I want to get cleared up while I'm still laying the sleepers and framing the partitions....
I'm planning on using a Pro-slope insert or something similar to get the slope for the drain. This will be set directly on the concrete floor slab (the shower itself will be a 'well' in the bathroom; no sill, just a 3" drop from the built-up floor elsewhere). I have to cut a trench in the slab and re-locate the waste pipe; but only a foot or so, that's no big problem. My plumbing sub and IMERC both say no problem for the buried s-trap; we'll use 2" abs and it ought not to plug up with hair....
So, Questions:
1. How is the slope insert attached to the concrete floor? Tap-cons and mastic or thinset?
2. My plumbing sub suggests laying in a piece of Black Joe under the membrane to protect it from the concrete. But if I'm using the Pro-Slope, that shouldn't be necessary, right?
3. Are most shower pan membranes compatible with Versabond or Full Flex? If now, what would you use? I assume I can't use a mastic tile adhesive like Lepage's Pro.
4. If I read things right, I've gotta have the weep holes in the drain body below the membrane. Confirm?
5. Since I won't have a sill, my upturn at the entry to the shower will just run up the 3" step and then across the subfloor for another 3-6" to die there; bathroom floor tile will be the same as shower floor tile anyway (1x1 hex--talk about cutting lots of little tiles!!! Daltile used to have 3 - or 4-point halves available but the local supplier never heard of 'em, so....)
6. Finally, the surround wall inside the bathroom for the shower will be built out of glass block, set right on the floor tile. (That wall will rise right through the ceiling, too.) This will be built using the silicone caulk the block manufacturer recommends. I don't see any issues with using the same caulk, or Mulco Flextra, to join it to the tiled walls and floors, do you?
Whaddya think?
Dinosaur
'Y-a-tu de la justice dans ce maudit monde?
If you are going to have a 3" down step into the basin that may not be such a good idea for older folks.
Look into showers for the handicapped.
Put a suface mounted hair screen on the drain.
Who ever invented work didn't know how to fish....
I got to meet the HO's elderly Mom yesterday when they all came up from the states to the 'cottage'. (She's the one who didn't want the high-backed Victorial claw-foot tub.) But she's spry enough to keep the 9- and 11-year-old grandkids at bay, just the same.
I don't figure that a 3" step down could be any harder for her to deal with than a 6" sill to step up and over....
Hair strainer for sure. When I think of the goop I've yanked out of shower drains over the years...! Yuuuuuuuuuuuuuuuuuuuuuuuuuuuuuuuuuuuuuuuuuuuuuuuuuuuuuuuuuuuuuuuuuuuuuuuuuuuuuuuuuuuuuuuuuuuuuuuuuuuuuuuchk!
Dinosaur
'Y-a-tu de la justice dans ce maudit monde?
I agree that the 3" step down is worth reconsidering. When people take their eyeglasses off to shower it can be hard to see. Even a little slip can be serious for an older person. You could have no stepdown at all, just start a slope at the entrance to the shower.
You could also put in a line of tiles at the entrance of a contrasting color to call attention to the change in slope. Maybe carry it up around the opening as a decorative detail.
There will definitely be a noticable visual signal demarking the two different levels of the floor--This is one of my pet peeves in bad design, when idjits put blind dead drops on the other side of doors....
Usually what I do is change the floor colour completely and radically if it works with the overall design; unfortunately in this case DWHO won't let me use so much as a single square inch of black anywhere--so I'm gonna have to get creative here. She's into nice, inoffensive beige tones, ya know...?
I was halfway to Montréal today to pick up the tile order when my pager went off, and the HO told me DW had changed her mind on the wall tile; so I turned around and came back. It's their nickel...but I'm up against a Nov 10 deadline. If we're not finished by then, it's gonna be nights and weekends until we are. I hate that....
Dinosaur
'Y-a-tu de la justice dans ce maudit monde?
Well, beige isn't terrible. And a lot goes with it besides black.
I don't know how near to Ottawa you are, but, since you're into tile, if you are ever in Ottawa there's a good tile store there called World Mosaic. It's a small store, but they have a lot of high-class stuff that most stores don't carry. Not a lot of the same ol' Italian. Who's got an Italian style home in the northeast, anyway? It's in the Glebe section of the city.
I'm closer to Montréal. I'm dealing with Cere Grès for the Daltile items; my local guy for the other stuff. But some of it has to be SO-ed from TO.
Mrs. HO wants white with beige 'accents'.
The beige has to match the stain used on the trim in the rest of the house.
So...it looks like there's going to be a beige accent stripe all around the shower floor. I gotta find a wall tile thick enough to land on that floor and hide the Vees left by the hexes--otherwise I'll have to cut about 250 little bitty eensie-weensie 1x1 hexagonal mosaic tiles smack-dab in half. The offcuts are so small they almost fall into the blade on my wet saw (I got a cheap table-saw style; I don't do enough regular tile work to justify a good wet-trolley saw.)
Dinosaur
'Y-a-tu de la justice dans ce maudit monde?
Put in a break line with a different color and a change in shape... Say a long narrow rectangle.
Do a reverse color to the floor tile.
Who ever invented work didn't know how to fish....
Edited 10/7/2003 12:31:20 AM ET by IMERC
I'm not the right guy to answer your questions.
My tiled showers are all custom sized site built showers .... tile walls and floors....
All with a drypack mud bed floor. Starting at the ply .... I felt.... then lay the preslope mud.
After that sets ... the membrane goes on ... this is installed with a two part clamping drain .... my plumber usually lays the memberane and installs the drain.
The membrane is run out and over the 2x curb ..... and up the walls about 6 inches.
I then lay the diamond mesh .... squeased tight up and over the curb ... helps keep the membrane in it's place... with no fasteners .... I also run the mesh up the walls so the bottom 6 inches of the walls are tied into the shower floor.
Then .... the second layer of drypack .... about an even inch think .... following the slope already set.
That layer of mud is run up the walls ..... making sure the floor/wall joint is square.
Then .... finally ... the tile.
So ... I got no idea about that premade pan ....
Or the best way to waterproof the glassblock/tile joint.
Assuming the glass block actes the same as tile .... a matching tile caulk is what I'd guess would work .... but keep in mind .... the mud bed pan has the membrane running up the walls also .... protecting thjat all important wall/floor junction.
I'd suggest asking this same Q over at http://www.johnbridges.com
Bet someone there's already done something similar.
Sorry I can't be of more help .... out of my element on this one.
JeffBuck Construction Pittsburgh,PA
Fine Carpentery.....While U Waite
everys now and then the light bulb clicks on upstairs.
The bulb for this idea came on right after I took off a good chunk of skin.
Little chunks of tile have a tendancy to cut when they fly out of your hand.
Edited 10/6/2003 8:56:49 PM ET by CAG
You wear safety glasses, too, I hope!
always when cutting tile, doing demo, cutting metal, using a nail gun etc.
and almost always most of the time... not perfect though.
The very first tile job I did I was too cheap to rent a tile cutter. I used a glass cutter, scoring and breaking the tile. It worked fine. You can even do gentle curves.
That's cheap....
Who ever invented work didn't know how to fish....
angle grinder with a diamond blade, takes a deft touch, but just a little practice
caulking is not a piece of trim