I have a large wood ceiling to install in a few weeks. The material is 1 x 6 tongue and groove pondersoa pine. The side that has the V-groove will be the back side with the full face side showing. The room is approximately 40′ wide with a 2-12 pitch from both sides to the center of the trusses. The room is 42′ in length. What would be the best way to start putting this material up. Should we work from the edge at the top of the wall and work towards the center peak, or start at the peal and work down. If starting at the top I dont want to get to the wall and have to rip a small width picece to finsh. It would probably look best if we have a nearly full width piece starting at the wall and going up the run to the peak. The center of the peak will be finished with a 1 x 6 bridging the gap to the two sides of the ceiling. Any help and tips on this would be appreciated.
Thanks
Steve
Update:
Does anyone have any feedback on using a line laser to help them start the first course and also use it to check for straightness of the courses as we are going up the ceiling? I have been looking at the Boscsh GLL2-80.
Additionally, is it necessary to make the end joints meet on a joist? With the tongue and groove configuration, I think the material is capable of remaining in place correctly. I was thinking also that doing this will give us the opportunity to have completely random butt joints. We would take a clean up cut on the ends that are in the field just to ensure that the butt joints are square.
Thanks to those that have replied. Some good points were menioned.


Replies
Steve
Measure closely.
divide by the width of the board.
make adjustments b/4 you start............figure your rip, chalk a line dead straight and equidistant from ridge to wall , exactly.
constantly checking as you go UP.
i'd start at the wall and work up-gives you something to hook the groove on that won't quickly fall on the floor.
check constantly!
So, you have drywall or other sheeting on the ceiling?
More information
We wil be putting the tongue and groove boards directly to the ceiling joist which will have a plastic sheet attached to retain the insulation. No drywall or OSB material. We are having the back side of the material coated with one coat of sealer to help with any potential moisture situation.
T&G ceiling + plastic sheet
I would be wary of the plastic sheet - unless the roof has a breathable membrane under the tiles (etc) or is ventilated. The plastic will not exclude all moisture (from a variety of sources including the walls) from the cavities and could well lead to long term damp and rot problems in the roof structure. I assume that it is not residential as I don't think that would meet current building regs as it would effectively be an improper (unventilated) cold roof design. I would not try to seal it in this way. I think the T&G used alone will allow enough damp migration - it will exclude most damp from the hall but also allow the air in the cavities to get rid of excess humidity. If you use the plastic then you should install roof/tile vents in the roof to ventilate it.
Put about 10 pieces together and accurately measure the overall width, then divide to get individual pitch.
Mark your surface about every 5 boards so you can catch and correct any "creep" as you go along.
Before you start, determine if your outer walls are straight and square. You may want to (unevenly) trim the bottom board to even things out a bit, but generally don't make the board uneven by more than about 1" or so unless the walls are visibly un-straight already. (If you start out un-unstraight, or get that way along the way, the un-straightness will be paifully obvious to anyone looking from one end of the room to the other. Long parallel lines are not a carpenter's friend.)
Blodgett's old house had a ceiling like that.
He could tell you how he did his if he happens to drop in.
don't over think..
If the walls are reasonably parallel I wouldn't worry about a lot of measuring until the last half or so.
I would also start at he bottom where gravity is more your friend and I would alternate which end I started from often.
Been my experience that if you always start at the same end it will wind up being tighter [covering less square footage] than if you alternate.
Over the years I've probably spent close to a year of my life on scaffolding installing t&g.....I don't miss it much :)
I agree with oldhand - don't over think it. Start it straight and adjust as you go - measure often between the row you're working on and where you want to end up to know how even things are. It's easy to adjust with more/less pressure being applied as you pry things together.
I've installed miles of t&g on ceilings and will guarantee that your plastic vapor barrier will be full of holes by the time you're done because you have to dig into the wood to pry the T&G into place. T&G directly on rafters is a horrible way to do it and if you are in an area with any kind of wind it will whistle through the boards in every joint and gap, although it's done that way all the time.
The ends should land on a rafter - if you don't any bend in the wood will make crappy looking gaps that you can't fix. If the end lands on solid wood you can pry it into place and nail it so it doesn't move. Most of the finish carps I've ever worked with would call it hack work to not hit the rafters.
Personally I like the wood to be pre-stained since that provides a bit of lubrication to allow the T&G to fit together easier. The wood should also be installed as to minimize crazy shrinkage gaps and twists. Trying to install dried out material is frustrating because it's never straight.
We'd normally work in 3 or 4 person teams - two carpenters on scaffolding installing, one cutting and one person sanding/staining.
Personally I view T&G installation as mostly the battle to get wavy, bowed, and otherwise uneven boards to fit neatly and closely together - that will be your biggest battle - not how to keep your rows even.
Hands down the 15g finish gun is better than the 16 simply because the larger nail holds better. When simply prying on the board isn't enough to get it tight, the board is often nailed off and the area with a gap is given a good hammer smack with a scrap to protect the tongue. You will only get one hammer smack - two and the board will simply bounce back. If you need to smack it again it should get another round of nails.
It will be important to quickly develop a feel for how out of whack boards can be and still seat correctly - the worst are saved for shorter end and starter cuts.
If there is ever a situation where the quality of the material will make a difference this is it. Each batch is likely to have a slightly different size in every direction so it pays to get as much as you need plus a little more up front.
As for getting a good chalk line on uneven plastic that's packed with insulation above it, good luck with that. It's simply better to measure up to the ridge from time to time.
don
I see he added to his first post-
butt joints.
Since you've so much of this, what's your thought to this method v. scarf?
thanks
divide it up
we usually make the first and last cut the same ,so if you using a 1x6 at the peak allow for that
i love butt joints we buscuit them together, a bad scarf will only get worse
start from the wall work up as Calvin suggested ,
its very rare to have the wall and peak to be the same mesurment the whole way through ,this is where creative carpentry comes in ,so you may have to scribe the piece at the wall ,
if its in the budget sheeting it first is the way to go then you have very random joints
T&G ceiling
Have install both ways, last job 1400 sq' Mahogany sealed 2 sides, butt joints, w/ buscuits & pl premiun back blocks, install over indoor pool, 4 years later not a single open joint. Quick, easy & tested results!
Finished Ceiling
Thanks to all that replied to my original post.
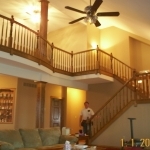
All material was prefinished. We did use butt joints, with about half of them not landing on the rafters. All ends were re-cut prior to being put up and touhed up with stain. We were fortunate that the frame job was good and when we got up to the center peak the edge of the material was parallel to the center of the truss within an 1/8 on both sides. Used a 1 X 8 on the flat to cover the center. No beam was wanted by the owner. Used a Senco SFN40 15 gage nailer with a tongue and groove shoe to nail through the tongue. Two nails slightly angled on each joist. Have a attached a few photos of the job. The third photo is the vestibule entry where the two side walls were finished with the material being installed on a 45 fron the ceiling to the top of a cultured stone wainscoat.
Looks Great!
I would think a butt joint between joist would be fine as it is fully supported by the tongue and groove. That said I would probably prefer to land on a joist for good measure. but who can argue with sucess. Nice work.
I am redoing a covered patio ceiling and I am replacing the old drywall with tongue and groove cypress. My concern is the far end of the patio and in a few other places there is nowhere to nail it into solid wood. I thought the best thing in my situation might be to install either 1x6 or 2x6 blocking with the blocking laid horizontally between the rafters and flush with the bottom so I have some solid wood to nail the ends of the tongue and groove into. I have attached some pictures to explain what I am asking. The first picture shows the far end there the rafter change direction and would result in certain boards being unsupported at the ends. The second picture shows the angled wall above the window. Since the T&G we are installing are approx 5.5" wide some of the boards will also be unsupported with an angle cut. Since the will be somewhat supported by the surrounding t&G boards will it provide enough support to keep them inline? The board will be installed perpendicular to the way the rafter runs of course. Hoping for a fast answer I plan on starting in the next day or two with install.
57,
I would install blocking where all ends of your boards will fall.
Ok then will do. Thank you. Honestly was hoping for a different answer as I really don't want to do that but also don't want it to look cheap or trashy. So I will suck it up and get it done.
57,
2x4 would be what I use, keeping the bottom flush to the joists unless you need to correct a high or low joist. You want a straight line at the wall.
And of course you might not need to do it but if you didn’t and needed to, would it bother you sitting there in your recliner?
I’m pretty retired now but sure wouldn’t want to take a call from a customer. Hindsight costs $.