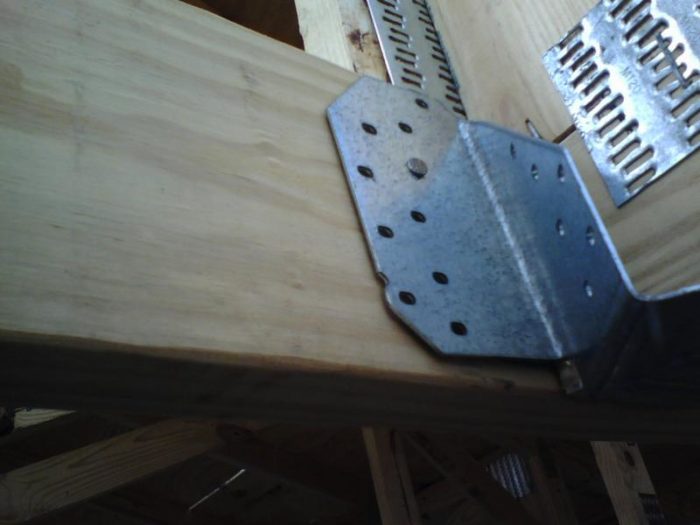
The roof trusses are up and the plywood sheathing is going on. here is a pic of one of the hip truss Simpson hangers. I am assuming they used just enough nails to hold it together and will go back and add more later.
Question: is there an issue with putting several nails through the connector plate? I guess with a big enough hammer you can get them to go through, but does it affect the joint strength? And what about the possibility of pushing off the hanger on the other side as the nail pokes through?
<edit to remove duplicate picture>
“When asked if you can do something, tell’em “Why certainly I can”, then get busy and find a way to do it.” T. Roosevelt
Edited 2/1/2007 10:25 am ET by FastEddie
Edited 2/1/2007 10:26 am ET by FastEddie


Replies
bump
View Image
are you 'simple but elegeant'?
I'm shocked, simply shocked, that those Breaktimers here who can wax so eloquently, for sometimes many dozens of posts, about stuff like roof sheathing thickness, are dumbstruck when it comes to this most basic of important structural questions.
.."" feeling for the end of the plank with my toes "
Ok I will bite.
Yes I put J-nails thru truss plates, sometimes the only way to do things. Be interesting to hear what the resident truss people have to say about that though. The nails should not however be long enough to penetrate the other side of the framing lumber.
The pic shows an incomplete assembly as far as I can see. Things are just tacked, not only at the 45 deg. intersection but further back to the left in the pic is a 90 deg. intersection that shows 1 toenail holding things together.
If I was guessing here I would say that quitting time came and that was the stop point for the day. Looks like the hip (I assume that is what the 45 deg intersection is) may well end up being a 2 ply member and we are only seeing 1/2 of it in the pic.
Post more pics when the assembly is complete so I know whether I can slowly back up the plank or if I am going to be forced to jump. ;-)
Why should the nails not penetrate the other side of the member being fastened to?I've always assumed that we can 1-1/2" hanger nails (with a deduction in load capacity) because of the problems that 3-1/2" nails could pose in some situations. I do not see why long nails would be a problem on Ed's job, one could easily just bend them over with a few whacks of a hammer from the other side.
Jon Blakemore RappahannockINC.com Fredericksburg, VA
"I do not see why long nails would be a problem on Ed's job..."
They would if it's only a one ply truss (As is the case here) and they pushed the plate off the other side.
Other than that it wouldn't matter.
The fact that an opinion has been widely held is no evidence whatever that it is not utterly absurd. [Bertrand Russell]
All the truss members are in place as shown in the picture.
I too assume it was quitting time , and they will go back and add more nails.
The cut sheets with the truss package show all locations where hangers are designed to be placed, but I did nbot see anything about nail sizes. My concern, and the reason for posting, is the possibilty of pushing the far-side plate off the truss with too-long nails.
"When asked if you can do something, tell'em "Why certainly I can", then get busy and find a way to do it." T. Roosevelt
As other people have posted, because the longer nails force the plate on the other side of the connection off.
I rarely use anything but J-nails (1 1/2)for any connector, and fill every hole every time. I have neither the time nor inclination to figure load reductions and what is needed when I am framing. Faster to fill the holes when working on them and just keep on keeping on for me.
the county here made me use special hanger nails..
I admit to not being 100.00% clear on the concept, but, as I understand it, one should use 16d commons whereever the wood backing is thick enough. The 1 1/2" hanger nails are only for when nailing into 1 1/2" of wood.SamT
Anyone who doesn't take truth seriously in small matters cannot be trusted in large ones either. [Einstein] Tks, BossHogg.
You're right, but - When you use the 1.5" nails, the hanger capacity is somewhat less. I think it's 65% of the table value, IIRC..Glad ya liked the tag line, BTW. Here's another Einstein quote for ya:
If I had my life to live over again, I'd be a plumber. [Albert Einstein]
What's your shock about? 2+ days later that was your post- where's the answer in that?
I would nail in a typical fashion, plate or no plate. This may not be smart, but I figure that if the nails penetrating the plate were a problem the truss company would flag those areas and do something different.
Just last week, I drilled through a plate to fasten two girder floor trusses together. The truss specs called for two 1/2" carriage bolts at a certain spot, with at least 4" spacing. As it were, that would be impossible to do without drilling through the plate, so I went ahead.
The specs said to try to avoid it where possible, so I'm assuming that, when not possible, to go ahead.
Jon Blakemore
RappahannockINC.com Fredericksburg, VA
Dang - I thought I had replied to this thread a couple of days ago. But my post appears to have vanished into cyber space somewhere.
I see a LOT of hangers without all the nails in 'em. I think framers just pound in a few until their arms get tired. (-:
Driving nails through plates isn't a big deal. I've never known anyone to make an issue of it in 20+ years.
You're right that the nails should NOT push the plate off the other side. That means either a block nailed on the other side first, or the use of the 10D X 1.5" nails.
According to ANSI/TPI standards the truss manufacturer has to specify all truss-to-truss connections. So a call to them should get you a specific answer about what exactly is required.
I can post those requirements if ya need 'em...
I am by no means a framer. I've framed some, I've built decks but mostly i've done trimwork. I do however have an associates degree in architectural technology wich give me just enough information to be dangerous. that aside, I know that when a connector is designed with a certain number of holes it is intended that all the holes be used. the design of the connector is either based on the shear strenght of the nail or the pull out resistance of the nail (or both). I would stick with the 1 1/2" nails and fill the holes. If the concern about the connector plate being compromised, I'm sure that could be answered with a quick phone call to the truss company. I often come accross hangers that are tacked when installing tongue and groove boards on ceilings. I just take the time to fill the holes with nails and backcharge the builder. I refuse to cover up an inadequate connection. my own flaw I suppose.
"it aint the work I mind,
It's the feeling of falling further behind."
Bozini Latini
"I know that when a connector is designed with a certain number of holes it is intended that all the holes be used."
That's basically true, but - Whomever specifies the hanger can specify a lower number by reviewing the exact situation for each hanger.
"I would stick with the 1 1/2" nails and fill the holes. "
Most hangers are designed for 16D comon nails in most situations. Since all of these members in this case are single ply, that's not gonna work. So whomever called out the hanger SHOULD have checked to see that the hanger worked with the 10DX1.5" nails.
Bumpersticker: If you think this car is dirty, then you should spend a night with the driver!
I would agree with you that the project engineer whom specified the hanger/connector should verify these conditions and nails to be used. I've read many prints where it will specify type of nail, size, and quantity to be used in a connection. definitely the engineer's or achitects realm. if the info is not stated I would just assume that all the nails should be put in and the teko nails in this situation would be to avoid pushing the truss plate off the other side.
"it aint the work I mind,
It's the feeling of falling further behind."Bozini Latini
RE nailing truss connectors, what I see framers doing is nail trusses together, tack the hangers in place, and then later the helpers come back and fill the holes with nails. Since it is a "later" task, sometimes hangers can get missed, and further, since it's more often the helpers, they may not understand, as earlier stated, that the connector has to have all holes filled in order for the connector to meet it's design load. So, missing hanger nails is sometimes on my framing punch lists, and I have had missing hanger nails on an inspection rejection note more than once. I always make it a point to be there during a framing inspection and rarely have had an inspector who wouldn't let me add a few missing nails while he was outside signing the card off and doing the paperwork. To me though, having all the nails in though is just what I would call reasonable quality of workmanship. Granted on the hanger shown, it is rather difficult to get all the nails in, especially since they are going into the truss plate. If it is a commercial type framing outfit, they may likely have a metal connector nailer.
Regarding using ~3" nails, well yea, that is a problem if it pushes the connector off the back, but I'm sure the framers will figure that out themselves.
There is one situation where I tell them to use 10p common or larger, and that is the case with joist hangers than get the angle nails: see link of Simpson Joist hangers with sheer nails (scroll down to the first "gallery" set of pictures.
Regarding nailing through metal plates, in the case you pictured, obviously they don't have any choice. Also, although a different case, when trusses are toenailed down to double top plates, I like seeing the nails through the truss plates, as I know it makes a much stronger connection, which probably doesn't matter, since on my jobs anyway, I always have them use hurricane clips.
Not too long ago, I had a situation where the truss company had messed up on the design and some mono trusses that were supposed to have ledger support had no place to nail the ledger to. Truss companies fix was to use LS50 type angles to secure the mono trusses to the beam. Personally I felt it was a Band-Aid fix, so I had the framers use 3" 10p common nails to nail the angle hanger and had them bend over or "cinch" the nails on the backside for extra strength. see attached pic.
As an inspector, I would require the hanger to be fully nailed, truss plate or no truss plate with 10d x 1-1/2" hanger nails. The roof truss manufacture will not take issue with nailing through plates as long as the other side is not disturbed (thus the 1-1/2" nails) As for the hanger manufactures (Simpson, USP and others), they require all of their hangers to be fully nailed ( nails in every hole) to achieve the designed structural requirements of the hanger.
Update: the truss plant sent over some drawings for the field repair, and all is well. Most of the trusses had one layer of 5/8 osb nailed to each side of the conection. One girder truss had 2 layers of 3/4" osb glued and scrwed to each side. I'll try to get a picture of that repair."Put your creed in your deed." Emerson
"When asked if you can do something, tell'em "Why certainly I can", then get busy and find a way to do it." T. Roosevelt
A repair for what?I thought this thread was just about nailing hangers into truss plates. Am I confused, or are you in the wrong thread?
They said it couldn't be done and I proved it.
Ok, I forget where I am sometimes. I saw it was my thread and it was about trusses .... 2 outta 3 aint bad."Put your creed in your deed." Emerson
"When asked if you can do something, tell'em "Why certainly I can", then get busy and find a way to do it." T. Roosevelt