Truss/Stickframe roof, gable question
ChuckNewcomb1
| Posted in Construction Techniques on
New here, love the site.
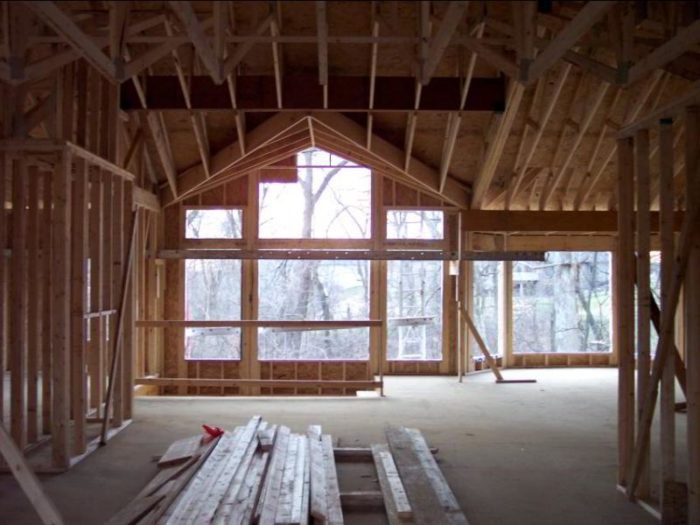
Here in the St Louis Area I dont get many stick frame jobs. Yesterday I had a blast recalling some old rusty skills I learned when I was starting my framing career. I was happy, and we just dont get to do this stuff everyday anymore.
I also would like to hear how any of you guys cantilever gables out 4 1/2″ for brick. (So the brick stops under the gable, then the siding starts. Ive typically sisterd the gable to the next truss in with lots of blocking etc etc. Is there a better way?
Boss Hog, if ya see this post Hope all is well, and hope to see you soon.
Chuck N.


Replies
Welcome to the board. Always happy to see someone local around.
A couple of times I've had guys ask me to make gable trusses 1 1/2" shorter for cantilevered gables. They would shoot a 2X8 down on the top plate and let it hang out 4" to catch the gable. I don't know if that's common or if it's a good idea. Cantilevered gables aren't something I see very often.
I don't know what else would work, except maybe shooting some 2X6s or 2X6s edgewise onto the studs and having then bear on the wall. Don't know how well that would work, though.
Hi Ron,Almost very house we do has a gable on the garage that gets bumped out for brick. But on this house the two main gables got it. And these are no small gables. 60' long with 20' piggybacks. Ive seen like you say about using a 2x8 on the top plates...Ive done that, but instead of having a truss built shorter, I used the 2x8 for the actual top plate. If you ask me they should just brick all the way up...but most builders here are tightwads LOLChuck
Chuck, I've done them in just about every conceivable manner and configuration.
Sometimes, weve also used 2x8 plates and often, 2 x10 or 2x12 backer plates (These are the third member in a typically doubled plate construction). Every situation is different and there's no easy answer, without thinking about all the variables.
A 60' truss is substantial enough that I'd give it much more serious consideration than I normally would for a 25 or thirty footer. On smaller sized gables, we have built the gable normal, sheath it, then add a false exterior build up essentially creating two separate walls.
What did you do on your current situation?
blue"...if you just do what you think is best testing those limits... it's pretty easy to find exactly where the line is...."
From the best of TauntonU.
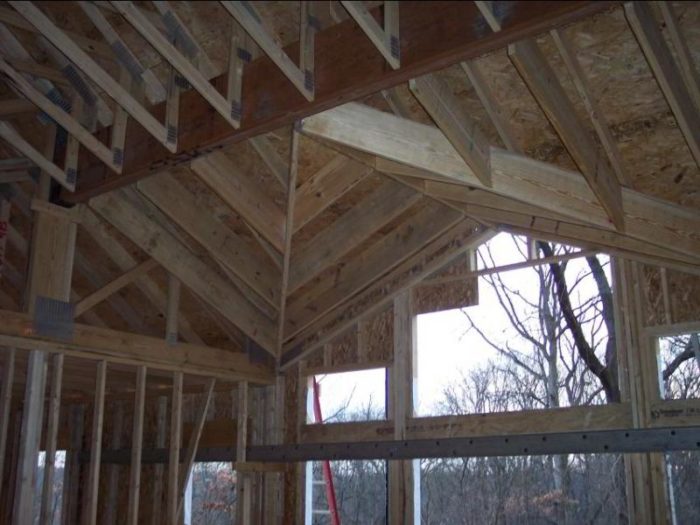
On this house we sistered them up with the next truss in, which I usually do anyway even if it isn't cantilevered out for brick. We also put on fly rafters etc etc, also pre build hip sets,..but thats all dependent on availability.So I sistered this house, and put blocks (mini "L" corners) in between the gable and next truss in. Same with the lookouts,..they run flatways, with another block nailed to them to form a stiffback. Im sure you know what I mean. The one end where layout starts seems pretty solid, the other end ends up with the next truss from gable only 12 inches away, so on that one I blocked the heck out of it, and it seems ok, but I could do better Im sure. I also made some little mini corners and nailed them on the outside of wall, flush with top of wall every 10 ft or so to help hold her up. Like you say, 30'trusses are no prob. On those I usually sister, or simply nail a 2x10 or 2x12 as a sheet rock backer as you do. Thanks for the advice. We are starting the same house again in two weeks, and maybe we can figure out a solid way. Straightening that 60' long 10/12 so that you have 4 1/4" or so for brick is a bear thats for sure!!Chuck
now right there if i were you i would snap a line 3" from the outside edge of wall (on top of the 2x8 that i used for my double plate where the gable cantilever's, and i would measure over from inside where i could see so 7 1/2") and then nail blocks on the line so that all i had to do when i set my sistered truss is nail the gable truss to the blocks and i'm gold! 3" plus 1 1/2" equal 4 1/2" when its nailed tight to blocks it is lined!
set yourself up every chance you get, a coupla quick grips or some sort of a dog and wedge system to pull it in tight to blocks if it bows out bad and again, gold! i would make a dead man out of plywood and see if i could use that to lever in the truss to the block.
now for the hard stuff, i will explain in detail how to hang fascia by yourself from the roof (top) without using any plywood deadmen for jigs! if there is any interest in antiquated framing techniques from so cal in the 70's
We also prebuild everything, then are forced to straighten after it's standing. I just take care to use straight linial for the top plates.
The gable is flown in, completly built. It will have the "sheet rock backer" attached to the gable that is flown in. The sheet rock backer will be the connector to the wall, which is already standing and braced straight. We simply then keep the sheet rocker parallel to the existing wall.
I would expect to set your 60 foot gable, on our wall in a couple of minutes with three guys and a crane operator. Usually, we work with three guys on trusses (two in the air, one on the tag) and a crane operator.
Quite often, on a cantilevered gable, we build a brick rack ledge that the gable sits on. I would make a 60' brick rack as strong as possible, but then later add some sistered 2x10 studs to transfer the weight of the gable directly to the top plates. I don't like to rely on brick racks, or brick to carry my framing.
We rarely rely on, or use lookouts. The only lookouts I use on gable work are when we have unusually projected rakes. Our regional styles dont' usually have large overhanged rakes. Typically, we only project our rakes 6 or 8 inches, which don't reqiure any lookouts.
Post some pics of your framing techniques. Our styles sound similar.
blue"...if you just do what you think is best testing those limits... it's pretty easy to find exactly where the line is...."
From the best of TauntonU.
I sure will get some more pics of our style Blue. Around here we don't do anything under 12" Rake Overhang. Which is a slight issue as we arent supposed to notch or cut any truss. When I ask for a dropped gable I get looked at like Im from another planet. Everyone here notches their gable 1 1/2" by 3 1/2" for lookouts. Ive also made "ladders" instead of lookouts, but they always seem weak over 12 inches. Your idea of 2x10 studs seems good if I understand it correctly....You mean from underneath the top cord down to the top plate with a 1 1.2" notch around the bottom cord?We had the gable set in maybe 10 minutes. Maybe thats long, but whenever we set, it seems thats the day that 20mph + winds come around. I do just like you do...two guys on top, one guy hooking up and running the tag line, and handing us braces and blocks.Have a good one.
Chuck
I sure will get some more pics of our style Blue. Around here we don't do anything under 12" Rake Overhang. Which is a slight issue as we arent supposed to notch or cut any truss. When I ask for a dropped gable I get looked at like Im from another planet. Everyone here notches their gable 1 1/2" by 3 1/2" for lookouts. Ive also made "ladders" instead of lookouts, but they always seem weak over 12 inches.
Your idea of 2x10 studs seems good if I understand it correctly....You mean from underneath the top cord down to the top plate with a 1 1.2" notch around the bottom cord?
We had the gable set in maybe 10 minutes. Maybe thats long, but whenever we set, it seems thats the day that 20mph + winds come around. I do just like you do...two guys on top, one guy hooking up and running the tag line, and handing us braces and blocks.
Have a good one.Chuck
Chuck, it sounds like we have the same philosophical roots. I think you'll be able to benefit from some of my trials and errors.
You are correct in your understanding of the notching and use of a 2x10 as a support for the cantilevered gable. I've often used some form of that technique. It works. Sometimes I only add one, sometimes I've added six or more. I don't think I've ever fit them tite to the top chord however. I'm usually relying on the sheer strength of nails. If I think I need more holding power, I put more nails in...but keep in mind, everything else I've done to this point was geared toward holding this beast up, so I rarely think I'll need to take the time to fit in a tite member.
Now..onto the rake issue. We've done many, many, many 12" rakes and we don't substantially deviate from our standard empty box method. Typically, the 12" projection is accomplished with either 3/8" x 12" ext ply rips, or a 1x12. In either case, we don't add a "ladder", nor cut in lookouts. In my rookie and apprentice days, I did both. Now I don't do either and guess what....it all stays up the same!
The reason it all stays up the same is because I fit the fly sub rafter tight from fascia to ridge and then do a substantial job nailing the roof sheathing from above. If the rake is going to dip, it will have to move a lot of attached materials. The extended osb roof sheathing will have to stretch. The fascia will have to push out, or move in, depending what "sags".
Basically, I'm telling you that you don't need anything....and I'm quite willing to stand out on the very edge of a 12" rake overhang, after the roof is nailed.
Your gable setting times sound normal, for a couple of guys using the "right" techniques. The most important detail about fast setting a gable is to have the rack of trussess set behind it first. You'd be surprised at how many people in my area think they have to set the gables first!
Your idea of the tag guy sending up blocks to achor the trusses is flawed. I did that in the 70's and 80's. I finally wised up in the 90's and have significantly improved our truss setting times.
blue"...if you just do what you think is best testing those limits... it's pretty easy to find exactly where the line is...."
From the best of TauntonU.
Hi Blue,What method do you use? We dont get to use the metal spacers much, so sometimes we cut 25 1/2" blocks, pre-set nails, and hang on the top plate.
Then have the helper hand us 16' stuff for bracing.Id love to hear more. Time is money.
Chuck
Couple of questions.
Where do you guys find the flat ground or even the room to do all the preassembly on the ground? Around here I can never seem to see it happening.
Second, do you have independent cranes or are you using boom trucks that deliver the trusses and set them. Here the truss company provides the boom truck as part of the deal, can't keep them hanging around while I fiddle with things unless I pay for an hourly rate and even then they aren't happy about it unless I pre-arrange.
It varies for me. Some builders I work for don't like the Truss Companies Crane Service, and others do. I don't mind the truss companies crane except sometimes they don't have enough reach, and sometimes I can request a certain operator who is darn good. That really helps.For big jobs we will get a private operator with a bigger boom, and hes damn cheap.Flat ground and room can be an issue and if there is not space to pre-build, I will persuade the builder to have the truss company sheet the second story gables if they are too big for us to lay down and stand later. It doesn't cost much. Then Ill get the trusses and crane same day, and all I do is put on a sheetrock backer on the bottom cord. Then we fly em in.Doing as much on the ground before crane day can save alot of time on certain houses, but on smaller houses its just as fast for us to hang rake, lookouts, and so forth up top. I'm all about pre building hip sets though!Chuck
"do you have independent cranes or are you using boom trucks that deliver the trusses and set them."
The company I work for offers crane service with the delivery. But probably only half our customers use it.
Some want the trusses on the ground for a day so they can mess with the gables, etc. Others use forklifts to set them. Some use indepentent cranes. Others have a cousin with a tractor and loader that has a boom pole bolted in the bucket.
In general, I think our crane drivers do a pretty good job of setting the trusses. Not because they're great operators, but because that's all they do.
They can pull up to a house and know where they need to set up without hardly thinking about it. And they can read the layouts and help the framer if he doesn't unserstand it.
With independent cranes, you might get someone who's never set trusses before. Then you have to try to tell them what to do while you're trying to work.
I've tried the farm tractor thing more than once, and I very much don't recommend that.
(-:
Bumpersticker: It's not my fault I'm the only one in the world who knows how to drive correctly.
Boss,
My local company is great as far as I am concerned their driver/operators are good (one I rank as great ). I just didn't undertsand how the other posters were finding space/time for what they were doing.
Getting the picture now.
Dovetail, I've built on some tight lots. There is always space around the perimeter for prebuilding stuff, if you intend to do that. On a tight lot, we carefully plan out our entire operation. To some, it will look like a haphazard mess, but to us, it's the only possible solution.
Sometimes we have to limit the lumber drops to a very specific amount.
blue"...if you just do what you think is best testing those limits... it's pretty easy to find exactly where the line is...."
From the best of TauntonU.
The truss company I'm currently using as one truck that has a crane mounted on it too. I asked the guy, and he said there is not much call for it though. Like you said, most framers want to sheath their gable ends and sometimes attach fly rafters before they are set on the house. For hip roofs, some portion of the hips are more often than not assembled on the ground and then the assembly is craned into place. Also, I find that a boom truck is always adequate for the houses I build, which generally don't go over 2200 sq ft. Locally there are a few guys who will come out for 2 hrs or 3 hrs for $200. The crane companies around here all have 4 hr minimums and are maybe around $90/hr plus some misc charges they tack on.
There is one big crane company around here that has everything except maybe a tower crane. Last time I called them I asked for a boom truck or the smallest crane they had. Guys tells me sorry, all their boom trucks are on long term assignment so it will have to be a crane. So anyway they showed up 3 hrs late, and then the driver says that the mid sized crane he has is too big to get into the tight city lot and he will go get something smaller. He returns in an hr and a half or so, with something smaller. By this time the framer is POed (I would be too) and we ended up being there until 6:30 PM. Then I get the bill and they charge me 2 hrs OT. Scratch them off my sub list....
Last time I called them I asked for a boom truck or the smallest crane they had. Guys tells me sorry, all their boom trucks are on long term assignment so it will have to be a crane. So anyway they showed up 3 hrs late, and then the driver says that the mid sized crane he has is too big to get into the tight city lot and he will go get something smaller. He returns in an hr and a half or so, with something smaller.
I wouldn't have paid that bill.
You originally asked for the smallest crane possible. He sent a larger one, then conveniently "found" one smaller when he couldn't get it on the lot. I wouldn't have bothered to even let him return if he said he was going for a smaller crane. My question would have been, "I ordered the smallest crane possible, why didn't you bring it the first time?"
blue"...if you just do what you think is best testing those limits... it's pretty easy to find exactly where the line is...."
From the best of TauntonU.
I've used just about every technique imaginable, but I flat out refused to use the metal clips (they were offered to me once). By then, I had already perfected our system.
Our system is incredibly easy. We use 92 5/8" studs. We put a 2' center layout mark on them in bulk (drop fifteen on the floor-push them up against a plate-mark the two outside edge studs-use a straight edge to connct the dots...which marks all the remaining 13 studs in about five seconds. Total prep time for 15 studs: one minute or less.
The studs themselves are incredibly easy to stage. We lean them against the bearing walls at 10' intervals, or toss them into the standing trusses...whichever makes sense at the time.
The next key to their efficiency is to only use them as you would a 49 1/2" block. Since we normally set two trusses at a time (I've never discovered a reason why three trusses were better), the stud works perfectly. I hang the stud out 24" past the last standing truss and only nail the minimum necessary behind me. That leaves about half the stud not nailed. I do this intentionally because I don't want to have to pull out unnecessary nails later, when I use these for my roof framing or kickers or if I use them on my punch out.
Simple 92 5/8" are the secret. It's not much of a secret but if you ever try it, you'll never go back. The studs don't get wasted...they get recycled. Can you say the same thing for your 25 1/2" blocks that takes you fifteen or twenty minutes to prepare?
The savings are many with studs...safer, more plentiful, easier to stage, useful up on the roof when your sheathing. The list goes on, but I think you get the idea.
blue"...if you just do what you think is best testing those limits... it's pretty easy to find exactly where the line is...."
From the best of TauntonU.
excellent idea chuck, keep it simple so it doesnt get messed up at the truss yard. we all know those guys are not to smart, if they had any brains they would be out in the field making the big bucks!
i believe i read in fine homebuilding or this forum the technique of building a square "box" out of the gable truss and the (second) next truss to it, this is built on the ground and then lifted to plates.
once set on the lines it automatically plumbs itself (if wall plates are level) and facilitates faster setting of the rest of the trusses, just set it, line it, and forget it, so you can run with the trusses, and just nail bottoms and spacers on tops for consecutive trusses as its already plumb.
this maximizes efficiency of the crane time, you just have to build the two truss box(s) on a flat surface ahead of time. note: surface does not have to be level in any direction, it just has to be flat and plane in and then you build square not level!
i also would take advantage of the opportunity to install outriggers and sub-fascia as well. the more you can pre fab on the ground, the more efficient you will be as long as you have lifting capacity and accurate layout. without a crane (or lift) is another story
wait i forgot..... the answer to the question..... i'm not dumb, just absentminded.... and making the truss yard guys look good, you are already "sistering" the first two trusses together to compensate for the overhang and want to know if there is a better way.
i don't know of one, but will readily jump on the bandwagon when it gets here. what i was trying to say was that some already use the "sistering" technique because it is more efficient for their application without an overhang.
you are already going about it the same way i would so keep up the great work.
ONe of the issues that we are normally confronted with on these gables configuration is firestopping (or draftstopping). I've seen guys frame the gables using standard methods, then find out that they have to do some firestopping that becomes a nigtmare, depending on the truss configuration.
blue"...if you just do what you think is best testing those limits... it's pretty easy to find exactly where the line is...."
From the best of TauntonU.
good point, that would also be good to take into consideration when prefabbing on ground, to make sure you have complied with firestop and any other issues that may arise such as hurricane and seismic structural connection issues.
it may be that you have to build with gable truss planing with wall for shear paneling to meet code although i think a metal connector could be engineered to work, check with simpson?
i just have to assume that 60' trusses are getting a crane which with effective use can save lots of time. even a bad plan is better than no plan, and i like to have A, B, and C ready to go!
We always set with cranes. Some houses we just lay the trusses up top, and stand em later. Some houses take us almost all day to set even with the crane. Usually those are chopped up, full of girders, vaulted areas, covered decks that the boom can barely reach etc etc,On those I set one or two at a time, unless 2 or 3 guys can comfortably walk them in place later. I also hate getting the trusses and crane at the same time. I would rather have a truss print, and specs way beforehand, but thats not always possible.Your right always have a plan. Some crane days are a breeze when EVERY one knows and does their part, But some days I could shoot my guys. LOL Chuck
"I would rather have a truss print, and specs way beforehand, but thats not always possible."
Since you're on BT, you obviously have internet access and an email account. If you press your truss supplier you can get that stuff emailed to you as PDF files whenever it's ready.
Actually, I don't know why people don't do that more often. Saves a lot of time.
The only downside is that sometimes it's hard to get the layout printed out big enough that you can read it. Some printing places allow you to email them files, and they'll print them out on large paper. But that's kind of a pain.
I'm probably getting in 20% of the plans I work on via email now.
To succeed, jump as quickly at opportunities as you do at conclusions. [Benjamin Franklin]
Hi Boss,You know our friend Jeff doesnt do computerized layouts LOL !! Im glad we were able to meet, and you were a big help on that one house we did with that crazy valley that was cut into the trusses. Well have to do lunch again sometime.
Hope all is well,
Chuck
Actually - I hadn't put 2 and 2 together and figured out who you were. Are you using a different screen name now? Or am I just confused?
Sometimes you have to be a bitch to get things done. [Madonna]
Its me Chuck, ...Boss.You treated me to a truss plant tour and lunch last year. Would like to meet up again sometime.
Chuck
If you want to stick frame, come to NC. Here, anything over about $250K is usually stick framed, excluding national/regional builders. There are tons of smaller builders around. The pay may not be what you are used to though.... There has been a building boom here in Raleigh almost constantly since '92 when I moved here.
Edited 1/7/2007 12:43 pm ET by Matt
Hi Matt,
I do miss stick framing.
Im originally from Richmond, VA and thats where I had my start in framing. In 10 years of framing there I set trusses 3 times. Most of those houses back there we did were 4-8k sq ft. Here we rarely see anything over 3k sq ft. Where I'm at near St Louis, the price to frame is much, much lower than it was back in Richmond. I hate it. I don't wanna get into the Union debate, but they are strong here in residential, and it can be hard for us non union guys to keep work lined up, and make a profit at it. I have noticed that some builders are turning away from Union framers due to slowness, and shoddy work. But Im stuck here for a while and eventually Ill relocate to a better area that has lumber yards that stock material over 20ft for rafters LOLTake care,
Chuck
What are they paying for a stick frame in Raleigh nowadays? Can a framer make a living?
blue"...if you just do what you think is best testing those limits... it's pretty easy to find exactly where the line is...."
From the best of TauntonU.
It probably boils down to about $4 to $6 per heated sq foot. That's after all extras are added in including unheated space. The cost of living (housing) might be somewhat less here and although lot of the subs have new trucks, I doubt that they live in big fancy houses, and their wives probably don't spend their days idly hanging out at the health clubs and driving bran new Lexuses.