Using a Track Saw for Flooring Repairs
Hi,
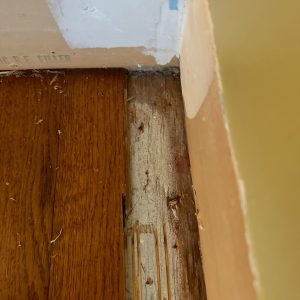
We are changing the baseboards to a modern style and not applying a quarter round shoe moulding. However, the gap between the last flooring board and the wall is about 1.5”.
Because the 5/16” thick narrow hardwood flooring has been glued and nailed to the floor, I’ve ripped the last flooring board away and the tongue on the next row of boards. The cut with the track saw is very clean. I have extra hard flooring that matches perfectly that I can lay in the open gap and bring it much closer to the wall.
The question I have is: How do I continue that rip cut into the walls at either end of the room? My track saw lets me cut very close to the wall in the ripping direction, but it stops short of the end walls by as much as 6”
Oscillating flush cut saws don’t leave crisp edges like the track saw does and I’m afraid a rough cut will stick out like a sore thumb.
Any suggestions?


Replies
Small one hand router with a stop/guide tacked to the finished floor.
Might have to do in several passes. Lower bit each pass or bring guide in for a series of passes.
For a clean, straight-looking cut, only the top surface matters. I'd recommend grabbing a hand saw to carefully cut the first millimeter or two of material as far as you can go. The saw will be almost parallel to the floor. Consider putting a weighted block next to the cut line so that you don't scuff up the "keeper" side accidentally and to aid in the cut. Use oscillating tool to finish.
Also, in fine woodworking, it's not uncommon to score the cut line surface with the equivalent of a utility blade. Use a straight edge. You then have something to rest the oscillating tool into in the part that doesn't get started by the hand saw.
Thanks for your suggestions. I did use a metal straightedge to score a line with a marking knife and used a chisel to deepen the mark. When I went to make a v notch with a chisel for the saw blade to ride in, the wall limited my angle to make the v notch.
I thought of the trim router, but it too would leave some hand work if it could fit between the wall and the ripped line with the track saw. An offset base for a trim router could have helped in the case.
Sticking a wooden straight down with double stick tape as suggested by 1095mike would have been easier/cleaner. Also, using a flush cutting pull saw would have helped too.
In the end, I can't really see the small gaps in the joint standing up and they are in the corner of the room.
Thanks for all of your effort and suggestions.
Perfect place for a planter or speaker.
That corner was made for it!
Stick a straight 3/4 board to the floor with double sided tape along the cut line. Use a fine tooth hand saw held against the board to get the cut started. Once you have a groove started angle the saw slightly to undercut the flooring so you will have a tight joint with the new piece.
I’d second the taped board suggestion. I would probably use my multi tool and ride it along the board’s edge with a slight backcut and finish it off with a sanding block
For a precise cut, hand saw the first millimeter, keeping the saw parallel to the floor. Use a weighted block for stability. Score the cut line with a utility blade and finish with an oscillating tool for fine woodworking.
Secure a straight board to the floor with tape along the cut line. Begin cutting with a fine-tooth hand saw against the board, angling slightly to create an undercut for a snug joint with the new piece.
Begin cutting with a fine-tooth hand saw against the board, angling slightly to create an undercut for a snug joint with the new piece.