FHB Logo Facebook LinkedIn Email Pinterest Twitter X Instagram Tiktok YouTube Plus Icon Close Icon Navigation Search Icon Navigation Search Icon Arrow Down Icon Video Guide Icon Article Guide Icon Modal Close Icon Guide Search Icon Skip to content
Subscribe
Log In
  • How-To
  • Design
  • Tools & Materials
  • Restoration
  • Videos
  • Blogs
  • Forum
  • Magazine
  • Members
  • FHB House
  • Podcast
Log In

Discussion Forum

Discussion Forum

Vapour barrier conundrum

Phizziwig | Posted in Energy, Heating & Insulation on February 1, 2012 08:39am

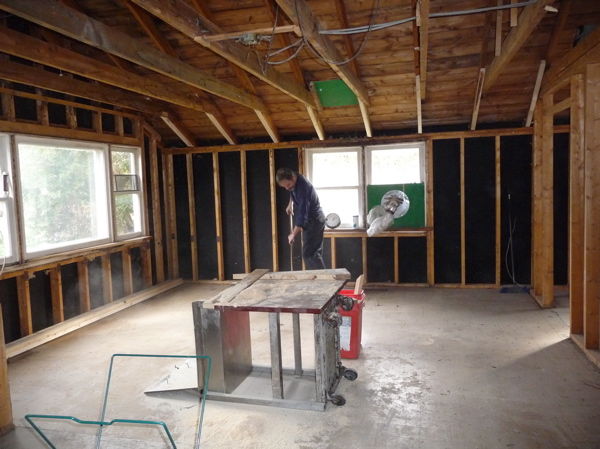
in the living room of our house, we have ceiling joists that are 24 inches OC and span 20 feet. The ceiling is only 7 1/2 feet high. In order to make the ceiling look higher, I would like to inset  T&G pine 4-6 inches within those joists. Because of the span and the weight of whatever goes on the ceiling, the ceiling joists will have to be tied in vertically with the roof joists.

So… the question is… where do I put the vapour barrier? Over the top of the joists and sag it down into them so that i can nail the ties in? Or underneath the ceiling joists and pushed up inside each one so that I can insert the T&G pine on top and then clad the joists?

Hopefully I’ve explained this properly…

Thanking you in advance for your help

Phizziwg

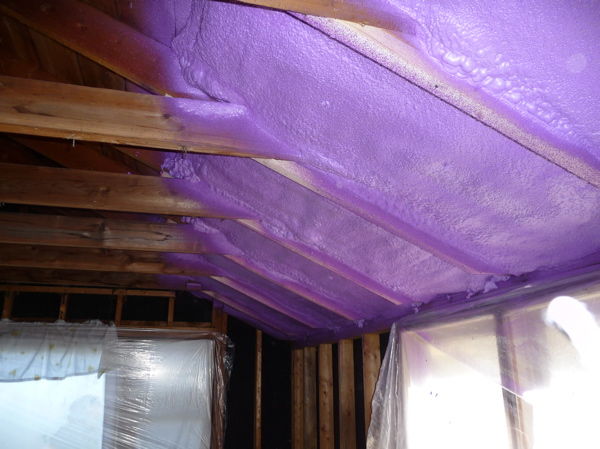
p.s. -yes we are replacing the windows! The sprayed insulation was added after the first picture….

Reply
  • X
  • facebook
  • linkedin
  • pinterest
  • email
  • add to favorites Log in or Sign up to save your favorite articles

Replies

  1. User avater
    xxPaulCPxx | Feb 01, 2012 01:34pm | #1

    Where is this house located, and what is the condition of the roof?

    1. Phizziwig | Feb 01, 2012 09:50pm | #6

      Vapour Barrier, Roof, Location

      This house is located in central Ontario and the roof is about the only thing that doesn't need fixing (other than the porch roof!). Luckily it was cheap and we don't mind work!

  2. calvin | Feb 01, 2012 05:54pm | #2

    phizz

    Before we/you go too much further............

    Where is the header in the wall over the window at the end of your room in the first picture?

    1. Phizziwig | Feb 01, 2012 09:45pm | #5

      Vapour Barrier (I think!)

      There obviously is no header! The previous owner/ builder? merely tucked the window under the top plate (30 years ago). Just one more thing in a list of many things to be remedied. If you look closely, the window also has a hole punched in so that  the pipe of a pellet stove can go through it... 

  3. DanH | Feb 01, 2012 08:12pm | #3

    You omitted the single most critical piece of information when it comes to discussing vapor barriers:  Where do you live?

    1. Phizziwig | Feb 01, 2012 09:28pm | #4

      Vapour Barrier Location

      Sorry, I live in central Ontario.....Canada

      1. User avater
        xxPaulCPxx | Feb 02, 2012 04:34pm | #7

        Ontario has some different climates - do you have the super cold winters or the mild and wet winters?

        1. Phizziwig | Feb 03, 2012 09:17am | #8

          Vapour Barrier

          Both! Three weekends ago we couldn't work at the house because it was so cold (no furnace yet!). This week it has rained and snowed and the driveway was a sheet of ice.  Some years we have snow covering the fence- this year we see grass....

  4. rdesigns | Feb 03, 2012 09:57am | #9

    In your climate, you definitely will need a vapor barrier, as you have stated. Some of the questions raised here about your location  have been asked to establish whether or not a VB is needed. Your response has made it clear that you do.

    Back to you original Q about how to install a VB in conjunction with 2 obstacles: 1) you need to install some vertical  struts or webs to support the ceiling joists. The connections would be less intrusive if you could make the connection using metal plates or gussets rather than overlapping the struts to the sides of the ceiling joists. 2) You want to use T&G pine for infill and the problem is how to keep the VB intact. It seems to me that your second option would be better. It would let you have better access for the installation of the struts, and you could also fit in the blocking you'll need for attaching the T&G without the interference of the VB.

    1. User avater
      xxPaulCPxx | Feb 03, 2012 12:24pm | #10

      I think he should add a layer of T&G plywood ABOVE the ceiling joists.  Seal the seams, apply vapor barrier over that, then fill with cellulose.

      The rafter only sections will have to be completely filled with foam to achieve any sort of R value, it can be done with rigid borad cut to size, then covered with drywall.

      1. rdesigns | Feb 03, 2012 03:04pm | #11

        The T&G plywood would be

        The T&G plywood would be better than individual T&G boards for air seal, but how would he work around the struts where they connect to rafters? Both the plywood and the VB would have to be painstakingly fit and sealed around them. Seems more tedious than his second option.

        1. Phizziwig | Feb 04, 2012 09:25am | #12

          Plywood

          I agree. The plywood would have been our option if we didn't have to support the ceiling joists....The second way is probably our best option. Thank you for your advice.....Phizziwig

          1. sapwood | Feb 04, 2012 12:20pm | #15

            Why the use of t&g ply? If

            Why the use of t&g ply? If your goal is simply to stop air migration, use 5/8" sheetrock. It's way cheaper and will work just fine. Caulk the seams. Prior to installing the sheetrock, build a temporary support wall under the joists to hold them in plane. Put up the rock, then above that lay down a layer of vapor barrier. Then (working in the attic now... lots of fun), install vertical ties to the rafters fastening through the VB and sheetrock into the joists. Use some sealant. After all the attic work is done, you remove the temporary support wall.

            The finished ceiling cladding can be 3/8" material glued to the sheetrock.

        2. Phizziwig | Feb 04, 2012 09:25am | #13

          Plywood

          I agree. The plywood would have been our option if we didn't have to support the ceiling joists....The second way is probably our best option. Thank you for your advice.....Phizziwig

          1. KDESIGN | Feb 04, 2012 12:14pm | #14

            Some ideas and a question:

            Phizziwig,

            As I understand this, the existing ceiling heat at the bottom of the joists is 7’-6”, and you feel that is too low aesthetically, so you want to infill the ceiling at a higher elevation between the joists to increase the perceived ceiling height.  What would you do with the exposed portions of the joists?

            And, as I understand this, in order to add the weight of a finished ceiling of any type, you need to support the joists because they are spanning 20 feet.  To support the ceiling joists, you could run threaded rods down from the roof ridge to the middle point of the ceiling joists.  To connect the rod to the joist, you could terminate the rod end in an oak 2 X 4 set on edge on top of the joist.  Make the 2 X 4 about 14-18” long.  Run the rod into the middle of it with a nut counter-bored into it deep enough to clear the top of the joist.  Then screw the 2 X 4 on edge, down to the joist with 6 structural screws with 3 on each side of the rod.  These screws would be about 5/16”, and they come in long lengths.  You could also counter-bore the screws down about 2” deep into the top of the 2 X 4, and use a shorter screw, say about 5” long. 

            With this approach, you do not have to attach anything to the sides of the joists, only to the top edges of them.  The top end of the rod could be attached to some type of clip angle mounted in the rafter peak, and allow some space to take up the load by tightening the nut.  

            If you needed the vapor barrier and/or plywood up on top of the joists, you could sandwich them under the 2 X 4 rod-anchoring piece.  So you would not need to cut and fit the vapor barrier or plywood around any type of obstacle.

            But I am still a little puzzled by what final effect you are seeking for the ceiling, and how you would treat the exposed joists if you raised the ceiling above the joist bottoms.   Maybe you could clarify your ideas about this part.      

        3. User avater
          xxPaulCPxx | Feb 04, 2012 02:17pm | #18

          With the plywood on top, you can simply put a load appropriate Eye on it with a steel cable and turnbuckle, or use threaded rod as KD suggests.  Now you only have a few small easily mananged penetrations to the VB.

          Where the rafters meet the joists, yes there is alot of cutting/fitting the drywall to between the joists up to where it will meet and seal to the underside of the VB of the plywood.  You have to go all the way to the bottom of the rafters there, unless you ditch the whole underside idea and just fom over the roof deck.

  5. User avater
    user-152047 | Feb 04, 2012 12:47pm | #16

    How about raising the existing joists ?

    Sounds like a lot of work to infill those joists and then wrap the old joists, which are probaly sagging down. If you only want to raise the ceiling six inches, don't see why you couldn't take out the old joists and raise them up six inches. I'm no structural engineer but don't see why that would weaken the roof, maybe have to beef up the ridge beam and install some blocking.

    Seems like that would be less finish work, you can do a flat T&G ceiling then and your ceiling will be straight and level. The insulation and vapor barrier would then be simple. Talk to your building inspector or an engineer and see what they say

    1. KDESIGN | Feb 04, 2012 01:03pm | #17

      If that was his intent, that is, to case each joist and leave them exposed, and then raise the ceiling finish between them, I question whether that would result in the appearance of a higher ceiling; as compared to just finishing the ceiling at its existing 7'-6" height. 

      Illusion always plays a part in structure appearance, and the tightly vaulted look may actually reverse the intended effect and make the ceiling look lower than 7'-6".  A light color in a cool hue (as opposed to warm wood tones) may do more to make the ceiling look higher than actually raising it a few inches.   

  6. florida | Feb 05, 2012 03:05pm | #19

    Why not just finish spraying the underside of the roof with foam?

    1. DanH | Feb 05, 2012 03:24pm | #20

      I still haven't figured out why a vapor barrier needs a condom in the first place.

      (What?  Cunnawhat????  Oh!  ... Never mind.)

    2. Phizziwig | Feb 06, 2012 03:39pm | #21

      Vapor barrier- foam

      $

Log in or create an account to post a comment.

Sign up Log in

Become a member and get full access to FineHomebuilding.com

Video Shorts

Categories

  • Business
  • Code Questions
  • Construction Techniques
  • Energy, Heating & Insulation
  • General Discussion
  • Help/Work Wanted
  • Photo Gallery
  • Reader Classified
  • Tools for Home Building

Discussion Forum

Recent Posts and Replies

  • |
  • |
  • |
  • |
  • |
  • |
View More Create Post

Up Next

Video Shorts

Featured Story

Fire-Resistant Landscaping and Home Design Details

These defensive details give homes a better chances of surviving wildfires.

Featured Video

How to Install Exterior Window Trim

Learn how to measure, cut, and build window casing made of cellular PVC, solid wood, poly-ash boards, or any common molding material. Plus, get tips for a clean and solid installation.

Related Stories

  • From Victorian to Mid-Century Modern: How Unico Fits Any Older Home
  • Designing the Perfect Garden Gate
  • Vintage Sash Windows Get an Energy-Efficient Upgrade
  • Design and Build a Pergola

Highlights

Fine Homebuilding All Access
Fine Homebuilding Podcast
Tool Tech
Plus, get an extra 20% off with code GIFT20

"I have learned so much thanks to the searchable articles on the FHB website. I can confidently say that I expect to be a life-long subscriber." - M.K.

Get home building tips, offers, and expert advice in your inbox

Signing you up...

This site is protected by reCAPTCHA and the Google Privacy Policy and Terms of Service apply.
See all newsletters
See all newsletters

Fine Homebuilding Magazine

  • Issue 332 - July 2025
    • Custom Built-ins With Job-Site Tools
    • Fight House Fires Through Design
    • Making the Move to Multifamily
  • Issue 331 - June 2025
    • A More Resilient Roof
    • Tool Test: You Need a Drywall Sander
    • Ducted vs. Ductless Heat Pumps
  • Issue 330 - April/May 2025
    • Deck Details for Durability
    • FAQs on HPWHs
    • 10 Tips for a Long-Lasting Paint Job
  • Issue 329 - Feb/Mar 2025
    • Smart Foundation for a Small Addition
    • A Kominka Comes West
    • Making Small Kitchens Work
  • Issue 328 - Dec/Jan 2024
    • How a Pro Replaces Columns
    • Passive House 3.0
    • Tool Test: Compact Line Lasers

Fine Home Building

Newsletter Sign-up

  • Fine Homebuilding

    Home building tips, offers, and expert advice in your inbox.

  • Green Building Advisor

    Building science and energy efficiency advice, plus special offers, in your inbox.

  • Old House Journal

    Repair, renovation, and restoration tips, plus special offers, in your inbox.

Signing you up...

This site is protected by reCAPTCHA and the Google Privacy Policy and Terms of Service apply.
See all newsletters

Follow

  • Fine Homebuilding

    Dig into cutting-edge approaches and decades of proven solutions with total access to our experts and tradespeople.

    Start Free Trial Now
    • Facebook
    • Instagram
    • X
    • LinkedIn
  • GBA Prime

    Get instant access to the latest developments in green building, research, and reports from the field.

    Start Free Trial Now
    • Facebook
    • YouTube
  • Old House Journal

    Learn how to restore, repair, update, and decorate your home.

    Subscribe Now
    • Facebook
    • Instagram
    • X

Membership & Magazine

  • Online Archive
  • Start Free Trial
  • Magazine Subscription
  • Magazine Renewal
  • Gift a Subscription
  • Customer Support
  • Privacy Preferences
  • About
  • Contact
  • Advertise
  • Careers
  • Terms of Use
  • Site Map
  • Do not sell or share my information
  • Privacy Policy
  • Accessibility
  • California Privacy Rights

© 2025 Active Interest Media. All rights reserved.

Fine Homebuilding receives a commission for items purchased through links on this site, including Amazon Associates and other affiliate advertising programs.

  • Home Group
  • Antique Trader
  • Arts & Crafts Homes
  • Bank Note Reporter
  • Cabin Life
  • Cuisine at Home
  • Fine Gardening
  • Fine Woodworking
  • Green Building Advisor
  • Garden Gate
  • Horticulture
  • Keep Craft Alive
  • Log Home Living
  • Military Trader/Vehicles
  • Numismatic News
  • Numismaster
  • Old Cars Weekly
  • Old House Journal
  • Period Homes
  • Popular Woodworking
  • Script
  • ShopNotes
  • Sports Collectors Digest
  • Threads
  • Timber Home Living
  • Traditional Building
  • Woodsmith
  • World Coin News
  • Writer's Digest
Active Interest Media logo
X
X
This is a dialog window which overlays the main content of the page. The modal window is a 'site map' of the most critical areas of the site. Pressing the Escape (ESC) button will close the modal and bring you back to where you were on the page.

Main Menu

  • How-To
  • Design
  • Tools & Materials
  • Video
  • Blogs
  • Forum
  • Project Guides
  • Reader Projects
  • Magazine
  • Members
  • FHB House

Podcasts

  • FHB Podcast
  • ProTalk

Webinars

  • Upcoming and On-Demand

Podcasts

  • FHB Podcast
  • ProTalk

Webinars

  • Upcoming and On-Demand

Popular Topics

  • Kitchens
  • Business
  • Bedrooms
  • Roofs
  • Architecture and Design
  • Green Building
  • Decks
  • Framing
  • Safety
  • Remodeling
  • Bathrooms
  • Windows
  • Tilework
  • Ceilings
  • HVAC

Magazine

  • Current Issue
  • Past Issues
  • Magazine Index
  • Subscribe
  • Online Archive
  • Author Guidelines

All Access

  • Member Home
  • Start Free Trial
  • Gift Membership

Online Learning

  • Courses
  • Project Guides
  • Reader Projects
  • Podcast

More

  • FHB Ambassadors
  • FHB House
  • Customer Support

Account

  • Log In
  • Join

Newsletter

Get home building tips, offers, and expert advice in your inbox

Signing you up...

This site is protected by reCAPTCHA and the Google Privacy Policy and Terms of Service apply.
See all newsletters
See all newsletters

Follow

  • X
  • YouTube
  • instagram
  • facebook
  • pinterest
  • Tiktok

Join All Access

Become a member and get instant access to thousands of videos, how-tos, tool reviews, and design features.

Start Your Free Trial

Subscribe

FHB Magazine

Start your subscription today and save up to 70%

Subscribe

Enjoy unlimited access to Fine Homebuilding. Join Now

Already a member? Log in

We hope you’ve enjoyed your free articles. To keep reading, become a member today.

Get complete site access to expert advice, how-to videos, Code Check, and more, plus the print magazine.

Start your FREE trial

Already a member? Log in

Privacy Policy Update

We use cookies, pixels, script and other tracking technologies to analyze and improve our service, to improve and personalize content, and for advertising to you. We also share information about your use of our site with third-party social media, advertising and analytics partners. You can view our Privacy Policy here and our Terms of Use here.

Cookies

Analytics

These cookies help us track site metrics to improve our sites and provide a better user experience.

Advertising/Social Media

These cookies are used to serve advertisements aligned with your interests.

Essential

These cookies are required to provide basic functions like page navigation and access to secure areas of the website.

Delete My Data

Delete all cookies and associated data