Vaulting a presently-trussed ceiling in a ranch house
One of the first things that happens in a post like this (as it should) is an admonishment to consult an engineer. I have already and more to come on that. The next might be let a professional do the work and I agree totally. I have no aspirations to raze my roof.
Situation: I have a ranch house where a one-story wing (25′ by 25′ or so) with flat 8′ ceilings has a roof structure. Photos attached. The photos show how there are not vertical chords running from ridge / peak to the bottom chords. I was not expecting that if only because so many truss types seem to. The engineer says that is fortuitous because the absence of that kind of trussing would allow a way to bring in a ridge beam underneath the top chords (from the outside), beveled in advance on its top to support them. Once that beam is installed, you then sister 2x10s to the existing top chords and methodically dismantle the existing trusses one-by-one in the process to convert to a framed roof from trussed. The silver lining is you don’t have to remove the roof entirely — sheathing and shakes stay in place. That was my take of the conversation, I’m sure there’s more to it.
He did not say it would be easy or cheap.
I’d welcome any comments that come to mind on any of this. For example, having explained all that, what do you think of this approach? Would it cause you to invent some new profanity?
I don’t have the exact pitch of the roof. As ranch houses go I’ve seen gentler-sloping… am thinking the peak is 6′ higher than the present 8′ ceilings. So I do wonder if I’m kidding myself will the vault still be so shallow that my opening up the ceiling won’t be worth the expense.
I should also mention the other option the engineer laid out is that the trusses are sufficient that I could remove a wall running not quite down the center line under the ridge) that presently divides kitchen and living room — it is not load bearing. Keep the 8′ ceilings but you at least open up the space at much lower cost.
Thx for any and all ideas!
SMALL EDIT 7/29/2013: For what it’s worth, this is in northern california (near San Francisco) so snow loads don’t factor much, though seismic might. Also, apparently local permit folks love their jobs.
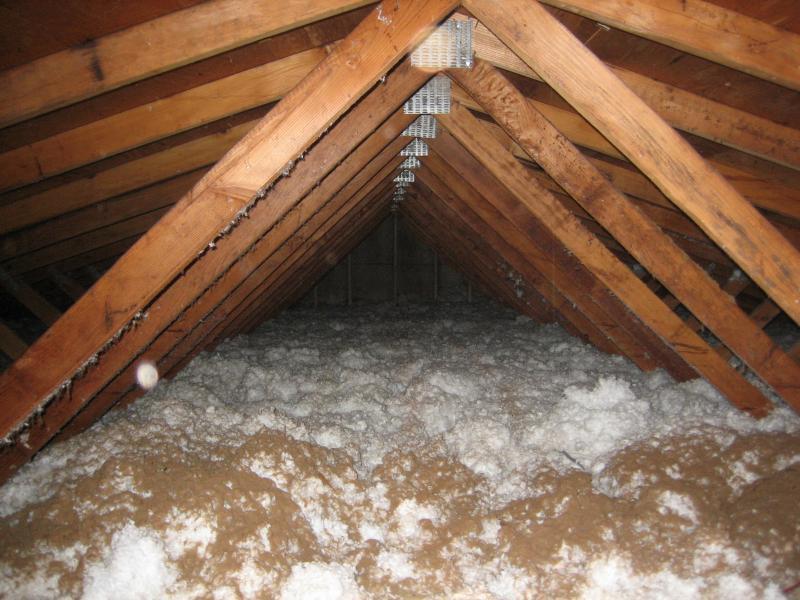
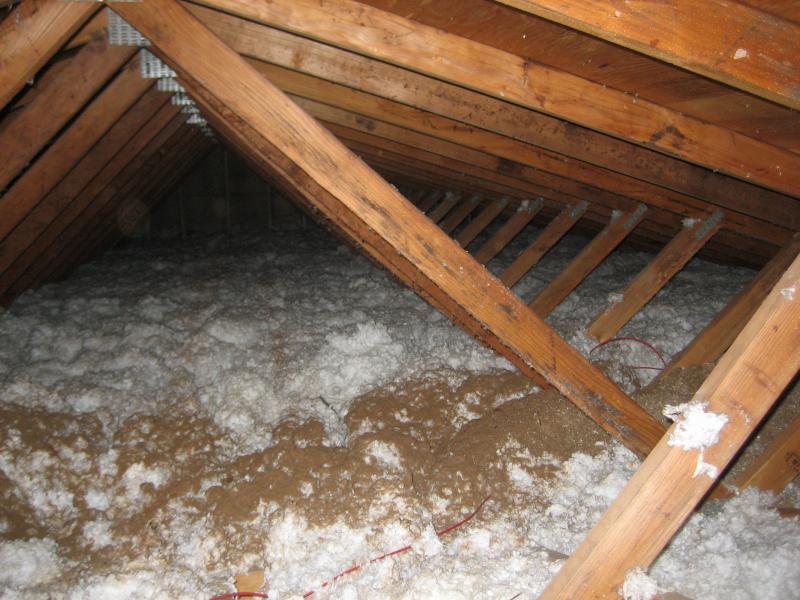 ?
?




Replies
If you really gotta have a vaulted ceiling, sell that house and buy a new one.
What about this approach
Skip the beveleled ridge beam, have a truss designer/engineer draw a scissor truss that can be applied to the side in two halves.
cut existing truss below this and voila vaulted ceiling!
It's even simplier than that. Put your ridge under the trusses before you do anything else then hang your new rafters in buckets on the ridge. You may have to remove the bottom row of sheathing and shingles ot get the new rafters in but that's not a big deal either. You could also put the new rafters in first then slide the ridge in and up but it's pretty fussy work and takes a little longer. Once you have the rafters in and strapped down nail lthe trusses to the rafters whereever they touch. Once that's done saw the truss webs flush with the bottom of the new rafters and you've got the hard part all done. I'd be inclined to use a manufactured rafter like a Trus Joist for lightness.
Sounds like a fun job to me. I think 4 guys should knock it out in less than a week, maybe even 3 days.
Yes horizontal cuts to rafter ends probably means some kind of tray ceiling or soffit on the perimeter.
Another engineering question I'll have is if I go with scissor trusses, can I go 4' on center and double up the capacity. This might look less busy if the full structure was left exposed.
Scissor trusses are going to give you an even much less dramatic look. Maybe less than half of the vault that of prevously suggested techniques.
Another solution would be to install a system of horizional beams (parrallel to the horizontal thrust forces) at the walls to resist the horizontal thrust of the rafters. The horizonal beam would be fastened to the horizontal cut on the rafters. The rafters would extend over and bear on the existing walls to support the vertical loads. (Would suggest you look into using and LVL engineered product for this beam.) This would eliminate the need for a ridge beam. Check with your engineer for sizing your rafters, horizontal beams and detailing the connections at the wall bean and at the ridge..
I have done something very similar before and and it work well. Also, it could all be done inside and from below without opening the roof etc. And like florida said, you would not have to do any dimo until the new structure was in place and carring the loads.
I'm not sure but what if this would not be the most econimically way of doing what you want.
Truss to vaulted ceiling
Scissor trusses will give you an even less dramatic effect. Could be less than half the vault of the existing pitch.
Another possible solution - Install a horizontal beam system at the walls. Fasten a horizinal beam (LVL) to the bottom of the horizontal cut rafters to risist the horizontal thrust of the rafters. The rafters would extend over and bear on the existing wall to carry the vertical loads same as before.
This would eliminate the need for a ridge beam. It could all be done inside and from below without opening up the roof or gables and could all be inplace carrying the loads before demo'ing the existing structure. It could be the most economical way of doing what you want.
Have your engineer size the rafters, beams and detail the connections.
(Note: This is a repeat of an earlier post that I did but did not get posted for some reason)
Sorry, can you clarify a little more especially you're 2nd paragraph? I'm having a tough time visualizing... or rather I'm visualizing a couple different things. Are you saying just run what are essentially rafter ties spanning the whole space but then keep it open (but then rafter ties would be 2' on center and we'd have quite the monkey bars. So I don't think you meant that... maybe some kind of additional "ring beam" structure going around the 25' square space @ about present ceiling level to prevent the outward thrust?
(Thx for noticing and (re-)posting.)
Truss to vaulted ceiling
OK. You are on the right track with the ring-beam idea, but the beams only have to be where the rafters meet / bear on the exterior walls. True, each end of the beams will have tied to the existing end walls and in effect tying them to each other..
Since I can't see and don't know the construction of the existing end walls, I can't suggest the best way to do this. If the existing tie plates of the end walls are lapped properly, then that may be adequate. Or you may have to install a ceiling joist / rafter tie at and attached to the end walls. (This could be part of the interior design.)
In any case, there are ways of accomplishing this. Once you demo the ceiling finnish, you can better see what to do. I don't know what your construction knowledge and experience is, but in any case you really need to get your engineer envolved. This is not standard residential construction. Not done properly, it could result in failure and injury.
I have done this on a couple of similar projects and it has worked well. Being from the old school (very old school) I don't have the computer skills to sketch and send anything on line. Let me know if I be of futher help. Good luck.
Truss to vaulted ceiling
Tripp, I have tried twice to reply to your request, but have not been able too. If this is posted, I will try again. My fingers are getting tired. I don't know what else to do. It's very discouraging.
You are getting close with the idea of the ring beam idea, but not beams on all four sides.
oops
I tried to push the "trusted user" button which should make all your posts work-to no avail. Some password things come up and the button will not take.
This is beyond my talents (none) so I suggest you email Rob Wotzak at: rwotzak@taunton.com
He should be able to make it happen. You are too long an upstanding member for this to screw it up.
thanks.
Thanks
for your persistence, oops. I think the post you intended got through. I was seeing a few weird things happen over the weekend on my posts (moderation queuing and cache size messages, probably related to ongoing spam triage.).
Anyway, I think I follow. Now I visualize what is almost a kind of secondary horizontal retention rafter right on the side walls (the walls parallel to the actual roof rafters, one of which is a gable end on the house, the other ends up on an L intersection w/ rest of house) -- used almost like a tie rafter to further manage the spreading force exerted by roof rafters on the walls. As you say if the top plates are lapped there may already be enough retention in place making such things redundant. I suspect you can only take that so far -- the length of the plate on which the rafters will sit is about 25' so can retention only on the sides suffice that is the question. (Enter the engineer.)
Your cautions about making sure things are done right are totally taken to heart. Note I'm the homeowner and all work will be done by one who knows what they're doing including engineering. In fact it's my own personal interest in making the absolute best choices here which is causing me to do this homework ... nobody cares and wants to think through this as much as I do.
Been there, done that...
DId this on a remodel a few years back. Forget about beveling the top of the ridge - obivously the engineer who recommened that had never acturally tried to make that work. There's the matter of all those nailer plates that project down below the truss members - and no two are the same.
I cut 2x10 blocks with the roof ptich on each side to sister up to the trusses at the peak. Used framing screws to attach them to the truss members. That gave me a flat surface to bump the ridge beam up to without having to fight with those tiger tooth plates. Once that was in place, I cut my rafters like normal to the existing plate and the new "ridge. I put them on 12" centers so you could sister and block up to the upper truss members and doing that also drops the depth required to make teh span, which makes them easier to get in beside the trusses. To make the work a little easier, I centered my blocking between the truss bracing points and added extras anywhere the top truss chord was spliced.. This allows you to transfer the roof loading to the new "rafter/clg joists". Remember that when you cut out that bottom chord, you have no tension tie left so the new Ridge beam has got to be capable of handling the load just like a floor girder. This could make for some pretty hefty LVL's for the ridtge and don't forger that you've got to have a column under each end of that beam to transfer the load - and a footing capable of taking it.
I used a lightweight metal beam from Metwood Building Products for my ridge. It makes attaching the new rafters a little more tricky as you have to use joist hangers screwed into the sides of the beam (if you want a flush beam look) or let them sit on top of the beam and block in between to lock them in place (which is what I did). Theyse ar box beams that weigh about half what a conventional beam woud for the same span & load. The last one I used was 12" deep and weighed about 450 lbs for a 24' span (beam span) and that was carrying roof and a one-story floor loading for a 22' wide structure. They custom build 'em to handle the load you have so one that length for roof load only would be even lighter. An LVL to handle that roof would probably be 18" deep and at least 2 plys, maybe 3, and that won't be light or easy to get in place.
The Metwood folks have been aouund for a long time but most engineers and builders (at least the ones I know) tend to keep their head in the sand so your guy may not have heard of them. I've been using them since '06 and saw an article in JLC around '04 (I think) where the bulder was using it for a ridge in an vaulted ceiling bonus room in one of the heavy snow states.
Ask your engineer to look into it. He's probbly never heard of them so the education might do him good.
Thx for the detailed how-ya-did-it
Definitely will get the engineer to even more specialized structured alternatives to the LVL for the beam. He did indeed suggest the ridge beam would be an LVL.
Regarding the flush attachment of rafters to ridge beam, that approach may not be critical, if we choose to go with top-mounting the rafters the beam (what you did) I think we might flatten the peak of the ceiling and cover beam altogether. There's not really any mechanical up there but maybe that creates a kind of place for chasework. Certainly there will be some kind of ceiling lighting to feed.
I didn't quite follow you when you said: To make the work a little easier, I centered my blocking between the truss bracing points and added extras anywhere the top truss chord was spliced. You meant ... it's easier to attach blocking without fasteners in the existing trusses impeding the nails from blocking?
Having done a number of these over the years I would highly recommend hiring a carpenter experienced with reframing remodels. It takes a few of these jobs to get the feel for how to do it quickly and well. If you do it yourself I'd suggest the same course of action - it will just take you 4 times as long. Engineers, contractors, and architects all vary in their level of experience, especially their experience with retrofitting structural framing in remodels. The best architects and engineers I've worked with over the years will come out and ask me what my prefferences and abilities are and come up with a plan that uses my strengths and solves the problem correctly.
The main advantage to doing this with a trussed roof is everything is relatively straight - which makes this about 20 percent faster than having to fight new lumber alongside sagging rafters! Other than that, forget they are trusses - it's just extra lumber up there and most of it will need to come down so don't be emotionally attached to saving any of it. What will be saved are the outermost cords in direct contact with the roof deck - we'll sister the new wood to this to preserve the connection to the roof deck.
Having said that I no longer spend much time thinking about how to go about these jobs - if there is a better way to do this I'll change my standard way of going about it, until then this is how it's done:
Move the existing insulation to another part of the house rather than a dumpster. I have used a 1 hp dust collector with 4" hoses to suck and blow insulation and it works great if it's free of debris. On the suction side use a rigid hose as you would for a dust collection system - 20' of hose is about right. On the discharge side use the much lighter inner hose out of a roll of insulated flex duct, essentially removing the insulated covering - duh.
If the insulation is filled with dead mice, wood or other scraps, call an insulation contractor and have them suck the space clean before (BEFORE) demoing the sheetrock. I don't think it's a practical use of time to simply demo the ceiling and let it all come down - it's not that hard to reuse the insulation.
Demo any wiring - don't try to work around it as it will only be in the way at every turn. Figure out where junction boxes and lights will be before hand, but don't let any wires get in the way.
Next protect the floor and windows - reframing a roof from the inside is not a spectator sport and even for the most experienced of us, something will fall now and then, and we don't want to make more work having to fix it. During the last remodeling vault a nail glanced off a rafter and took out a window.
Now get a big pair of sharp end nipper pliers or a cutoff wheel in a mini grinder and cut EVERY nail flush that's protruding through the plywood/osb. Even if you don't think a nail is going to be a problem it will be at some time in the process so take them all out. This seems like a big task, but only takes an hour or so.
Demo the sheetrock and get every sheetrock screw and nail out of the trusses - nails will grab skin, get in the way of something, and are just a plane safety hazard that's easily taken care of.
Now use an air nozzle and blow off every inch of the trusses and roof deck, then vacuum every inch of the room with a good size shopvac with a drywall dust filter. The two or three hours you spend blowing off the trusses and vacuuming the walls and floor will result in a huge increase in creature comfort over the next week while it's being reframed.
Next I'd demo every other truss removing everything that isn't attached directly to the roof. With the remaining trusses strip out the inner cords leaving just the horizontal at ceiling height (to keep the walls from spreading) and the outermost that's attached to the roof. At the ridge use those same big end nippers and peal off the metal joining plates. Don't worry about the roof falling in, but if you are and need to convince yourself it's ok - run a very tight mason's string line from one end of the building to the other just off the underside of the 2x6's against the roof. For this I like 120 lb spider wire fishing line - it's super light, super strong and with a 6 lb hammer hanging off one end for tension is flat as glass. The roof won't move.
A beam has to be placed at the ridge and while it's not necessary to put it up directly against the roof deck, the highly skilled carps I have worked with would make fun of me if I didn't get it up as far as possible to minimize the amount the beam hangs down. If you have a choice go with a beam that's wider and hangs down less. You're probably looking at a pretty sizeable stack of deep lvl's. Sitting high on a ladder retrofitting lvl's into the underside of the roof I like things to be easy and joining the lvl's with load rated Timberloc screws is much easier than through bolting or trying to use nails. On a multi-ply situation like this the architect or engineer may specify how they are to be connected to each other so make sure to mention you preffer timberlocs BEFORE he draws up the plans. With something like a heavy duty right angle Milwakee drill you can set timberlocs all day and not be worn out. If the engineer will allow it, a small countersink just allowing the screw head to be flush with the surface is ideal. You'll probably be using 3 timberlocs every foot from both sides of a 3 or 4 layer lvl beam. Start them with a good blow from a hammer rather than just pushing hard until they grab.
Now for the interesting part. You want to cut a channel in the roof framing for the lvl's to fit up into, but it shouldn't be all the way through or the ridge may close and buckle the roofing at the ridge if the ply/osb isn't tight at the top - better to not risk it and leave about a 2"x2" of framing wood at the top of your cut. The channel you cut out can be oversized, but don't get carried away or other carpenters will make fun of you. I like to run a tight string line from one side of the ridge to the other and carefully mark the framing - the first layer of lvl goes tight to this cut with a few deck screws (the screws are just to aid in keeping everything managable and is not structural) and is held as straight as you make the cut. The opposide side of the channel you're cutting out of the ridge should allow a 1/2" or so gap so you don't have to fight them in too much. Get the ridge beam plumb or it will screw up your rafter cuts.
Properly support the ends of the beam with solid posts or laminated studs (as per your engineer) with a clear load path down to a suitable footer (normally the foundation, unless it's a large load then an additional pad is poured under the existing footing to support the extra weight).
Now the fun begins! There is no way I'd rely on fishing 2x10 rafters through the soffits, or other such shenanigans. It just doesn't work as well as it sounds and it only takes trying to turn one rafter from on it's side to verticle to know there has to be a better way. A much better option with framing this large is using a ledger against the walls that the rafter tails will but into and be held in place with face mounted joist hangers. This allows the rafter to go straight up and the angle cut on both ends is the same. The hardest part is getting a good solid ledger that will be partly above and below the top plates, can be notched around existing framing, yet allow good holding strength of the hanger nails. It's ideal to use an lvl that's ripped at an angle so the bottoms of the rafters flush with the bottom of the lvl, but only if you don't mind cutting into the roof framing again so the lvl's can sit up high enough that any cuts in the lvl's are minimal. Again, leave a 2x2 of framing material at the top of the lvl notch. The last engineered specs for something like this had me installing three 1/4" x 3-1/2" simpson structural screws every 16". Predrill for simpson screws to prevent splitting old dried out framing. Also flush the heads of the simpson screws to they don't interfere with the hangers we'll be using to hold the rafters up.
You'll want to use a beafy hanger that's cross nailed as well as tico nailed flat to the lvl. If you don't have one, pick up a palm nailer since driving 16d nails by hand at weird angles and with limited space isn't fun. In case you're wondering how a hanger can fit around the new rafter and mis the existing framing, well it doesn't - you will need to notch the framing as the new rafters are installed. I use torx head deck screws and pl premium polyurethane construction adhesive to both hold the rafter in place tight to the existing framing and the lvl as well as bond it permanently to the existing framing. Once a new rafter is in place and screwed down then cut the existing framing as much as needed to get the hangers in place and to have room to nail it properly.
About this time you'll realize the benefit of using lumber with minimal crowns since you'll have to fight any crowns to get the rafter up tight to the roof deck. Your roof will be fairly straight which will help a great deal, but you may have to install a hanger temporarily and use it to wedge off of to get the rafter into place. In the most extreme cases I've used a hydraulic jack/ram such as used to straighten car frames and whatnot. The smaller models work great since we're not talking a huge amount of force.
Along the same lines you'll want to cut the old framing back from the ridge enough to install hangers at the ridge. Don't let your engineer talk you into the ones that go onto the beam first then you fit the rafters over the top and everything gets nailed from the side - there just isn't enough side to side space unless the exsiting framing is totally removed, which is still doable if you only cut out and replace one at a time. Personally I like to use a face mounted joist hanger with good cross nailing if it's allowed even though the angles of the bearing surfaces aren't correct. Angled 2x tapered shims make up the difference in bearing angle and the cross nailing really anchors everything to the ridge beam well.
If additional ridge ties are required (they will be), my favorite is simply bulk rolled simpson strap that's run under the ridge and nailed to rafters on either side. This allows the ridge beam to no project any lower than necessary - don't fall for it if they recommend a horizontal 2x under the ridge beam!
The cross nailed face hangers at the ledger on the walls should take the place of any huricanne clips - there's a lot of strength in that setup. If additional connection strength is required between the studs and ledger/top plate I'd first try to suggest bulk rolled simpson nailing strap nailed to the side of the stud before the ledger is applied, wrapped up behind the ledger, over the top and back down the face where it's nailed after the ledger is installed.
After the sheetrock is down and everything is cleaned up I'd guess a good carp could have the trusses demo'ed and a channel cut for the lvl's in two days. Another two or three days to get the beam in place and properly supported unless there are problems with a clear load path and/or undersized footer. As for the actual rafters I'm thinking about 3 trusses worth each day so that's about 4 days in your case. Another two days for unexpected stuff. That comes to two weeks and change, which is about right. At $200 a day you'll spend $2200 for a carp, $500 for an engineer to put his stamp on it, whatever your permit fees are, and something like $1200 in materials. Add in the lights, sheetrock, paint, demo, insullation, and whatever your architect is worth (not much in this case unless he's also an engineer) and you can get a pretty clear picture of what it's going to cost.
Hope this helps!
~Don
Thx for all the detail
Thanks Don for the step by step -- very valuable information and appreciate the selfless time taken by you (and everybody really) to offer your input. I've searched online far and wide and really found nothing with as much detail and good perspective as I'm finding here from all you guys.
At work today we replaced a beam and had to force an overhead deck up a few inches and it quickly reminded me how something simple can get exponentially difficult without a little "feel" for how to use leverage of various kinds to your advantage. Today it took a temp wall to help force up a low spot combined with a stud sprung under the beam at a bit of an angle (because it's adustable) combined with a 4x4 post temporarily installed for something to pry off of, some bar clamps here and there to help cinch things together, some wax to help reduce the force needed to slide the beam into place, and a bunch of 6" sds screws.
I also wouldn't get up in the framing to retrofit a beam without a 6 lb sledge with 18" handle - a big hammer gets used a lot to "tap" things into place.