FHB Logo Facebook LinkedIn Email Pinterest Twitter X Instagram Tiktok YouTube Plus Icon Close Icon Navigation Search Icon Navigation Search Icon Arrow Down Icon Video Guide Icon Article Guide Icon Modal Close Icon Guide Search Icon Skip to content
Subscribe
Log In
  • How-To
  • Design
  • Tools & Materials
  • Restoration
  • Videos
  • Blogs
  • Forum
  • Magazine
  • Members
  • FHB House
  • Podcast
Log In

Discussion Forum

Discussion Forum

Walk Out Bay Roof

Framer | Posted in Construction Techniques on November 12, 2004 07:30am

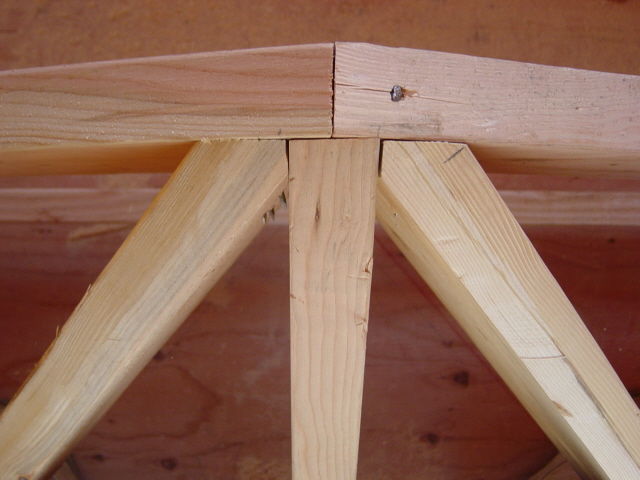
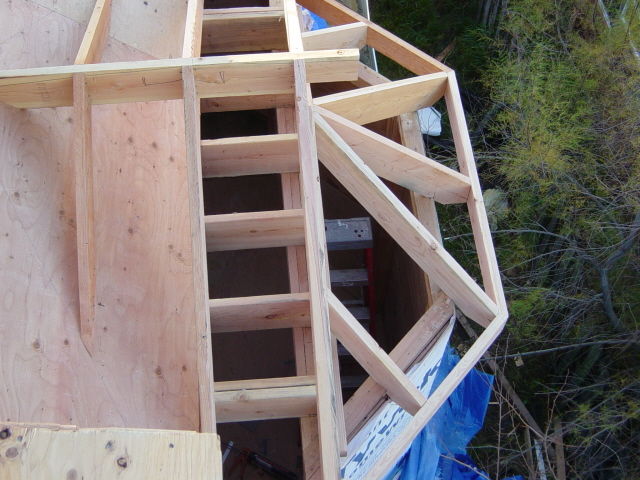
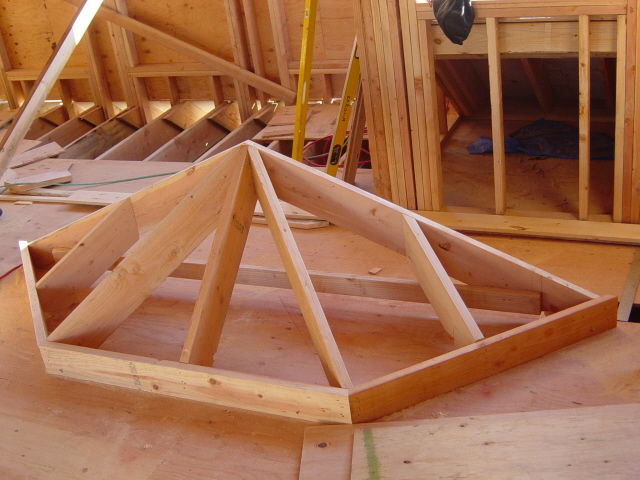
I framed a 8′ wide Walk Out Bay Roof yesterday with a 2′ projection and a 8″ overhang up against a Gable end wall so the two side rafters follow the pitch of the gable end roof so all the rafters came to a point. Keeping the same overhang all the way around the hips will sit off the corners and the the common with the 2′ run will be a steeper pitch.

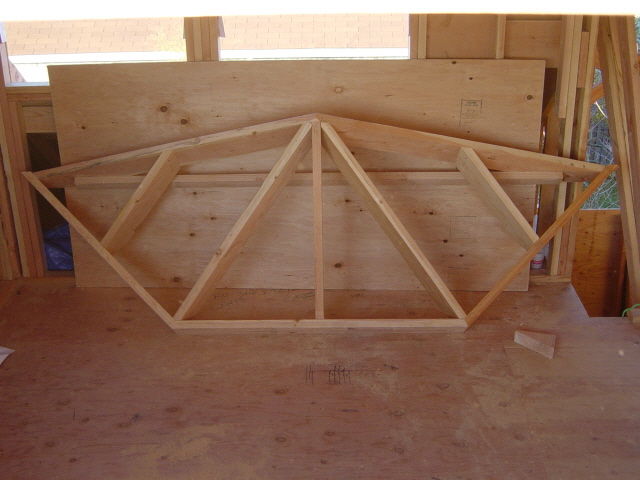
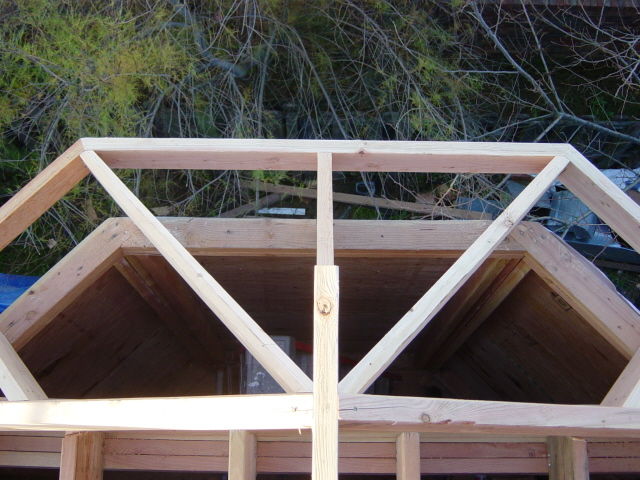
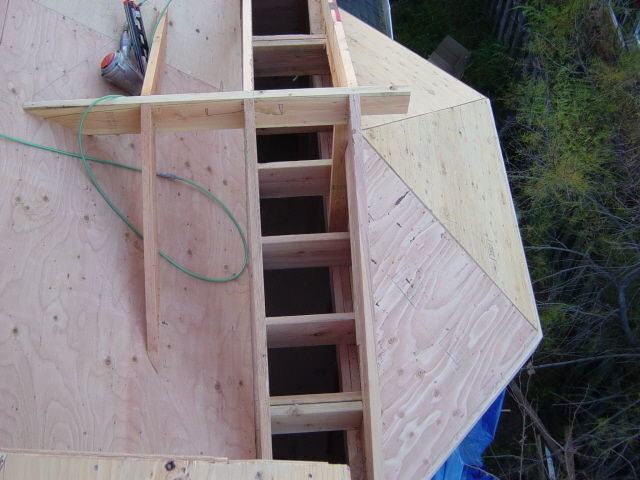
I had no room outside to set up a ladder and working from a step ladder was a pain so I snapped out chalklines of the whole bay on the subfloor and built the roof on the third floor of the addition tacking the subfascia into the floor and then nailing all the rafters together in place and cutting my plywood to fit and then taking it back off and sticking the roof out the window and setting on the top plates and nailing it in and then sheathing it.

Doing it this way was the fasted way I’ve done it.Every single measurement and angle is right there on the deck it’s impossible to make a mistake. You don’t get to many bays with this type of roof you usually have the hips running at 67.5° for a 45° bay and have a ledger but theses rafters all came to a point.

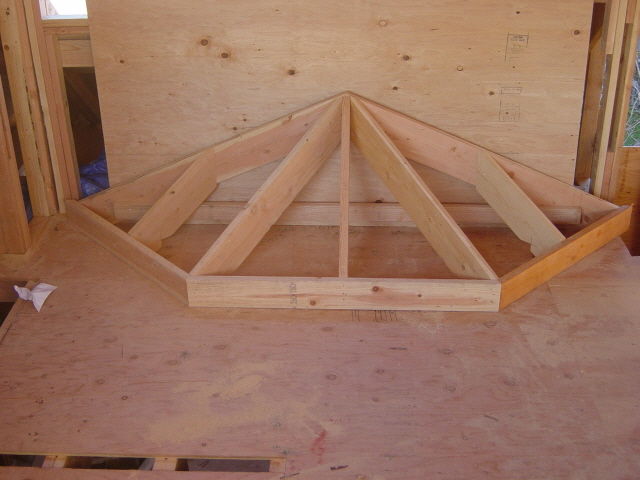
When I set the roof in place my fascia was already on and I just nailed the sheathing up and it was done. Has anyone framed this type of bay before? It looks nice because the 8′ wide bay with a 4′ run common lines up with the gable above it.

Joe Carola


Edited 11/11/2004 11:47 pm ET by Framer

Reply
  • X
  • facebook
  • linkedin
  • pinterest
  • email
  • add to favorites Log in or Sign up to save your favorite articles

Replies

  1. blue_eyed_devil | Nov 13, 2004 02:16am | #1

    I've framed a lot of bays Joe, but I've never framed one that came to a point like that. I have framed them with the commons parallel with the rafters on the gable but we've always had some sort of level ridge.

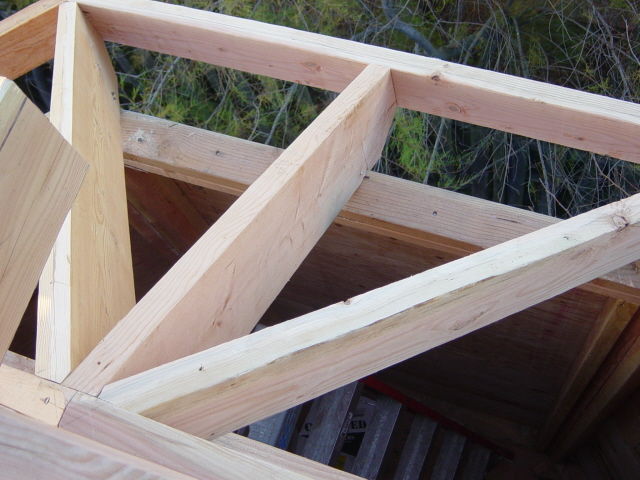
    It looks like you did a crackerjack job (that's a compliment). I hope you eyeballed those layon jacks though!

    blue

    Warning! Be cautious when taking any framing advice from me. Although I have a lifetime of framing experience, all of it is considered bottom of the barrel by Gabe. I am not to be counted amongst the worst of the worst. If you want real framing information...don't listen to me..just ask Gabe!

    1. Framer | Nov 13, 2004 02:49am | #2

      Blue,

      This is a house that I framed back in 1987 with the same Bay Roof to a Point. It was actually the first time I framed one that way plus I was only 22 at the time and it was a bump out in the kitchen and it was also Cathedral with all the different pitches on it I went back underneath the rafters and furred them down to have clean sheetrock lines.

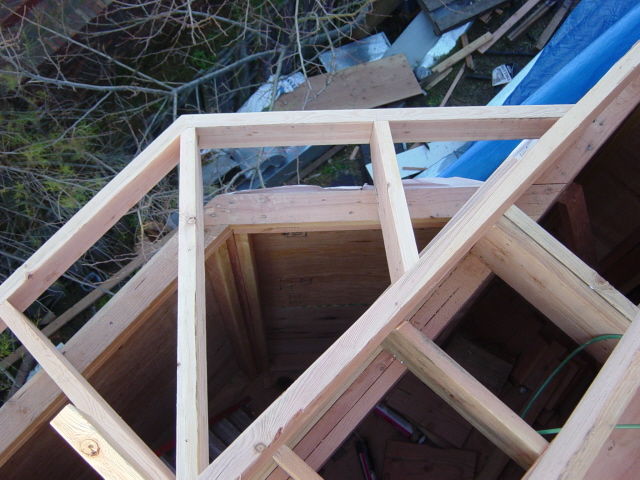
      With my Blues eyes I eyeballed those two little valley jacks for you...;-)

      Joe Carola

      1. blue_eyed_devil | Nov 13, 2004 03:16am | #3

        Nice shack and nice bay addition.

        I hope you felt the demons releasing as you dared eyeball your first jack. You had it easy though...you had plenty of leeway to make second and third cuts!

        I've used your prefram method before...including putting all the plywood on before setting it. I've never prebuilt one over a bay however. Snapping out the lines is key and makes it quite simple.

        It looked like your rafters planed into the back side of the fascia...which seemed inconsistent if your using 1/2" sheathing. Are my eyes deceiveing me?

        blue

        Warning! Be cautious when taking any framing advice from me. Although I have a lifetime of framing experience, all of it is considered bottom of the barrel by Gabe. I am not to be counted amongst the worst of the worst. If you want real framing information...don't listen to me..just ask Gabe!

        1. Framer | Nov 13, 2004 03:30pm | #4

          Blue,

          I laid out the plumbcut at 5-3/4" that would be to the back of the 2x6 fascia so it should be sticking up 1/4" above but the 2x6 was almost 5-5/8" so most of the plumbcut was up about 3/16" but I use 5/8" sheathing so if you put a straight edge or (your speedsquare..;-) on top of the sheathing it's within a 1/4" to the outside of the top of the 2x6.

          That roof has 4 different pitches to it so they all plained in pretty good.

          Joe Carola

  2. mdresimprov | Nov 13, 2004 05:22pm | #5

    Nice work Joe! I just finished a roof on a bay window with a head and seat board. Rise of pitch was only about 4 inches from the projection edge to the existing soffit.Although I've always framed them in place, I like the idea of framing it on the ground and lifting it in place. Thanks for the pics and instruction.

    1. Framer | Nov 13, 2004 09:49pm | #6

      Thank You. For me the key thing to framing a roof like this or a Bastard Hip with equal overhangs is I figure everything including the overhang as my runs putting me at the back of the fascia and then work back to the plate. Doing it that way gives you all your framing points including where the hip sits off the corner and all your runs. With Bastard Hips and Equal Overhangs if you figure to the plate for your steep side you would have to adjust the run once you've figured your overhang in.

      With this bay when you figure to the back of the fascia all you have to do is level the line in from the top of the plumbcut with the framing square and measure down to the top plate and that will tell you exactly where to layout your Birdsmouths for the other rafters or if you can't fit a Birdsmouth in with the other rafters you can add to the plates.

      Joe Carola

      1. mdresimprov | Nov 13, 2004 10:19pm | #7

        Once again good instruction. Thanks!

        MES

      2. blue_eyed_devil | Nov 14, 2004 02:19am | #8

        Joe, great minds think alike.

        I always figure all my rafters from exactly the same point..the back of the fascia...and I always figure all my rafters in total length...run + projection and work backward to find the heel.

        One difference that I do is simply cut heel blocks if I can cut a birdsmouth. I much prefer cutting heel blocks. I simply lay the rafter onto the overhang...fasten it...then snug in a heel block. If the overhang (they are always completed before I start adding rafters) is out of level, I use the heel block to lever it up.

        blueWarning! Be cautious when taking any framing advice from me. Although I have a lifetime of framing experience, all of it is considered bottom of the barrel by Gabe. I am not to be counted amongst the worst of the worst. If you want real framing information...don't listen to me..just ask Gabe!

        1. Framer | Nov 14, 2004 03:06am | #9

          Blue,

          The first time I did a Bastard Hip was when I was 22. I laid out the low pitch common and the high pitch common and figured how much to raise the plate on the High pitch side. I ran the ridge long and nailed the Low Pitch side commons on first and then I laid the High Pitch common in place and scribed it where it should be at the ridge and cut the ridge there and then nailed the common to it.

          I then made some high pitch rafters with just the birdsmouth and overhangs on them and nailed them on the raised plate keeping the last one in from the corner about 20". Then I nailed in my 2x fascia across the lower pitch commons and across the high pitch common and the little tails that I made and where they intersected at the outside corner was right where the hip went so I strong a line from that point to the ridge and that was my Hip length.

          I put a framing square on edge plumb and slid it into the chalkline at the outside and inside of the top plate and marked it and that was the center of where my hips birdsmouth was.

          The Key thing with theses Bastard Hips with equal overhangs is the back of the fascia poit as you know. So if anyone has a problem as to where to offset the hip and doesn't know any Trig or know how to use a Construction Master Calculator (and know what to punch into it)can just simply nail the fascia up all around first and you can''t go wrong.

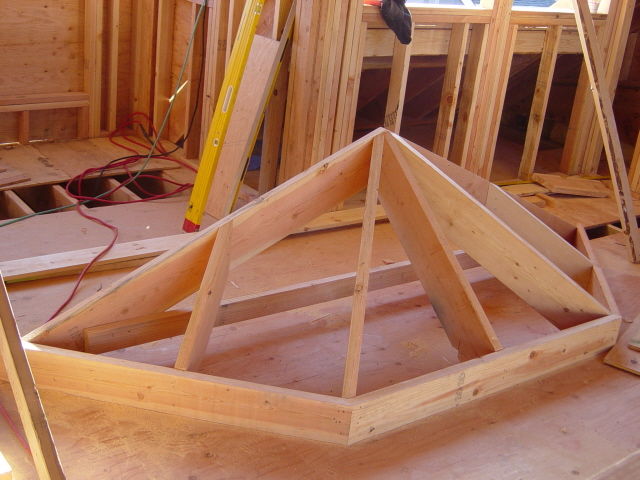
          Your going to laugh when you see theses pictures of this bay I framed about 12 years ago. It was an experiment. I made small rafters with a birdsmouth and an overhang and nailed the fascia on and then nailed the common on and hips and then ran the rest of the rafters in-between perpendicular like Spider Webs.

          Joe Carola

          1. blue_eyed_devil | Nov 14, 2004 05:08am | #10

            It does look weird Joe. I had to look several times and re read to figure out what was going on.

            I've been working with bastard hips since 1988....I never give em a second thought any more. I don't know trig and work exclusively with Geometry.  It took me many years to figure out that the most important spot was that back of the fascia...after that, everything became quite easy. I wasn't taught that way and old habits die hard.

            blueWarning! Be cautious when taking any framing advice from me. Although I have a lifetime of framing experience, all of it is considered bottom of the barrel by Gabe. I am not to be counted amongst the worst of the worst. If you want real framing information...don't listen to me..just ask Gabe!

          2. FramerT | Nov 14, 2004 06:23am | #11

            Wish someone had taught me...I too, had to look at those pics twice scratching my head.I DIDN'T DO IT...THE BUCK DOES NOT STOP HERE.

          3. rez | Nov 14, 2004 06:02pm | #12


          4. FramerT | Nov 14, 2004 06:56pm | #13

            Thanx for the pics Rez. #6 & #7 let me see how you fastened it. I used to run 2x6 cantilevered over bay wall[minus 1 1/2"]as joist and set rafters on top.No seat cut,ala jack rafter. Never did a 'point' though. Good looking house,too. Ahh,and the 'truck'ain't too shabby either.I DIDN'T DO IT...THE BUCK DOES NOT STOP HERE.

          5. rez | Nov 14, 2004 07:07pm | #14

            Of course those pics were from Framers 1rst post on this thread and his few later on.

            They were downsized to permit their viewing to the dialup patrons that have difficulty downloading the larger files.

            That last pic I just threw into the batch as one of my favorites. No charge for that. lol 

Log in or create an account to post a comment.

Sign up Log in

Become a member and get full access to FineHomebuilding.com

Video Shorts

Categories

  • Business
  • Code Questions
  • Construction Techniques
  • Energy, Heating & Insulation
  • General Discussion
  • Help/Work Wanted
  • Photo Gallery
  • Reader Classified
  • Tools for Home Building

Discussion Forum

Recent Posts and Replies

  • |
  • |
  • |
  • |
  • |
  • |
View More Create Post

Up Next

Video Shorts

Featured Story

A Classic Paint Sprayer Gets a Thoughtful Refresh

The Titan Impact X 440 offers great coverage with minimal overspray.

Featured Video

How to Install Exterior Window Trim

Learn how to measure, cut, and build window casing made of cellular PVC, solid wood, poly-ash boards, or any common molding material. Plus, get tips for a clean and solid installation.

Related Stories

  • Podcast Episode 693: Old-House Hazards, Building Larsen Trusses, AI in Construction
  • FHB Podcast Segment: Finding Hazardous Materials in a Fixer-Upper
  • A Classic Paint Sprayer Gets a Thoughtful Refresh
  • Podcast Episode 692: Introduction to Trade Work, Embodied Carbon, and Envelope Improvements

Highlights

Fine Homebuilding All Access
Fine Homebuilding Podcast
Tool Tech
Plus, get an extra 20% off with code GIFT20

"I have learned so much thanks to the searchable articles on the FHB website. I can confidently say that I expect to be a life-long subscriber." - M.K.

Get home building tips, offers, and expert advice in your inbox

Signing you up...

This site is protected by reCAPTCHA and the Google Privacy Policy and Terms of Service apply.
See all newsletters
See all newsletters

Fine Homebuilding Magazine

  • Issue 332 - July 2025
    • Custom Built-ins With Job-Site Tools
    • Fight House Fires Through Design
    • Making the Move to Multifamily
  • Issue 331 - June 2025
    • A More Resilient Roof
    • Tool Test: You Need a Drywall Sander
    • Ducted vs. Ductless Heat Pumps
  • Issue 330 - April/May 2025
    • Deck Details for Durability
    • FAQs on HPWHs
    • 10 Tips for a Long-Lasting Paint Job
  • Issue 329 - Feb/Mar 2025
    • Smart Foundation for a Small Addition
    • A Kominka Comes West
    • Making Small Kitchens Work
  • Issue 328 - Dec/Jan 2025
    • How a Pro Replaces Columns
    • Passive House 3.0
    • Tool Test: Compact Line Lasers

Fine Home Building

Newsletter Sign-up

  • Fine Homebuilding

    Home building tips, offers, and expert advice in your inbox.

  • Green Building Advisor

    Building science and energy efficiency advice, plus special offers, in your inbox.

  • Old House Journal

    Repair, renovation, and restoration tips, plus special offers, in your inbox.

Signing you up...

This site is protected by reCAPTCHA and the Google Privacy Policy and Terms of Service apply.
See all newsletters

Follow

  • Fine Homebuilding

    Dig into cutting-edge approaches and decades of proven solutions with total access to our experts and tradespeople.

    Start Free Trial Now
    • Facebook
    • Instagram
    • X
    • LinkedIn
  • GBA Prime

    Get instant access to the latest developments in green building, research, and reports from the field.

    Start Free Trial Now
    • Facebook
    • YouTube
  • Old House Journal

    Learn how to restore, repair, update, and decorate your home.

    Subscribe Now
    • Facebook
    • Instagram
    • X

Membership & Magazine

  • Online Archive
  • Start Free Trial
  • Magazine Subscription
  • Magazine Renewal
  • Gift a Subscription
  • Customer Support
  • Privacy Preferences
  • About
  • Contact
  • Advertise
  • Careers
  • Terms of Use
  • Site Map
  • Do not sell or share my information
  • Privacy Policy
  • Accessibility
  • California Privacy Rights

© 2025 Active Interest Media. All rights reserved.

Fine Homebuilding receives a commission for items purchased through links on this site, including Amazon Associates and other affiliate advertising programs.

  • Home Group
  • Antique Trader
  • Arts & Crafts Homes
  • Bank Note Reporter
  • Cabin Life
  • Cuisine at Home
  • Fine Gardening
  • Fine Woodworking
  • Green Building Advisor
  • Garden Gate
  • Horticulture
  • Keep Craft Alive
  • Log Home Living
  • Military Trader/Vehicles
  • Numismatic News
  • Numismaster
  • Old Cars Weekly
  • Old House Journal
  • Period Homes
  • Popular Woodworking
  • Script
  • ShopNotes
  • Sports Collectors Digest
  • Threads
  • Timber Home Living
  • Traditional Building
  • Woodsmith
  • World Coin News
  • Writer's Digest
Active Interest Media logo
X
X
This is a dialog window which overlays the main content of the page. The modal window is a 'site map' of the most critical areas of the site. Pressing the Escape (ESC) button will close the modal and bring you back to where you were on the page.

Main Menu

  • How-To
  • Design
  • Tools & Materials
  • Video
  • Blogs
  • Forum
  • Project Guides
  • Reader Projects
  • Magazine
  • Members
  • FHB House

Podcasts

  • FHB Podcast
  • ProTalk

Webinars

  • Upcoming and On-Demand

Podcasts

  • FHB Podcast
  • ProTalk

Webinars

  • Upcoming and On-Demand

Popular Topics

  • Kitchens
  • Business
  • Bedrooms
  • Roofs
  • Architecture and Design
  • Green Building
  • Decks
  • Framing
  • Safety
  • Remodeling
  • Bathrooms
  • Windows
  • Tilework
  • Ceilings
  • HVAC

Magazine

  • Current Issue
  • Past Issues
  • Magazine Index
  • Subscribe
  • Online Archive
  • Author Guidelines

All Access

  • Member Home
  • Start Free Trial
  • Gift Membership

Online Learning

  • Courses
  • Project Guides
  • Reader Projects
  • Podcast

More

  • FHB Ambassadors
  • FHB House
  • Customer Support

Account

  • Log In
  • Join

Newsletter

Get home building tips, offers, and expert advice in your inbox

Signing you up...

This site is protected by reCAPTCHA and the Google Privacy Policy and Terms of Service apply.
See all newsletters
See all newsletters

Follow

  • X
  • YouTube
  • instagram
  • facebook
  • pinterest
  • Tiktok

Join All Access

Become a member and get instant access to thousands of videos, how-tos, tool reviews, and design features.

Start Your Free Trial

Subscribe

FHB Magazine

Start your subscription today and save up to 70%

Subscribe

Enjoy unlimited access to Fine Homebuilding. Join Now

Already a member? Log in

We hope you’ve enjoyed your free articles. To keep reading, become a member today.

Get complete site access to expert advice, how-to videos, Code Check, and more, plus the print magazine.

Start your FREE trial

Already a member? Log in

Privacy Policy Update

We use cookies, pixels, script and other tracking technologies to analyze and improve our service, to improve and personalize content, and for advertising to you. We also share information about your use of our site with third-party social media, advertising and analytics partners. You can view our Privacy Policy here and our Terms of Use here.

Cookies

Analytics

These cookies help us track site metrics to improve our sites and provide a better user experience.

Advertising/Social Media

These cookies are used to serve advertisements aligned with your interests.

Essential

These cookies are required to provide basic functions like page navigation and access to secure areas of the website.

Delete My Data

Delete all cookies and associated data