FHB Logo Facebook LinkedIn Email Pinterest Twitter X Instagram Tiktok YouTube Plus Icon Close Icon Navigation Search Icon Navigation Search Icon Arrow Down Icon Video Guide Icon Article Guide Icon Modal Close Icon Guide Search Icon Skip to content
Subscribe
Log In
  • How-To
  • Design
  • Tools & Materials
  • Restoration
  • Videos
  • Blogs
  • Forum
  • Magazine
  • Members
  • FHB House
  • Podcast
Log In

Discussion Forum

Discussion Forum

Wall Mounted Desk

PhilS | Posted in Construction Techniques on January 9, 2009 08:04am

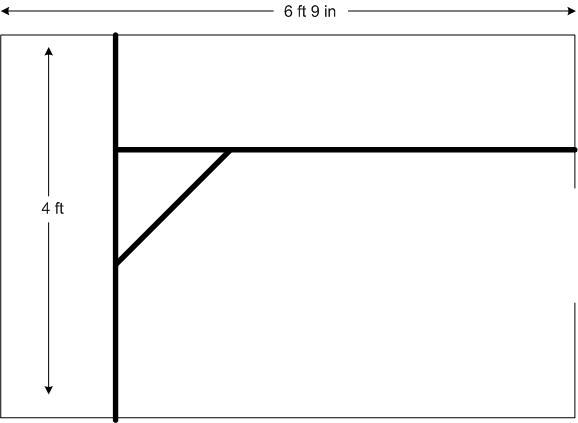
A friend of mine is converting a large closet into a small office. He wants to install a wall mounted “L” shaped desk as shown in the attached picture. I think he plans to use 3/4 ply or similar as the desktop sitting on 2×4 braces shown in the drawing.

Will 2/4’s carry this load? He plans to have a computer monitor and some other electronic equipment on the desk.

What’s the best way to construct the joints where the supports meet?

In general, what’s the best way to do this?

BTW, the drawing is not to scale.

Thanks; Phil

Reply
  • X
  • facebook
  • linkedin
  • pinterest
  • email
  • add to favorites Log in or Sign up to save your favorite articles

Replies

  1. User avater
    Huck | Jan 09, 2009 08:37am | #1

    Will 2/4's carry this load?

    2x4's with 3/4" ply?  I don't see a problem.  Attach joints with 3" screws.  Screw a 2x4 ledger to the wall into the studs around the perimeter.  Can't go wrong.  Russian army could tap-dance on it.

    "...craftsmanship is first & foremost an expression of the human spirit." - P. Korn

    bakersfieldremodel.com

  2. Scott | Jan 09, 2009 08:46am | #2

    2x3 would be fine. Use plain screws like Huck says, or if you want to get fancy use pocket screws or biscuits.

    I made a similar desk years ago from a thrown-out solid core commercial door. In that case I didn't need any frame, just cleats up against the wall.

    Scott.

  3. User avater
    CapnMac | Jan 09, 2009 08:48am | #3

    Well, there are a lot of answers to your questions.

    My first is, is the diagonal going to have a slide-out keyboard tray put under it?

    This can be a good way to get the typing height of the keyboard down around the 25" AFF it needs to be, while keeping the desktop height near the 29-31" height that is best for those surfaces.  If so, you want to run 2x4 to frame around the keyboard tray, usually a pair perpendicular to the diagonal portion, and a "header" at the "closed" depth of the keyboard tray.

    Will plywood suffice?  It might, but in my experience, using two layers is better, and you can lap the joints, too.

    I also prefer a triangular plywood brace under such counters, set into a dado in a 2x4 to carry 24" deep counters back to the wall.  But, that's from experince in these spaces where you need counters that wind up being stood upon when upper cabinets or upper bookshelves go in later (or when networking cable gets run).

    Oh, tell your friend to install more outlets, too (I like a quad on either side of the keyboard location).  Get desk grommets, too--even with all of the wireless "stuff" out there, there always seems to be one more thing to run through the counter top (or the power to this, that, or the other thing.

    Occupational hazard of my occupation not being around (sorry Bubba)
    1. PhilS | Jan 09, 2009 09:41am | #4

      Thanks for the prompt replies guys. Regrading the joints where the 2x4's (or whatever) meet, what's the best way to do that? Lap joint? Hanger? Something else?Phil

      1. User avater
        Huck | Jan 09, 2009 09:48am | #5

        Just butt one end into the other piece, and screw it in from behind.  That's it."...craftsmanship is first & foremost an expression of the human spirit." - P. Korn

        bakersfieldremodel.com

      2. User avater
        CapnMac | Jan 10, 2009 12:19am | #10

        Regrading the joints where the 2x4's

        On the wall, as cleats, simple butt joints will work (assuming that this is all paint-grade anyway).  Out on the front edge, a half-lap is good.  A butt joint will suffice, if you land it on one of the support brackets.

        Now, there is a design alternative, too.  Take the "L" out of the plan, and just go with shelves up the long wall, and leave room for a nice recliner.  Laptop goes on the counter when not being used, or from the recliner.  No longer a great deal of reason to "trap" one's self in an after-thought (not up to the) task chair, in a poorly-lit cubboard, "computing" away.  Wireless means being able to dedicate a space to preiphreals and medai storage; the person in the man-machine interface can go be comfortable.Occupational hazard of my occupation not being around (sorry Bubba)

  4. Howard_Burt | Jan 09, 2009 05:28pm | #6

    "In general, what's the best way to do this?"

    In my opinion, the best way to do this is not to use wood at all. Some aluminum angle for the wall cleat, along with these brackets, and your done. Couldn't be simpler.

    http://www.businessfurnitureshop.com/workstation_brackets.htm


    View Image

  5. User avater
    BillHartmann | Jan 09, 2009 09:45pm | #7

    I am not sure what view I am looking at.

    If it is an 6-9 long top with it only being attached to the wall at ONE END you will need lots and lots of steel and engineering.

    Or is this a have 4 ft leg and a 6-9 leg with the back of each section continuously attached to the wall? And no support at the ends or front? And if so how deep are the sections 24", 30"?

    Edit - after seeing the other replies I guess that what I am seeing is the the dark lines going to the be 2x4's and that the top with be the sections to the left and top.

    And that there is going to be support allow the back of each top and the ends.

    Is that right?

    .
    William the Geezer, the sequel to Billy the Kid - Shoe


    Edited 1/9/2009 1:50 pm by BillHartmann

    1. PhilS | Jan 09, 2009 10:01pm | #8

      Your edit is correct. His original plan was for 2x4's at the front, some support at the wall for the back and the ends.Thank you.

      1. User avater
        BillHartmann | Jan 09, 2009 11:03pm | #9

        The weak spot will be where the 6ft side 2x4 meets the 4ft 2x4.A couple of angle supports or L bracket will help..
        William the Geezer, the sequel to Billy the Kid - Shoe

  6. User avater
    xxPaulCPxx | Jan 10, 2009 12:26am | #11

    If the wall is 4' on on dimension, and 6'9" on the other, the entire desk can be one solid sheet of sheet material.  I would use a single sheet on 3/4" melame, cut the opening where he will sit, then use the edge banding to cover the cut.

    On the walls, a simple piece of 2x2 leveled across the height (-3/4") where the desk top will be.  Place the top, then screw up from the bottom.

    IF anything heavy gets placed, you can deal with that pretty easy with reinforcement... but that is a big if.  Most computer equipment today is ALOT lighter than it ever was before (inkjet printers, thin monitors).  I don't see the need for that much reinforcement.

    Think IKEA light and thin, not warehouse thick and strong.

    Tu stultus es
    Rebuilding my home in Cypress, CA
    Also a CRX fanatic!

    Look, just send me to my drawer.  This whole talking-to-you thing is like double punishment.

    1. Bob_B | Jan 14, 2009 08:05pm | #12

      Paul makes a good point about using one sheet and from experience, laminate or melamine is much nicer than ply to work on.  I've done some desks like this, the latest being my own. (attached, made from leftover materials from various jobs, some day I'll edge band the keyboard drawer....).  2x cleats are nice for mounting but even 1x will work with supports.  On my desk, I supported the monitor corner with an "I" made from  3/4" A/B ply, glued and screwed together.   With the corner configuration in your sketch, I'd look to support it around the keyboard/monitor with some type of angled bracing as suggested by another poster.  Also, I'd put 1x material on the front in place of edge banding. Glued and nailed, it will add some stiffness. My 2 cents. 

    2. PhilS | Jan 15, 2009 10:25am | #14

      Actually, its something like 4'3" x 6'9". Is it possible to get a single sheet to accommodate that size?

      1. User avater
        xxPaulCPxx | Jan 15, 2009 10:41am | #15

        I believe the stock size 49" wide. you could makeup the extra2" with a 2x (1.5") on one side and some 1/2" stock or plywood on the other side, edge flush with the top and painted white.Otherwise, I'd just leave a space onthe edges 1" even just so you could run cords.Tu stultus es
        Rebuilding my home in Cypress, CA
        Also a CRX fanatic!Look, just send me to my drawer.  This whole talking-to-you thing is like double punishment.

        Edited 1/15/2009 2:42 am by xxPaulCPxx

  7. User avater
    McDesign | Jan 14, 2009 10:01pm | #13

    Do a torsion box - elegant.  http://www.taunton.com/finewoodworking/ProjectsAndDesign/ProjectsAndDesignArticle.aspx?id=28855


    Forrest


    Edited 1/14/2009 2:06 pm ET by McDesign

    1. User avater
      FatRoman | Jan 15, 2009 04:48pm | #16

      Cool. Thanks for the link. Interesting video.'Man who say it cannot be done should not interrupt man doing it' ~ Chinese proverb

      View Image

  8. User avater
    PeterJ | Jan 15, 2009 06:49pm | #17

    Fast and good.

     Cleat wall with 1x2 at desk height less top thinkness, mount Fastcap brackets, perhaps every stud for 3/4 material, but I'd probably skip studs and plan on doubling top material. You can easily span 30" with double thick top, even with heavy CRTs.

    Next fit one thickness of particle board of material in room, match lines across joint, scribe walls if way off. Take the two pieces out of room and laminate 3/4 ply across joint, now you've got a big L.

    Your choice of laminate, 5 x 12 will get it seamless. Lam edges, then top. Get help carrying into room, flop on brackets and cleats and a few screws, gravity does the rest. 1/2 x 1/2 quarter round pinned at top to wall joint and you're done.

    Done commercial baths with multiple sinks with similar techniques with no failures, the Fastcaps are surprisingly strong.

    http://www.fastcap.com/products.aspx?id=278


    Everything will be okay in the end.  If it's not okay, it's not the end. 

Log in or create an account to post a comment.

Sign up Log in

Become a member and get full access to FineHomebuilding.com

Video Shorts

Categories

  • Business
  • Code Questions
  • Construction Techniques
  • Energy, Heating & Insulation
  • General Discussion
  • Help/Work Wanted
  • Photo Gallery
  • Reader Classified
  • Tools for Home Building

Discussion Forum

Recent Posts and Replies

  • |
  • |
  • |
  • |
  • |
  • |
View More Create Post

Up Next

Video Shorts

Featured Story

Putting Drywall Sanders to the Test: Power, Precision, and Dust Control

A pro painter evaluates a variety of drywall sanders and dust collection systems for quality of finish, user fatigue, and more.

Featured Video

Micro-Adjust Deck-Baluster Spacing for an Eye-Deceiving Layout

No math, no measuring—just a simple jig made from an elastic band is all you need to lay out a good-looking deck railing.

Related Stories

  • A Summer Retreat Preserved in the Catskill Mountains
  • Fine Homebuilding Issue #332 Online Highlights
  • The Trump Administration Wants to Eliminate the Energy Star Program
  • Podcast Episode 685: Patching Drywall, Adding Air Barriers, and Rotted Walls

Highlights

Fine Homebuilding All Access
Fine Homebuilding Podcast
Tool Tech
Plus, get an extra 20% off with code GIFT20

"I have learned so much thanks to the searchable articles on the FHB website. I can confidently say that I expect to be a life-long subscriber." - M.K.

Get home building tips, offers, and expert advice in your inbox

Signing you up...

This site is protected by reCAPTCHA and the Google Privacy Policy and Terms of Service apply.
See all newsletters
See all newsletters

Fine Homebuilding Magazine

  • Issue 331 - June 2025
    • A More Resilient Roof
    • Tool Test: You Need a Drywall Sander
    • Ducted vs. Ductless Heat Pumps
  • Issue 330 - April/May 2025
    • Deck Details for Durability
    • FAQs on HPWHs
    • 10 Tips for a Long-Lasting Paint Job
  • Issue 329 - Feb/Mar 2025
    • Smart Foundation for a Small Addition
    • A Kominka Comes West
    • Making Small Kitchens Work
  • Issue 328 - Dec/Jan 2024
    • How a Pro Replaces Columns
    • Passive House 3.0
    • Tool Test: Compact Line Lasers
  • Issue 327 - November 2024
    • Repairing Damaged Walls and Ceilings
    • Plumbing Protection
    • Talking Shop

Fine Home Building

Newsletter Sign-up

  • Fine Homebuilding

    Home building tips, offers, and expert advice in your inbox.

  • Green Building Advisor

    Building science and energy efficiency advice, plus special offers, in your inbox.

  • Old House Journal

    Repair, renovation, and restoration tips, plus special offers, in your inbox.

Signing you up...

This site is protected by reCAPTCHA and the Google Privacy Policy and Terms of Service apply.
See all newsletters

Follow

  • Fine Homebuilding

    Dig into cutting-edge approaches and decades of proven solutions with total access to our experts and tradespeople.

    Start Free Trial Now
    • Facebook
    • Instagram
    • X
    • LinkedIn
  • GBA Prime

    Get instant access to the latest developments in green building, research, and reports from the field.

    Start Free Trial Now
    • Facebook
    • YouTube
  • Old House Journal

    Learn how to restore, repair, update, and decorate your home.

    Subscribe Now
    • Facebook
    • Instagram
    • X

Membership & Magazine

  • Online Archive
  • Start Free Trial
  • Magazine Subscription
  • Magazine Renewal
  • Gift a Subscription
  • Customer Support
  • Privacy Preferences
  • About
  • Contact
  • Advertise
  • Careers
  • Terms of Use
  • Site Map
  • Do not sell or share my information
  • Privacy Policy
  • Accessibility
  • California Privacy Rights

© 2025 Active Interest Media. All rights reserved.

Fine Homebuilding receives a commission for items purchased through links on this site, including Amazon Associates and other affiliate advertising programs.

  • Home Group
  • Antique Trader
  • Arts & Crafts Homes
  • Bank Note Reporter
  • Cabin Life
  • Cuisine at Home
  • Fine Gardening
  • Fine Woodworking
  • Green Building Advisor
  • Garden Gate
  • Horticulture
  • Keep Craft Alive
  • Log Home Living
  • Military Trader/Vehicles
  • Numismatic News
  • Numismaster
  • Old Cars Weekly
  • Old House Journal
  • Period Homes
  • Popular Woodworking
  • Script
  • ShopNotes
  • Sports Collectors Digest
  • Threads
  • Timber Home Living
  • Traditional Building
  • Woodsmith
  • World Coin News
  • Writer's Digest
Active Interest Media logo
X
X
This is a dialog window which overlays the main content of the page. The modal window is a 'site map' of the most critical areas of the site. Pressing the Escape (ESC) button will close the modal and bring you back to where you were on the page.

Main Menu

  • How-To
  • Design
  • Tools & Materials
  • Video
  • Blogs
  • Forum
  • Project Guides
  • Reader Projects
  • Magazine
  • Members
  • FHB House

Podcasts

  • FHB Podcast
  • ProTalk

Webinars

  • Upcoming and On-Demand

Podcasts

  • FHB Podcast
  • ProTalk

Webinars

  • Upcoming and On-Demand

Popular Topics

  • Kitchens
  • Business
  • Bedrooms
  • Roofs
  • Architecture and Design
  • Green Building
  • Decks
  • Framing
  • Safety
  • Remodeling
  • Bathrooms
  • Windows
  • Tilework
  • Ceilings
  • HVAC

Magazine

  • Current Issue
  • Past Issues
  • Magazine Index
  • Subscribe
  • Online Archive
  • Author Guidelines

All Access

  • Member Home
  • Start Free Trial
  • Gift Membership

Online Learning

  • Courses
  • Project Guides
  • Reader Projects
  • Podcast

More

  • FHB Ambassadors
  • FHB House
  • Customer Support

Account

  • Log In
  • Join

Newsletter

Get home building tips, offers, and expert advice in your inbox

Signing you up...

This site is protected by reCAPTCHA and the Google Privacy Policy and Terms of Service apply.
See all newsletters
See all newsletters

Follow

  • X
  • YouTube
  • instagram
  • facebook
  • pinterest
  • Tiktok

Join All Access

Become a member and get instant access to thousands of videos, how-tos, tool reviews, and design features.

Start Your Free Trial

Subscribe

FHB Magazine

Start your subscription today and save up to 70%

Subscribe

Enjoy unlimited access to Fine Homebuilding. Join Now

Already a member? Log in

We hope you’ve enjoyed your free articles. To keep reading, become a member today.

Get complete site access to expert advice, how-to videos, Code Check, and more, plus the print magazine.

Start your FREE trial

Already a member? Log in

Privacy Policy Update

We use cookies, pixels, script and other tracking technologies to analyze and improve our service, to improve and personalize content, and for advertising to you. We also share information about your use of our site with third-party social media, advertising and analytics partners. You can view our Privacy Policy here and our Terms of Use here.

Cookies

Analytics

These cookies help us track site metrics to improve our sites and provide a better user experience.

Advertising/Social Media

These cookies are used to serve advertisements aligned with your interests.

Essential

These cookies are required to provide basic functions like page navigation and access to secure areas of the website.

Delete My Data

Delete all cookies and associated data