OK, I know I shouldn’t let my wife see my building magazines, but….
My wife is trying to get me to build a wall-mounted track system so she can hang pictures suspended from the track via variable lengths of wire. The idea is to be able to (relatively) quickly and easily re-arrange photos/paintings/posters (without having to repair nail holes). She says she got the idea from “one of those magazines (I) read.” I can’t find anything with the search function (not sure it is FineHomebuilding…but figure that is the most likely source). Has anyone seen the article or build a similar system? Thanks.
Jeff


Replies
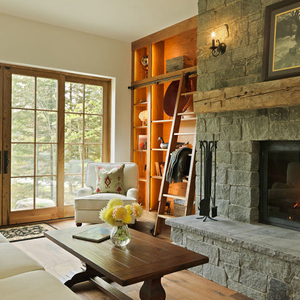
Picture molding. Like chair rail, it's both elegant and useful. I don't quite know the history, but it's been going on for at least a couple hundred years now.
Yours doesn't have to be as fancy as those pictured, but it really adds class to a room I think. There are modern rails made. Have fun, and send some picts.
http://swanpicturehangers.com/
Excellent! Thanks for the reply & link. The molding will look much better than the modern gallery stuff that I thought I'd have to use.
Jeff
There's a fancy name for the moulding from which pictures are hung in Europe. It's the reailing over the door tops and under the crown.
One note on doing this in rooms only about 8'-9' tall. The framed items will not lay flat to the wall, they will be tipped out to the diagonal from the mounting point on the frame to the clip stand-off from the moulding. There are Design Committees outh there who will not approve of "tippy" pictures. Also, unless the frames have stout weight to them, they can also sway (worse yet, bang on the wall with opened/closed doors and the like). Now, with 10 or 12' ceilings, the tipping out nature can improve the viewing angle for the items.
But, even then, you still need light directed on the pictures, as overhead light will be shaded by the overhanging upper frame. Which usually becomes the other Design Committee objection ("All hte pictures are too dark on top!").
But, it can be a neat way to organize collections of framed items, especially ones that might change or re-arrange. Just needs to take into consideration the design considerations.
Long piece of stainless strip and some refrigerator magnets.
Had the almost same thing in my dorm room at collidge 40 years ago.
There, they imbedded a recessed channel into the plaster/ceement walls. You want to hang something? Slip in some hook and hang it via a wire.
Believe it or not I have not seen this idea used in a residential setting, only in art galleries and I don't frequent those much!! What is the suggested "hold down" from the ceiling to allow for the hooks? There would need to be some clearance to get the hook on the rail. 1/4 inch to 1/2 inch depending on the application? Just guessing. Thanks for the advice. Mike L.
Here is ours. There are actually two picture rails, one just below the crown molding (which I have heard was common). The second we added just below the frieze, and in line with all the architraves above the windows and doors.Our ceilings are ten feet. Ceiling height will play a big roll.
So the dark line about 1/3 of the way up the crown is the joint between a picture mold and the crown?The first time I ran into picture molding, it was held down from the ceiling just 1/2" to leave room for the hooks. So it looked like a small crown.With higher ceilings, you have more options, and if you also have tall doors, even more --It's great when you have a chance to line up with the door tops, as you did, or Craftsman-style, where there is maybe a 1x2 shelf with a plate-display groove.With these larger Craftsman details, the picture hooks are often quite elaborate, and a design element in and of themselves. They have to be custom made to get back to the wall surface anyway, so make a feature out of them!Got any more pics? It looks nice.Aitchkay
I'll try and take some more pictures.I suspect that line you are seeing is the shadow between the crown and picture rail. 1/3 sounds about right.
I'm a big fan of picture molding, especially in houses built with wet plaster.
Plenty of people live with art they got bored with 10 years ago, just because they don't want to patch their walls.
As for the tipping problem, most picture-rail hooks are too short, and sit on the face of the molding, out from the wall.
It's not too hard to make your own hangers with a custom jig:
Decide on your material first -- most hardware stores sell strips of brass in various widths and gauges.
-- Mount a 3/4" dowel in a scrap of 2x8-2x12
-- 2-3" away from the first dowel, drill a hole for a removable 1/2” dowel.
Wrap a test strip around the 3/4” dowel, and back around the 1/2” dowel to form an S.
Using a scrap of your picture mold as a guide, screw a scrap of wood next to the 3/4” dowel at the right tangent to form a good hook, leaving just enough room to slip in your metal.
Now with the 1/2” dowel removed, slip another test piece between the block and the 3/4” dowel, wrap around it to just past the 1/2” hole, insert the 1/2” dowel, and wrap back in an S.
Cut the ends to length, file and sand smooth, with rounded corners.
What you want to end up with is a hook that will go over the top of the molding securely, and reach far enough down past it that the back of the hook sits against the wall. The gold braid, or monofilament, whatever you choose as a hanging string, should be within 1/4” of the wall, minimizing tip-out of the picture.
I haven’t had problems with tip-out, probably because I make sure that my hooks sit tight to plaster. But I’d bet that you could tweak an almost-invisible monofilament “harness” that would pass over the top front corners of the picture frame and hook or wrap around the bottom corners. That should remove tip-out completely.
For kids’ rooms, kitchens, etc, it’s fun to rout a groove in the flat of the picture mold to receive either a strip of corkboard (for pushpins), or, (my favorite, for magnets) a 1/4”x1/1/4” strip of steel.
Now you can hang up those ephemeral crayon drawings, current heart-throb posters, etc, without damaging your walls!
Aitchkay