FHB Logo Facebook LinkedIn Email Pinterest Twitter X Instagram Tiktok YouTube Plus Icon Close Icon Navigation Search Icon Navigation Search Icon Arrow Down Icon Video Guide Icon Article Guide Icon Modal Close Icon Guide Search Icon Skip to content
Subscribe
Log In
  • How-To
  • Design
  • Tools & Materials
  • Restoration
  • Videos
  • Blogs
  • Forum
  • Magazine
  • Members
  • FHB House
  • Podcast
Log In

Discussion Forum

Discussion Forum

Waste Line Rough-In Approval

DesignBuild | Posted in Energy, Heating & Insulation on February 17, 2008 10:00am

trying to finish up my waste rough in for a powder-room and would love to get some code checks before I glue up. Attached are two configurations for the WC waste line. The first option shown seems cleaner to me but I think it is not vented correctly, but as I understand it New Jersey follows the IRC, and the IRC does not require a vent for the WC. Doesn’t mean its not a good idea to have one anyway though.

I think the second option provides a proper vent for the WC. My concern with the second option is that double street 45 that seems like a place for “it” to slow down potentially causing a back-up.

Couple notes – that 3″ vertical pipe at the top of the sweep is a vent to the roof with no other waste lines tying in to it.

Would love to get some thoughts, comments.
Sean

ps – also posted this over at Terry Love forums but seems a little slow over there

Reply
  • X
  • facebook
  • linkedin
  • pinterest
  • email
  • add to favorites Log in or Sign up to save your favorite articles

Replies

  1. User avater
    mmoogie | Feb 17, 2008 10:10pm | #1

    First option looks better to me. Looks they they both have exactly the same functionality as far a venting goes. I'm assuming that vertical pipe on the left is the vent. But I'm not a plumber. I just wind up doing a bunch on my own jobs, and have been reading the Cauldwell books just last week. I'm curious to see what the real plumbers have to say.

    Steve

  2. McPlumb | Feb 18, 2008 06:08am | #2

    At the top of the block pillar, use the long turn 4" fitting,run up  to a point where a regular 4" tee can pick up the toilet, in the top of this fitting use a reducer to 3" for the vent. On the horizonal of the vent stack fitting put spigot clean out and plug.

    At the 4" tee run the pipe towards the toilet pickup point, lay the long turn y on its side, this will pick up the toilet. Put a reducer in the fitting to pick up the 2" pipe, keep in mind the 2" inch must have 1/4" fall per foot.

    For proper venting it should be a regular tee on the vent stack and not a long turn fitting.

    A long turn fitting should be laid on its side, except at the base of a stack. There should be a cleanout at the base of the stack.

    Hope I have given an understandable explaination.

  3. davidmeiland | Feb 18, 2008 07:06am | #3

    I'm not a plumber, but #2 looks better to me. I assume the horizontal 3" is from a toilet, and the vertical is the vent. In #1 you are turning down before venting, which the 'spector here would not allow. In #2, your vent takeoff is at the point where the waste line turns down.

    Could be completely wrong. Worth priced charged....

    1. DesignBuild | Feb 18, 2008 07:43am | #4

      thanks for the replies. When I first tried to follow your direction McPlumb I must say I was like "huh?" -- but then I put pen to paper and if I understand you correctly, which I think I do, it should look like the attached sketch. Its a little rough but should be clear enough I hope. There is also a quick elevation showing how the Lav. vent ties back into the 3" vent to roof.It turns out New Jersey follows the National Standard Plumbing Code -- unfortunately Taunton's Code Check Complete is not so complete since it only refers to the UPC or IRC, or does the NSPC fall under one of these?Obviously I would prefer to do it the correct way so I have no doubt in mind when the inspector shows up even if we fall under the IRC which does not require the vent for the WC.David, you are correct, the horizontal (actually 4") is from the toilet and the vertical is a 3" vent to roof.

      1. dovetail97128 | Feb 18, 2008 08:00am | #5

        Your sketch shows a question about a "santee" where you have drawn and labeled a regular tee. Yes, That fitting has to be a "santee"
        They can't get your Goat if you don't tell them where it is hidden.

        1. davidmeiland | Feb 18, 2008 09:02am | #6

          What is the difference between a "regular" tee and a san-tee?

          Design-Build, the fitting that combines a wye with a 45 is called a combo. Your drawing shows one or two. At least that's what we call 'em here.

          1. dovetail97128 | Feb 18, 2008 09:12am | #7

            David, A san tee has a curve to the one leg of it, a shorter version of a long sweep "T". It allows the waste to enter another drain pipe heading in the direction of flow as opposed to at 90 deg. to the flow.
            http://www.plumbingfittingsdirect.com/pvcdwv/85036.html

            Edited 2/18/2008 1:16 am by dovetail97128

          2. davidmeiland | Feb 18, 2008 09:18am | #8

            The fitting in that link is a tee or san-tee. The fitting DesignBuild is drawing is a combo.

          3. dovetail97128 | Feb 18, 2008 09:26am | #9

            Left hand side of his drawing, vertical pipe has a fitting where the horizontal comes into it. He has a note with a "?" mark.. His drawing shows a "T" (What I call a vent "T"" A san tee would work there. Edit. I see what you are saying now. A combination would work there .

            Edited 2/18/2008 1:29 am by dovetail97128

          4. User avater
            BillHartmann | Feb 18, 2008 10:13am | #10

            I am get easly confused on this stuff.But my understanding that a combo should never be used on a horiztonal to vertical change.The reason is that the weir point (how log the water has to get in the pipe before water stops flowing is so low that that it can be lower than the trap and syphon the trap dry..
            .
            A-holes. Hey every group has to have one. And I have been elected to be the one. I should make that my tagline.

      2. User avater
        McDesign | Feb 18, 2008 04:33pm | #12

        Hey - nice sketch.  A good drawing like that's often better than a photograph.

        Forrest

        1. DesignBuild | Feb 18, 2008 06:59pm | #13

          thanks for all the insight guys -- glad you liked the sketch, figured it was the least I could do to aid in the exchange since describing plumbing layouts can get pretty confusing pretty quickly. I've updated it just for clarity but I think I'm in good shape now -- looks like the big mistake I was making was using that long sweep combo instead of a sanitary tee.Just curious McPlumb, could I leave the set-up I showed in my original Option 2 with the Lav waste tying in down low, or is the vent for my Lav in the layout you recommended actually helping to vent my toilet as well?Again, many thanks for sharing your insights, will make me feel much better when I start gluing.

          1. User avater
            ToolFreakBlue | Feb 18, 2008 07:51pm | #14

            I know you asked McP, but I think having the lav tie in high (as in the sketch) is beneficial in that it gives you more flushing ability of the line. BY that I mean the use of the lav will add more water to the wc line helping to clean it out, assuming hands are washed after toilet use.TFB (Bill)

          2. DesignBuild | Feb 18, 2008 11:17pm | #15

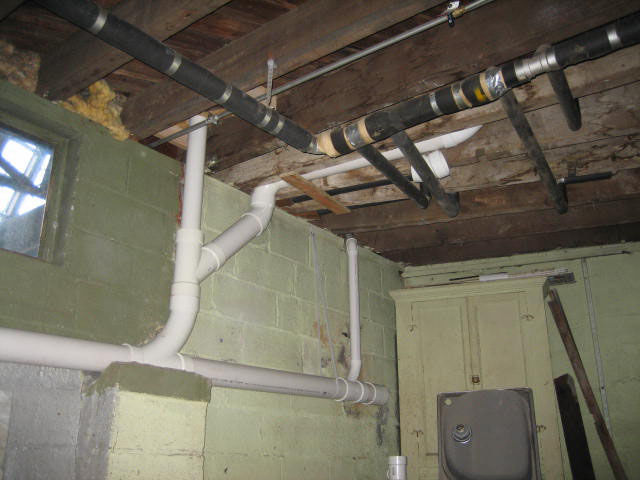
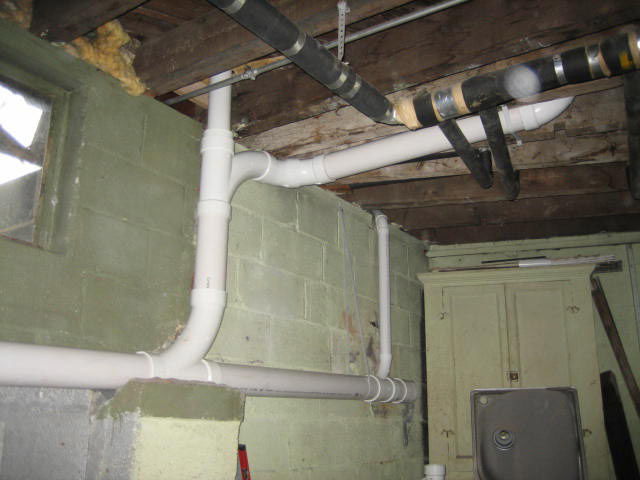
            alright -- I guess I don't have to tell you all that its easy to draw something but once you get into the real world there are some things you just can't account for on paper.I went to dry fit the layout but I ran into an issue -- the framing in my house is really screwy, it basically radiates out from the block foundation wall that you see so it is not perpendicular to it. So in order to drop the toliet waste and bring it into the combo fitting, it would have to cross under the floor joist, and because of the radiator pipes, it would not fit without notching the joist more then I would be comfortable with. My solution is what you see in the photo -- will that offset turn-down present code issues for me? Or, is that Lav waste line technically my toilet vent at that point (Wet Vent?) Not sure what my other options would be.Thanks again for your patience and help.
            Sean

          3. davidmeiland | Feb 18, 2008 11:20pm | #16

            That will work fine. It's not wet vented.

          4. User avater
            ToolFreakBlue | Feb 18, 2008 11:24pm | #17

            Nice clean look too!TFB (Bill)

          5. McPlumb | Feb 19, 2008 12:00am | #18

            Look's good, I suppose your gonna want a raise now!

            Having the Lav back vented helps assure the free movement of air, as was said earlier the Lav water will help keep the fitting clean.

          6. Hackinatit | Feb 19, 2008 12:11am | #19

            It'll go through that like grass through a goose.Liberty = Freedom from unjust or undue governmental control.

            American Heritage Dictionary

          7. DesignBuild | Feb 19, 2008 01:23am | #20

            you guys rock, I really appreciate the guidance. Starting the glue up right away. I see now that my original layout -- even though it may have worked -- did not have the advantage of having the Lav wash out the toilet waste line and now it does - that was actually a recommendation in Cauldwell's book that I bought a while back. Cutting and gluing is easy, but it takes a pro to know how to lay out a smart plumbing system, especially in a remodel -- so my hats off to you guys.Sean

          8. User avater
            Joe | Feb 19, 2008 03:08am | #21

            What’s the code there for venting the W/C? Here if it’s within 2' of the stack, ones not required. In your pictures it looks more than 2' so I’m guessing you need a vent. . .http://www.josephfusco.org
            http://joes-stuff1960.blogspot.com/

            Edited 2/18/2008 7:08 pm ET by Joe

          9. DaveRicheson | Feb 27, 2008 12:02am | #22

            Are you the Joe Fusco from the pre-prospero days, or just adding links to his site to your post?

          10. User avater
            Joe | Mar 06, 2008 09:40pm | #23

            The last time I checked I'm me, how about you?http://www.josephfusco.org
            http://joes-stuff1960.blogspot.com/

          11. DaveRicheson | Mar 06, 2008 10:31pm | #24

            I'm still me, I think. Although some days I think my first name is "Hey."

            Glad to see you are at least occassionaly keeping in touch here.

          12. User avater
            Joe | Mar 06, 2008 11:47pm | #28

            Dave,I'm even pre-webx. . . . This place is just to crowded nowadays. Hell I've even seen Blue change his name to Jim Allen ;-)http://www.josephfusco.org
            http://joes-stuff1960.blogspot.com/

          13. DaveRicheson | Mar 07, 2008 12:21am | #29

            I'm still trying to get use to that one

      3. ravz | Mar 06, 2008 11:04pm | #25

        Nice drawing!!

        1. DesignBuild | Mar 06, 2008 11:31pm | #26

          thanks Ravz -- you know what they say about a picture being worth a thousand words, especially when it comes to describing plumbing layouts!!inspector shows up Monday so if he doesn't like the looks of the real thing maybe I can impress him with the sketch.

          1. ravz | Mar 06, 2008 11:33pm | #27

            lol, don't forget to print out this thread for him.. that will really impress him.


  4. McPlumb | Feb 18, 2008 04:14pm | #11

    Yes, that is what I was trying to desribe. One other though, if you want, you could put a fitting with a cleanout where the Lav drain goes horizonal.

    Bill Hartman has it right about the 4" tee, it needs to allow air in the top portion of the pipe, so it will vent properly.

Log in or create an account to post a comment.

Sign up Log in

Become a member and get full access to FineHomebuilding.com

Video Shorts

Categories

  • Business
  • Code Questions
  • Construction Techniques
  • Energy, Heating & Insulation
  • General Discussion
  • Help/Work Wanted
  • Photo Gallery
  • Reader Classified
  • Tools for Home Building

Discussion Forum

Recent Posts and Replies

  • |
  • |
  • |
  • |
  • |
  • |
View More Create Post

Up Next

Video Shorts

Featured Story

Podcast Episode 688: Obstructed Ridge Vent, Buying Fixer-Uppers, and Flashing Ledgers

Listeners write in about removing masonry chimneys and ask about blocked ridge vents, deal-breakers with fixer-uppers, and flashing ledgers that are spaced from the wall.

Featured Video

How to Install Exterior Window Trim

Learn how to measure, cut, and build window casing made of cellular PVC, solid wood, poly-ash boards, or any common molding material. Plus, get tips for a clean and solid installation.

Related Stories

  • Guest Suite With a Garden House
  • Podcast Episode 688: Obstructed Ridge Vent, Buying Fixer-Uppers, and Flashing Ledgers
  • FHB Podcast Segment: Finding the Right Fixer-Upper
  • Keeping It Cottage-Sized

Highlights

Fine Homebuilding All Access
Fine Homebuilding Podcast
Tool Tech
Plus, get an extra 20% off with code GIFT20

"I have learned so much thanks to the searchable articles on the FHB website. I can confidently say that I expect to be a life-long subscriber." - M.K.

Get home building tips, offers, and expert advice in your inbox

Signing you up...

This site is protected by reCAPTCHA and the Google Privacy Policy and Terms of Service apply.
See all newsletters
See all newsletters

Fine Homebuilding Magazine

  • Issue 332 - July 2025
    • Custom Built-ins With Job-Site Tools
    • Fight House Fires Through Design
    • Making the Move to Multifamily
  • Issue 331 - June 2025
    • A More Resilient Roof
    • Tool Test: You Need a Drywall Sander
    • Ducted vs. Ductless Heat Pumps
  • Issue 330 - April/May 2025
    • Deck Details for Durability
    • FAQs on HPWHs
    • 10 Tips for a Long-Lasting Paint Job
  • Issue 329 - Feb/Mar 2025
    • Smart Foundation for a Small Addition
    • A Kominka Comes West
    • Making Small Kitchens Work
  • Issue 328 - Dec/Jan 2024
    • How a Pro Replaces Columns
    • Passive House 3.0
    • Tool Test: Compact Line Lasers

Fine Home Building

Newsletter Sign-up

  • Fine Homebuilding

    Home building tips, offers, and expert advice in your inbox.

  • Green Building Advisor

    Building science and energy efficiency advice, plus special offers, in your inbox.

  • Old House Journal

    Repair, renovation, and restoration tips, plus special offers, in your inbox.

Signing you up...

This site is protected by reCAPTCHA and the Google Privacy Policy and Terms of Service apply.
See all newsletters

Follow

  • Fine Homebuilding

    Dig into cutting-edge approaches and decades of proven solutions with total access to our experts and tradespeople.

    Start Free Trial Now
    • Facebook
    • Instagram
    • X
    • LinkedIn
  • GBA Prime

    Get instant access to the latest developments in green building, research, and reports from the field.

    Start Free Trial Now
    • Facebook
    • YouTube
  • Old House Journal

    Learn how to restore, repair, update, and decorate your home.

    Subscribe Now
    • Facebook
    • Instagram
    • X

Membership & Magazine

  • Online Archive
  • Start Free Trial
  • Magazine Subscription
  • Magazine Renewal
  • Gift a Subscription
  • Customer Support
  • Privacy Preferences
  • About
  • Contact
  • Advertise
  • Careers
  • Terms of Use
  • Site Map
  • Do not sell or share my information
  • Privacy Policy
  • Accessibility
  • California Privacy Rights

© 2025 Active Interest Media. All rights reserved.

Fine Homebuilding receives a commission for items purchased through links on this site, including Amazon Associates and other affiliate advertising programs.

  • Home Group
  • Antique Trader
  • Arts & Crafts Homes
  • Bank Note Reporter
  • Cabin Life
  • Cuisine at Home
  • Fine Gardening
  • Fine Woodworking
  • Green Building Advisor
  • Garden Gate
  • Horticulture
  • Keep Craft Alive
  • Log Home Living
  • Military Trader/Vehicles
  • Numismatic News
  • Numismaster
  • Old Cars Weekly
  • Old House Journal
  • Period Homes
  • Popular Woodworking
  • Script
  • ShopNotes
  • Sports Collectors Digest
  • Threads
  • Timber Home Living
  • Traditional Building
  • Woodsmith
  • World Coin News
  • Writer's Digest
Active Interest Media logo
X
X
This is a dialog window which overlays the main content of the page. The modal window is a 'site map' of the most critical areas of the site. Pressing the Escape (ESC) button will close the modal and bring you back to where you were on the page.

Main Menu

  • How-To
  • Design
  • Tools & Materials
  • Video
  • Blogs
  • Forum
  • Project Guides
  • Reader Projects
  • Magazine
  • Members
  • FHB House

Podcasts

  • FHB Podcast
  • ProTalk

Webinars

  • Upcoming and On-Demand

Podcasts

  • FHB Podcast
  • ProTalk

Webinars

  • Upcoming and On-Demand

Popular Topics

  • Kitchens
  • Business
  • Bedrooms
  • Roofs
  • Architecture and Design
  • Green Building
  • Decks
  • Framing
  • Safety
  • Remodeling
  • Bathrooms
  • Windows
  • Tilework
  • Ceilings
  • HVAC

Magazine

  • Current Issue
  • Past Issues
  • Magazine Index
  • Subscribe
  • Online Archive
  • Author Guidelines

All Access

  • Member Home
  • Start Free Trial
  • Gift Membership

Online Learning

  • Courses
  • Project Guides
  • Reader Projects
  • Podcast

More

  • FHB Ambassadors
  • FHB House
  • Customer Support

Account

  • Log In
  • Join

Newsletter

Get home building tips, offers, and expert advice in your inbox

Signing you up...

This site is protected by reCAPTCHA and the Google Privacy Policy and Terms of Service apply.
See all newsletters
See all newsletters

Follow

  • X
  • YouTube
  • instagram
  • facebook
  • pinterest
  • Tiktok

Join All Access

Become a member and get instant access to thousands of videos, how-tos, tool reviews, and design features.

Start Your Free Trial

Subscribe

FHB Magazine

Start your subscription today and save up to 70%

Subscribe

Enjoy unlimited access to Fine Homebuilding. Join Now

Already a member? Log in

We hope you’ve enjoyed your free articles. To keep reading, become a member today.

Get complete site access to expert advice, how-to videos, Code Check, and more, plus the print magazine.

Start your FREE trial

Already a member? Log in

Privacy Policy Update

We use cookies, pixels, script and other tracking technologies to analyze and improve our service, to improve and personalize content, and for advertising to you. We also share information about your use of our site with third-party social media, advertising and analytics partners. You can view our Privacy Policy here and our Terms of Use here.

Cookies

Analytics

These cookies help us track site metrics to improve our sites and provide a better user experience.

Advertising/Social Media

These cookies are used to serve advertisements aligned with your interests.

Essential

These cookies are required to provide basic functions like page navigation and access to secure areas of the website.

Delete My Data

Delete all cookies and associated data