FHB Logo Facebook LinkedIn Email Pinterest Twitter X Instagram Tiktok YouTube Plus Icon Close Icon Navigation Search Icon Navigation Search Icon Arrow Down Icon Video Guide Icon Article Guide Icon Modal Close Icon Guide Search Icon Skip to content
Subscribe
Log In
  • How-To
  • Design
  • Tools & Materials
  • Restoration
  • Videos
  • Blogs
  • Forum
  • Magazine
  • Members
  • FHB House
  • Podcast
Log In

Discussion Forum

Discussion Forum

What to do with gas line

catch32 | Posted in General Discussion on March 2, 2006 06:55am

Stupid Homeowner Question #74

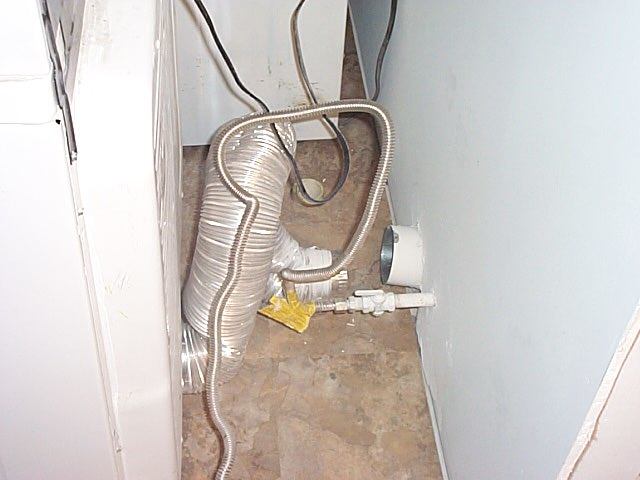
I have a dryer gas supply line the sticks out of the wall about 6″ horizontally. Because of this I can get the dryer no closer to the wall then 14″. See attached photo.

I know the contractor should have installed the gas line coming vertically out of the floor. Now the floor finish is in and I don’t want to rip into the floor. Is it OK to cut out a section of drywall at the bottom of the wall and have the gas line hookup recessed into the wall? I’m woundering if Code would allow this?

Reply
  • X
  • facebook
  • linkedin
  • pinterest
  • email
  • add to favorites Log in or Sign up to save your favorite articles

Replies

  1. Marc | Mar 02, 2006 07:30am | #1

    I would put a 90 degree elbow before the valve.

    Marc

  2. FastEddie | Mar 02, 2006 07:42am | #2

    Well that was stoopid wasn't it.  Agree with putting a 90 before the valve.  be sure you use a different plumber, or you might end up with the gas valve in front of the dryer vent.


    "When asked if you can do something, tell'em "Why certainly I can", then get busy and find a way to do it."  T. Roosevelt


    Edited 3/1/2006 11:43 pm ET by FastEddie

  3. Dave45 | Mar 02, 2006 04:45pm | #3

    I've fixed this problem on a few gas stove installations by opening a small space in the bottom of the wall and running the gas line thru the bottom plate.  It's a PITA, but it gives you the room you need.  Make sure it's OK with your local codes.

    1. davidmeiland | Mar 02, 2006 06:11pm | #4

      You're not allowed to run the flex thru wood anywhere I've worked.

      There is probably an elbow inside the wall, with that too-long nipple threaded into it. Turn off the gas, remove the valve and the nipple, and then find the correct shorter nipple and another elbow to keep the line tight against the wall. It might be necessary to put the valve, the nipple, the elbow, and the second nipple all together before threading into the elbow in the wall. Did that make any sense?

      1. Dave45 | Mar 03, 2006 12:14am | #10

        I don't run flex thru the wood.  If things are close, I like to have the gas line run thru the bottom plate and extend a couple of inches.  Then, you can run your shutoff valve and flex line.  I usually put in a piece of blocking so a leak doesn't let gas accumulate in the wall cavity.

        It's sorta like those in-the-wall washing machine water valves - just lower - lol.

        1. davidmeiland | Mar 03, 2006 12:58am | #11

          I think the OP's best call (and probably the legal one if he were here) is to run the hard pipe laterally thru the studs one or two bays, and bring it  out next to the machine, not behind it. That way the valve is accessible without moving the machine. With many appliances the BI here requires that, but it may only apply to 'built-in' and not something like a freestanding dryer.

          I think that Dryerbox makes a recess housing that accommodates the 4" exhaust and the gas line within the wall. I have used them (w/o the gas) to get the exhaust into the wall, and it works like a charm.

          Yeah... in fact they say that all models incorporate a gas knockout.

          http://dryerbox.com/specifications.htm

          I think I'd still rather have the gas beside the machine. It's easy to get the aluma-flax to 'slinky' into the dryerbox, it would be much harder with gas flex and you've have to use a fairly short one.

          1. JohnSprung | Mar 03, 2006 03:44am | #12

            Instead of opening the wall and going thru the studs, how about replacing the nipple coming out of the wall with one that would allow you to get an ell on there and make the sidways run close to the existing sheetrock?  Just measure from the valve to the sheetrock, round down to the next half inch increment, and subtract from the length of the old nipple when you get it out. 

            With the vent stuff in there, there's plenty of room for the gas pipe to bring the valve clear of the side of the machine.  It would save messing with sheetrock at all.  


            -- J.S.


          2. davidmeiland | Mar 03, 2006 04:00am | #13

            The difficulty is in turning the pipe when it's that close to the wall. It can be done, but you have to pre-install either an elbow pointing outwards, which requires a certain number of turns, or the valve, which needs handle clearance. It is a lot easier to have the nipple poking out of the wall. Probably easiest of all is to have the pipe pop up thru the bottom of an adjacent cabinet, and avoid the wall altogether.

  4. User avater
    BillHartmann | Mar 02, 2006 06:44pm | #5

    A different comment.

    I can't tell, but it appares to me that the vent flex is plastic. If so get rid of it.

    And even if it is AL it needs to be cut down. You want just enough to make the connection.

    1. User avater
      xxPaulCPxx | Mar 02, 2006 08:51pm | #6

      Actually, for a dryer that is not the case.  My Building Inspector told me a couple of weeks ago that while all gas flex lines are normally 24" to 36", the exception is the dryer line which can be up to 6'!  The reason is that it needs that length to be pulled away from the wall for access.Rebuilding my home in Cypress, CA

      Also a CRX fanatic!

      1. BillBrennen | Mar 02, 2006 10:41pm | #9

        Paul,Reread Bill Hartmann's post. He was addressing the 4" diameter vent ducting, not the flexible gas supply.Bill

        1. User avater
          xxPaulCPxx | Mar 03, 2006 07:59pm | #14

          D'OH! 

          Yep, I missed the word "vent" next to the word "flex".  Thanks for the catch!Rebuilding my home in Cypress, CA

          Also a CRX fanatic!

          1. catch32 | Mar 04, 2006 09:11am | #15

            Thanks Guys!The dryer sits right next to the Laundry Room door, so having the gas line to the side of the dryer would not be ideal. I like the dryer box idea. I don't see why I couldn't open up a stud bay and box it out with drywall. I'll seal off the Stud bay with drywall to prevent and code non-compliance.

  5. sungod | Mar 02, 2006 08:58pm | #7

    You can cut a square 6-8" hole in the wall, replace the elbow inside with a shut-off valve, add another elbow if the valve is not positioned right, block/clamp down the pipe and then drywall the sides of the recess opening.
    After doing all of this, will still have a problem with the dryer duct. Even with 12" the duct is being pinched to much at its elbows. Look at the picture, the ducts bends reduce the airflow, easily doubling the use of energy

    1. gtmtnbiker | Mar 02, 2006 09:07pm | #8

      When I remodelled my basement last year, I used a gas outlet box to recess the gas connection. It was similar to: http://kitchen-bath.gillroys.com/Garbage_disposers_water_heaters_and_softeners/Water_heaters/Gas_Outlet_Box-s488682.html

      For the dryer vent, I had rigid 4" dryer ducting in the wall with a 90deg elbow at the bottom.  The duct was sticking pass the plaster/drywall by about 3-4 inches.  When pushing the dryer back, I had to line it up carefully and then just push the dryer into the elbow.  This enabled me to have the dryer a couple of inches from the wall. 

      It worked great.

  6. gotcha | Mar 04, 2006 06:43pm | #16

    Mike,
    You can also get a vent kit that has 2 elbows and much more tubing which goes up over all of the "stuff" and back down. With the 2 elbows, it was much easier to hook up also. I have a gas pipe sticking out and also have 220 which I use, and fought that pipe trying to hook up vent and not crush to tubing. Going with the kit I bought made it a quick fix.
    Pete

Log in or create an account to post a comment.

Sign up Log in

Become a member and get full access to FineHomebuilding.com

Video Shorts

Categories

  • Business
  • Code Questions
  • Construction Techniques
  • Energy, Heating & Insulation
  • General Discussion
  • Help/Work Wanted
  • Photo Gallery
  • Reader Classified
  • Tools for Home Building

Discussion Forum

Recent Posts and Replies

  • |
  • |
  • |
  • |
  • |
  • |
View More Create Post

Up Next

Video Shorts

Featured Story

FHB Podcast Segment: Finding the Right Fixer-Upper

Get expert guidance on finding a fixer-upper that's worth the effort.

Featured Video

Micro-Adjust Deck-Baluster Spacing for an Eye-Deceiving Layout

No math, no measuring—just a simple jig made from an elastic band is all you need to lay out a good-looking deck railing.

Related Stories

  • Guest Suite With a Garden House
  • Podcast Episode 688: Obstructed Ridge Vent, Buying Fixer-Uppers, and Flashing Ledgers
  • FHB Podcast Segment: Finding the Right Fixer-Upper
  • Keeping It Cottage-Sized

Highlights

Fine Homebuilding All Access
Fine Homebuilding Podcast
Tool Tech
Plus, get an extra 20% off with code GIFT20

"I have learned so much thanks to the searchable articles on the FHB website. I can confidently say that I expect to be a life-long subscriber." - M.K.

Get home building tips, offers, and expert advice in your inbox

Signing you up...

This site is protected by reCAPTCHA and the Google Privacy Policy and Terms of Service apply.
See all newsletters
See all newsletters

Fine Homebuilding Magazine

  • Issue 332 - July 2025
    • Custom Built-ins With Job-Site Tools
    • Fight House Fires Through Design
    • Making the Move to Multifamily
  • Issue 331 - June 2025
    • A More Resilient Roof
    • Tool Test: You Need a Drywall Sander
    • Ducted vs. Ductless Heat Pumps
  • Issue 330 - April/May 2025
    • Deck Details for Durability
    • FAQs on HPWHs
    • 10 Tips for a Long-Lasting Paint Job
  • Issue 329 - Feb/Mar 2025
    • Smart Foundation for a Small Addition
    • A Kominka Comes West
    • Making Small Kitchens Work
  • Issue 328 - Dec/Jan 2024
    • How a Pro Replaces Columns
    • Passive House 3.0
    • Tool Test: Compact Line Lasers

Fine Home Building

Newsletter Sign-up

  • Fine Homebuilding

    Home building tips, offers, and expert advice in your inbox.

  • Green Building Advisor

    Building science and energy efficiency advice, plus special offers, in your inbox.

  • Old House Journal

    Repair, renovation, and restoration tips, plus special offers, in your inbox.

Signing you up...

This site is protected by reCAPTCHA and the Google Privacy Policy and Terms of Service apply.
See all newsletters

Follow

  • Fine Homebuilding

    Dig into cutting-edge approaches and decades of proven solutions with total access to our experts and tradespeople.

    Start Free Trial Now
    • Facebook
    • Instagram
    • X
    • LinkedIn
  • GBA Prime

    Get instant access to the latest developments in green building, research, and reports from the field.

    Start Free Trial Now
    • Facebook
    • YouTube
  • Old House Journal

    Learn how to restore, repair, update, and decorate your home.

    Subscribe Now
    • Facebook
    • Instagram
    • X

Membership & Magazine

  • Online Archive
  • Start Free Trial
  • Magazine Subscription
  • Magazine Renewal
  • Gift a Subscription
  • Customer Support
  • Privacy Preferences
  • About
  • Contact
  • Advertise
  • Careers
  • Terms of Use
  • Site Map
  • Do not sell or share my information
  • Privacy Policy
  • Accessibility
  • California Privacy Rights

© 2025 Active Interest Media. All rights reserved.

Fine Homebuilding receives a commission for items purchased through links on this site, including Amazon Associates and other affiliate advertising programs.

  • Home Group
  • Antique Trader
  • Arts & Crafts Homes
  • Bank Note Reporter
  • Cabin Life
  • Cuisine at Home
  • Fine Gardening
  • Fine Woodworking
  • Green Building Advisor
  • Garden Gate
  • Horticulture
  • Keep Craft Alive
  • Log Home Living
  • Military Trader/Vehicles
  • Numismatic News
  • Numismaster
  • Old Cars Weekly
  • Old House Journal
  • Period Homes
  • Popular Woodworking
  • Script
  • ShopNotes
  • Sports Collectors Digest
  • Threads
  • Timber Home Living
  • Traditional Building
  • Woodsmith
  • World Coin News
  • Writer's Digest
Active Interest Media logo
X
X
This is a dialog window which overlays the main content of the page. The modal window is a 'site map' of the most critical areas of the site. Pressing the Escape (ESC) button will close the modal and bring you back to where you were on the page.

Main Menu

  • How-To
  • Design
  • Tools & Materials
  • Video
  • Blogs
  • Forum
  • Project Guides
  • Reader Projects
  • Magazine
  • Members
  • FHB House

Podcasts

  • FHB Podcast
  • ProTalk

Webinars

  • Upcoming and On-Demand

Podcasts

  • FHB Podcast
  • ProTalk

Webinars

  • Upcoming and On-Demand

Popular Topics

  • Kitchens
  • Business
  • Bedrooms
  • Roofs
  • Architecture and Design
  • Green Building
  • Decks
  • Framing
  • Safety
  • Remodeling
  • Bathrooms
  • Windows
  • Tilework
  • Ceilings
  • HVAC

Magazine

  • Current Issue
  • Past Issues
  • Magazine Index
  • Subscribe
  • Online Archive
  • Author Guidelines

All Access

  • Member Home
  • Start Free Trial
  • Gift Membership

Online Learning

  • Courses
  • Project Guides
  • Reader Projects
  • Podcast

More

  • FHB Ambassadors
  • FHB House
  • Customer Support

Account

  • Log In
  • Join

Newsletter

Get home building tips, offers, and expert advice in your inbox

Signing you up...

This site is protected by reCAPTCHA and the Google Privacy Policy and Terms of Service apply.
See all newsletters
See all newsletters

Follow

  • X
  • YouTube
  • instagram
  • facebook
  • pinterest
  • Tiktok

Join All Access

Become a member and get instant access to thousands of videos, how-tos, tool reviews, and design features.

Start Your Free Trial

Subscribe

FHB Magazine

Start your subscription today and save up to 70%

Subscribe

Enjoy unlimited access to Fine Homebuilding. Join Now

Already a member? Log in

We hope you’ve enjoyed your free articles. To keep reading, become a member today.

Get complete site access to expert advice, how-to videos, Code Check, and more, plus the print magazine.

Start your FREE trial

Already a member? Log in

Privacy Policy Update

We use cookies, pixels, script and other tracking technologies to analyze and improve our service, to improve and personalize content, and for advertising to you. We also share information about your use of our site with third-party social media, advertising and analytics partners. You can view our Privacy Policy here and our Terms of Use here.

Cookies

Analytics

These cookies help us track site metrics to improve our sites and provide a better user experience.

Advertising/Social Media

These cookies are used to serve advertisements aligned with your interests.

Essential

These cookies are required to provide basic functions like page navigation and access to secure areas of the website.

Delete My Data

Delete all cookies and associated data