FHB Logo Facebook LinkedIn Email Pinterest Twitter X Instagram Tiktok YouTube Plus Icon Close Icon Navigation Search Icon Navigation Search Icon Arrow Down Icon Video Guide Icon Article Guide Icon Modal Close Icon Guide Search Icon Skip to content
Subscribe
Log In
  • How-To
  • Design
  • Tools & Materials
  • Restoration
  • Videos
  • Blogs
  • Forum
  • Magazine
  • Members
  • FHB House
  • Podcast
Log In

Discussion Forum

Discussion Forum

Window trim detail

measuretwice | Posted in Construction Techniques on December 18, 2002 02:07am

Your aesthetic/artistic opinions on Victorian-era window trim please.

I’m using 5-1/4″ casing for sides and head, with rosette (corner) blocks about 5-5/8″ square at head joints, stool and apron at bottom.  Cove & bead or possibly ogee on both edges of casing.

Many of the windows are double units, one is quadruple, and there is also one bay.  The jambs between these multiple units are spaced for full-width casings.

My questions:

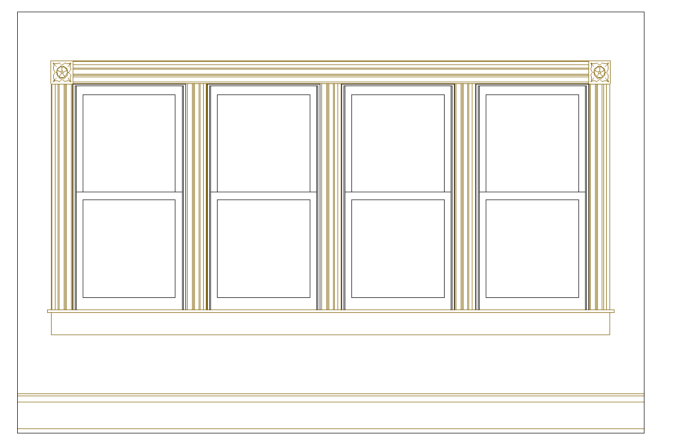
(1) Whether to have rosettes at every casing joint along the head casing, or  whether to have rosettes at outside corners only

(2) Assuming rosettes at outside corners only, whether to cope the middle casing(s) to the head casing

(3) Assuming cope, whether to have middle casing flush or recessed relative to head.  Or other possibilities?

(Rosettes at corners only are shown in attached bitmap)

My concerns: (1) may look cluttered but (2-3) may not look authentic and also involves tougher joints.

Reply
  • X
  • facebook
  • linkedin
  • pinterest
  • email
  • add to favorites Log in or Sign up to save your favorite articles

Replies

  1. DaveHeinlein | Dec 18, 2002 02:45am | #1

    How about a rosette at each top corner(natch) and one over the center vertical casing. Not so cluttered, yet a little more interesting.

  2. Ragnar17 | Dec 18, 2002 03:24am | #2

    Woody,

    I think every Victorian window I've seen - when trimmed with corner blocks - has also had additional blocks for multi-gang windows.  I think you're right on when you say it will look more authentic this way. 

    I don't think you need to worry about it looking cluttered: it just looks right when you're using corner blocks.

    I thought you might be interested in knowing that I've come across at least one house which also had blocks at sill elevation (instead of having a stool and apron).  I'm partial to the stool and apron, but it's probably just because I don't usually go the corner block routine anyway, since most of my work is around 1905-1930.

    Anyway, I'm posting a picture so you can see this full-cornered window, just for kicks.  Look to the left of the photo.

    Ragnar

    1. measuretwice | Dec 18, 2002 06:17pm | #3

      Thanks Ragnar for your input -- I'm going with the rosettes-at-every-joint option.

      I checked the parlor image -- it looks nice with blocks at the bottom.  Unfortunately my cat happened to see the image too and promptly forbade me from installing anything other than "cat-width" sills!  Orders are orders. 

      Incidentally, are those >=10 foot ceilings in your parlor job?

      Woody 

      1. Ragnar17 | Dec 19, 2002 09:43am | #5

        Woody,

        Actually, the "parlor" image is taken from a B&B in Port Townsend, WA, where I was married last summer.  I can't take any credit for the work - it is original circa 1889.

        The main floor ceilings are a full 12 feet!  The second floor is 10 feet, and the third at least 8.  They really knew how to build back then!

        On the subject of window stool width, my three cats enthusiastically agree with your decision.  ;)  My biggest, Spencer Doodle, is a 18-pounder and prefers 5/4x6 window stools -- see attachment.

        Regards,

        Ragnar

  3. PhillGiles | Dec 19, 2002 01:33am | #4

    The "window" BMP shows your corner blocks as being about equal in width with the casing while your description indicates that the blocks are larger: IMHO, getting the sizes closer, as per your drawing, may look better.

    In any case, blocks at every joint would be the more faithful to the period

    .

    Phill Giles

    The Unionville Woodwright

    Unionville, Ontario

  4. Ragnar17 | Dec 21, 2002 11:23am | #6

    Wiley,

    Attached is a photo of what I think you're talking about.  To give you some sizes, I usually use 1x5 for the side casings, 1x6 for the head casing, and 1x4 for the apron, if you're doing windows.

    The fillet (or bead, as I think you refered to it) is about 7/16" thick x about 1-1/4" deep, bit a bullnose on it.  I let it overhang a 1/2" at the sides and bullnose the end grain, too.

    The caps are milled from solid 1-1/2 x 2-1/2 stock.  They're solid caps, so you don't need to put on a dust cap, like you would if you were using crown molding.  If you're thinking about trimming without the caps, I'd strongly advise against it: the whole thing looks 10x better with them in place! 

    On doorways, I pre-assemble the head casing and put it up first.  Then I cut the side casings to length and snap them in place.

    You should be able to get everything you need in at least 16' lengths, so have fun with that big opening!  I've done a 3-gang window immediately adjacent to a door once, but I think that only added up to about 12 feet or so.

    Ragnar

    1. PhillGiles | Dec 21, 2002 07:02pm | #7

      Maybe it's just the way I have my computer setup; but, when I receive very large pictures like this (it's well over 100K I think, and it's the way most of these pictures are posted), the viewable area on my screen is generally just a corner of the picture, I can scroll around, or I can save it and cut it down in size; OR, it would be really nice if the posters could resize them before posting..

      Phill Giles

      The Unionville Woodwright

      Unionville, Ontario

      1. rez | Dec 21, 2002 07:29pm | #8

        Ya, I was able to scroll around enough to see angled shots of about half the window, some crown molding, photos on a wall and a central ceiling light fixture. Was that the intent?


  5. RussellAssoc | Dec 21, 2002 08:09pm | #9

    For some reason I can't bring up your picture, however, at the risk of being the only contrarian, I would would frame the ganged windows with a full length head casing, with a block at each corner and cover the vertical window joints with flat 1/4" by the width  of the mull (vertical joint) with mull covers, minus a 1/8" reveal on each side, the mull strip running from the head down to the stool.  A much cleaner installation.  I usually use 1/4" masonite for the mull strips if they are to be painted.

    1. measuretwice | Dec 22, 2002 01:41am | #10

      Hi Russ

      Thanks for your input.  In my case the spaces between jambs on the ganged windows are such that the cover would have to be 5-1/4" to 5-1/2" wide (assuming 1/8" reveals).  I think a relatively wide flat piece here would look out of place next to the fairly detailed outer casings.

      Good luck

      and since so many posters seem to close with a quote, here is one of my own:

      Don't accept in your family, friends, or coworkers that which you would not tolerate in politicians, business leaders, or clergy.


      1. Ragnar17 | Dec 22, 2002 05:14am | #11

        Woody,

        Nice quote.  I like the idea: a single standard to be applied to one and all.

        Regards,

        Ragnar

  6. Ragnar17 | Dec 22, 2002 05:26am | #12

    Wiley,

    Glad you like the style, and thanks for resizing the pic!  Maybe you can give me some guidance on how to do that - seriously!  What program do you use, etc.?

    The arrow in the picture is pointing to the cap.  The apron is the piece that goes under the window stool.  Unfortunately, the picture doesn't show the apron that well.  However, if you go back up to the original post on this thread, there's a sketch that shows the apron and stool quite well.

    As to your questions: I use the same size on small windows, too.  The window in the pic, for example, is a fairly small "piano" window (called that because an upright piano fits under it quite nicely).  I purchased the fillet as you described, and the caps are stock moldings at the lumberyard I frequent.  Look around and see if you can find some -- it's definitely nicer than trying to nail up crown mold, and the projection (i.e. spring angle) is more pronounced.

    I'm not sure I understand your question about caulking the caps and fillet.  I use adhesive and nails to assemble it.  If you cut the pieces right, you shouldn't have to do much caulking when you're all done -- although it has been known to happen!  ;)

    Ragnar

    1. PhillGiles | Dec 22, 2002 08:02am | #13

      I use MS Photoeditor (photoed.exe); if you don't have a copy on your machine (it comes with Office and with other MS apps), then just do a internet search and you should easily find a free source for it.

      With it, the best way to resize seems to be with pixel counts (i.e. if the raw picture is 600 pixels wide, and you want 1/2 size, resize it to 300 pixels..

      Phill Giles

      The Unionville Woodwright

      Unionville, Ontario

      1. Ragnar17 | Dec 23, 2002 09:08pm | #15

        Wiley,

        Your assumption about painters caulk is correct: sometimes you'll have to fill some gaps, but in general the goal is to keep the use of caulk to a minimum.  I find that painters caulk is especially handy for filling the gap between casing and wall when the wall is wavy, etc.  Also, just slightly filling this joint makes painting a lot easier.

        The crown molding in the photo is something I've only seen in houses built around 1911 to 1912, and I call it a "flat" crown or "flat cove".  This is because the primary element is nothing more than a piece of S4S which has been back-beveled to allow it to fit snug against wall and ceiling.  The other two pieces are just picture rails. 

        In many of the houses (especially colonial revivals) from the 1920s, I've seen a very similar cove/crown detail where two pieces of picture rail bracket a third, larger piece.  The only difference is that the third piece is a large cove.

        Ragnar

    2. Piffin | Dec 23, 2002 12:00am | #14

      I've posted a link to Irfanview which a lot of us use for photo resixing, viewing, and editing or conversions in the gallery. G there and look for the irfanview thread to download it free.

      Excellence is its own reward!

      "The first rule is to keep an untroubled spirit.

      The second is to look things in the face and know them for what they are."

      --Marcus Aurelius

      1. Ragnar17 | Dec 23, 2002 09:09pm | #16

        Piffin, Phill, and Wiley:

        Thanks for the suggestions on resizing photos.  I'm going to learn how to do it in the near future!

        Ragnar

Log in or create an account to post a comment.

Sign up Log in

Become a member and get full access to FineHomebuilding.com

Video Shorts

Categories

  • Business
  • Code Questions
  • Construction Techniques
  • Energy, Heating & Insulation
  • General Discussion
  • Help/Work Wanted
  • Photo Gallery
  • Reader Classified
  • Tools for Home Building

Discussion Forum

Recent Posts and Replies

  • |
  • |
  • |
  • |
  • |
  • |
View More Create Post

Up Next

Video Shorts

Featured Story

Outdoor Lighting

Lighting up an exterior isn't just about ambiance— it's also about code compliance. Here is what the code says about safety and efficiency when it comes to outdoor lighting.

Featured Video

A Modern California Home Wrapped in Rockwool Insulation for Energy Efficiency and Fire Resistance

The designer and builder of the 2018 Fine Homebuilding House detail why they chose mineral-wool batts and high-density boards for all of their insulation needs.

Related Stories

  • How Trump's “Big Beautiful Bill” Will Affect the Inflation Reduction Act
  • A Drip-Free, Through-Window Heat Pump
  • Podcast Episode 690: Sharpening, Wires Behind Baseboard, and Fixing Shingle Panels
  • FHB Podcast Segment: Hand Tool Sharpening Tips

Highlights

Fine Homebuilding All Access
Fine Homebuilding Podcast
Tool Tech
Plus, get an extra 20% off with code GIFT20

"I have learned so much thanks to the searchable articles on the FHB website. I can confidently say that I expect to be a life-long subscriber." - M.K.

Get home building tips, offers, and expert advice in your inbox

Signing you up...

This site is protected by reCAPTCHA and the Google Privacy Policy and Terms of Service apply.
See all newsletters
See all newsletters

Fine Homebuilding Magazine

  • Issue 332 - July 2025
    • Custom Built-ins With Job-Site Tools
    • Fight House Fires Through Design
    • Making the Move to Multifamily
  • Issue 331 - June 2025
    • A More Resilient Roof
    • Tool Test: You Need a Drywall Sander
    • Ducted vs. Ductless Heat Pumps
  • Issue 330 - April/May 2025
    • Deck Details for Durability
    • FAQs on HPWHs
    • 10 Tips for a Long-Lasting Paint Job
  • Old House Journal – August 2025
    • Designing the Perfect Garden Gate
    • Old House Air-Sealing Basics
  • Issue 329 - Feb/Mar 2025
    • Smart Foundation for a Small Addition
    • A Kominka Comes West
    • Making Small Kitchens Work

Fine Home Building

Newsletter Sign-up

  • Fine Homebuilding

    Home building tips, offers, and expert advice in your inbox.

  • Green Building Advisor

    Building science and energy efficiency advice, plus special offers, in your inbox.

  • Old House Journal

    Repair, renovation, and restoration tips, plus special offers, in your inbox.

Signing you up...

This site is protected by reCAPTCHA and the Google Privacy Policy and Terms of Service apply.
See all newsletters

Follow

  • Fine Homebuilding

    Dig into cutting-edge approaches and decades of proven solutions with total access to our experts and tradespeople.

    Start Free Trial Now
    • Facebook
    • Instagram
    • X
    • LinkedIn
  • GBA Prime

    Get instant access to the latest developments in green building, research, and reports from the field.

    Start Free Trial Now
    • Facebook
    • YouTube
  • Old House Journal

    Learn how to restore, repair, update, and decorate your home.

    Subscribe Now
    • Facebook
    • Instagram
    • X

Membership & Magazine

  • Online Archive
  • Start Free Trial
  • Magazine Subscription
  • Magazine Renewal
  • Gift a Subscription
  • Customer Support
  • Privacy Preferences
  • About
  • Contact
  • Advertise
  • Careers
  • Terms of Use
  • Site Map
  • Do not sell or share my information
  • Privacy Policy
  • Accessibility
  • California Privacy Rights

© 2025 Active Interest Media. All rights reserved.

Fine Homebuilding receives a commission for items purchased through links on this site, including Amazon Associates and other affiliate advertising programs.

  • Home Group
  • Antique Trader
  • Arts & Crafts Homes
  • Bank Note Reporter
  • Cabin Life
  • Cuisine at Home
  • Fine Gardening
  • Fine Woodworking
  • Green Building Advisor
  • Garden Gate
  • Horticulture
  • Keep Craft Alive
  • Log Home Living
  • Military Trader/Vehicles
  • Numismatic News
  • Numismaster
  • Old Cars Weekly
  • Old House Journal
  • Period Homes
  • Popular Woodworking
  • Script
  • ShopNotes
  • Sports Collectors Digest
  • Threads
  • Timber Home Living
  • Traditional Building
  • Woodsmith
  • World Coin News
  • Writer's Digest
Active Interest Media logo
X
X
This is a dialog window which overlays the main content of the page. The modal window is a 'site map' of the most critical areas of the site. Pressing the Escape (ESC) button will close the modal and bring you back to where you were on the page.

Main Menu

  • How-To
  • Design
  • Tools & Materials
  • Video
  • Blogs
  • Forum
  • Project Guides
  • Reader Projects
  • Magazine
  • Members
  • FHB House

Podcasts

  • FHB Podcast
  • ProTalk

Webinars

  • Upcoming and On-Demand

Podcasts

  • FHB Podcast
  • ProTalk

Webinars

  • Upcoming and On-Demand

Popular Topics

  • Kitchens
  • Business
  • Bedrooms
  • Roofs
  • Architecture and Design
  • Green Building
  • Decks
  • Framing
  • Safety
  • Remodeling
  • Bathrooms
  • Windows
  • Tilework
  • Ceilings
  • HVAC

Magazine

  • Current Issue
  • Past Issues
  • Magazine Index
  • Subscribe
  • Online Archive
  • Author Guidelines

All Access

  • Member Home
  • Start Free Trial
  • Gift Membership

Online Learning

  • Courses
  • Project Guides
  • Reader Projects
  • Podcast

More

  • FHB Ambassadors
  • FHB House
  • Customer Support

Account

  • Log In
  • Join

Newsletter

Get home building tips, offers, and expert advice in your inbox

Signing you up...

This site is protected by reCAPTCHA and the Google Privacy Policy and Terms of Service apply.
See all newsletters
See all newsletters

Follow

  • X
  • YouTube
  • instagram
  • facebook
  • pinterest
  • Tiktok

Join All Access

Become a member and get instant access to thousands of videos, how-tos, tool reviews, and design features.

Start Your Free Trial

Subscribe

FHB Magazine

Start your subscription today and save up to 70%

Subscribe

Enjoy unlimited access to Fine Homebuilding. Join Now

Already a member? Log in

We hope you’ve enjoyed your free articles. To keep reading, become a member today.

Get complete site access to expert advice, how-to videos, Code Check, and more, plus the print magazine.

Start your FREE trial

Already a member? Log in

Privacy Policy Update

We use cookies, pixels, script and other tracking technologies to analyze and improve our service, to improve and personalize content, and for advertising to you. We also share information about your use of our site with third-party social media, advertising and analytics partners. You can view our Privacy Policy here and our Terms of Use here.

Cookies

Analytics

These cookies help us track site metrics to improve our sites and provide a better user experience.

Advertising/Social Media

These cookies are used to serve advertisements aligned with your interests.

Essential

These cookies are required to provide basic functions like page navigation and access to secure areas of the website.

Delete My Data

Delete all cookies and associated data