FHB Logo Facebook LinkedIn Email Pinterest Twitter X Instagram Tiktok YouTube Plus Icon Close Icon Navigation Search Icon Navigation Search Icon Arrow Down Icon Video Guide Icon Article Guide Icon Modal Close Icon Guide Search Icon Skip to content
Subscribe
Log In
  • How-To
  • Design
  • Tools & Materials
  • Restoration
  • Videos
  • Blogs
  • Forum
  • Magazine
  • Members
  • FHB House
  • Podcast
Log In

Discussion Forum

Discussion Forum

Yikes! How would you trim this?

lunabean1 | Posted in Construction Techniques on July 13, 2011 09:31am

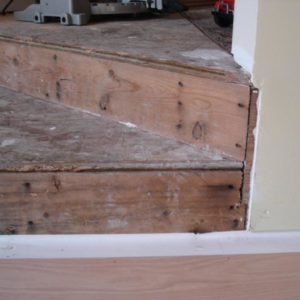
We’ve got two steps leading from a hallway down into the living room.  I’ve got 5″ wide bullnose for the edge of the step, with a groove in the back, and will put the same oak plank flooring on the step as in the living room.  Since the bottom of the steps will have the tongue and groove flooring and not a regular stair tread, I think the riser will have to sit on top of the flooring, right?  Then maybe a small 1/4 round on top, though I really don’t like those.  I have 3/4″ oak for the risers.

What’s got me most befuddled is the corner shown in the picture.  How would you finish off the vertical sides here?  We’ll be using 5″ trim for the baseboard.  (As much as I’d LOVE to use oak, it’s probably gonna have to be pine.)  Would you put a skirt board on the corner of the wall?  No trouble to match the skirt up with the baseboard in the hall, but how to transition the skirt on the living room wall?  Maybe I should go with a wider baseboard in the living room – size it the same height as the riser under the bottom step?  Biggest problem with that is that I’d have to rip all the baseboard, and I’m feeling lazy, as well as the added price for the materials.  (We’ve been working on this house for six years now, and I really want to get the floors done and a kitchen in!)

Does any of this make sense?  (Maybe don’t answer that last bit.)  Any ideas would be so VERY appreciated!
Reply
  • X
  • facebook
  • linkedin
  • pinterest
  • email
  • add to favorites Log in or Sign up to save your favorite articles

Replies

  1. calvin | Jul 13, 2011 10:26am | #1

    luna

    What you do on the right of the treads must look good.

    By itself, in relation to the treads and even to the look you're going to have on the left side of those stairs.................

    So, can you step back and take another shot of the whole stair area?

    thanks.

  2. lunabean1 | Jul 14, 2011 06:42pm | #2

    Another picture and idea

    This is just cobbled together, and is a different set of steps, but it looked like this set might be an easier place to start.  I tried this new set with a wider piece of vertical trim, but thought this narrower trim looked better.  (Of course, this is all oak, too.  Will pine look okay next to the oak?  Subjective, I know, but there's a heck of a lot of baseboard that'll be needed and at this point I kinda just want this house done!)

    It looks like I'll have to add a layer of 1/2" ply behind the riser to get it to match up to the vertical trim.  Not sure yet how this will work on the other steps, but I'll just start to play around with it tomorrow when the treads and riser materials are delivered.

    Is this looking like I'm headed in the right direction?

    1. calvin | Jul 14, 2011 11:28pm | #3

      Luna

      What you are doing is the way to go when a clear cut easy to figure answer doesn't just jump right out.  Use scrap or nondiscript wood to mock up the finishes.  But, what you do on one end of the room needs to "match" with the other side.  Maybe not pc for pc, but the overall way you deal with the transitions from riser to trim to base.

      If you finished the odd corners (drywall) and cut to fit the treads to return over them, you  might get by with the base running under the lip of the tread.  The bottom riser would trim the floor and have a return on the ends.  The base woiuld die into the end of those returned risers.

      But, that vertical pc looks good if you can figure a way to end it up top.

      I realize you want the project done, but this finish is an important focal point of the room.  You won't be putting a couch in front of this.

      Take your time and try a few different mock ups till you get it right.

      Best of luck.

  3. sawzall316 | Jul 17, 2011 11:54am | #4

    The transition piece is key

    Your on the right track. The transition piece should bridge between both levels base boards for a smooth professional look.

    Do yourself a favor and spend the extra for the oak. You will always look at this with regret if you do not. I do not know what clear pine sells for in your area but in Chicago it is at par or sometimes more than oak. I have got to believe it's similar in your neck of the woods. 

  4. ki | Jul 26, 2011 08:45pm | #5

    stairs

    i sort of agree, the treads need to extend beyond the corner of the wall and return into the wall, like the horn

    on a windowsill, then the risers can do likewise underneath and the base can but into it.

    in the second picture with the mock up, i cant make out why the bottom step is angled like that. does it have to be?

    or are the mock up pieces just cut that way?

    1. lunabean1 | Aug 05, 2011 09:40pm | #8

      Our crazy angled house

      We built on an existing foundation, and I never knew the angles in it would create such difficulties down the road!

      There are two reasons for the angle.  When you come in the front door, this step goes down into the great room.  The walls in the hallway are angled outward as you approach the steps.  The other, bigger reason for the angle, is that the door to the basement (on the left side of the steps - not shown) is too close to the step, and the step protrudes into the doorway a bit, so it has to be angled.  By doing this on the other side, there's a little symmetry.

      I have an extra piece of the tread material left over from some other steps, so I was going to rip the nose from the extra piece and use it to finish the tread on the angled sides. 

  5. Snort | Jul 27, 2011 02:37pm | #6

    Luna, here's what I came with on a wonky set.

    It's tough finishing winder treads that are made up of flooring. These risers were run on top of the flooring, which I sanded first. I don't normally use shoe there, but in this case, the contractor insisted.

    1. lunabean1 | Aug 05, 2011 09:31pm | #7

      Very helpful pics - thanks!

      I did put the riser on top of the flooring.  No shoe for now, but we'll have to see how much things shrink in the dead of winter.  The pictures of the skirt board are soooo helpful.  We have another set of two steps into the kitchen, and I spent half an hour looking for just this kind of thing this morningl.  I should have checked back here first!

      Still struggling with the corner trim/skirt on the steps shown in my first post, but I think I just about have it worked out.  It would be so much easier if we were planning on painting the trim.  In order to get the riser for the top step (the one that has the flooring for the tread)  to meet up with the trim piece, the angle is 22 1/2 degrees (since the step is sitting at 45), but when the same vertical trim piece meets the trim/baseboard at the very top of the step, it would need to be cut at 45 degrees. 

      I've about resigned myself to using two pieces for the vertical trim.  One for the lower part and one for the top.  I tried using one piece, and cutting the bottom part at 22 1/2 and the top part at 45, but then the cut at the top wasn't flush with the corner of the wall.  (And that probably doesn't make any sense in words.)

      Anyway, thanks again!

      1. Snort | Aug 06, 2011 04:20pm | #9

        If it's the big house oo7 pic, that vertical looks a bit out of proportion, to me.

        That top riser could wrap around the corner, then miter into the vertical piece, which in turn could miter into the baseboard.

        or-

        The vertical piece could be a separate element, like a plinth. Celebrate it by using 5/4 material?

        -or-

        Base cap can hide a multitude of sins

        Not a diss, but I've never understood why such a design element as stairs, is left until it can't be changed. You may have to open up a 55 gal drum of Carpenter-Ina-Can!

      2. Snort | Aug 06, 2011 04:24pm | #10

        If it's the big house oo7 pic, that vertical looks a bit out of proportion, to me.

        That top riser could wrap around the corner, then miter into the vertical piece, which in turn could miter into the baseboard.

        or-

        The vertical piece could be a separate element, like a plinth. Celebrate it by using 5/4 material?

        -or-

        Base cap can hide a multitude of sins

        Not a diss, but I've never understood why such a design element as stairs, is left until it can't be changed. You may have to open up a 55 gal drum of Carpenter-Ina-Can!

        PS It's too bad the twits at the top wiped out all the pictures from the picture threads. A lot of great info was trashed... and it really boosted the activity here, ha!

        1. DanH | Aug 06, 2011 04:30pm | #11

          You can say that again!

          1. lunabean1 | Aug 15, 2011 12:05pm | #12

            Noticed the lack of activity

            I haven't been on for a year or two, and I noticed how little was going on.

            In the picture (007), the piece I used was just a bit of left-over flooring, so I could see how the real pieces of trim might fit together.  We'll use 3" or 4" wide trim for all the vertical in the house.  We've decided to go with straight stock.  Saw it done in another house, and it looked nice.  I priced out both pine and oak, and it looks like we'll go with oak - now we just need to wait another year so we can afford it!

Log in or create an account to post a comment.

Sign up Log in

Become a member and get full access to FineHomebuilding.com

Video Shorts

Categories

  • Business
  • Code Questions
  • Construction Techniques
  • Energy, Heating & Insulation
  • General Discussion
  • Help/Work Wanted
  • Photo Gallery
  • Reader Classified
  • Tools for Home Building

Discussion Forum

Recent Posts and Replies

  • |
  • |
  • |
  • |
  • |
  • |
View More Create Post

Up Next

Video Shorts

Featured Story

Simple and Discreet Countertop Power

A new code-compliant, spill-safe outlet from Legrand offers a sleek solution for a kitchen island plug.

Featured Video

How to Install Exterior Window Trim

Learn how to measure, cut, and build window casing made of cellular PVC, solid wood, poly-ash boards, or any common molding material. Plus, get tips for a clean and solid installation.

Related Stories

  • Fire-Resistant Landscaping and Home Design Details
  • A New Approach to Foundations
  • A Closer Look at Smart Water-Leak Detection Systems
  • Guest Suite With a Garden House

Highlights

Fine Homebuilding All Access
Fine Homebuilding Podcast
Tool Tech
Plus, get an extra 20% off with code GIFT20

"I have learned so much thanks to the searchable articles on the FHB website. I can confidently say that I expect to be a life-long subscriber." - M.K.

Get home building tips, offers, and expert advice in your inbox

Signing you up...

This site is protected by reCAPTCHA and the Google Privacy Policy and Terms of Service apply.
See all newsletters
See all newsletters

Fine Homebuilding Magazine

  • Issue 332 - July 2025
    • Custom Built-ins With Job-Site Tools
    • Fight House Fires Through Design
    • Making the Move to Multifamily
  • Issue 331 - June 2025
    • A More Resilient Roof
    • Tool Test: You Need a Drywall Sander
    • Ducted vs. Ductless Heat Pumps
  • Issue 330 - April/May 2025
    • Deck Details for Durability
    • FAQs on HPWHs
    • 10 Tips for a Long-Lasting Paint Job
  • Issue 329 - Feb/Mar 2025
    • Smart Foundation for a Small Addition
    • A Kominka Comes West
    • Making Small Kitchens Work
  • Issue 328 - Dec/Jan 2024
    • How a Pro Replaces Columns
    • Passive House 3.0
    • Tool Test: Compact Line Lasers

Fine Home Building

Newsletter Sign-up

  • Fine Homebuilding

    Home building tips, offers, and expert advice in your inbox.

  • Green Building Advisor

    Building science and energy efficiency advice, plus special offers, in your inbox.

  • Old House Journal

    Repair, renovation, and restoration tips, plus special offers, in your inbox.

Signing you up...

This site is protected by reCAPTCHA and the Google Privacy Policy and Terms of Service apply.
See all newsletters

Follow

  • Fine Homebuilding

    Dig into cutting-edge approaches and decades of proven solutions with total access to our experts and tradespeople.

    Start Free Trial Now
    • Facebook
    • Instagram
    • X
    • LinkedIn
  • GBA Prime

    Get instant access to the latest developments in green building, research, and reports from the field.

    Start Free Trial Now
    • Facebook
    • YouTube
  • Old House Journal

    Learn how to restore, repair, update, and decorate your home.

    Subscribe Now
    • Facebook
    • Instagram
    • X

Membership & Magazine

  • Online Archive
  • Start Free Trial
  • Magazine Subscription
  • Magazine Renewal
  • Gift a Subscription
  • Customer Support
  • Privacy Preferences
  • About
  • Contact
  • Advertise
  • Careers
  • Terms of Use
  • Site Map
  • Do not sell or share my information
  • Privacy Policy
  • Accessibility
  • California Privacy Rights

© 2025 Active Interest Media. All rights reserved.

Fine Homebuilding receives a commission for items purchased through links on this site, including Amazon Associates and other affiliate advertising programs.

  • Home Group
  • Antique Trader
  • Arts & Crafts Homes
  • Bank Note Reporter
  • Cabin Life
  • Cuisine at Home
  • Fine Gardening
  • Fine Woodworking
  • Green Building Advisor
  • Garden Gate
  • Horticulture
  • Keep Craft Alive
  • Log Home Living
  • Military Trader/Vehicles
  • Numismatic News
  • Numismaster
  • Old Cars Weekly
  • Old House Journal
  • Period Homes
  • Popular Woodworking
  • Script
  • ShopNotes
  • Sports Collectors Digest
  • Threads
  • Timber Home Living
  • Traditional Building
  • Woodsmith
  • World Coin News
  • Writer's Digest
Active Interest Media logo
X
X
This is a dialog window which overlays the main content of the page. The modal window is a 'site map' of the most critical areas of the site. Pressing the Escape (ESC) button will close the modal and bring you back to where you were on the page.

Main Menu

  • How-To
  • Design
  • Tools & Materials
  • Video
  • Blogs
  • Forum
  • Project Guides
  • Reader Projects
  • Magazine
  • Members
  • FHB House

Podcasts

  • FHB Podcast
  • ProTalk

Webinars

  • Upcoming and On-Demand

Podcasts

  • FHB Podcast
  • ProTalk

Webinars

  • Upcoming and On-Demand

Popular Topics

  • Kitchens
  • Business
  • Bedrooms
  • Roofs
  • Architecture and Design
  • Green Building
  • Decks
  • Framing
  • Safety
  • Remodeling
  • Bathrooms
  • Windows
  • Tilework
  • Ceilings
  • HVAC

Magazine

  • Current Issue
  • Past Issues
  • Magazine Index
  • Subscribe
  • Online Archive
  • Author Guidelines

All Access

  • Member Home
  • Start Free Trial
  • Gift Membership

Online Learning

  • Courses
  • Project Guides
  • Reader Projects
  • Podcast

More

  • FHB Ambassadors
  • FHB House
  • Customer Support

Account

  • Log In
  • Join

Newsletter

Get home building tips, offers, and expert advice in your inbox

Signing you up...

This site is protected by reCAPTCHA and the Google Privacy Policy and Terms of Service apply.
See all newsletters
See all newsletters

Follow

  • X
  • YouTube
  • instagram
  • facebook
  • pinterest
  • Tiktok

Join All Access

Become a member and get instant access to thousands of videos, how-tos, tool reviews, and design features.

Start Your Free Trial

Subscribe

FHB Magazine

Start your subscription today and save up to 70%

Subscribe

Enjoy unlimited access to Fine Homebuilding. Join Now

Already a member? Log in

We hope you’ve enjoyed your free articles. To keep reading, become a member today.

Get complete site access to expert advice, how-to videos, Code Check, and more, plus the print magazine.

Start your FREE trial

Already a member? Log in

Privacy Policy Update

We use cookies, pixels, script and other tracking technologies to analyze and improve our service, to improve and personalize content, and for advertising to you. We also share information about your use of our site with third-party social media, advertising and analytics partners. You can view our Privacy Policy here and our Terms of Use here.

Cookies

Analytics

These cookies help us track site metrics to improve our sites and provide a better user experience.

Advertising/Social Media

These cookies are used to serve advertisements aligned with your interests.

Essential

These cookies are required to provide basic functions like page navigation and access to secure areas of the website.

Delete My Data

Delete all cookies and associated data