How to Build a Floating Vanity
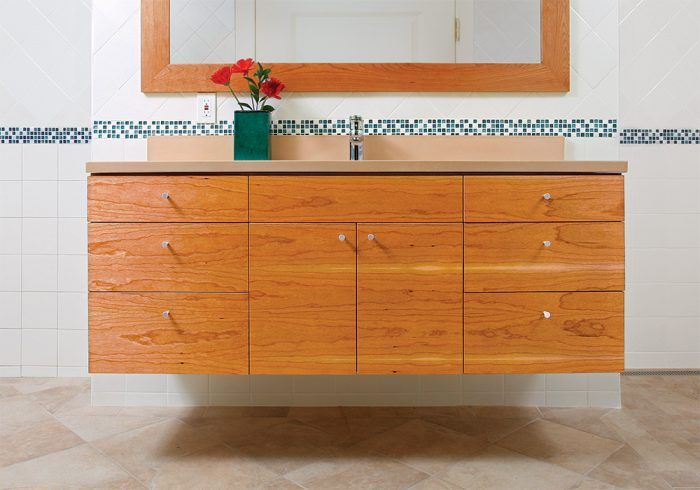
A modern cherry cabinet supports a heavy counter while levitating above the bath floor.

Synopsis: Because Fine Homebuilding‘s Project House was about to get a new custom bathroom sink (see “Make Your Own Lightweight Concrete Vanity Top,” FHB #234) made by Buddy Rhodes, it was time to build some cabinetry to match. The editors turned to Nancy Hiller, and in this “Master Carpenter” article, she describes how she built a sleek cherry floating vanity that is compliant with the Americans with Disabilities Act. For this vanity, Hiller used plywood for the carcases, but coated the exterior with cherry-veneered moisture-resistant MDF. After the carcases and drawers were assembled, Hiller hung the unit on the bathroom wall, using four 16-in. steel brackets (rated for 330 lb. per pair) to suspend the vanity. This article includes sidebars on custom veneer, clamping techniques to make sure boxes are square, using router templates for precise work, and determining the extent of support that a hanging vanity needs. Also, watch the companion video series demonstrating the processes used in this project.
As someone who prefers not to be vexed by job-related anxieties in the wee hours, I work hard to prevent foreseeable problems. On most jobs, gravity is the cabinetmaker’s friend. When it comes to floating furniture, however, gravity poses certain challenges. If you don’t take these challenges seriously, you may find yourself with a cabinet that wants to fall apart—or worse, one that falls off the wall.
Fine Homebuilding asked me to build a bathroom vanity for their Project House, and structural challenges were only one of the issues. Designed by architect Duncan McPherson, the cabinet’s sleek, clean look depended on careful planning and on maintaining sharp lines. The vanity also was intended to be compliant with the Americans With Disabilities Act, so the center portion below the sink was to be removable for wheelchair access. To accentuate the horizontal shape, I wanted to wrap the exterior in the continuous grain of cherry-veneered moisture-resistant MDF; the carcases could be made from maple plywood. Solid maple drawers would be dovetailed for looks and strength.
The carpenter
|
Strength from fasteners and face frames
To build the cabinets, I began by cutting the case parts from prefinished 3 ⁄ 4-in.-thick maple plywood. Because the sides of this cabinet were to have finished panels applied during installation, the 1 ⁄ 4-in. plywood backs could simply be applied to the back of the cases, instead of housed in a groove or a rabbet.
To ensure the strength of these cabinets, I built them with biscuits interspersed with 2-in. Confirmat screws. After gluing and clamping the cases, I cleaned up glue squeeze-out and installed the screws.
Although the design is European-inspired, I added face frames to reinforce the structure of the cases and to have an alternative to veneer tape for covering the plywood edges.
I milled solid-cherry stiles and rails, and joined the parts with pocket screws to make the face frames. I attached each frame to its case with glue and clamps, positioning the clamps inside the box so that pressure would be applied at the visible joints between case edge and face frame. After cutting the 1 ⁄ 4-in. backs for all three cases, I test-fit the cases to each other in their final configuration, using T-nuts, bolts, and screws to attach the removable center case to the outer sections.
Plywood boxes, beautifully disguised
The vanity was made in three sections. The outer carcases are supported by brackets and angle irons. In turn, they support a center carcase that can be removed for permanent wheelchair access. Above the center carcase, a dummy panel conceals the sink.

The sequence of cuts keeps the grain continuous
Before turning on the tablesaw, the author first planned the cuts on the custom veneer panel so that the continuity of the grain would remain intact and the dimensions for adjacent pieces would be exactly the same.

Dovetailed drawers are easy with the right jig
Once the cases were fitted with their face frames, I installed the drawer slides. This way, I knew the exact dimensions of the drawer boxes. I also kept the hardware in mind when determining where to cut the groove for drawer bottoms, because some types of drawer slides require a specific location relative to the bottom of the drawer side.
After cutting out the drawer parts from solid maple, I sanded the interior faces and set up the dovetail jig. Dovetails make a strong, beautiful drawer, but there was no reason for me to cut them by hand. using a Keller jig, I can cut the four parts for one drawer in about 10 minutes. I cut the grooves for the 1 ⁄ 4-in. plywood bottoms on the tablesaw and ripped the drawer back at the groove so that I could insert the bottom into the groove after the sides were assembled. Once the drawers were glued and clamped, I made sure that they were square and flat. I sanded the drawer boxes when the glue was dry, then inserted the drawer bottoms and fixed them in place with two small screws.
Custom veneer is a game changer I consider myself lucky to live in Bloomington, because there’s a world-class custom-veneer shop right in town. Although Heitink Architectural Veneer and Plywood supplies more than 120 species of veneered products to architectural millwork clients for enormous commercial projects (Las Vegas casinos, for example), it also makes small projects like this one possible. Pallets of veneer come into the factory and are trimmed, glued, and spliced into sheets. The sheets then are laminated to substrates of any size or type. Heitink can arrange the panels’ grain patterns to match sequentially so that an entire room can be wrapped in a unique pattern of wood grain. |
Start with strong boxes

Trick of the trade

Doors and drawer fronts from custom-veneer material
I could have bought a sheet of 3 ⁄ 4-in. cherry plywood off the shelf to create the vanity front, but including the end panels meant that I’d need more than one sheet, and then the grain wouldn’t be continuous. luckily, there’s a custom-veneer place in town where I was able to choose the veneer and how it would be laid up on three separate panels.
I marked out the door and drawer faces on the plywood so that the grain alignment would be continuous across the face of the cabinet. I cut the drawer fronts and doors, then edge-banded them with heat-sensitive veneer tape and sanded the tape flush at the edges. I also drilled holes and mounted the European hinges on the doors. After locating the hinge plates on the inside faces of the center cabinet by holding the doors in position and placing marks directly on the inside of the case, I put the doors aside until the cabinet installation.
Create Identical parts
Tool of the tradeTemplates for precision When I’m making cabinets, I’m in a production mind-set, so I use a router and a jig to cut the drawer dovetails. I’ve used several jigs, but the Keller jig is my favorite. It’s incredibly simple and efficient, and it produces beautiful joints. The jig consists of two aluminum templates, one for the pins and one for the tails, that are clamped to the respective pieces. The set comes with top bearing-guided router bits and retails for about $270. |
Finish for a wet area
Bathroom cabinets should have a water resistant finish. If I were building more cabinets, I would have them sprayed with a conversion varnish; for this one cabinet, though, I brushed on several coats of oil-based polyurethane. To prepare the cabinet parts for the polyurethane, I vacuumed, then wiped it all down with a tack rag moistened with mineral spirits to remove any remaining dust.
After brushing on a coat of polyurethane, I let it dry thoroughly overnight. The next day, I scuffed up the surfaces with 220-grit sandpaper, tacked again, and applied a second coat. I repeated the whole thing for a third coat, too.
Dial in a precise fit
Putting it in place
Once on site at the Project House, I began the installation by placing 2x blocking between the studs in the wall. usually, you have to remove drywall to access the stud bays, but if you’re careful, you can hide repairs behind the cabinet. (On this project, I had access to the back of the tiled wall.) using heavy construction screws, I attached one line of blocking to support brackets for the top of the cabinet and another line below for angle iron at the base.
Next, I found the centerline of the wall and marked a horizontal line for the top of the casework. I located the tops of the upper brackets by measuring down 3 ⁄ 4 in. from the line. Each outside cabinet would be supported by two brackets positioned as close as possible toward the sides of each case to avoid taking up space that could otherwise be used for storage inside the drawer. I marked and drilled the positions of the holes, then installed the brackets and checked across all four to confirm that they were level.
I set the outer cabinets on the brackets and transferred the measurements for the plumbing onto the back of the center cabinet. After cutting the holes and checking the fit, I installed the center cabinet by carefully lowering it into place onto temporary supports. I then attached all three cases together by inserting bolts into the T-nuts. I screwed the outer cases onto the brackets and locked them into place. To draw the face frames tight, I also ran bolts through the face-frame edges.
I scribed the end panels to the wall and attached them with wood glue and brads. (The interior finished panels next to the center cabinet were cut and installed in the shop.) Now I was ready to finish the puzzle. I hung the doors, then attached each drawer face to its box with 1-in. #6 pan-head screws fitted through 3 ⁄ 4-in. by 1 ⁄ 8-in. fender washers. I carefully adjusted the faces until they were even across the entire assembly. (Placing coins between the faces is a great way to maintain even margins between the elements.) Finally, I fit the central dummy panel that will conceal the sink and attached it to the outside cases by screwing it to the blocks above the center cabinet.
In a perfect world, screws would be enough
|
Photos by Charles Bickford, except where noted.
From Fine Homebuilding #236
For more information, watch the companion video series demonstrating the processes used in this project.
To see the print version of the article, click the View PDF button below:


