
How to Estimate Materials for Roofing Projects
Builder Mike Guertin explains 3 ways to calculate the quantity of shingles you'll need for your next roofing job.
One of the biggest challenges for experienced builder and novices alike is accurately estimating materials for a construction project–especially for roofs, because they can be difficult to access for taking measurements.
But don’t fret–In this excerpt from my book Roofing with Asphalt Shingles, I describe three reliable methods for determining the area of a roof, plus I’ve included tips for estimating the number of extra shingles you’ll need for waste, overlaps, and starter shingles.
Note: be sure to take your time and double-check your numbers when calculating the quantity of shingles, underlayment, flashings, and other materials needed for your roofing project. The more accurate your estimates, the less time you’ll waste waiting for material deliveries during the project.
How Shingle Quantities are Measured
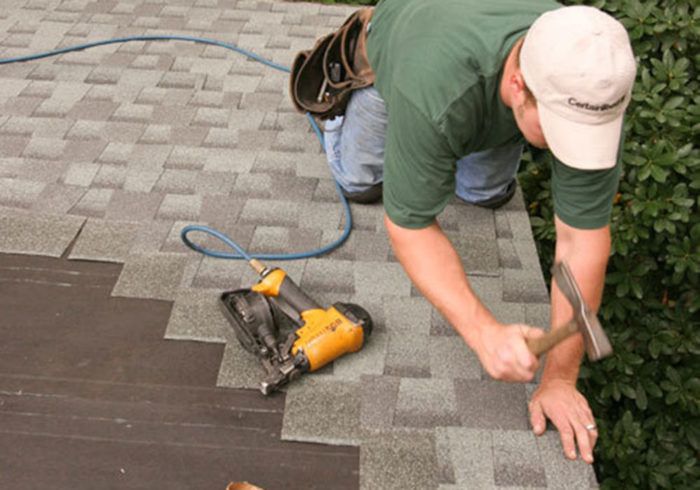
Roof shingles are sold by both the bundle and by the square. A square of shingles is the quantity needed to cover 100 sq. ft. of roof. Shingles are packaged in paper- or plastic-wrapped bundles designed to be light enough for a person to carry, so heavier shingles require more bundles per square. Three bundles to a square is most common, which applies to most three-tab strip shingles and some lightweight laminated shingles. Heavier three-tabbed shingles and laminated shingles require four, or sometimes five, bundles to cover a square. When shingles come three bundles to the square, there are 29 standard-sized shingles (12 in. by 36 in.) in each bundle.
Figuring out the roof area is the first step to determine how many bundles you’ll need to order. There are two ways to size up a new or freshly stripped roof: the measurement method and the sheet-count method. There’s a third method for calculating bundles when you’ll be laying new shingles over old or if the old roof is still in place.
Once you have a bundle or square count for the main roof area, you’ll add additional shingles to account for waste, starter shingles, and extra shingles for hip and ridge caps.
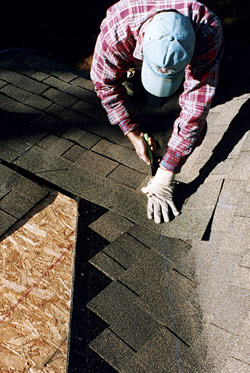
1. Measurement method
The most accurate way to determine how many bundles of shingles you’ll need is to hop up on a roof and measure each roof plane. If all the roof planes are rectangles, all you have to do is multiply the length times the width of each plane to get the square footage and then add up the square footage of each plane (for more complicated roofs, see “Calculating the Area of a Complex Roof”).Often the roof is too steep to walk on without safety equipment, so you need to do the estimate from the ground. In that case, measure the length of the building at the ground level and estimate any rake-edge overhangs. Then, from a ladder, use a stiff, wide-blade measuring tape to measure from the eaves edge to the ridge (see the accompanying drawing).

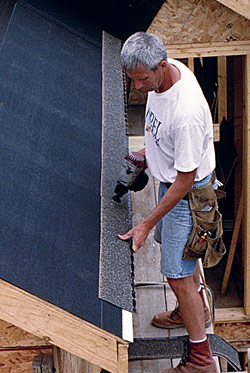
2. Sheet-count method
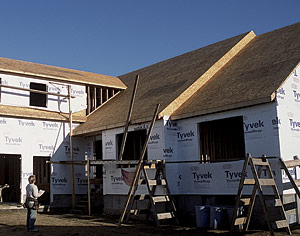
When the sheathing is still exposed, I’m more inclined to use the sheet-count method than the measurement method. It’s fast and you can usually complete it from the ground. Of course, you can use this method only on roofs sheathed with 4-ft. by 8-ft. structural panels.Each structural panel is 32 sq. ft., and you can easily count the full panels from the ground. You can also tally them up by gauging the relative size of ripped and crosscut sheets along the edges of the roof to the size of a full sheet. Diagonally cut sheets along hips and valleys are a little more difficult to size, but you can usually assign them a relative size such as half or quarter of a full sheet and be close enough (see the accompanying drawing).
If the shingles you are using come three bundles to a square, calculating the number of bundles you’ll need is simple. Each bundle covers 33.3 sq. ft. of roof area—close enough to the 32 sq. ft. a sheet covers. So just order one bundle for each sheet of roof sheathing.
For other bundle counts per square, divide the number of sheets of sheathing by three and you’ll have the total number of squares needed to cover the roof. This works because three sheets of sheathing equal roughly 100 sq. ft. (one square).
This may sound like a crude measurement method, but you have to be realistic about how accurate you really need to be. The 1.3-sq.-ft. difference per sheet is a good margin to allow for waste along gable or hip edges. I’ll look at calculating waste further in the next section.
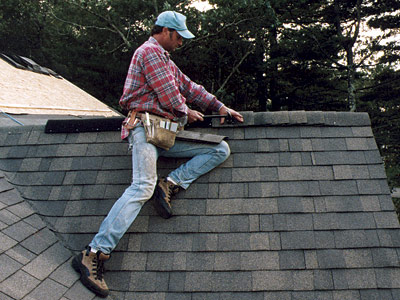
3. Shingle-count method
This method makes it easy to size up most roofs if the old shingles haven’t been stripped off yet or if you’ll be doing a layover, that is, shingling over existing shingles.
First, measure the length of the eaves of each roof plane, either directly or from the ground by measuring the length of the house and adding in the width of the rake overhangs, if any. Alternately, if the existing shingles are standard three-tab, you can get the eaves’ length by counting the number of tabs along the ridges and eaves to determine the length in feet (one tab is equal to 1 ft.).
Now, to get the length of the rakes, count the existing courses of shingles from eaves to ridge. The exposure on each course of shingles is 5 in., so you can multiply the number of courses by 5 in. and then divide by 12 to get the length of the rakes. Just be sure to check that the existing shingles are standard 12-in. by 36-in. shingles and not metric size. Multiply the length of the eaves by the length of the rake and you have the area in square feet.
How many extra shingles should you buy?
If you order shingles based solely on the area of the roof, you won’t have enough. You’ll need shingles for starter courses along the eaves and sometimes at rakes, and you’ll need shingles to cap hips and ridges. Cutting shingles also generates waste. In some places, including at the rakes, against walls and chimneys, and at valleys, you’ll need to cut shingles. Some of the cutoffs will be big enough to use as starter shingles or in other areas where cut shingles are needed, but smaller cutoffs will be waste.
Plan for waste factor
The only roof that will generate no waste from cutting is that rare simple gable whose roof length is divisible by the 3-ft. length of a shingle. Other simple gable roofs will require cut shingles at the rakes. From there, the waste factor increases with every obstruction, such as a chimney, and with every hip or valley.
Laminated shingles typically generate less waste than three-tab shingles do because you don’t have to maintain a cutout pattern, but it’s tricky to determine exactly how many square feet of shingles you will be able to salvage. It’s best to plan your order using the same waste factor that you would use for three-tab shingles—at worst you’ll just have a couple of bundles to return.For a simple roof, I generally figure 1 percent as a waste factor. On a complex roof with open valleys, I add 5 percent and sometimes more. There’s no calculation you can use to determine the extra shingles you’ll need for waste. With experience estimating jobs, you’ll get a feel for how many extra shingles to order.
Waste is also generated when shingles are damaged, which is inevitable when you’re moving shingles around a steep roof slope and some will slide off. You may be able to salvage part of the damaged shingle, but don’t count on it. You can also waste shingles when you nail them improperly and have to remove them. You may drive nails too low in the exposure or fasten one off a control line.
If you have a crew that tends to be sloppy and damage shingles, you’ll probably need a couple of extra bundles per job. If your crew is conscientious, one extra bundle should be enough for most jobs.
Fall-off pieces along a gable end, trimmings along valleys, and damaged shingles can add up to 5 percent of the total shingles needed to roof a house.It may take several extra bundles of shingles to provide starter shingles along the eaves and rake edges on a large roof.
Plan for extra valley material
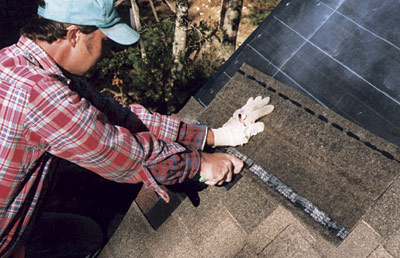
Valleys are either woven or cut; both methods require about the same number of shingles. On a woven valley, each course of shingles is extended beyond the valley crease and at least 12 in. onto the adjacent roof plane. You’ll use 2 ft. of extra shingle material for each pair of woven courses. In the case of cut valleys, the shingles from the first roof plane that’s shingled also extend onto the adjacent roof plane at least 12 in. just like woven valleys. Shingles from the next roof plane are cut just up from the valley line, and the cutoff pieces usually aren’t big enough to use elsewhere on the roof. Order two extra shingles per linear foot of valley to account for the overlaps and cutoffs. On a 16-ft. valley, you would need 32 shingles or roughly one extra bundle.
Starter shingles
Starters are shingles with the exposure portion trimmed off, leaving just the self-seal strip and top lap. They are fastened along the eaves edges to seal down the first course of shingles and provide coverage material beneath the tab cutouts just like the top lap of each successive course.
When you’re using laminated shingles to roof a house, you can save a little money by ordering cheaper three-tab shingles for the starters or better yet, use shingles left over from a previous job. Since laminated shingles have no cutouts, all you really need the starter strip to do is seal the shingles down and shed any water that passes through the joints between shingles.
Rake-edge starter shingles
You don’t need to install starters along the rake, but some roofers do it to create a neater-looking edge where shingles extend past rakes. To install, you can cut the exposure off as you would for eaves starters, or, if you are using three-tab shingles, you can just install the shingles along the rake. Don’t use full laminated shingles for rake starters; the exposure portion is too thick. Determine the number of shingles to order for starters by measuring the length of the eaves and rakes, then round up to the nearest foot and divide by three (the length of a shingle).
Hip and ridge cap shingles
Hips and ridges are covered with cap shingles, which are 1-ft. shingle squares that wrap over the hip or ridge. Like regular shingles, they overlap for a 5-in. exposure.On roofs shingled with three-tab or no-cutout shingles, you simply cut standard shingles into caps. You can cap about 35 lin. ft. of ridge or hips with each bundle of three-tab shingles that come three bundles to the square. You can also salvage waste shingle pieces and portions of damaged shingles for use as caps.
For roofs shingled with laminated shingles, multi-cutout shingles, and other patterned shingles, you’ll have to order hip-and-ridge shingles that are manufactured as companions to the specific shingle product you are using. They’re sold by the bundle and usually cap 35 lin. ft., but check with your supplier because some products vary. Just measure the length of the ridges and hips and divide by 35 to determine how many bundles of regular or hip-and-ridge shingles you’ll need.
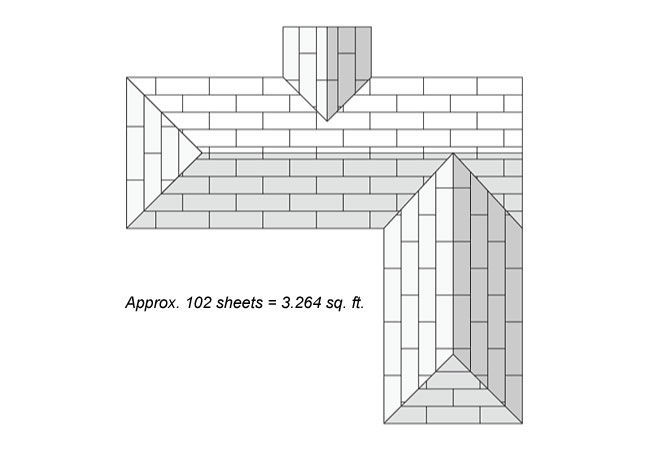
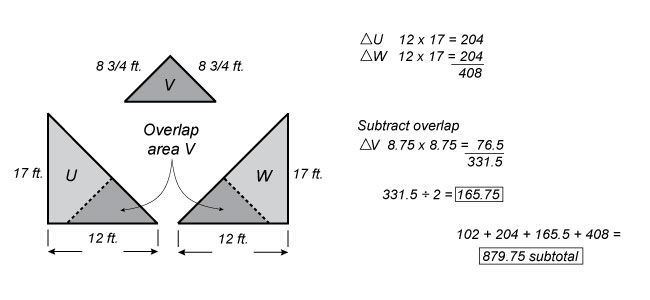
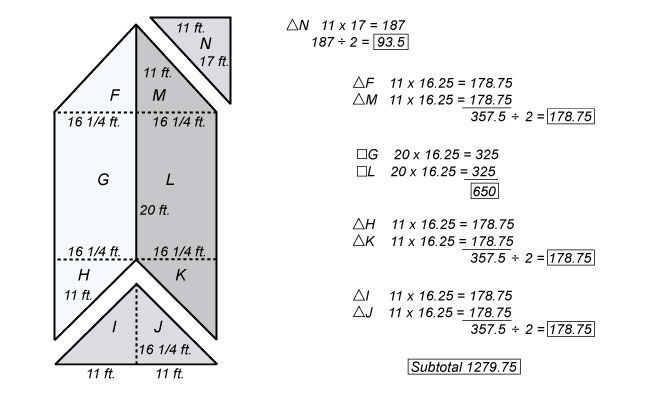
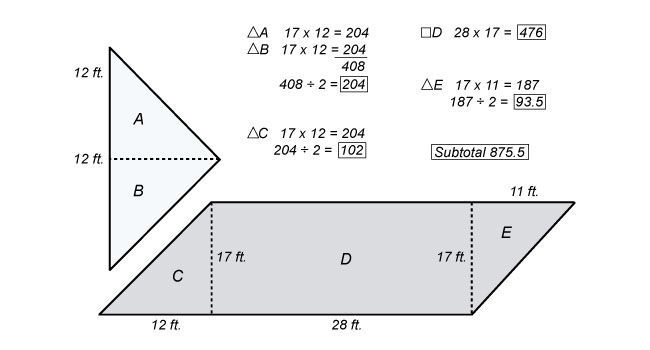
Calculating the Area of a Complex Roof
Areas of complex roofs with multiple hips and valleys take the most time to calculate. Start by making a rough sketch of the roof. To simplify the calculation, break down the sketch into rectangles and right triangles (triangles with one 90-degree corner), then take as many measurements of the roof as you can to match the sides of the rectangles and triangles on the sketch.
Use visual cues from the existing roof shingles or roof sheathing to determine square lines off eaves edges or ridges. These cues will help you measure the lengths of the sides of the rectangles and triangles. For instance, the cutout slots on shingled roofs run perpendicular (90 degrees) to the eaves, and nail rows in sheathing are pretty close to square also. It is difficult sometimes to get accurate measurements. Don’t get too concerned though; just round lengths to the nearest 6 in.
With the sketch filled in with measurements, you can determine the size of the roof area. The area of a rectangle is length multiplied by width, whereas the area of a right triangle is the length of the two sides that meet at the 90-degree corner multiplied together and divided by two (this works because a right triangle is half a rectangle).
Tally the square footages of all the rectangles and triangles, which will give you the total square footage for the roof. The example here shows the calculation for a roof with two hips.
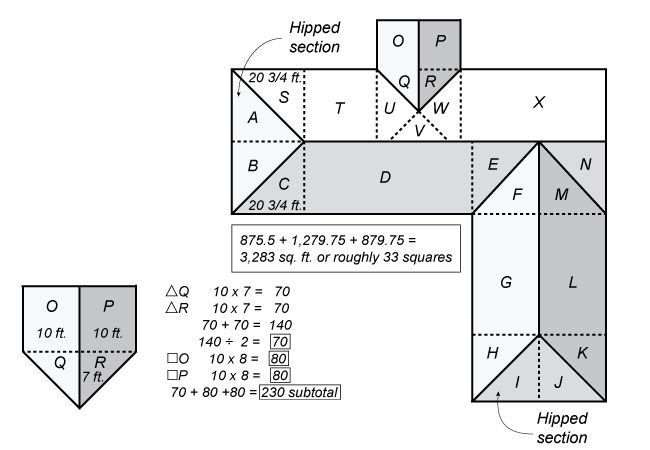

Areas ‘U’ and ‘W’ are odd because they have an overlapping section ‘V’. Rather than reconfiguring to establish several smaller right triangles, it’s easier to subtract out the overlap (‘V’) from the total areas of ‘U’ and ‘W’.
Mike Guertin is a builder in Rhode Island and a contributing editor to Fine Homebuilding magazine.
Photos by: Mike Guertin; Drawings by: Mario Ferro
More on Roofs:
9 Upgrades to Windproof Your Roof – Master these roof-installation details to keep asphalt shingles on and rain out of your house.
10 Roof Goofs and How to Fix Them – Surprisingly, it is not damage from wear and tear that causes most roof leaks but mistakes made during installation or reroofing. This article uses photos and drawings to illustrate what those mistakes are and what you can do about them.
Throw Away Your Hammer Stapler and Get a Pneumatic Cap Fastener – Installing house-wrap and roofing underlayment with a cap fastener is definitely a best practice — but it may even be mandated by code. Here’s an overview of all the current systems on the market. Learn what type of cap fastener is right for your project.
Designing the Right Roof Rake – Among the important details on a roof is the rake, the sloping edge along the end wall of a gable, shed, or gambrel roof.
Time-Tested Approach to Chimney Flashing – Proven methods and durable materials keep out water for decades.
A Crash Course in Roof Venting – Learn how to construct a vented attic properly. Review the theory behind venting. Understand when to vent your roof, when not to, and how to execute each approach successfully.
Fine Homebuilding Recommended Products
Fine Homebuilding receives a commission for items purchased through links on this site, including Amazon Associates and other affiliate advertising programs.

Hook Blade Roofing Knife
Flashing Boot

Ladder Stand Off

View Comments
The estimation of area for this roof example is unnecessarily complicated. It can be done by making just six measurements and by considering six rectangular areas in three pairs, one pair for each roof
62x17x2 = 2108
31x16.25x2 = 1008
8x10x2 = 160
Total 3276
Often the roof is too steep to walk on without safety equipment, so you need to do the estimate from the ground. In that case, measure the length of the building at the ground level and estimate any rake-edge overhangs.
- gutter cleaning columbia md
Thanks for sharing! Learning about roof installation is important. In kitchen and bath remodeling Alpharetta we make sure that our installers are well trained and follow proper guidelines.