When I was an apprentice, the old-timers I worked with referred to sawhorses as trestles or trestle benches, and many a new man on the job had his skill tested, and longevity determined, by the task of sawhorse making. I was given that test a time or two and had the results closely scrutinized by some good, but notoriously grumpy, old carpenters.
Spanned by a pair of sturdy planks, trestle benches can be used as work platforms (scaffolding), and as work tables when topped off with a plywood panel. The top members, sometimes called cross beams, and the legs can be made of thick stock when they’re required to support heavy loads. When used for scaffolding, tops are usually made of on-edge 2x6s or 4x4s. If extra stability is needed, tops can be made of 2x8s flatwise, with 2×4 or 1×8 legs.
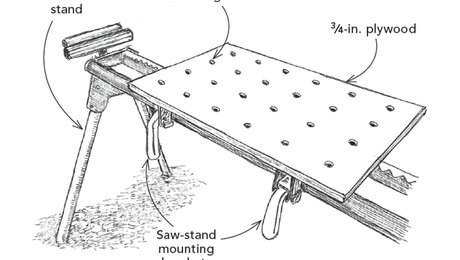
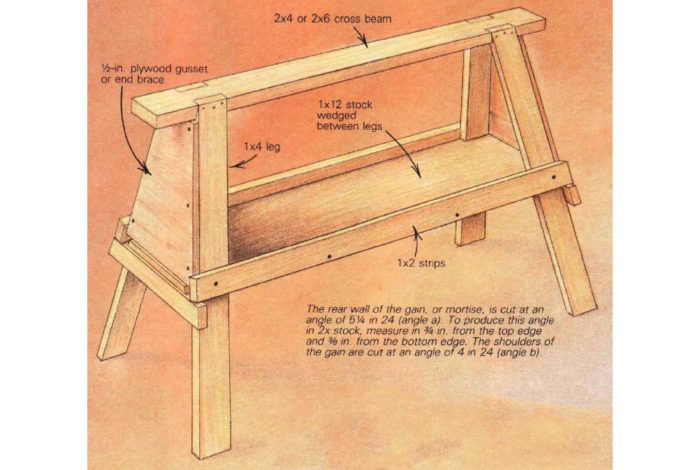
In most situations, lightness and portability are virtues, and I continue to make sawhorses the way I learned from my first textbook. These sawhorses, like the one in the drawing at right, are strong and fairly easy to move around. Detailed instructions for making them are not included in most new textbooks, but they used to be, and the old Audels even explained how to figure the length of the leg using trigonometry.
A sawhorse should be knee high, which is typically about 2 ft. In the old days, when most lumber was cut with a handsaw and the stock was held down with one knee, this was a good height to deliver the thrust from the saw. Some horses had a long slot in the top that was used for ripping. The material to be cut was fully supported by the top, and the saw would pass through the slot. These days most lumber is cut with circular saws, but 2 ft. continues to be a convenient height.
Sometimes I make horses with longer legs to use as scaffolding to reach high ceilings, and later cut the legs to normal height. Sometimes I cut the legs even shorter so the top is only about 12 in. high. A plank laid across low sawhorses will put me at the right height for working close to the ceiling for installing crown mouldings or door and window trim.
It’s also helpful to have a shelf in at least one horse. I use a length of 1×12 for the shelf and wedge it evenly between the legs. Then I add 1×2 strips along the sides (to keep tools from rolling off the shelf). The strips are screwed to the legs and to the edges of the shelf. Aside from holding tools and materials, the shelf strengthens the horse by preventing the legs from spreading laterally. The only problem with a shelf is that it makes the horses harder to stack. I put the ones with shelves on the bottom and stack the others on top.
For more illustrations and details, click the View PDF button below:


