FHB Logo Facebook LinkedIn Email Pinterest Twitter X Instagram Tiktok YouTube Plus Icon Close Icon Navigation Search Icon Navigation Search Icon Arrow Down Icon Video Guide Icon Article Guide Icon Modal Close Icon Guide Search Icon Skip to content
Subscribe
Log In
  • How-To
  • Design
  • Tools & Materials
  • Restoration
  • Videos
  • Blogs
  • Forum
  • Magazine
  • Members
  • FHB House
  • Podcast
Log In
How-To

Wrapping cords and hoses

Learn how to avoid twists and kinks that can cause damage

By Tucker Windover Issue 200
  • X
  • facebook
  • linkedin
  • pinterest
  • email
  • add to favorites Log in or Sign up to save your favorite articles

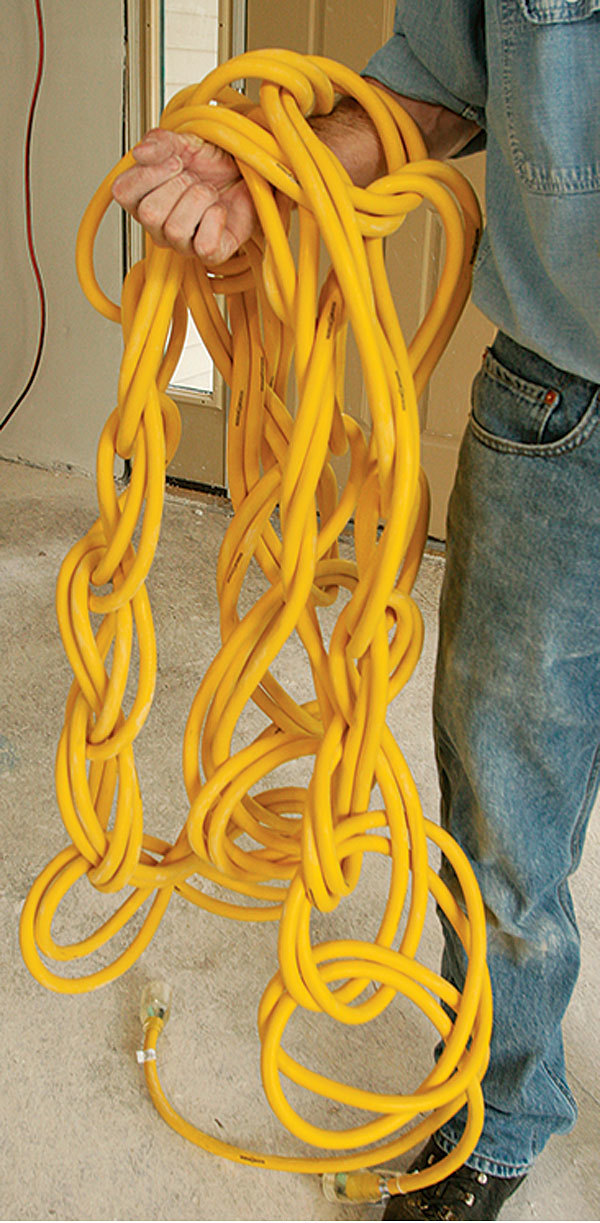
We’ve all done this or have seen it done on the job site, but coiling cords too tightly introduces twists and kinks and should be avoided.

Despite all the cordless tools that keep showing up on job sites, air hoses and extension cords still need to be rolled out every morning and wrapped up at the end of the day. Coiling them tightly for storage introduces twists and kinks that can cause damage and make them harder to manage around the work zone.

WATCH IT ON VIDEO: 3 Ways to Wrap Cords and Hoses

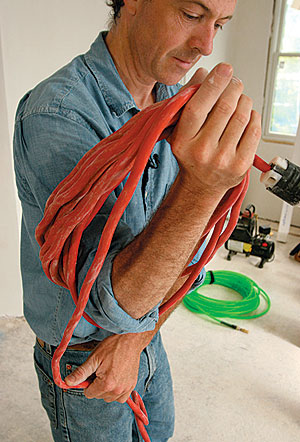
To keep a medium-gauge electrical cord in good condition and to avoid coiling, I drape the line back and forth over my hand until I have a few feet left. Then I tie off the bundle with the remaining cord and create a loop to hang it with. For heavy-gauge electrical cords that are too bulky to drape and bundle, I weave a daisy chain, which then can be folded into a manageable size for transportation and storage.

For polyurethane air hoses, I avoid twisting the line by folding every other loop in the opposite direction. This method requires less time to coil the lines, and it allows them to be uncoiled easily. No matter what method is used for wrapping and storing hoses and cords, it’s important to avoid kinking or creasing the line or housings. For that reason, I avoid wrapping cords too tightly or hanging them from nails for storage. Instead, I hang cords on 2x blocks of wood fixed to the wall.

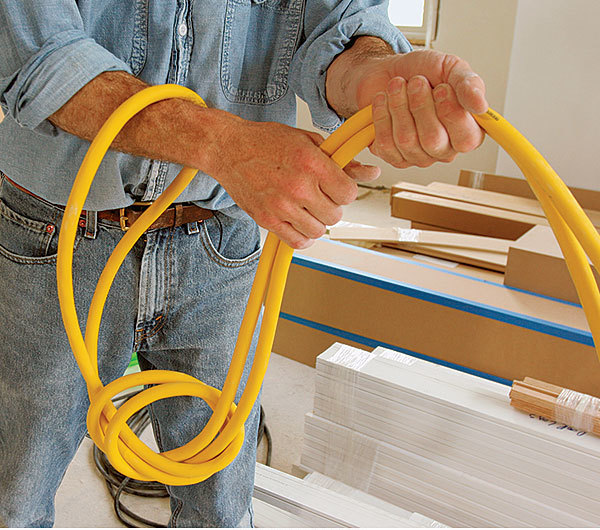
Drape electrical cords in a loose bundle

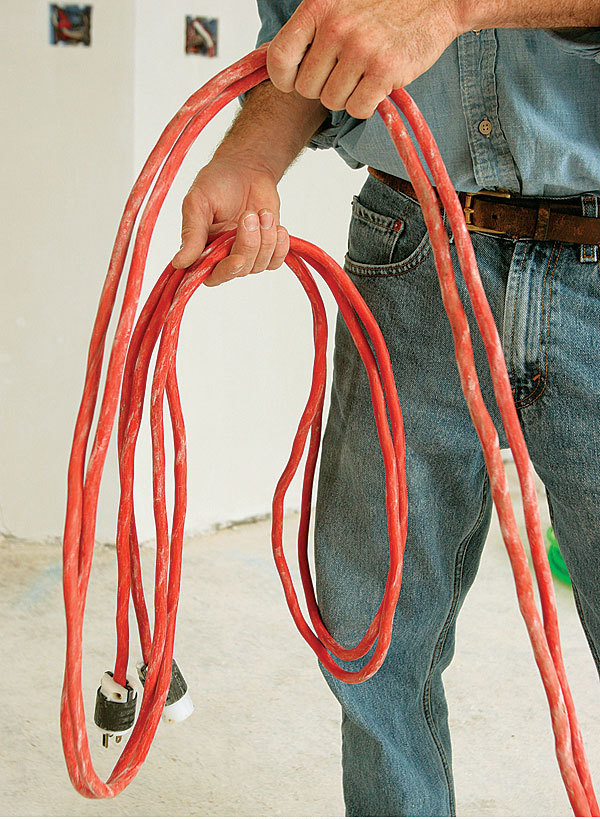
Double the cord. Collect the male and female plug ends together. Drape them over your hand, and begin looping the doubled cord back and forth. This prevents the cord from twisting. Note: The bumpy appearance of this cord is evidence that it was mishandled severely in the past.

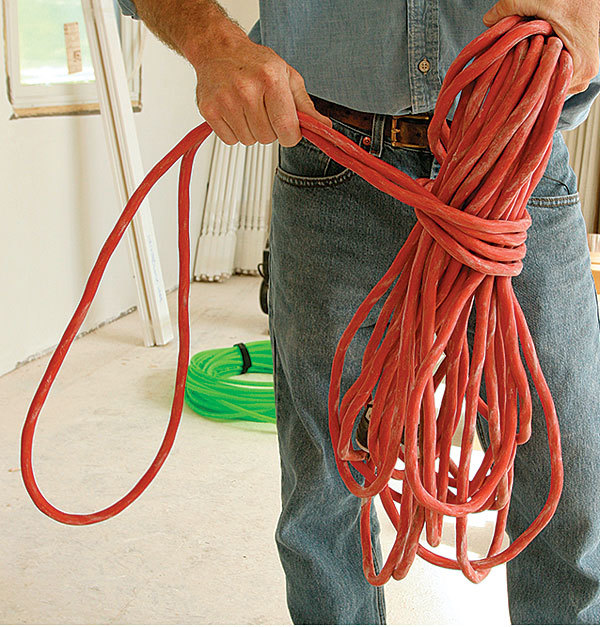
Tie the cord. With a few feet remaining, I begin circling the cord around the middle to tie off the looped bundle. I don’t pull the loops as tight as I can; that puts unnecessary strain on the cord.

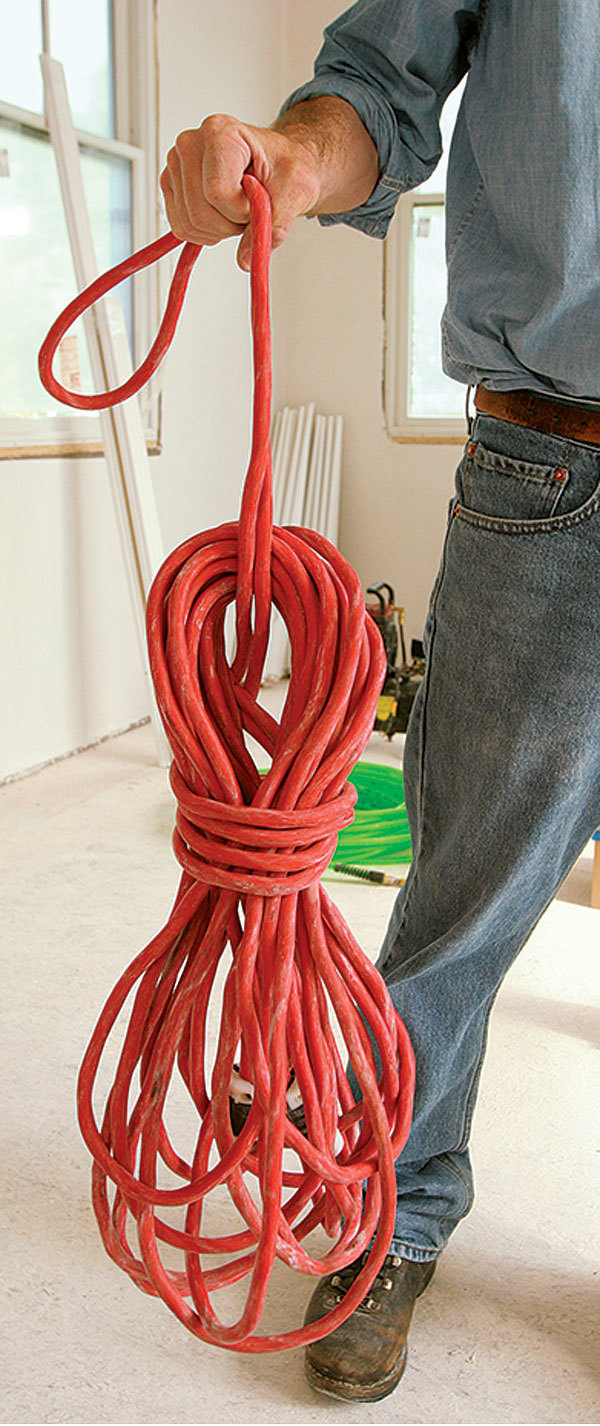
Create a loop for storing. Finish by passing the doubled end through the center of the bundle. This prevents the cord from unraveling and provides a loop to hang the cord from. Note: This method of tying off the cord might not be recommended by the manufacturer because it could eventually distort the shape. In my experience, the damage is minimal, and the payoff in convenience is worth the risk.

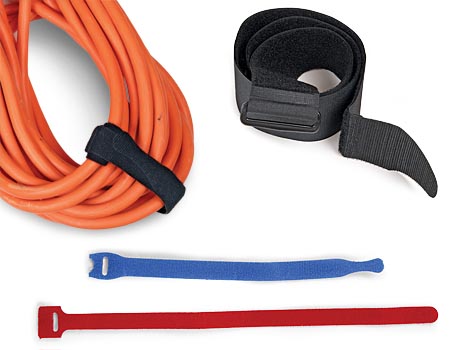
Wrap it up with Velcro

Job-site cords and hoses should not be left lying around at the end of the day. Although there are any number of options for tying up cords and hoses, I like to use Velcro. Not only has Velcro (www.velcro.com) come up with different sizes and strengths of its hold-fast hook-and-loop fabric, but it also sells a variety of colored straps. Color-coding cords and tools for different job sites, equipment owners, or cord gauges is a smart way to stay organized. At less than $6 for multiple ties in red or black, or a variety pack, there is no reason not to enhance productivity with proper cord management.

—John Ross, associate Web editor

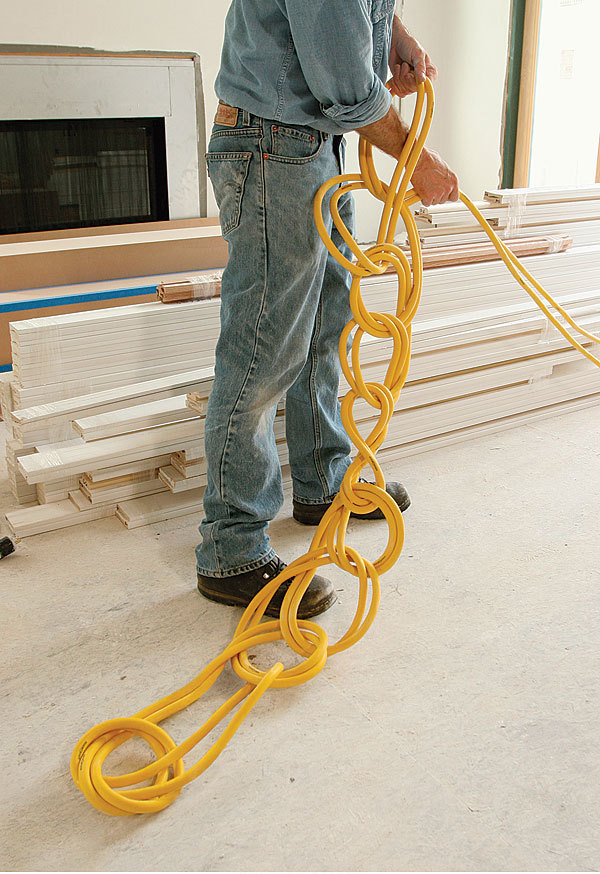
Weave heavy-gauge cords into a chain

Start with a simple knot. Double the cord, and tie a knot in the end with the loop. To begin the braid, I pass my hand through the loop and pull the doubled cord back through. This creates another loop that I pull the cord through. And so on.

Keep the loops loose. I keep loops medium in size and avoid pulling them tight to prevent kinks from developing in the cord (photo left). When coiled, the cord can be folded for ease of handling and storage (photo right).

Air hoses require a reverse coil

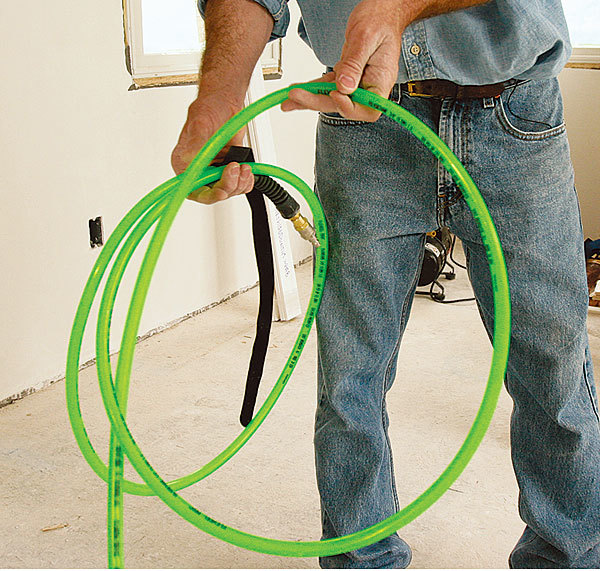
Every other coil is reversed. Begin coiling the air hose by looping it once at one end. To reverse the second coil, bring the loop in so that the line exits behind the second coil.

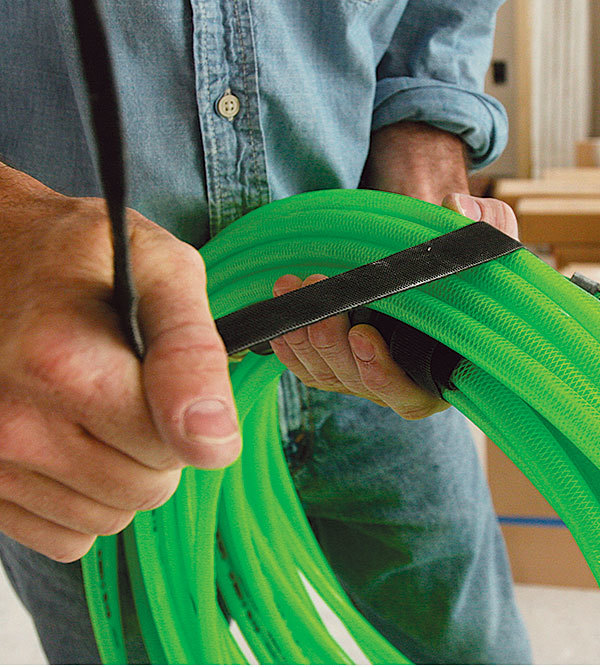
Strap for storage. While a scrap of electrical wire can be used to secure the bundle, I prefer a Velcro cloth strap, which comes with many cords or can be purchased separately at home stores (click the “Read More” button above for details).

Magazine extra: Watch video of Tucker demonstrating the three techniques he uses to wrap his cords and hoses.

Photos by: John Ross, except where noted

Sign up for eletters today and get the latest how-to from Fine Homebuilding, plus special offers.

Signing you up...

This site is protected by reCAPTCHA and the Google Privacy Policy and Terms of Service apply.
See all newsletters
See all newsletters
×

Get home building tips, offers, and expert advice in your inbox

Signing you up...

This site is protected by reCAPTCHA and the Google Privacy Policy and Terms of Service apply.
See all newsletters
See all newsletters

New Feature

Fine Homebuilding Forums

Ask questions, offer advice, and share your work

  • X
  • facebook
  • linkedin
  • pinterest
  • email
  • add to favorites Log in or Sign up to save your favorite articles

View Comments

  1. Suburbanguy | Oct 03, 2018 03:50pm | #1

    As any sailor will tell you, you must give a twist to the electrical cord with each hank, just like rope, air hose (and garden hose as well). This explains why one shouldn't dump the electrical spool on the ground and start pulling when wiring a home. You'll get those twists--in reverse. Mount the spool on an axle.
    For extension cords, simply purchase a hand-cranked spool from the Orange or Blue store . It's much simpler than all of these methods.

Log in or create an account to post a comment.

Sign up Log in

Become a member and get full access to FineHomebuilding.com

Up Next

Video Shorts

Featured Story

Tall Deck on a Sloped Lot

When deck posts exceed what the prescriptive code tables allow, it's time to consult a structural engineer for post sizing and possible bracing.

Featured Video

Micro-Adjust Deck-Baluster Spacing for an Eye-Deceiving Layout

No math, no measuring—just a simple jig made from an elastic band is all you need to lay out a good-looking deck railing.

Related Stories

  • Versatile Tool Vest
  • Talking Shop
  • Tame Your Cable Ties
  • Perfect Pouch for Remodeling

Discussion Forum

Recent Posts and Replies

  • |
  • |
  • |
  • |
  • |
  • |
View More Create Post

Highlights

Fine Homebuilding All Access
Fine Homebuilding Podcast
Tool Tech
Plus, get an extra 20% off with code GIFT20

"I have learned so much thanks to the searchable articles on the FHB website. I can confidently say that I expect to be a life-long subscriber." - M.K.

Get home building tips, offers, and expert advice in your inbox

Signing you up...

This site is protected by reCAPTCHA and the Google Privacy Policy and Terms of Service apply.
See all newsletters
See all newsletters

Video

View All Videos
  • Podcast 545: Mystery Fasteners, Basement-Ceiling Insulation, and Mixed-Use Malls
  • Podcast 537: Bowed Block Walls, Air-Sealing a Post-Frame Shop, and a Rotten Door Jamb Fix
  • Podcast 537: Members-only Aftershow—Tool Storage and Organization
  • 10 Great Gift Ideas for People Who Love Tools
View All

Tool Storage

View All Tool Storage Articles
  • Storage-Bin Solution
  • Repurpose Tool Boxes
  • Smart Truck Storage
View All Tool Storage Articles

Fine Homebuilding Magazine

  • Issue 331 - June 2025
    • A More Resilient Roof
    • Tool Test: You Need a Drywall Sander
    • Ducted vs. Ductless Heat Pumps
  • Issue 330 - April/May 2025
    • Deck Details for Durability
    • FAQs on HPWHs
    • 10 Tips for a Long-Lasting Paint Job
  • Issue 329 - Feb/Mar 2025
    • Smart Foundation for a Small Addition
    • A Kominka Comes West
    • Making Small Kitchens Work
  • Issue 328 - Dec/Jan 2024
    • How a Pro Replaces Columns
    • Passive House 3.0
    • Tool Test: Compact Line Lasers
  • Issue 327 - November 2024
    • Repairing Damaged Walls and Ceilings
    • Plumbing Protection
    • Talking Shop

Fine Home Building

Newsletter Sign-up

  • Fine Homebuilding

    Home building tips, offers, and expert advice in your inbox.

  • Green Building Advisor

    Building science and energy efficiency advice, plus special offers, in your inbox.

  • Old House Journal

    Repair, renovation, and restoration tips, plus special offers, in your inbox.

Signing you up...

This site is protected by reCAPTCHA and the Google Privacy Policy and Terms of Service apply.
See all newsletters

Follow

  • Fine Homebuilding

    Dig into cutting-edge approaches and decades of proven solutions with total access to our experts and tradespeople.

    Start Free Trial Now
    • Facebook
    • Instagram
    • X
    • LinkedIn
  • GBA Prime

    Get instant access to the latest developments in green building, research, and reports from the field.

    Start Free Trial Now
    • Facebook
    • YouTube
  • Old House Journal

    Learn how to restore, repair, update, and decorate your home.

    Subscribe Now
    • Facebook
    • Instagram
    • X

Membership & Magazine

  • Online Archive
  • Start Free Trial
  • Magazine Subscription
  • Magazine Renewal
  • Gift a Subscription
  • Customer Support
  • Privacy Preferences
  • About
  • Contact
  • Advertise
  • Careers
  • Terms of Use
  • Site Map
  • Do not sell or share my information
  • Privacy Policy
  • Accessibility
  • California Privacy Rights

© 2025 Active Interest Media. All rights reserved.

Fine Homebuilding receives a commission for items purchased through links on this site, including Amazon Associates and other affiliate advertising programs.

  • Home Group
  • Antique Trader
  • Arts & Crafts Homes
  • Bank Note Reporter
  • Cabin Life
  • Cuisine at Home
  • Fine Gardening
  • Fine Woodworking
  • Green Building Advisor
  • Garden Gate
  • Horticulture
  • Keep Craft Alive
  • Log Home Living
  • Military Trader/Vehicles
  • Numismatic News
  • Numismaster
  • Old Cars Weekly
  • Old House Journal
  • Period Homes
  • Popular Woodworking
  • Script
  • ShopNotes
  • Sports Collectors Digest
  • Threads
  • Timber Home Living
  • Traditional Building
  • Woodsmith
  • World Coin News
  • Writer's Digest
Active Interest Media logo
X
X
This is a dialog window which overlays the main content of the page. The modal window is a 'site map' of the most critical areas of the site. Pressing the Escape (ESC) button will close the modal and bring you back to where you were on the page.

Main Menu

  • How-To
  • Design
  • Tools & Materials
  • Video
  • Blogs
  • Forum
  • Project Guides
  • Reader Projects
  • Magazine
  • Members
  • FHB House

Podcasts

  • FHB Podcast
  • ProTalk

Webinars

  • Upcoming and On-Demand

Podcasts

  • FHB Podcast
  • ProTalk

Webinars

  • Upcoming and On-Demand

Popular Topics

  • Kitchens
  • Business
  • Bedrooms
  • Roofs
  • Architecture and Design
  • Green Building
  • Decks
  • Framing
  • Safety
  • Remodeling
  • Bathrooms
  • Windows
  • Tilework
  • Ceilings
  • HVAC

Magazine

  • Current Issue
  • Past Issues
  • Magazine Index
  • Subscribe
  • Online Archive
  • Author Guidelines

All Access

  • Member Home
  • Start Free Trial
  • Gift Membership

Online Learning

  • Courses
  • Project Guides
  • Reader Projects
  • Podcast

More

  • FHB Ambassadors
  • FHB House
  • Customer Support

Account

  • Log In
  • Join

Newsletter

Get home building tips, offers, and expert advice in your inbox

Signing you up...

This site is protected by reCAPTCHA and the Google Privacy Policy and Terms of Service apply.
See all newsletters
See all newsletters

Follow

  • X
  • YouTube
  • instagram
  • facebook
  • pinterest
  • Tiktok

Join All Access

Become a member and get instant access to thousands of videos, how-tos, tool reviews, and design features.

Start Your Free Trial

Subscribe

FHB Magazine

Start your subscription today and save up to 81%

Subscribe

You have 1 free article remaining.

Get complete site access, including thousands of videos, how-to tips, tool reviews, and design features.

Start your FREE trial

Already a member? Log in

We hope you’ve enjoyed your free articles. To keep reading, become a member today.

Get complete site access to expert advice, how-to videos, Code Check, and more, plus the print magazine.

Start your FREE trial

Already a member? Log in

Privacy Policy Update

We use cookies, pixels, script and other tracking technologies to analyze and improve our service, to improve and personalize content, and for advertising to you. We also share information about your use of our site with third-party social media, advertising and analytics partners. You can view our Privacy Policy here and our Terms of Use here.

Cookies

Analytics

These cookies help us track site metrics to improve our sites and provide a better user experience.

Advertising/Social Media

These cookies are used to serve advertisements aligned with your interests.

Essential

These cookies are required to provide basic functions like page navigation and access to secure areas of the website.

Delete My Data

Delete all cookies and associated data