Building a Shed? Get the Site, Footings, and Floor Frame Right
The floor and foundation for a small outbuilding can be simple and easy to install compared to that of a bigger building, but you will want to get the details right if you want your shed to last.
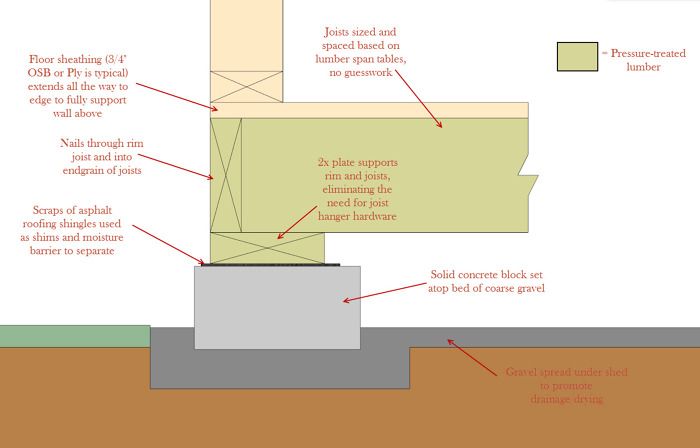
You may never look at it again, but one of the most important parts of a shed structure is the floor frame. Not only will the building method change depending on your overall design, but it’s also important to think about moisture, load paths, lumber spans, and the basics of proper framing.
Start with a solid base
Unless you live in an area that’s so dry that moisture accumulation isn’t a concern, or have soil that drains exceedingly well, it’s a good idea to cover the area under the shed with several inches of coarse gravel (3/4″ is a common option). The idea behind the coarse gravel is that it defeats the natural process of capillarity, which causes water to rise up from the ground after rainfall. Forgive my simplistic builder’s summary of capillarity, but it’s essentially a function that allows water to be sucked from large areas to smaller areas, regardless of gravity. The spaces between pieces of gravel are essentially large pores, and are large compared to the smaller pores between grains of soil, sand, or whatever substrate is below the gravel. So, by adding a layer of gravel, you’ve eliminated the ability of water to wick upward into your shed. Gravel also aids drainage and evaporation, both of which are crucial under a shed. You can’t always stop water, but you can provide it a means for running off or drying.
If you lay a bed of gravel you can actually build the shed floor frame right on the gravel. This is a common approach when buying a factory-built shed. You’ll want to check with your local building department to make sure they’re ok with this (most I’ve encountered consider small detached structures under a certain square footage to not require permanent footings). Another common approach is to set concrete blocks on the ground, first digging out the grass and topsoil, to a depth of maybe 6 or 12 inches below grade, and fill the hole with gravel. Use solid concrete blocks, not the hollow variety used in masonry wall construction, and remember that blocks are commonly available in several sizes, which is handy when it comes to getting close to level. As a rule I don’t stack blocks more than 2 or 3 high (depending on block size) because the higher the stack the lower the stability. In situations where the ground is sloping severely, or you want a more permanent connection with the site, you should choose poured concrete footings that extend below the local frost depth. If the shed will be on stacked blocks or poured footings you’ll need to consider the number of footings and how they are spaced. This is directly tied to the type of floor frame you will be using.
The best shed-floor framing is simple and sturdy
In most cases a shed is built atop a floor frame of dimensional lumber and plywood or OSB. This method is fast, and follows conventional and familiar framing techniques. Joists run the short direction, typically spaced every 16 inches, and are captured by rim joists on the long sides of the shed. If the joists are set atop a plate (see picture) then you won’t need joist hangers to reinforce the ends of each joist. If no plates are used, you must use joist hangers. Also, pay attention to the span of the lumber you’re choosing for the floor, information which can be found readily on the internet, in building code books, or at your local building department. Often people will oversize their joists, thinking that 2x10s “look” right for a floor frame, when in reality 2x6s or 2x8s might be more than adequate and can save money.
Don’t forget to use galvanized nails for constructing this portion of the shed frame! Standard (“bright”) framing nails are not compatible with pressure-treated lumber!
Happy building!
– Justin
Follow editorial director Justin Fink on Instagram @mrjfink
Fine Homebuilding Recommended Products
Fine Homebuilding receives a commission for items purchased through links on this site, including Amazon Associates and other affiliate advertising programs.
Portable Wall Jack
Guardian Fall Protection Pee Vee
Sledge Hammer
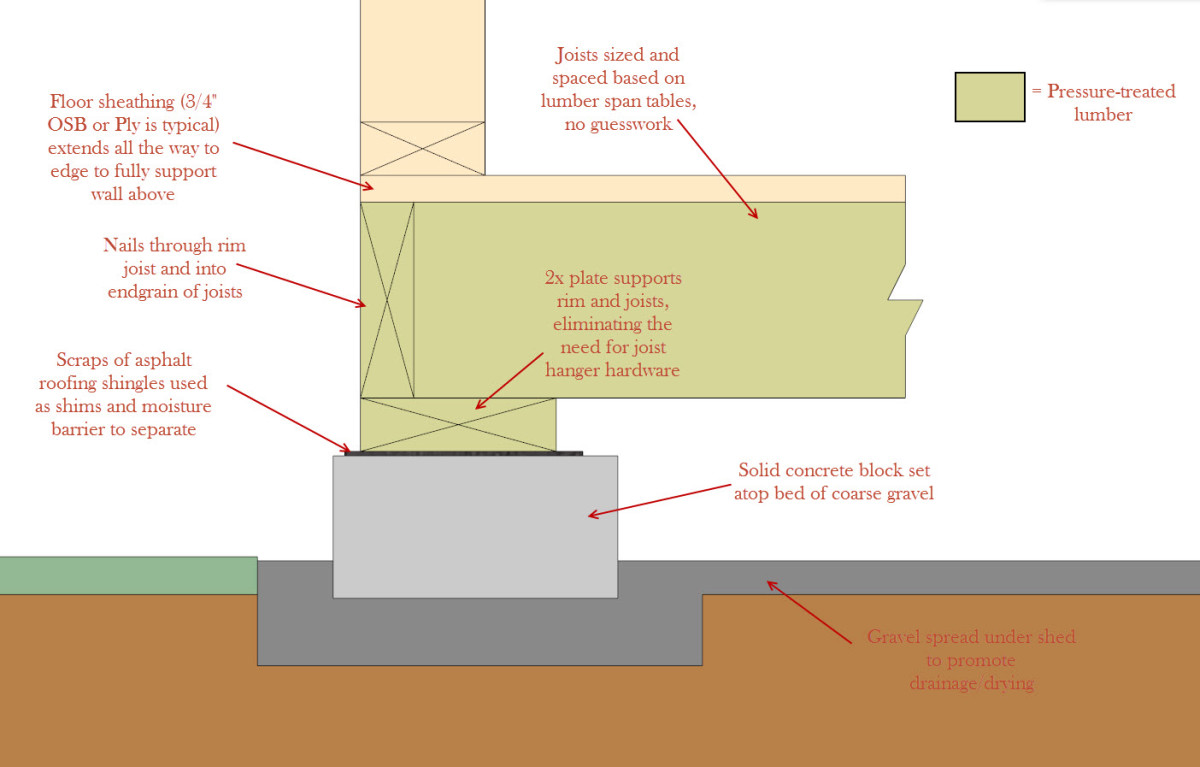
Follow these basic rules of thumb when planning and building the floor of your shed.







View Comments
Justin,
You are right to recommend that the builder seeks the appropriate size for the floor joists, but the 2X plate that you recommend to support the ends of the joists is almost certainly undersized. Without a continuous foundation to support the ends of the joists, the combined dead and live loads will be transferred to that plate, which is acting as a beam between the end supports. While this is just a shed, as a civil engineer I strongly suggest that the same diligence be applied to sizing the end beams.
The "rim joists" are actually acting as a beam between the end supports as well, and will initially contribute some additional support, but nailing into the end-grain of the joists is not an acceptable method of fastening for this application. Joist hangers would be needed, which is what you are trying to avoid.
I enjoy the FHB articles and applaud your attempt to simplify the construction of a shed, but given the range of applications for storage sheds, they may (like mine!) be expected to carry a substantial load, and should be sized appropriately.
Hi Justin,
Does the rim joist/floor joist merely sit atop the 2x plate? I see nothing on the drawing indicating whether it is attached to the 2x plate.
Thanks for posting this piece. Very helpful.