Restoring an Antique Timber-Frame Home
Follow the process of disassembling, moving, and reconstructing the timber-frame structure.
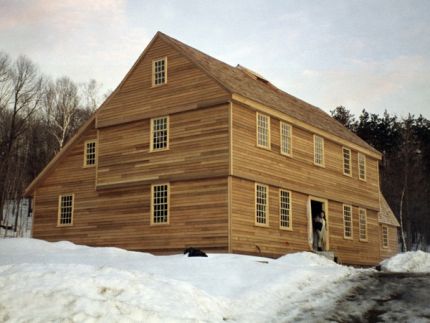
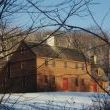
I’ve been a fan of old houses for a long time, and I’ve been involved in restoring and moving a number of timber-frame houses over the years. In this audio slideshow I’ll tell you the story of my home, a classic timber-frame Colonial originally built in Farmington, Connecticut, in the early 1700s.
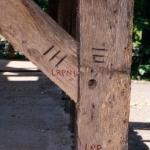
After more than two centuries the house had fallen on hard times and was going to be torn down for commercial development before I got my hands on it. While it looked beat up from the outside, the bones of the house were still in excellent condition. It was constructed entirely of white oak and was joined and assembled with traditional timber frame pegged joinery.

A new home, piece by piece
Having disassembled and reassembeled old timber-frame houses for many years I’ve become familiar with how they are built, so the process of deconstructing, moving, and reassembling the parts was fairly straightforward. All of the boards and timbers were marked and mapped out, then loaded one by one onto a truck and delivered to the site where we laid a new foundation. Assembling the timber-frame structure took only about two days with the help of a small crew and a crane.
We added two additions to the original structure. There was evidence that the house at one point had a salt-box lean-to attached to it so we restored the home with that section added. Also, we built an addition which contains all of the plumbing and venting, since the old structure was not designed to accommodate these modern-day pipes.
Over the next few months I hope to post more photos and stories from this project and others. Until then, please leave a comment, ask a question, or just enjoy the photos.
| MORE IN THIS SERIES: 18TH CENTURY TIMBER-FRAME COLONIAL | |
 |
PART ONE: SAVING THE STRUCTURE
Follow the process of disassembling, moving, and reconstructing the timber-frame structure. |
 |
PART TWO: PERIOD DETAILS
Follow along with the reconstruction of the period details, including doors, windows, and moldings. Watch it now. |
 |
PART THREE: HIDING THE MODERN UPGRADES
Learn how modern mechanicals and conveniences were hidden behind and 18th century facade. Watch it now. |


View Comments
Outstanding, what a beautiful house.
John's lived the dream i've had for years, fantastic,if i could do one thing in life this would be it.My only complaint...it was'nt a ninety minute video.
I have found myself hopelessly in love with older houses. However I live on the west cost I do not get to see houses such as this. Thank you so much for sharing!!
Excellent labor of love. Can't find Hand hueghed beams like that today. Well worth the work i'm sure. how long did the whole projest take?
Nice job John.. you have learned alot since the first house we did in 1974..looks like you had alot more help this time congratulations
Nice house.........what do YOU think of some shutters on the windaows to take away the starkness of the walls??
I wish you would have showed more of the interior.I loved the kitchen(what we could see of it)
Absolutely fascinating. It's amazing that you were able to assemble it in only two days. Look forward to more photos of the interior.
What a beautiful job. We (the public) owe you a debt for being there to spot the intrinsic and historical value and ensure it was not lost. The restoration is not only beautiful but honest and spiritually aesthetic.
I am shocked that a town such as Farmington, that prides itself on its history (the town tag line is "Respecting History, Planning the Future") would permit such a house - a pre-revolutionary structure - to be torn down. This is a testament to the naivete and nearsightedness of today's zoning and building departments.
Wow!, I can't wait for the full length slideshow, showing the finished interior and exterior, specifically how heating and electrical were secreted into the historic portion of the house, and more on the original timber frame structure.
What kind of tool did you make to remove the pegs driven at the joints?
What kind of tool did you make to removed the pins driven at the joints?
What's the siding, Hemlock ?
As a transplanted "Nutmegger", i miss the old homes on the East Coast. Thank you for preserving this beauty and please keep us posted on its progress!
Thanks for saving a piece of American history. This house was around when Geo. Washington was a wee young one. That's awesome.
To all who commented - Thanks, and there will be more to come about some of the other aspects of the process and finished product. A couple of specific answers, though, to:
bigswede69 - The lack of shutters is partly my taste and uncertainty about accuracy. I like the starkness of the walls (reminds me of how straight-forward life was back then) but also we couldn't find evidence of there being any exterior hardware around the windows or other indications that there were ever shutters on this particular house. So for both reasons, we chose to leave them off.
decorhappy - Well, after we laid everything out with all the beams correctly placed on the new house deck and pre-assembled the 4 timber bents (each one 2 posts connected by a single girt...think football goalposts), then it took just two days to pull everything up into place and re-peg the frame.
WilliamRoss - The house was originally built in the 1700's in a section of Farmington that, subsequently, was split off in 1868 to form part of the town of Plainville, CT. The house was within the borders of Plainville when dismantled. The historic society there supported the removal and reconstruction as more desirable than having the house bulldozed.
MisterChairman - Secrets of the heating, AC, electrical, and plumbing to come! It's a tremendous advantage to have the house totally apart to plan and install the "modern" mechanicals...something most owners of an antique house struggle with when restoring an existing structure.
spitfiremk5 - The siding is commercial #1 red cedar, but with the mill-finished side turned inward to let the rougher cut (more rustic?) side show. It gave the siding a bit more of an aged look as it weathered, too.
Bruski - We went to a metal working shop and had them create a set of 1"; 1.5"; 2" and 2.5" diameter hardened steel rods, each with a deep conical indention cut into one end, to fit over the protruding points of the old pegs. That way we could wail-away at driving the pegs out (a lot harder after 300 years than one might think) without busting up the old pegs and making them undriveable. Where the pegs were cut off flush with the beams, we used a similar set of solid rods. We knew we were going to make new green pegs for the reassembly, but chose to drive the old pegs out (rather than drill them out), not to save them, but to preserve the integrity of the peg holes...most of which were set somewhat off-center to pull the joints tight when the house was framed originally. I have a nice souvenir collection of slightly-crooked antique oak pegs, if anyone is interested.
Can you imagine hand hueghing and joining all those OAK beams? It is hard enough to work it with mordern tools.
You used a crane, easier of course.
But in the old days they used to build each end wall lying flat on the ground. Then they pulled it up to the vertical (as you probably know).
Here in Holland some people still call their house their "op trek". Translated it means "pull up". Congratulations on your beautiful optrek!
One of the very nice things I see on your house is the use of cedar siding.
Of course there are many wood framed old houses (some from about the 1300s and many from the 1400s and 1500s and later) here and restoration and preservation is important but we don't have that beautiful wood siding like you do. Wattle and Daub (clay over sablings) due the scarcity of wood in Europe was used.
A nice place to see old houses, some like yours, is an open air museum called Bokrijk in Belgium. The inside of your house looks just like those. Again congratulations on saving that nice house.
Peter
Beautiful! All your efforts are so obviously worth it. Lucky guys!
Fantastic project.But what was the budget?
There are several answers to the question Ellipse asked about our budget. First, a lot of the work on a project of such a personal nature I did myself...including all of the masonry...and I can't really count those hours or put a price to it. Also, I had already owned the land for several years. On the expense side, we hired contractors for excavation, landscaping, concrete foundation and poured floor, electrical, heating/AC, plumbing, roofing and siding, painting, well-drilling, and the crane work to help put up the frame. For the carpentry, throughout the project I was guided by the expertise and craftsmanship of an older and wiser carpenter who had moved to Connecticut years before from the French-speaking part of Canada. From the framing to the finish work I was his wingman and helper. I learned a lot. Out-of-pocket costs for all work and materials came in under the $300K construction loan. While I was able to manage the dollars spent pretty well, another budget came in way over. That was the time it took to complete the project. Easily, it was nearly three-times as long as I had thought. So long that when we got our C.O. the local building department gave it to us framed!
He there:
Very glad to find this blog as I am an N.J. Architect (former New Englander) with an avid interst in saving or adapting old structues for reuse. I'm very involved with Historic Districts, and have had more recent luck with relocating post and beam 19th Century barns. It's been so hard to watch local 19th century local historic homes being torn down in Somerset County. This blog gives me some hope. I guess we just have to figure out how to market the concept. Any suggestions?
I just watched the video again. Are the second floor and addition 8 over 12 "cottage" style windows a local type? Did you have input from the Local Historical Society as to the appropriate windows? Here in Somerset Cty, NJ. we might have seen 12 over 8 sashes.
Just wondering.
Here's a couple of thoughts for barnmover...marketing the concept is a struggle because it's a one-on-one relationship between somebody who loves old houses and a house. Concepts like adaptive use, historic districts and preservation variances in building codes help, but we're swimming against the tide. Hopefully, more people will see the beauty and value in restoration results others have had and some number will be won over.
About the 8-over-12 windows, there were a couple of guiding principles. 1) What was originally there from the evidence; 2) What would have been correct for a house of that age in the part of Connecticut it was built in; and 3) What looked right. First, in the upstairs of the oldest part of the house we had evidence that the original window size would have held 8-over-12 double-hung sash windows (and 12-over-12 on the first floor). Second, a pioneering New England architectural historian at Yale, named J. Fredrick Kelly, published a book in the early 1900s with many pictures of old houses and many measured drawings from an available wealth of early houses that hadn't been too messed with yet. The book, The Early Domestic Architecture of Connecticut, has been a bible and handbook for restorers here. From the book, it was obvious that many houses of the period of ours used 8-over-12 windows. Third, in the new gambrel-roofed addition, we used sash sizes that looked right for the positions they were in, such as 8-over-12 in the downstairs and 6-over-6 in the upstairs peaked dormers.
That's truly gorgeous and I can't believe you managed to succeed in moving the whole house too! After this I wouldn't be surprised if you took on building classic replicas for other people too!
Thanks, Marcio, and to all the others for your nice comments and questions.
An interesting thing happened recently regarding the house. One of the people who helped in the dismantling of the house at its original location contacted me. Seems that back then laying on a beam behind a wall he had found an early coin. He sent me a photo of the discovery: a George II penny dated 1736. Since often a coin was put in a "new" house for good luck, I'm assuming that may have been the case here. If so, it does help, along with architectural indications, to support the dating of the house's construction as prior to 1750. As of yet I have not been able to find out exactly who the first owner/builder of the house was, so this is a welcome clue to help with the search.