
A Concrete Countertop and Sink in a Single Pour
Formed and finished with off-the-shelf materials, a vanity top takes shape upside down.
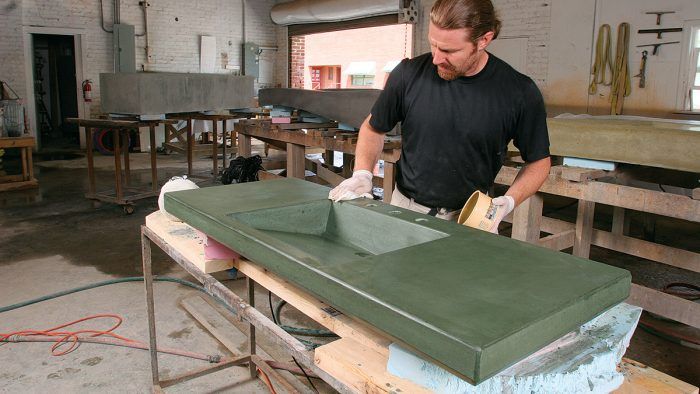
Custom concrete countertops can be one of the most-original, dynamic design features in a home. With its almost unlimited flexibility in color, shape, and character, concrete is incredibly cool and extremely functional, especially when used for a countertop with an integral sink.
Concrete is easy to mix and use, but there is a learning curve to working with it. By combining commonly practiced form-building methods with our own trial and error, we’ve developed an efficient way to build a relatively complex and striking concrete countertop/sink. Here, we illustrate how we make a vanity top using a contemporary sink-bowl design. We like this sink because it is simple to construct and functional for hand-washing, but many other bowl designs are possible using these same techniques.
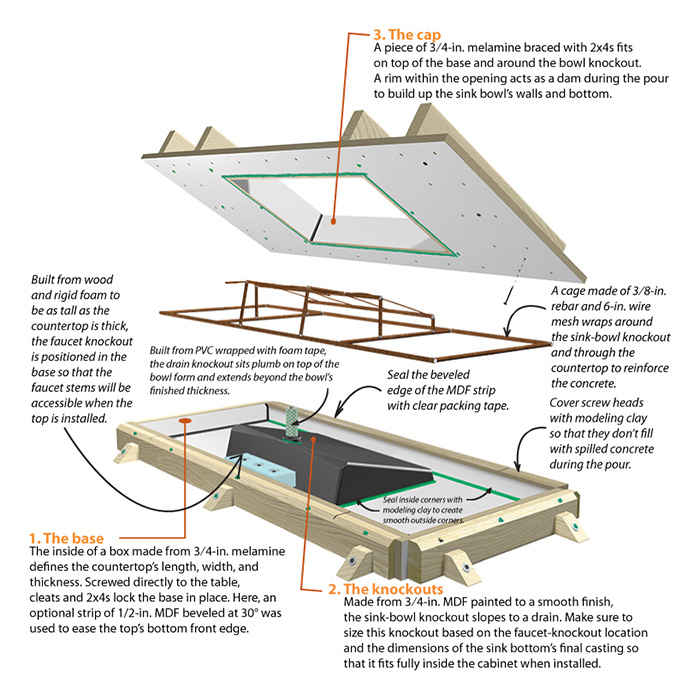
A three-part form
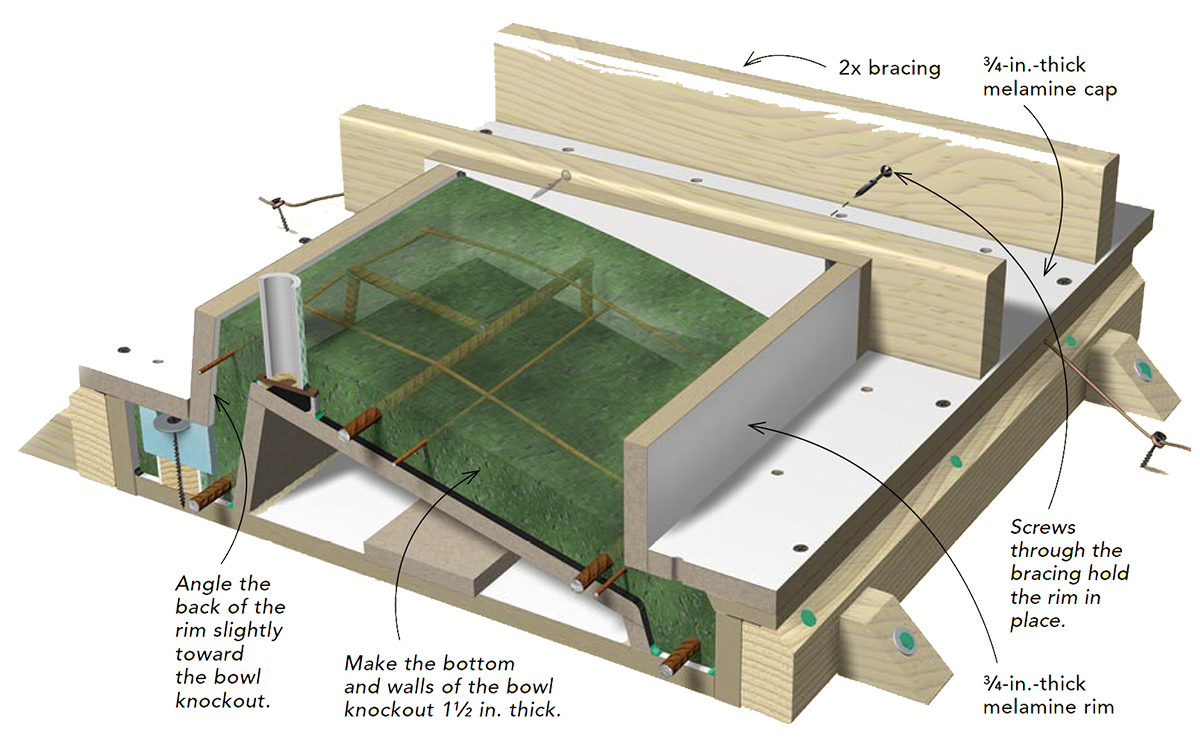
Here, separate parts come together to contain and shape the concrete mix. The inside of the base creates the outside of the countertop. Sink knockouts shape the sink bowl and provide holes for drain and faucet fixtures. A cap with an opening in its center forms the sink bowl’s sides and bottom.
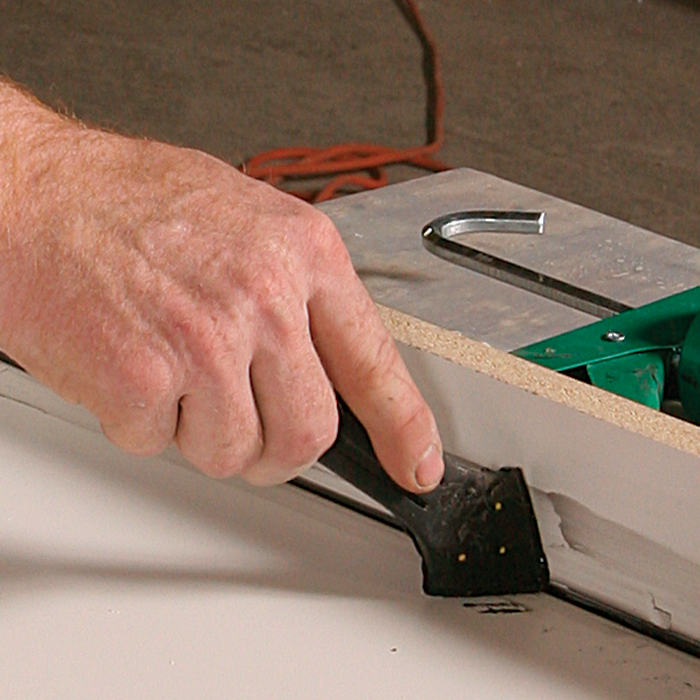
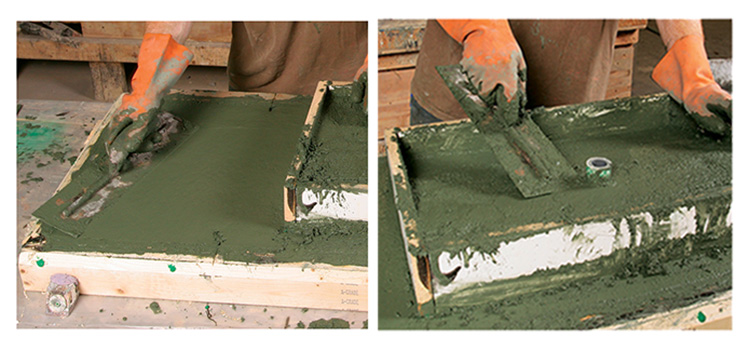
Seal and smooth the baseBecause the concrete mix contains a large amount of liquid, it’s important to build a base form that prevents liquid from leaking through the inside corner seams. Also, inside corners on the form translate to outside corners on the finished top, so we take our time to make them as smooth as possible. We apply black silicone in areas where a perfect finished edge isn’t necessary, like the sides and back of this top, using denatured alcohol to clean excess off the form. We use modeling clay in all areas where we want a smooth, finished edge because it is easier to control than silicone. Whether using silicone or modeling clay, be sure to push it firmly into the joint as you go. |
 |
 |
Getting the right mix is tricky
No one can tell you exactly how to mix a perfect batch of concrete, largely because so many variables go into one. For starters, you have to consider the proportions and properties of the basic materials you’re using, such as aggregate, sand, and cement. For example, the type of sand, its fineness, and the amount of water it’s already holding affect the consistency of the mix. The sand we used for this countertop was a mined silica sand. When choosing sand, keep in mind the grading of the size of the particles in the sand. Simply put, you want to use a good variation in sizes, and a good amount of fine-grained sand. We also use river sand, which is dredged and screened as opposed to mined. River sand has a larger variation in color and size gradation than mined sand. In most areas, masonry sand is readily available, and it works, too. We don’t use it, though, because it results in a less favorable final color than the white sand we prefer.
Additional ingredients affect the concrete as well. Fibers can be added for strength, as can fly ash, but they affect the consistency of the mix. Other ingredients, such as water reducers and plasticizers, help to keep the mixture together while improving the flow of the concrete mix within the form. The type and the amount of colorant also can affect the character of the mix, as can the temperature and the humidity in the workspace.
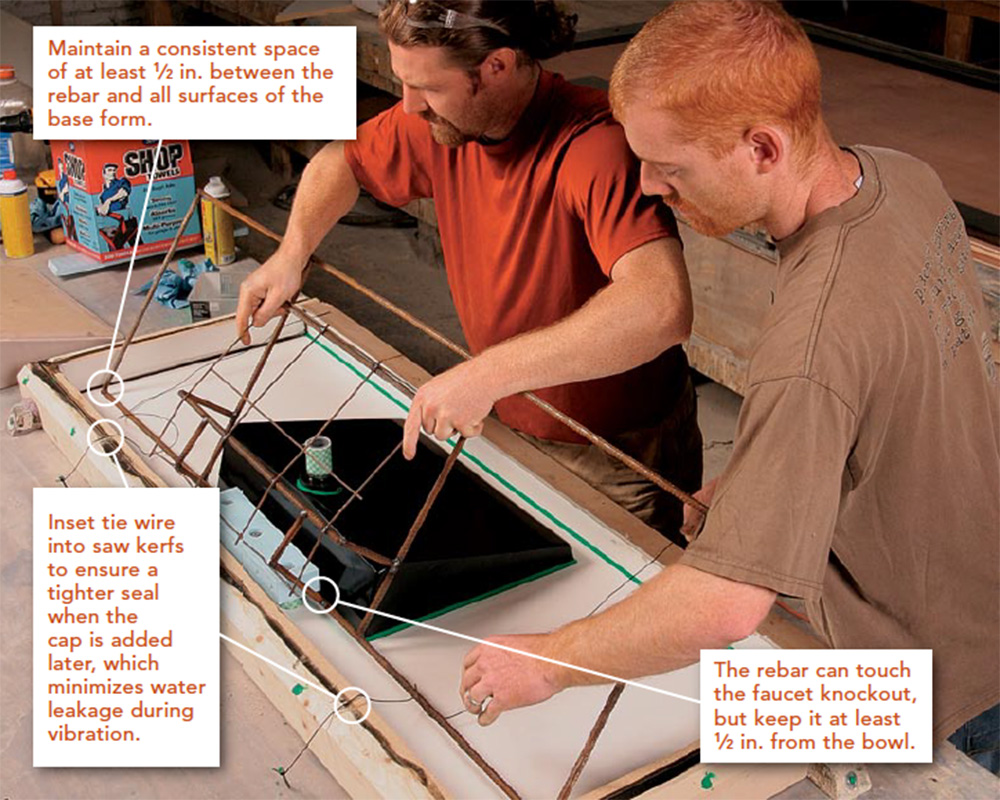
Hang the rebar cage to stayWe suspend a rebar cage in the base from tie wire wrapped around screws in the table so that it won’t move during the pour, making sure not to scratch the forms in the process. Once the cage is in place, we spray a generous coat of silicone over all surfaces inside the base to help them release once the concrete cures; spraying the rebar won’t affect its bond to the concrete. To make a strong cage quickly, we weld the 3 ⁄ 8-in. rebar and 6-in. wire mesh together, making sure the clearances around the bowl knockout are at least as large as the largest aggregate we’re using in the concrete mix. Although we prefer welding for its speed and strength, joining the pieces with tie wire can work, too (see below).
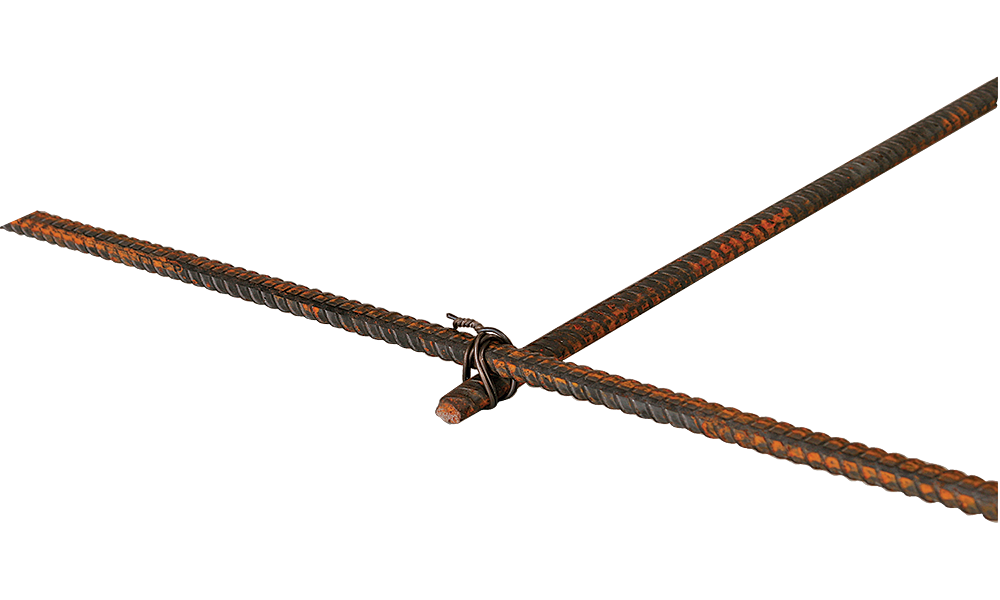
A no-weld alternative If you join rebar and wire mesh together using tie wire, keep in mind that the rebar will be subjected to a lot of movement once the mix is vibrated. Make all connections extremely secure, as shown here, and be sure to maintain the clearances indicated above. The cage around the bowl knockout can be made entirely with 6-in. wire mesh, then tied to rebar running through the top.
|
The possibilities are almost endless, and your solution depends on the results you’re looking for as well as the materials and the environmental conditions on hand. Some companies market specific ratios for the mixes they use and sell, but everybody’s basically finding similar solutions. We recommend a ratio of approximately 3 parts sand to 1-1 ⁄ 2 parts 3 ⁄ 8-in. gravel to 1-1 ⁄ 4 parts type-1 portland cement.
The ultimate goal is to have your concrete consolidate and flow well. Creating a mix that stays together and still remains fluid can be a real balancing act, however. If you’re new to concrete, you might be tempted to add more water to the mix to improve its flow. Keep in mind that the results are always better if you use a low proportion of water because a drier mix makes for a denser, stronger finished product. We try not to exceed a 45% water-to-cement weight ratio. A water reducer and plasticizer like the one we use (Super Sealz, www.blueconcrete.com) lowers the amount of water needed to maximize flow.
Vibration, which is the mechanical process of consolidating the mix, directly affects the ratio of water and admixtures you should use. Keep in mind that weak vibration requires a more fluid mix. The bottom line is that you might have to experiment to see what factors yield results that you like.
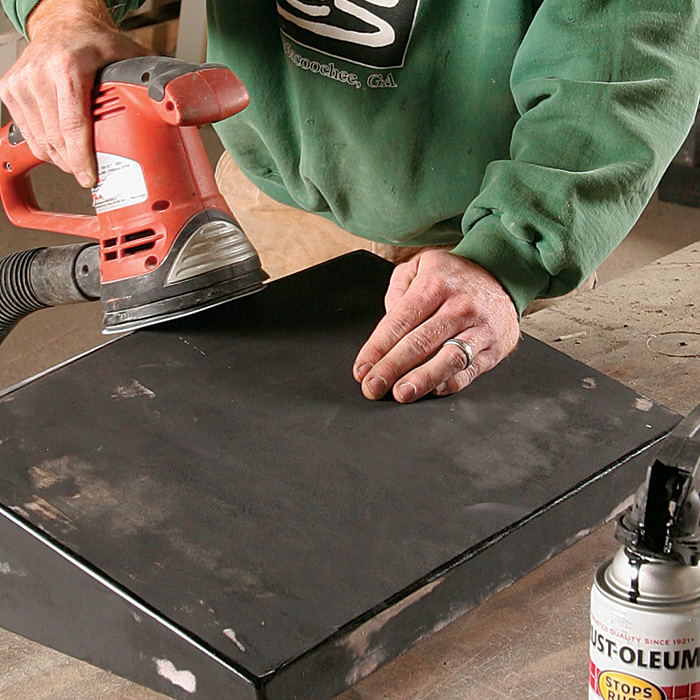
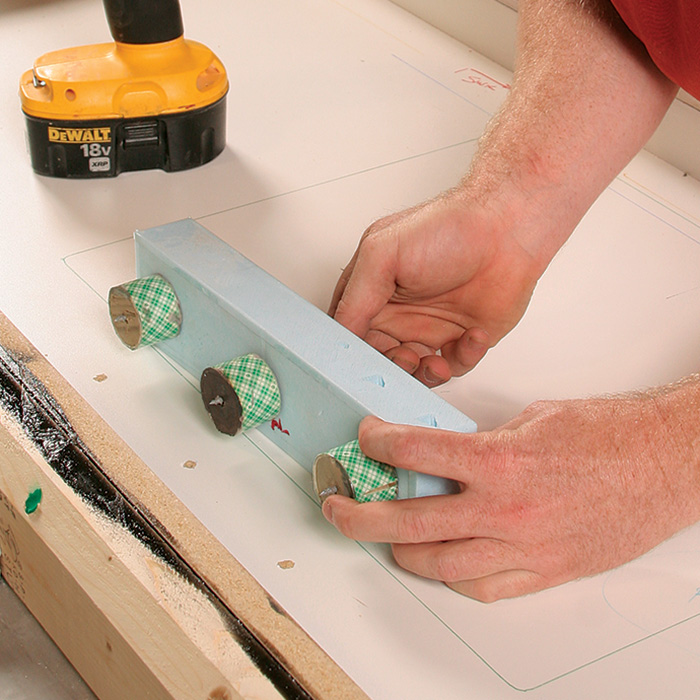
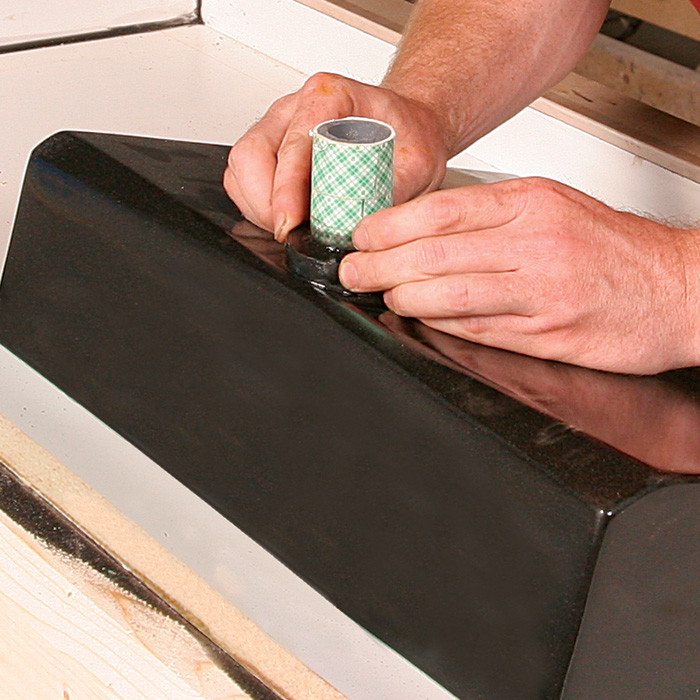
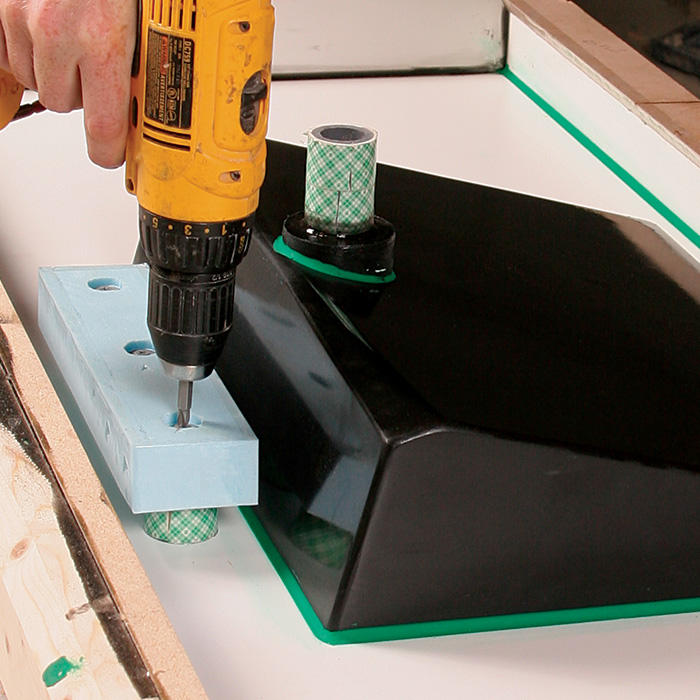
Build knockouts to do just that
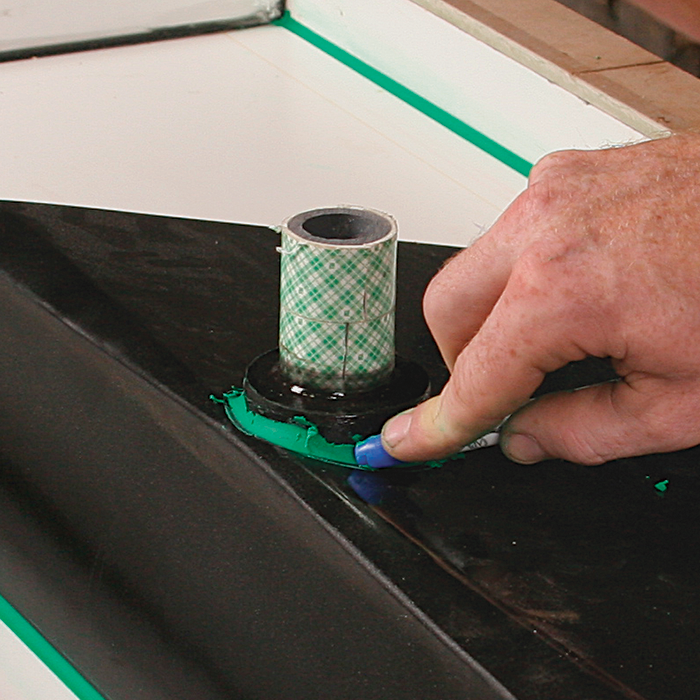
Built separately and then attached to the base form, sink knockouts need to have an impermeable, super-smooth finish. After applying a skim coat of Bondo wood filler to the bowl knockout’s outer edges, we sand all surfaces smooth and apply multiple coats of high-gloss spray enamel, sanding between coats (1). Locate the screw holes to secure the faucet knockout before the bowl knockout is installed (2). The faucet knockout is made of 1-in.-tall wood dowels that are wrapped with foam tape followed by clear packing tape. A rectangular block of rigid foam on top of the dowels provides clearance for faucet-stem lock nuts. Use five-minute epoxy to glue the bowl knockout to the base and the drain knockout to the bowl (3). After sealing all the edges inside the base form, screw the faucet knockout in place (4). Cover the screw heads with tape so that they don’t fill with concrete.
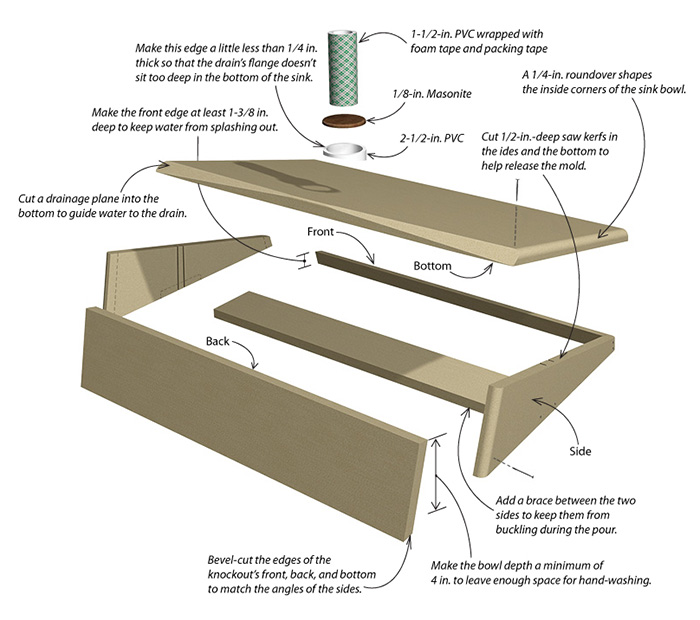
Overlap the joints in order
Glue and nail the bowl knockout together in the manner shown here because it will need to be broken out of the cured top one piece at a time. Concrete compresses knockouts as it cures. Faucet and drain knockouts include foam to absorb some compression, but the bowl knockout doesn’t. Saw kerfs help, but this form needs to remain rigid so that it won’t buckle under the concrete’s weight.
 |
 |
 |
 |
Color possibilities are endless
For a concrete countertop, color is a matter of taste. The easy solution is to purchase a mortar color from a local supplier of concrete materials, but the range of colors is often limited. Ordering from a color distributor often offers a better selection but requires purchasing larger quantities. Some retailers specialize in matching colors and quantities for countertop fabricators. We recommend B&J Colorants because the company is knowledgeable about the specifics of concrete countertops. Color manufacturers like B&J offer color ratios, but you should experiment by mixing, pouring, and vibrating some sample molds. Doing so will give you a better handle on the process and a definitive answer on what the final color of the top will be.
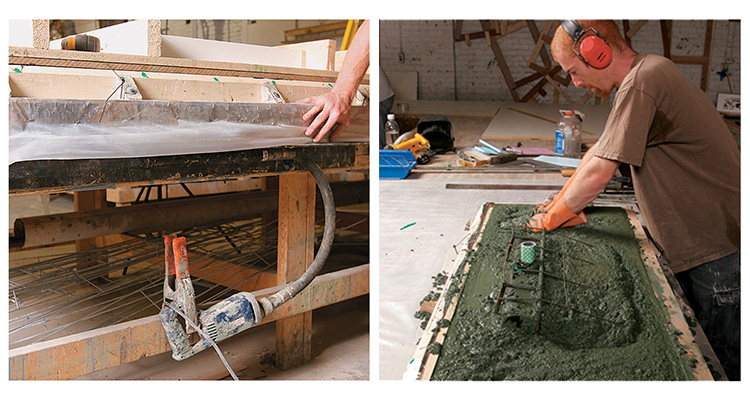
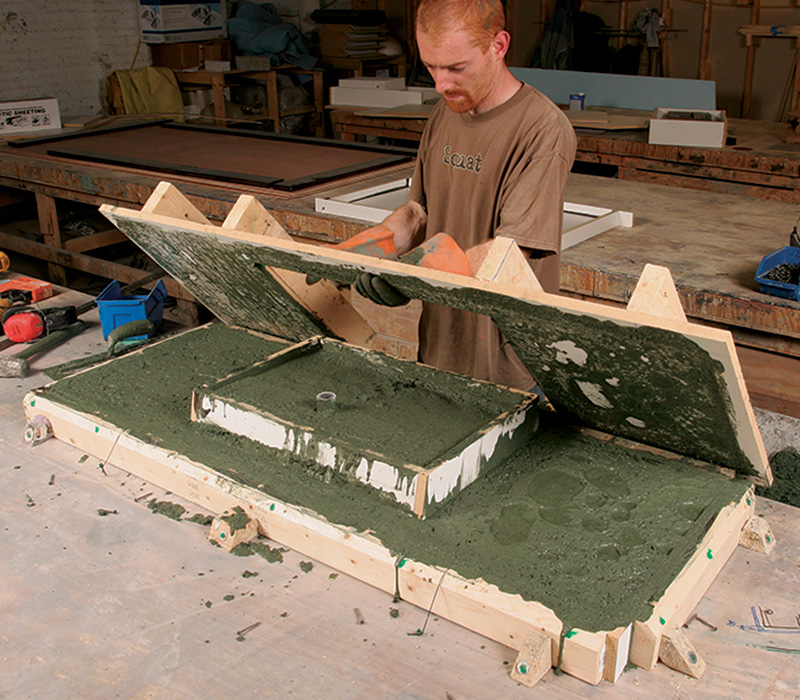
Fill the base first, then add the cap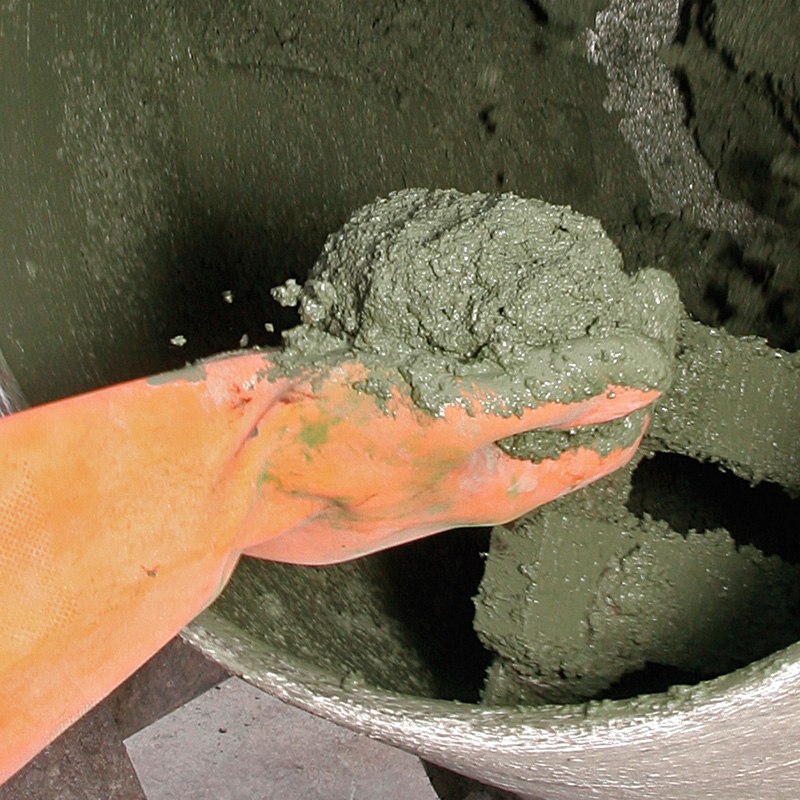
The concrete needs to flow around the knockouts in the base and build up the sink bowl’s sides and bottom. To accomplish both, we create a mix that is firm enough to form a ball in the hand without slumping, then add it to the base two handfuls at a time, making sure it fills all of the form’s crevices. As shown in the drawing, the cap is large enough so that it can be screwed directly into the 2x4s around the base. Size and position the rim to create sink walls and a bottom that are 1-1 ⁄ 2 in. thick. Drill 1 ⁄ 4-in. holes throughout the cap to let air escape from the mix when the cap is installed.
 |
 |
Fill the voids before sealing the top
The finishing process starts after the forms are pulled off the cured top. Examine the surface for voids, gaps, or bubbles. Depending on the quality of the vibration and the flow of the concrete, you might have a surface close to being finished. Even if it is close, the concrete likely has air trapped just below the surface. Pounding the surface with the bristles of a stiff brush or grinding it with a moderate-grit abrasive pad opens these cavities so that they can be filled.
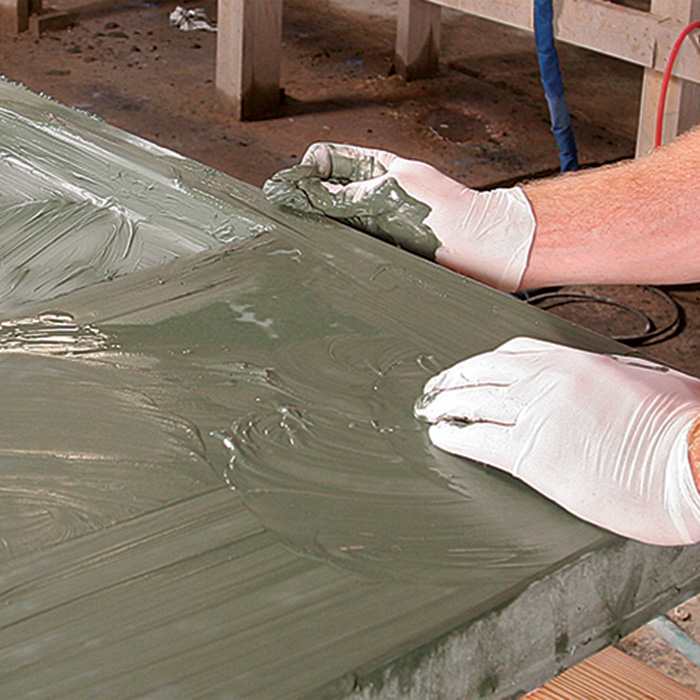
To fill pockmarks left by trapped air bubbles or any other imperfections in the finished surfaces or the edges of the concrete, we skim-coat the top with a slurry mixture that’s made of cement, water, acrylic bonder, and pigment.
Concrete surfaces are porous and have the potential for staining. You can minimize staining in two ways. The first is to coat the concrete with a material that prevents absorption, such as epoxy resin. Unfortunately, this approach creates a clear layer over the surface, which is at risk of being cut or scratched. Epoxy resin also prevents the pleasant contact with the natural surface of the concrete.
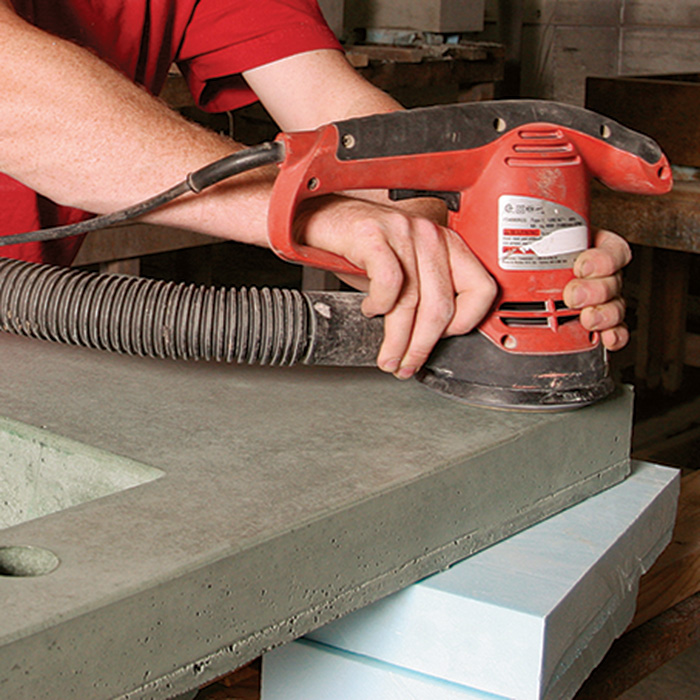
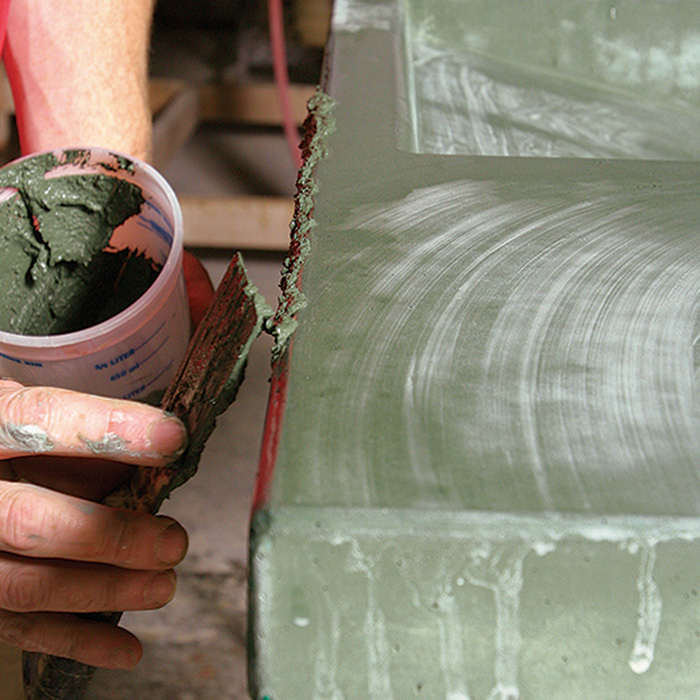
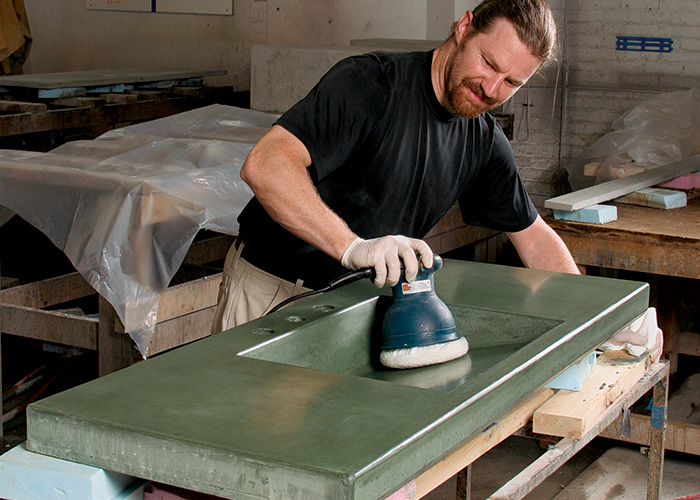
Grind and polish to a smooth finishAllow the top to cure for at least 72 hours before finishing. To open cavities caused by trapped air bubbles, grind the surface with 400-grit, then 800-grit dry diamond-abrasive grinding pads on a random-orbit sander (1). We usually use a pneumatic water-fed grinder/polisher, but a random orbit sander also works. After watering down the top, rub a slurry made of cement, pigment, water, and acrylic bonder into any holes and defects in the surface, leaving it higher than the surface of the countertop (2). After 15 to 30 minutes, wipe the excess off the surface with a clean paper towel. For deeper blemishes, add sand to the slurry, and trowel it into any imperfections in the top (3). Grind the remaining slurry down with 800-grit or finer pads after 24 hours. When the finish is the consistency you desire, apply two coats of penetrating sealer, allowing each to dry for several hours. Finally, apply two to three coats of paste wax over the entire surface in the same manner as buffing a car. Use a fine buffing pad to bring out the shine (4). |
 |
 |
 |
 |
The second approach, which we prefer, is to minimize absorption by applying a penetrating sealer and a finish coat of wax. The concrete still feels like concrete, and it has a relatively high degree of stain protection. The longer you can allow the concrete to cure before applying a penetrating sealer, the more effective the sealer will be. We use Porous Plus (www.miraclesealants.com), which requires that two coats be applied with several hours between coats.
After the sealer has been applied and absorbed by the concrete, a wax finish coat can increase shine and create a soft, natural texture. We typically use a paste wax, which we wipe onto the surface and, after five to ten minutes, remove with a car buffer. We apply two or three coats of the wax. If you want a higher sheen, a final shine can be applied to the wax by hand-rubbing with paper towels and a little water.
For maintenance, a new coat of wax can be applied every six months to a year to bring back the original luster of the countertop. The sealer should not need to be reapplied, except in instances when the countertop has been damaged or deeply scratched.
Magazine Extra: View step-by-step photos that detail how to make and remove the three-part form after the concrete cures.
Jeremy French owns Mandala Design in Asheville, N.C.
Matt Kabat owns Vitrium DesignWorks, also in Asheville.
Photos by Chris Ermides.
From Fine Homebuilding #190
For more photos, drawings, and details, click the View PDF button below:
