FHB Logo Facebook LinkedIn Email Pinterest Twitter X Instagram Tiktok YouTube Plus Icon Close Icon Navigation Search Icon Navigation Search Icon Arrow Down Icon Video Guide Icon Article Guide Icon Modal Close Icon Guide Search Icon Skip to content
Subscribe
Log In
  • How-To
  • Design
  • Tools & Materials
  • Restoration
  • Videos
  • Blogs
  • Forum
  • Magazine
  • Members
  • FHB House
  • Podcast
Log In

Fine Homebuilding Project Guides

Decks

Guide Home
  • Design & Planning
  • Tools & Materials
  • Footings & Foundations
  • Framing a Deck
  • Installing Decking
  • Installing Railings
  • Deck Stairs
  • Custom Details
  • Finishes, Repairs, and Maintenance
  • Complete Deck Builds

Building a Pergola: Prepare and Install the Slats

Use spacers and string lines to set the ripped 2x spacers atop the pergola.

By David Schiff
  • X
  • facebook
  • linkedin
  • pinterest
  • email
  • add to favorites Log in or Sign up to save your favorite articles

You’ll make the 26 slats that provide the shade for this pergola by ripping 16-ft. 2x4s in half along their length. Before you rip them, you’ll cut the 2x4s to length and add a simple decorative chamfer to both ends of 24 slats. That way, you’ll make each crosscut 12 times instead of 24 times. Two slats will be cut to length to fit between posts.
Once all the slats are made, you’ll install one slat on each end of the pergola and run a string between them so you won’t need to measure the overhang for each slat. You’ll cut a couple of spacers so you can gauge the spaces between slats without measuring. You’ll install each slat with one 2-in. screw into each joist. You’ll measure and cut the two slats that butt into the inside of the posts, then you’ll finish up by making four separate overhang pieces to butt into the outside of the posts.

Tip: If you are using lightweight sawhorses like the ones shown here, put some weight on them so they won’t tip as you make the rip cuts. Here, we borrowed a couple of pavers from a patio that was being installed along with the pergola.


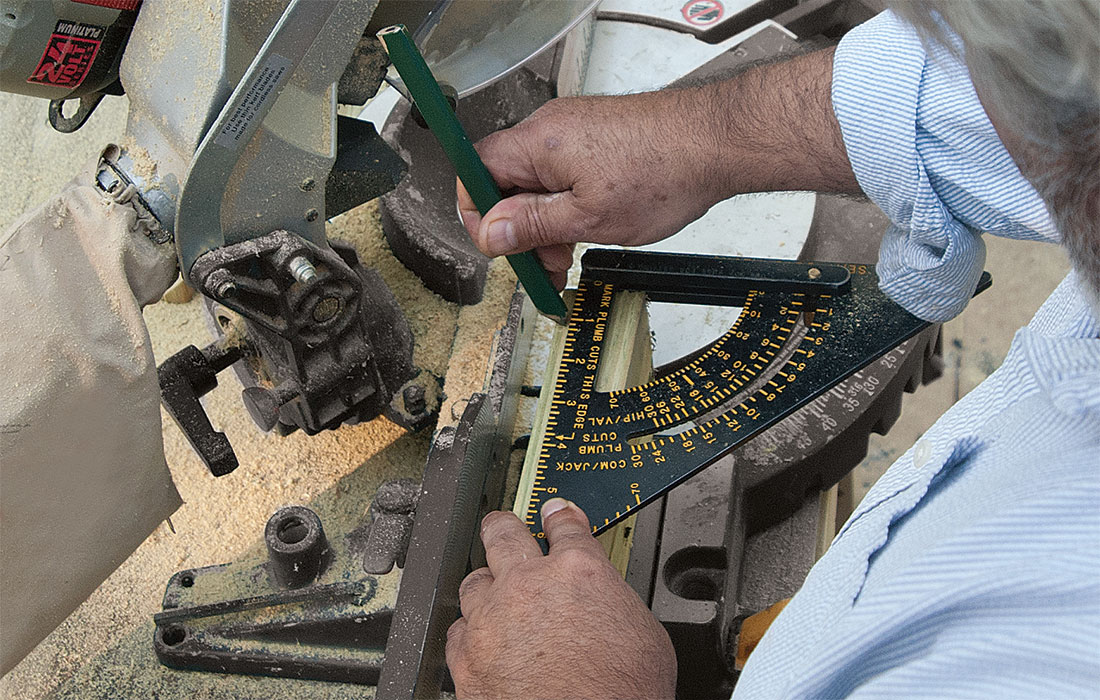
1. Lay out the end chamfer. Use a miter saw to cut one end of a 2×4 square. Then stand the 2×4 on edge and make a mark 1 in. from the end. Use a square to draw a 45-degree line from the mark to the end of the board.

2. Cut the chamfers. Set the miter saw to 45 degrees and cut the chamfer along the layout line as shown. Put the other end of the board on the saw table and make a square cut 182-1/2 in. from the long end of the first chamfer. Then lay out and cut the second chamfer, making sure the long ends of both chamfers are on the same face of the board. Repeat steps 1 and 2 for 12 of the 13 boards.

3. Rip the slats to width. At the end of one slat, make a mark at 1-3/4 in. across its width. Put a rip guide on the circular saw and position it so the blade will cut through the mark. Set the saw to cut about 2 in. deep. Clamp a scrap of 2×4 atop each horse so the saw will cut into the scrap instead of the top of your horses. Place the 2×4 slat stock atop the scrap with a few feet overhanging the side of each horse. Clamp one end of the stock to the scrap and start ripping from the other end. When you reach the clamp, reposition the board with the cut past the clamp and complete the cut. Rip all 13 of the 2x4s.

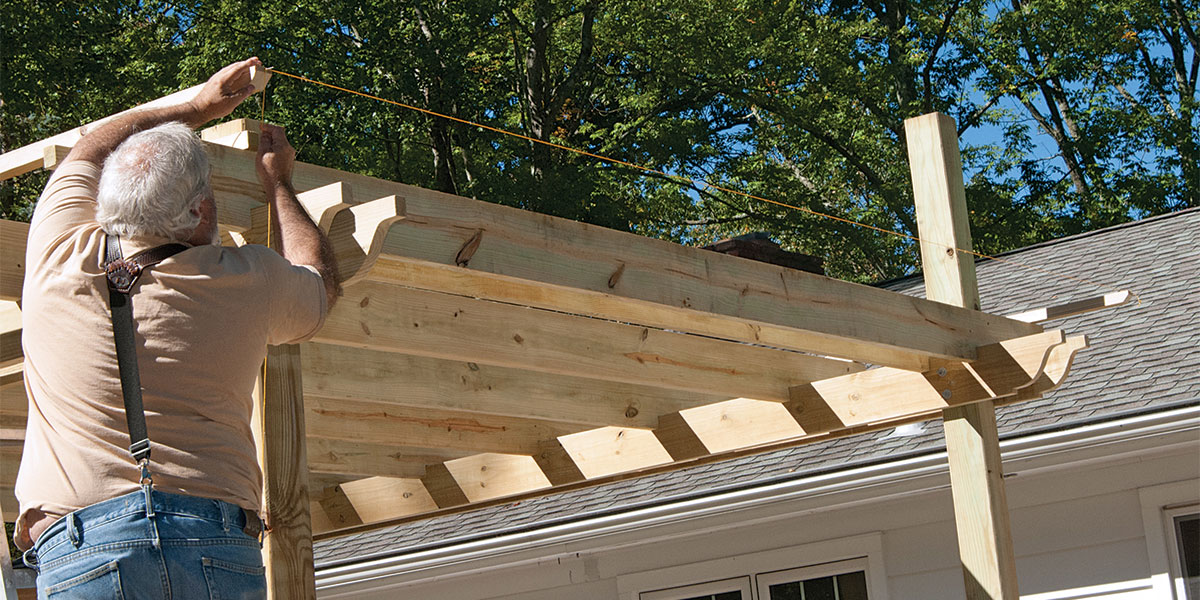
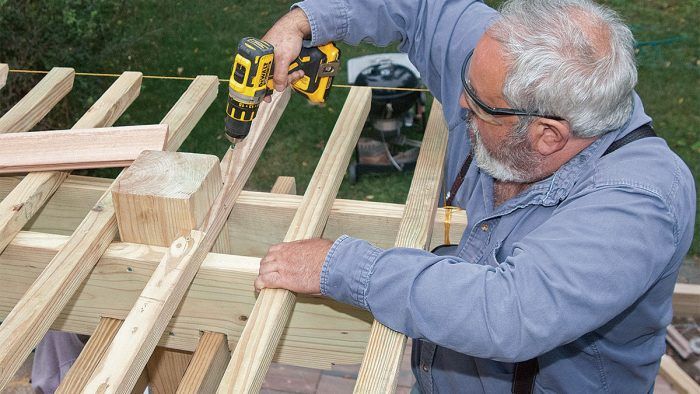
4. Install the end slats and guide string. As mentioned, the slats will overhang the joists by 15 in., so make a mark on the bottom of two end slats, 15 in. from one end. Then mark the top of both end joists 2-1/2 in. from both ends. Align the marks and attach the end slats with a 2-in. deck screw into each joist, checking as you go that the slats are 2-1/2 in. from the end of each joist. Tack a finish nail to one end of each slat and tie a string between the nails as shown.

5. Make the spacers and install the slats. Cut two pieces of scrap to 5-1/4 in. to use as spacers as you install the slats starting from one end. (See “Calculating Slat Spacing” if your joists are not 182-1/2 in. long.) Use one 2-in. deck screw into each joist. Depending on the length of your joists, the third slat in from each end of the joists is likely to intersect two posts. Cut these slats to butt between the posts—you’ll cut separate overhang pieces later. “What You’ll Need” gives the theoretical length of these slats, but the distances between your posts will probably vary from that, so measure between posts for a snug fit.


Tip: Tiny spacing variations can accumulate over the course of 26 slats. So when you put the 14th slat in place, check if it is the same distance from the post you are working toward as the 13th slat is from the post you are working from. If the distances vary more than 1/2 in. or so, recalculate the spacing you have left and recut spacers accordingly.


Calculating Slat Spacing

Let’s say, for example, you are making a pergola with posts 10 ft. on center with joists that are 134-1/2 in. long. If you want the end slats to be 2-1/2 in. in from the end of the joists like the pergola shown here, subtract 5 in. to get 129-1/2 in. You want about 5 in. of space between each slat. One slat at 1-3/4 in. wide plus one 5 in. of space equals 6-3/4 in. Dividing 129.5 by 6.75 tells you that you’ll need 19 slats. At 1-3/4 in. wide, those 19 slats will take up 33-1/4 in., leaving you with 96-1/4 in. There will be 18 spaces between the slats, so 96-1/4 in. divided by 18 means the slats will be spaced 5-3/8 in. apart.


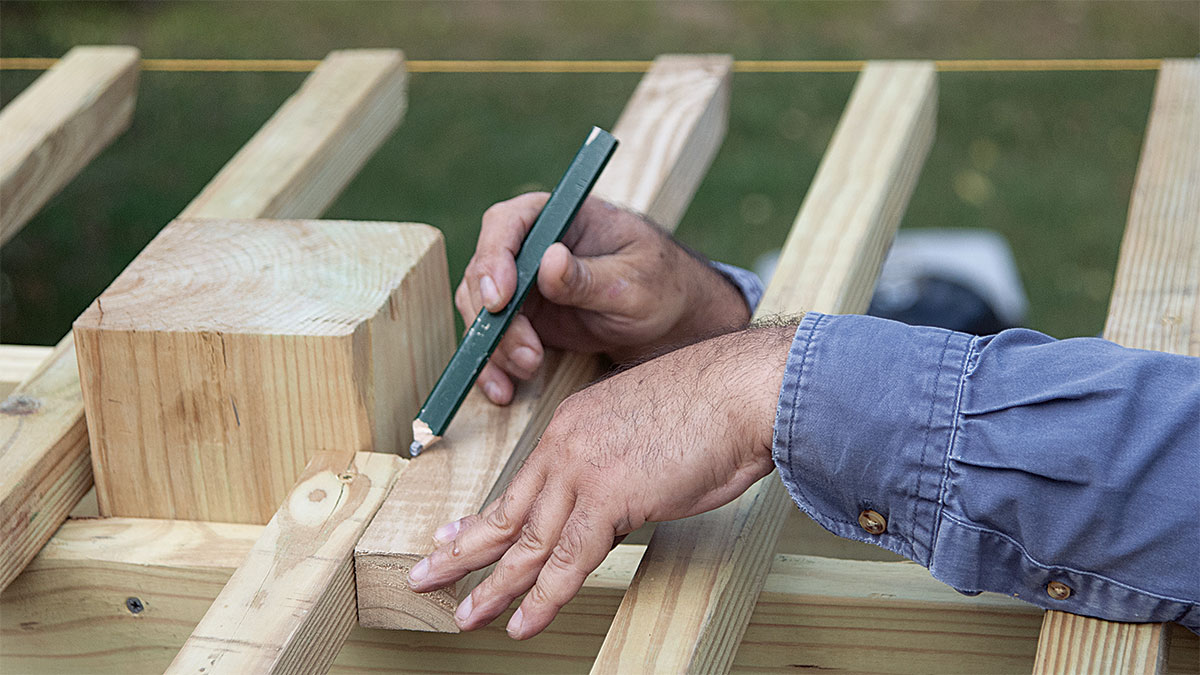
6. Cut the overhang pieces to length. If the full width of a slat butts into a post, just measure between the string and the outside of the post and cut two overhang pieces, including end chamfer, to that length. If, as shown here, only part of the slat’s width overhangs, you’ll need to notch the overhang pieces to fit around the post. In that case, start by making an overhang piece that’s about 24 in. long. Align the piece to the string and mark where it meets the slat that butts into the post. Cut two pieces to that length.

7. Mark the notch depth. With the overhang pieces cut to length, put a spacer in place, put the overhang piece in place against the post, and mark the depth of the notch on the end of the piece. Do the same for the overhang piece for the opposing post. 8. Kerf the notches. Use a square to extend the notch length mark into a line. Set your circular saw to cut to the depth of the notch. If the notch is deep as shown here, make lots of kerfs to ensure you won’t break the piece when you knock out the waste with a chisel.


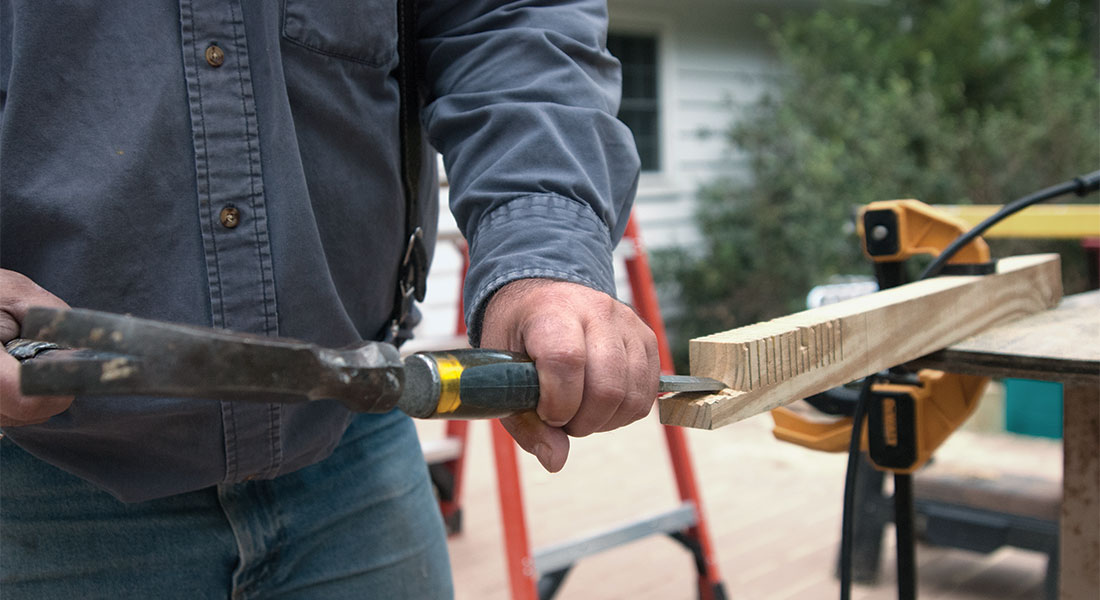
9. Remove the notch waste. Working from the end of the overhang piece, use a hammer and chisel to remove the waste from the notch. Next, notch the opposing overhang piece. Make a notch on two overhang pieces for the remaining posts (if necessary).

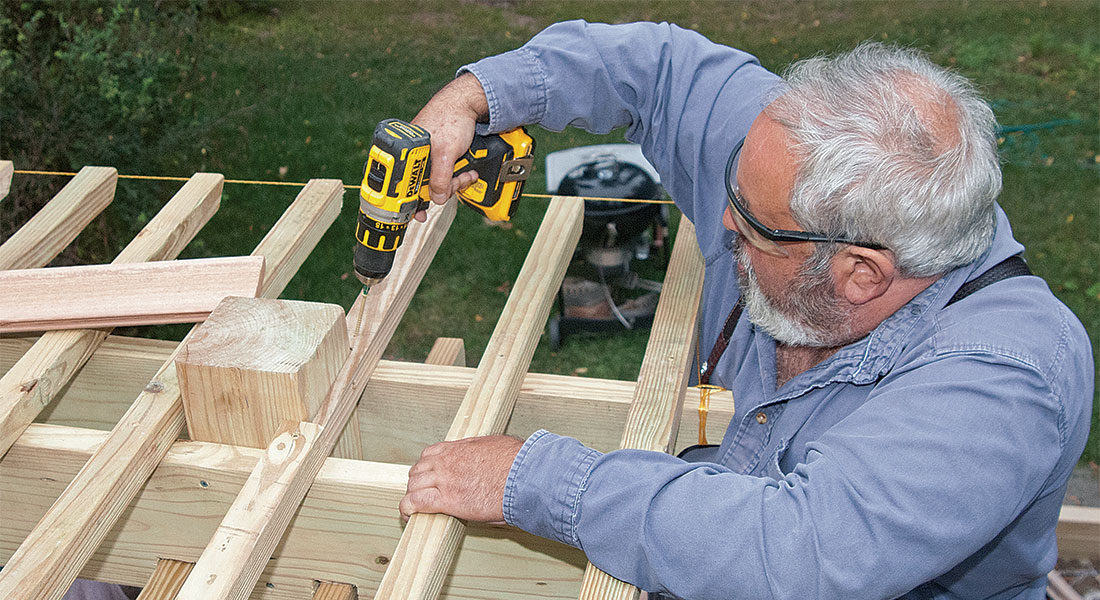
10. Install the overhand pieces. Put each overhang piece in place and install it with one 2-in. screw into the post and one into the joist.

Fine Homebuilding Recommended Products

Fine Homebuilding receives a commission for items purchased through links on this site, including Amazon Associates and other affiliate advertising programs.

Angel Guard Deck Demon

Demo has never been easier with the deck demon. The tool keeps the worker in an upright position and uses leverage to remove decking from framing, a must have tool for demo.
Buy at Amazon

Cepco BoWrench Decking Tool

This tool makes straightening deck boards a breeze during installation.
Buy at Amazon

MicroFoam Nitrile Coated Work Gloves

These gloves are comfortable and have a good grip, making for splinter-free work.
Buy at Amazon
Previous: Building a Pergola: Install the Joists and Cut Off the Posts Next: Bright Ideas for a Well-Lit Deck

Guide

Decks

Chapter

Custom Details

Sign up for eletters today and get the latest how-to from Fine Homebuilding, plus special offers.

Signing you up...

This site is protected by reCAPTCHA and the Google Privacy Policy and Terms of Service apply.
See all newsletters
See all newsletters

Log in or create an account to post a comment.

Sign up Log in

Become a member and get full access to FineHomebuilding.com

Decks

Decks

Hundreds of articles and videos by top deck-building pros on how to design and build a beautiful, sturdy, and safe deck

View Project Guide

View All Project Guides »

Become a member and get unlimited site access, including the Decks Project Guide.

Start Free Trial

Design & Planning
  • Basic Design Options
  • Generating Plans
  • Calculating Deck Loads
  • Code Compliance
Tools & Materials
  • Deck Building Tools
  • Foundation and Framing Materials
  • Decking Materials
  • Fasteners and Hardware
Footings & Foundations
  • Choosing a Foundation
  • Sizing and Laying Out Footings
  • Excavation
  • Pouring the Foundation
Framing a Deck
  • Framing Overview
  • Installing the Ledger
  • Setting Posts and Beams
  • Installing Joists
Installing Decking
  • Decking Basics
  • Installation Process
  • Adding Fascia and Other Decorative Elements
Installing Railings
  • Installing Deck Railing Posts
  • Building Wood Rails and Balustrades
  • Non-Wood Railing Options
  • Installing Nonwood Balustrades
Deck Stairs
  • Deck Stairs Overview
  • Laying Out, Cutting, and Installing the Stringers
  • Installing Treads, Risers, and Stair Railings
Custom Details
  • Benches, Planters, and Privacy Features
  • Pergolas
  • Lighting
Finishes, Repairs, and Maintenance
  • Deck Finishes
  • Cleaning and Refinishing
  • Inspection and Repair
Complete Deck Builds
  • Grade-Level Decks
  • Raised Decks

Fine Home Building

Newsletter Sign-up

  • Fine Homebuilding

    Home building tips, offers, and expert advice in your inbox.

  • Green Building Advisor

    Building science and energy efficiency advice, plus special offers, in your inbox.

  • Old House Journal

    Repair, renovation, and restoration tips, plus special offers, in your inbox.

Signing you up...

This site is protected by reCAPTCHA and the Google Privacy Policy and Terms of Service apply.
See all newsletters

Follow

  • Fine Homebuilding

    Dig into cutting-edge approaches and decades of proven solutions with total access to our experts and tradespeople.

    Start Free Trial Now
    • Facebook
    • Instagram
    • X
    • LinkedIn
  • GBA Prime

    Get instant access to the latest developments in green building, research, and reports from the field.

    Start Free Trial Now
    • Facebook
    • YouTube
  • Old House Journal

    Learn how to restore, repair, update, and decorate your home.

    Subscribe Now
    • Facebook
    • Instagram
    • X

Membership & Magazine

  • Online Archive
  • Start Free Trial
  • Magazine Subscription
  • Magazine Renewal
  • Gift a Subscription
  • Customer Support
  • Privacy Preferences
  • About
  • Contact
  • Advertise
  • Careers
  • Terms of Use
  • Site Map
  • Do not sell or share my information
  • Privacy Policy
  • Accessibility
  • California Privacy Rights

© 2025 Active Interest Media. All rights reserved.

Fine Homebuilding receives a commission for items purchased through links on this site, including Amazon Associates and other affiliate advertising programs.

  • Home Group
  • Antique Trader
  • Arts & Crafts Homes
  • Bank Note Reporter
  • Cabin Life
  • Cuisine at Home
  • Fine Gardening
  • Fine Woodworking
  • Green Building Advisor
  • Garden Gate
  • Horticulture
  • Keep Craft Alive
  • Log Home Living
  • Military Trader/Vehicles
  • Numismatic News
  • Numismaster
  • Old Cars Weekly
  • Old House Journal
  • Period Homes
  • Popular Woodworking
  • Script
  • ShopNotes
  • Sports Collectors Digest
  • Threads
  • Timber Home Living
  • Traditional Building
  • Woodsmith
  • World Coin News
  • Writer's Digest
Active Interest Media logo
X
X
This is a dialog window which overlays the main content of the page. The modal window is a 'site map' of the most critical areas of the site. Pressing the Escape (ESC) button will close the modal and bring you back to where you were on the page.

Main Menu

  • How-To
  • Design
  • Tools & Materials
  • Video
  • Blogs
  • Forum
  • Project Guides
  • Reader Projects
  • Magazine
  • Members
  • FHB House

Podcasts

  • FHB Podcast
  • ProTalk

Webinars

  • Upcoming and On-Demand

Podcasts

  • FHB Podcast
  • ProTalk

Webinars

  • Upcoming and On-Demand

Popular Topics

  • Kitchens
  • Business
  • Bedrooms
  • Roofs
  • Architecture and Design
  • Green Building
  • Decks
  • Framing
  • Safety
  • Remodeling
  • Bathrooms
  • Windows
  • Tilework
  • Ceilings
  • HVAC

Magazine

  • Current Issue
  • Past Issues
  • Magazine Index
  • Subscribe
  • Online Archive
  • Author Guidelines

All Access

  • Member Home
  • Start Free Trial
  • Gift Membership

Online Learning

  • Courses
  • Project Guides
  • Reader Projects
  • Podcast

More

  • FHB Ambassadors
  • FHB House
  • Customer Support

Account

  • Log In
  • Join

Newsletter

Get home building tips, offers, and expert advice in your inbox

Signing you up...

This site is protected by reCAPTCHA and the Google Privacy Policy and Terms of Service apply.
See all newsletters
See all newsletters

Follow

  • X
  • YouTube
  • instagram
  • facebook
  • pinterest
  • Tiktok

Join All Access

Become a member and get instant access to thousands of videos, how-tos, tool reviews, and design features.

Start Your Free Trial

Subscribe

FHB Magazine

Start your subscription today and save up to 70%

Subscribe

We hope you’ve enjoyed your free articles. To keep reading, become a member today.

Get complete site access to expert advice, how-to videos, Code Check, and more, plus the print magazine.

Start your FREE trial

Already a member? Log in

Privacy Policy Update

We use cookies, pixels, script and other tracking technologies to analyze and improve our service, to improve and personalize content, and for advertising to you. We also share information about your use of our site with third-party social media, advertising and analytics partners. You can view our Privacy Policy here and our Terms of Use here.

Cookies

Analytics

These cookies help us track site metrics to improve our sites and provide a better user experience.

Advertising/Social Media

These cookies are used to serve advertisements aligned with your interests.

Essential

These cookies are required to provide basic functions like page navigation and access to secure areas of the website.

Delete My Data

Delete all cookies and associated data