Stronger, Smarter Deck Stairs
The ideal stair stringers balance strength, durability, and ease of assembly.
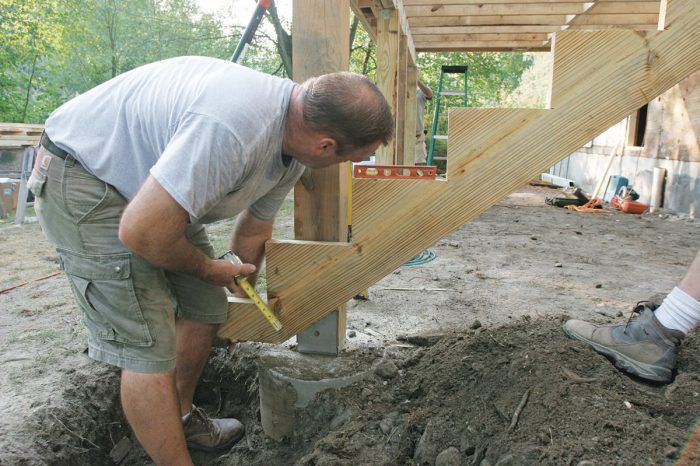
Synopsis: The stairs attached to a raised deck involve a unique set of challenges and face a different type of abuse than any interior staircase. But the extra effort required to build them also affords some opportunities for building stronger stairs that ease the installation of the guardrails, risers, treads, and trim that come next. This article explains a few tricks for making the job run smoothly and to ensure that the stairs are strong, safe, and ready to survive the weather.
The stairs attached to a raised deck involve a unique set of building challenges, and they face a different type of abuse than any interior staircase. In addition to having to follow stricter span tables, use code-required hardware, and negotiate potentially uneven surfaces where the stringers land at grade, deck stairs have to survive abuse from the elements—including dramatic swings in moisture content, the possibility of freeze/thaw cycling, and a daily dose of UV rays from the sun. At the same time, these challenges afford some opportunities for building stronger stairs that ease the installation of the guardrails, risers, treads, and trim.
This doesn’t require a radical change in the way you build deck stairs. In fact, our approach is mostly a combination of standard practices and best practices—with a few tricks thrown in for helping the job to run smoothly.
Layout should make life easier
When you’re building a deck, you often have a variable that isn’t present with interior staircases: a flexible landing point. When laying out a stringer between two fixed points, the rise and run of the cuts must add up to fit the available space between the header at the top and the floor at the bottom, while also complying with code minimums and maximums for riser height and tread width. With deck stairs, on the other hand, you can form and pour the pad after the stringers are cut and set. The math for calculating risers and treads then becomes much easier, and it takes a back seat to other priorities. As long as you stay within the code minimums and maximums, you’re now free to lay out the riser height and tread width at whatever measurements feel comfortable, make the math simplest, combine to yield a stringer that fits in the rough space you’re aiming to fill, or make the best use of the tread and riser material.
Strategies for strength
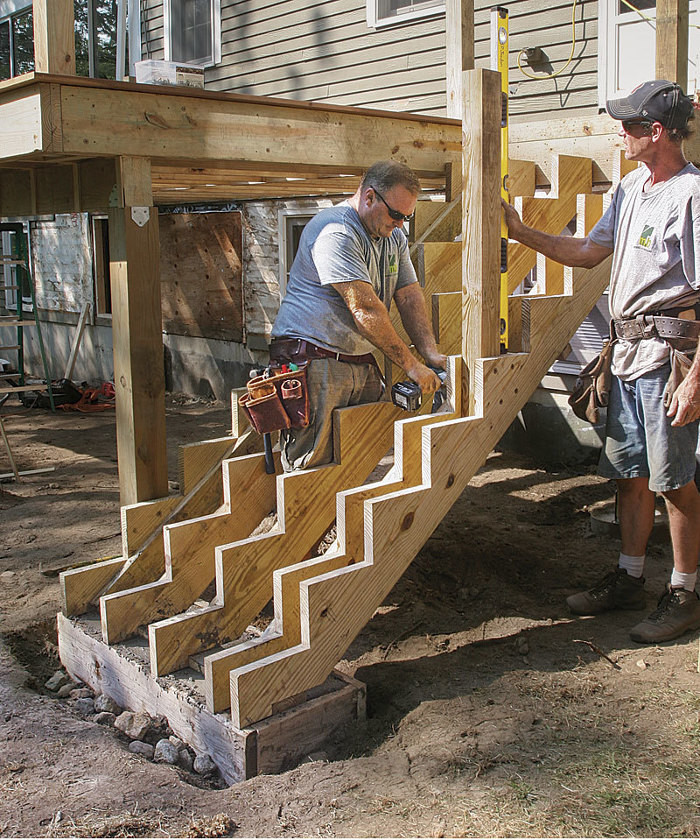 Although there are no provisions in the building code for interior stair-stringer spans and methods of attachment, deck stairs have guidelines.
It’s not surprising that many builders get this wrong, because with notched stringers, the maximum span is only 6 ft. measured horizontally. If you’re just over that distance (as we were on this project), check to see if your code official will allow additional stringers and/or sistering additional lumber to the conventional 2×12 stringers as a means of providing extra rigidity without adding midspan posts and footings.
Regardless of span issues, there are a couple of good reasons for cutting one or two extra stringers. The code-required hardware used to attach the upper end of a stringer to the deck has a minimum setback from the end of the dropped rim, which can be a problem when the stairs are at one end of the deck rather than someplace in the middle. We feel comfortable making the argument that only the walkable stringers need to be attached with code-compliant hangers. The extra outer stringer, then, can be thought of as support for stiffening the railing posts and as a provision for solid nailing when attaching the treads, risers, and trim.
For more photos, drawings, and details, click the View PDF button below:
Fine Homebuilding Recommended Products
Fine Homebuilding receives a commission for items purchased through links on this site, including Amazon Associates and other affiliate advertising programs.
Angel Guard Deck Demon
N95 Respirator
Cepco BoWrench Decking Tool


View Comments
This is a good article on a key part of deck design. Here are two additional tips: (1) Just like posts, do not attach the bottom of the stringers directly to the concrete footing. In wet or snowy climates, the long stretch of exposed grain will soak up water from the concrete and rot the bottom of the board -- even PT. Instead, screw the stringers to two standard post bases, bolted to the concrete pad. Fill the gap with a short piece of PT 2x4. Just like your posts, this will hold the end of the stringers up an off of the concrete, so they can dry. (2) All of the exposed grain in the notches cut for each stair tread is another invitation to water which leads to cracks that weaken the stringer. Simply cover and seal all of these surfaces with a generous layer of DAP 230, before you install your treads.
I hope this is helpful,
Mark
Hi Mark
I live in the Pacific Northwest and thus plenty of rain. I like your idea of using post bases to keep the stringer base up off the concrete. Are they rated for horizontal loads?
Regarding Dap 230, have used it successful on PT wood/
Regards Tom