FHB Logo Facebook LinkedIn Email Pinterest Twitter X Instagram Tiktok YouTube Plus Icon Close Icon Navigation Search Icon Navigation Search Icon Arrow Down Icon Video Guide Icon Article Guide Icon Modal Close Icon Guide Search Icon Skip to content
Subscribe
Log In
  • How-To
  • Design
  • Tools & Materials
  • Restoration
  • Videos
  • Blogs
  • Forum
  • Magazine
  • Members
  • FHB House
  • Podcast
Log In

Fine Homebuilding Project Guides

Drywall

Guide Home
  • Drywall Basics
  • Tools and Materials
  • Hanging Drywall
  • Taping and Sanding
  • Special Installations
  • Drywall Repairs
  • Plaster
How-To

Elegant Wainscot From Drywall Scraps

Use strips of drywall to create custom paneling that will add detail and charm to most any room.

By Myron R. Ferguson Issue 197
  • X
  • facebook
  • linkedin
  • pinterest
  • email
  • add to favorites Log in or Sign up to save your favorite articles
Frame-and-panel construction. Stiles and rails divide the wainscot, framing recessed panels edged with vinyl bead. The wainscot can be capped with a vinyl bead or with a hardwood chair rail as shown in the photo (above) and drawing (below, right).

Synopsis: Although wainscot paneling can be an elegant addition to any room, traditional wood installations can be difficult, pricey, and time-consuming. Myron R. Ferguson has come up with a unique alternative: wainscot made with drywall scraps. The veteran drywall installer outlines his technique for saving drywall pieces bound for the trash and turning them into custom paneling.


Frame-and-panel construction

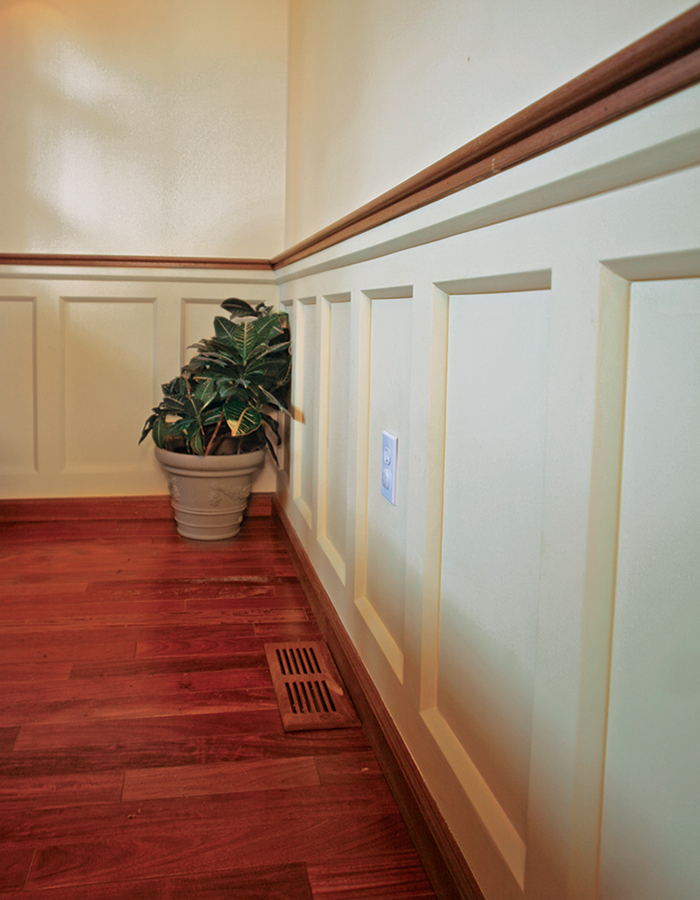
Wainscot can improve the look of a room dramatically, but installing it typically demands a decent amount of money, time, and skill in trim, joinery, and finish work. If you’re willing to stray from the traditional approach, however, wainscot doesn’t have to be nearly so complicated.

I create wainscot by using leftover drywall (otherwise heading to the Dumpster) and decorative vinyl bead. Often, wainscot is painted, so why not make it out of dry wall? It’s far less expensive than wood, especially when a bunch of scrap is lying around a job site. Also, drywall doesn’t expand and contract due to temperature and moisture changes, so it stays looking good for a long time. My process demands a certain amount of skill, but assembly is far quicker than the traditional alternative—and the finished look is just as great.

Plan the electrical layout for clean outlet installations

Working electrical receptacles into a wainscot assembly can cause problems, especially when symmetry and clean lines are the goal. With proper planning, however, outlets can be easily integrated into a wall without looking as though the wainscot were merely built around them.

wainscot paneling

Whenever possible, I visit the job site before any electrical work is done and figure out the approximate layout of the wainscot. I tell the electrician to run wire to the general location of the boxes and to leave it looped in the wall.

When I’m installing the drywall and wainscot, I cut a hole in the wall where I want an outlet, reach in, and pull the looped wire through. I typically place electrical boxes in one of two places, either in the exact center of a panel or in the center of one of the stiles. I use an old-work box for either installation (see the article “Problem-Solving Electrical Boxes” in FHB#186)

Another option is to position all the outlets horizontally in the baseboard. This layout requires you to install taller baseboard, but it makes for an easier wainscot installation because the electrical boxes don’t interfere with the layout.

Consider door and window transitions carefully

Nowhere is quality craftsmanship more evident than where wainscot meets a door or window opening. Done well, the transitions look seamless and well planned. Every room is different, though, so perfecting these details can take some creative thinking.

When possible, which isn’t often, I let the wainscot butt directly into the door and window casing while allowing the window stool to overlap the wainscot. Most likely, the wainscot stands proud of the molding, though. In these situations, I butt the wainscot to a pilaster at a door opening, or I build out the casing to accommodate the aforementioned butt joint.

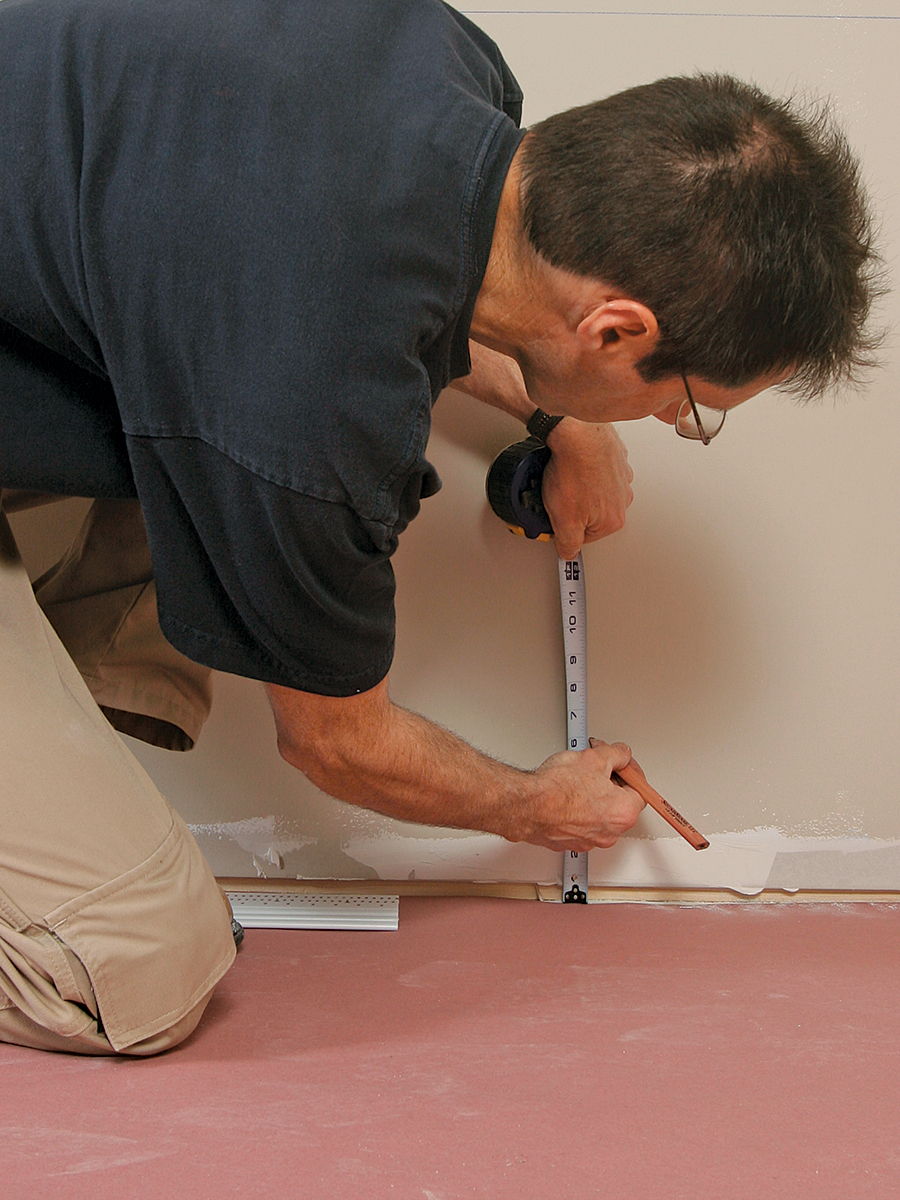
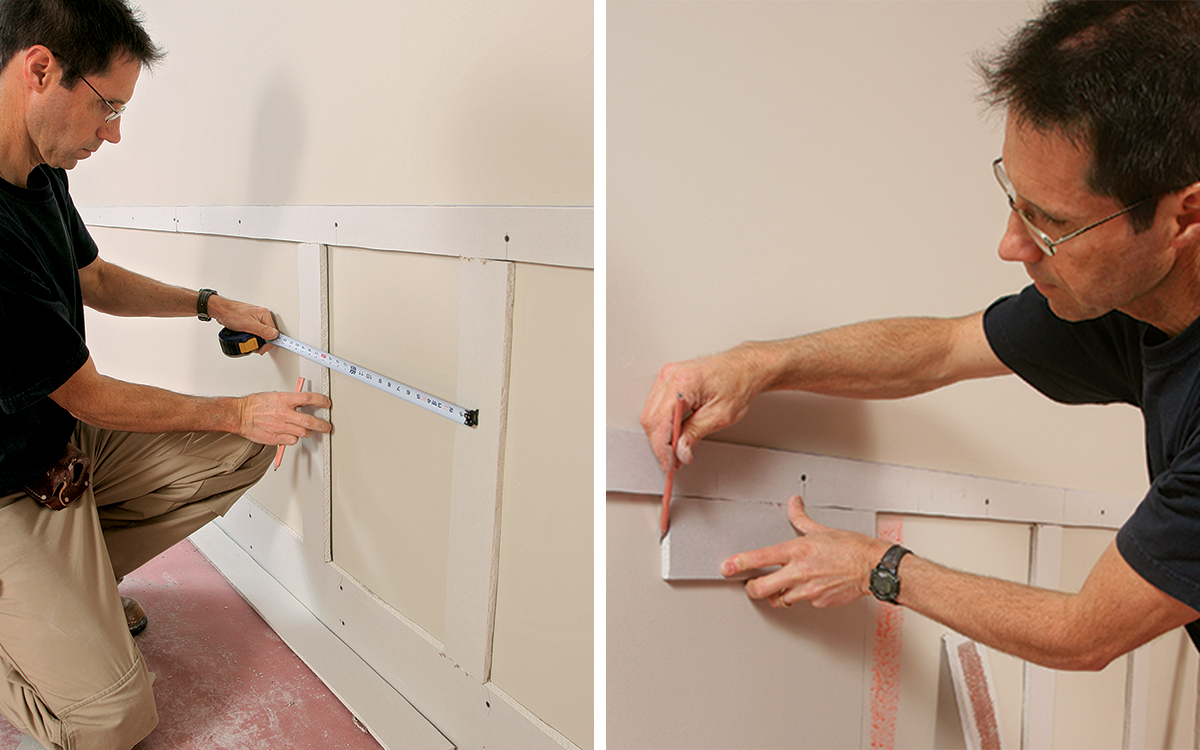
Create a layout that suits the room

Traditionally, wainscot is built to a height of 32 in. off the floor, but it doesn’t have to be limited to that dimension. Ceiling height, window height, and homeowner preference all can affect the decision about wainscot height. Stile width and spacing are established once the rails are installed. Each stile’s placement is determined by what looks best for a given room.

measuring for wainscoting
Measure, mark, and snap a level line around the room. Hold the wainscot’s top rail to this line to be sure all the panels are level.

wainscot paneling measurements
The bottom rail is wider than the top rail. The distance from the top of the bottom rail to the top of the baseboard, which will be added later, should be equal in width to the top rail. In this case, the top rail is 2-1/2 in. wide, and the baseboard will be 3-1/2 in. wide. I snap a line 6 in. off the floor and cut a piece of drywall 6 in. wide to get the proper proportions.

marking for studs
Mark stud locations. When one stud is located, use a tape measure to transfer the location of the others to the top- and bottom-rail pieces.
securing with drywall screws
Drywall screws keep the rails in place. Be sure to hit each stud with 1-5/8-in. drywall screws when securing the rails. Place one screw through the top rail and two in the bottom rail.

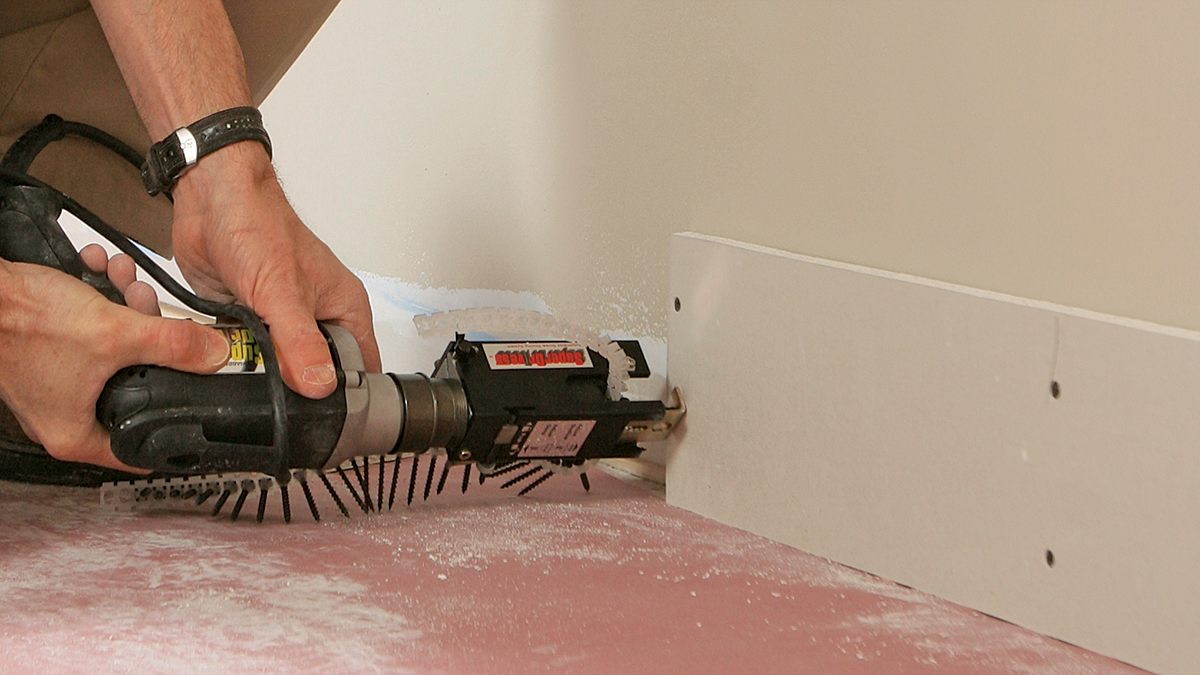
Stiles are secured with spray adhesive

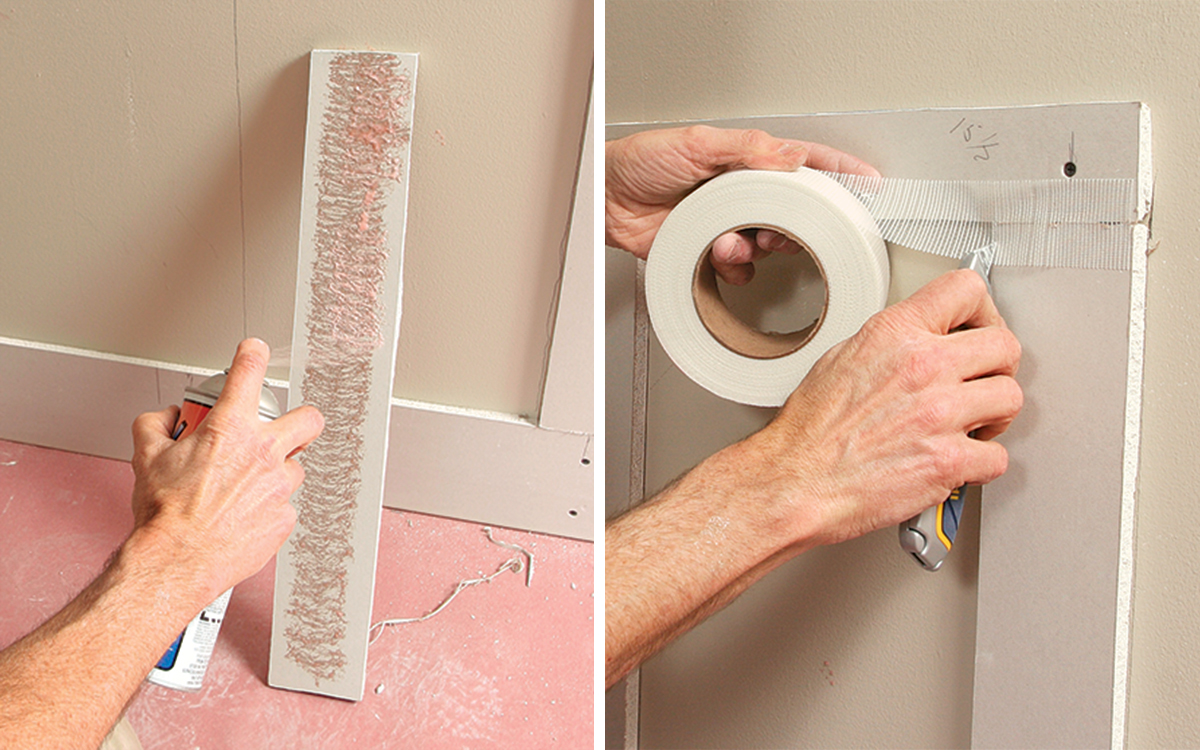
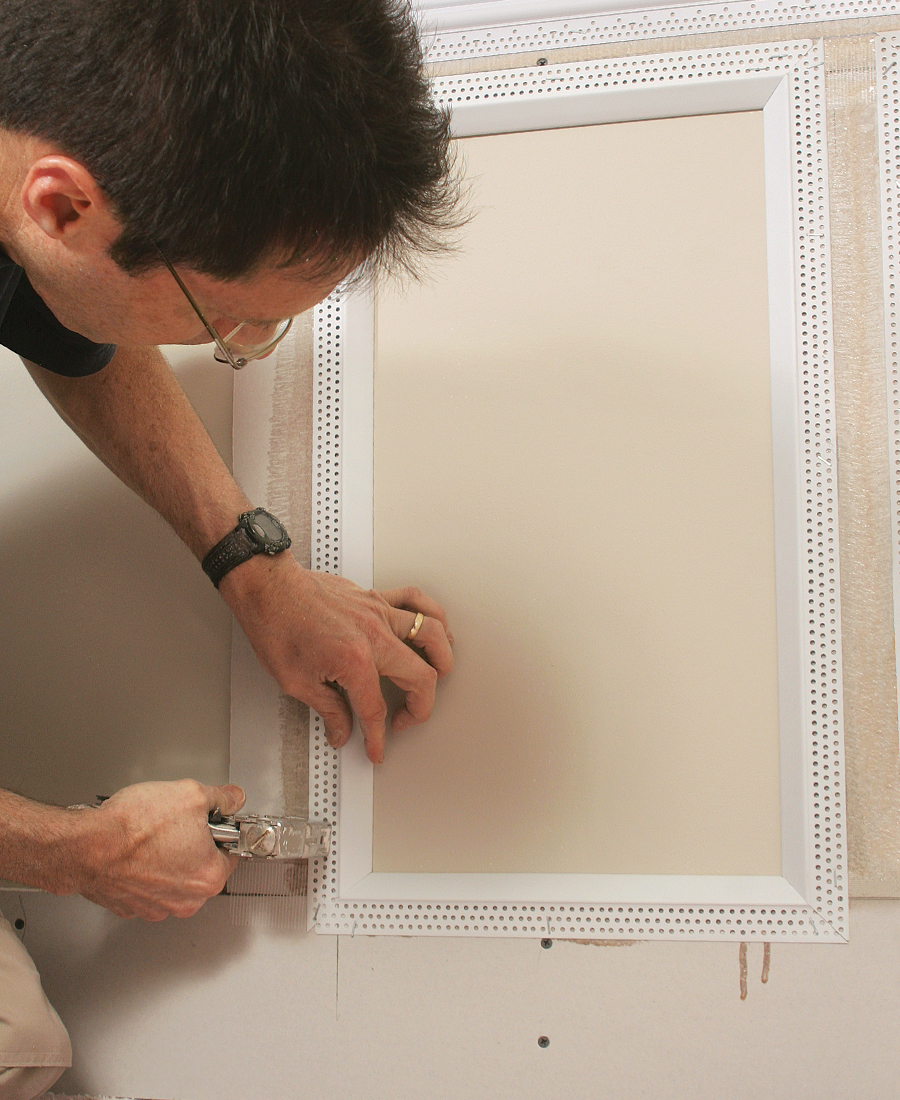
The likelihood of each stile aligning perfectly with every stud is slim, so relying on screws to secure each stile isn’t practical. Spray adhesive is perfectly suited for this job. i’ve tried several brands and like the product made by trim-tex best for the sole reason that it applies adhesive in a wider, more-consistent pattern than other brands.

fitting panel stiles
Dry-fit the stiles. Reposition each stile until you get a layout that you like. Make a spacer block to speed the process of marking stile locations, but don’t be afraid to cheat if you have to. No one will notice if you make a panel 1/8 in. smaller to get the layout to work.
spray adhesive and mesh tape
Yes, spray adhesive is strong enough. Apply two coats of adhesive on the back of each stile and on the wall. Let the adhesive set up for a few seconds before pressing the stile firmly in place. Cover each joint with self-adhesive mesh tape.

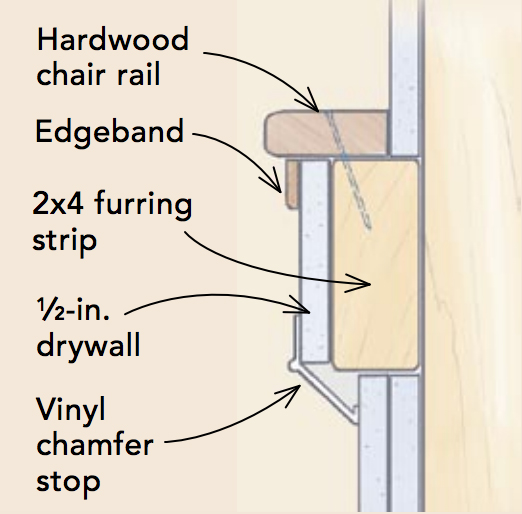
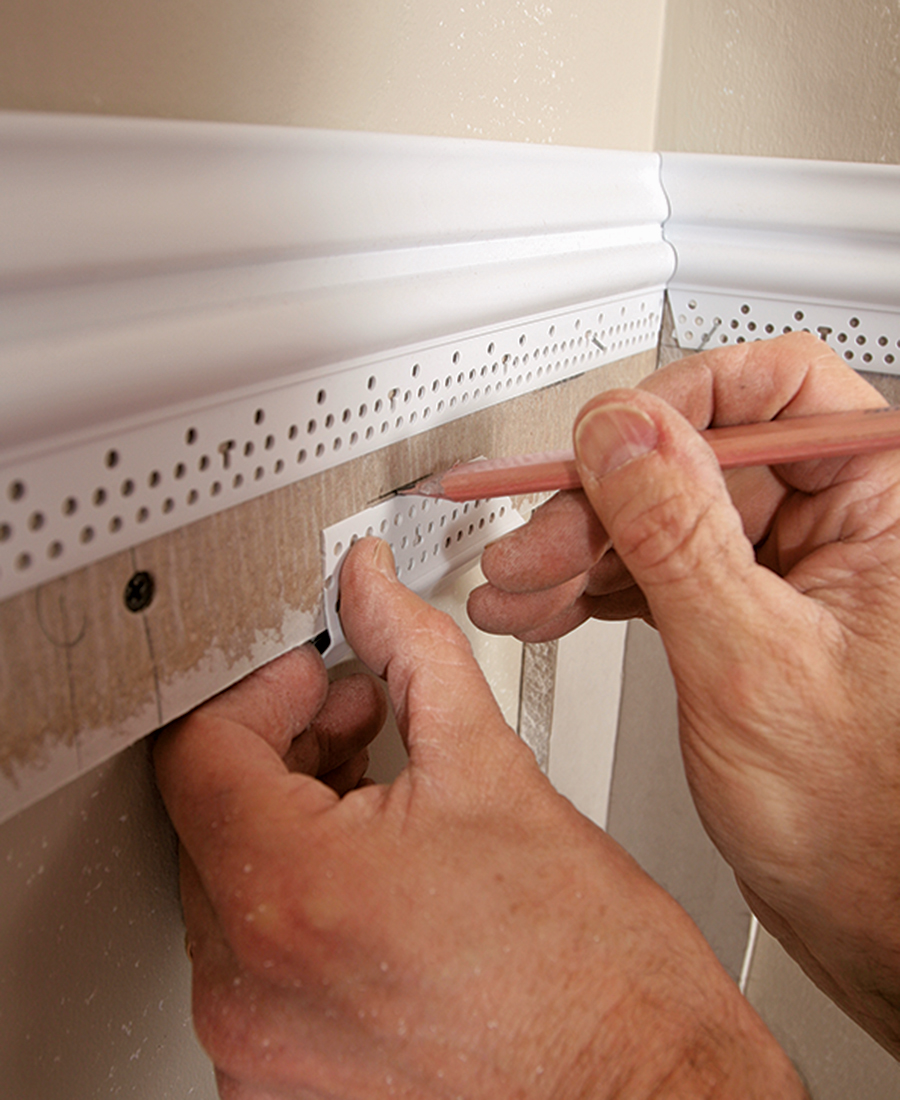
Specialty bead adds style and durability

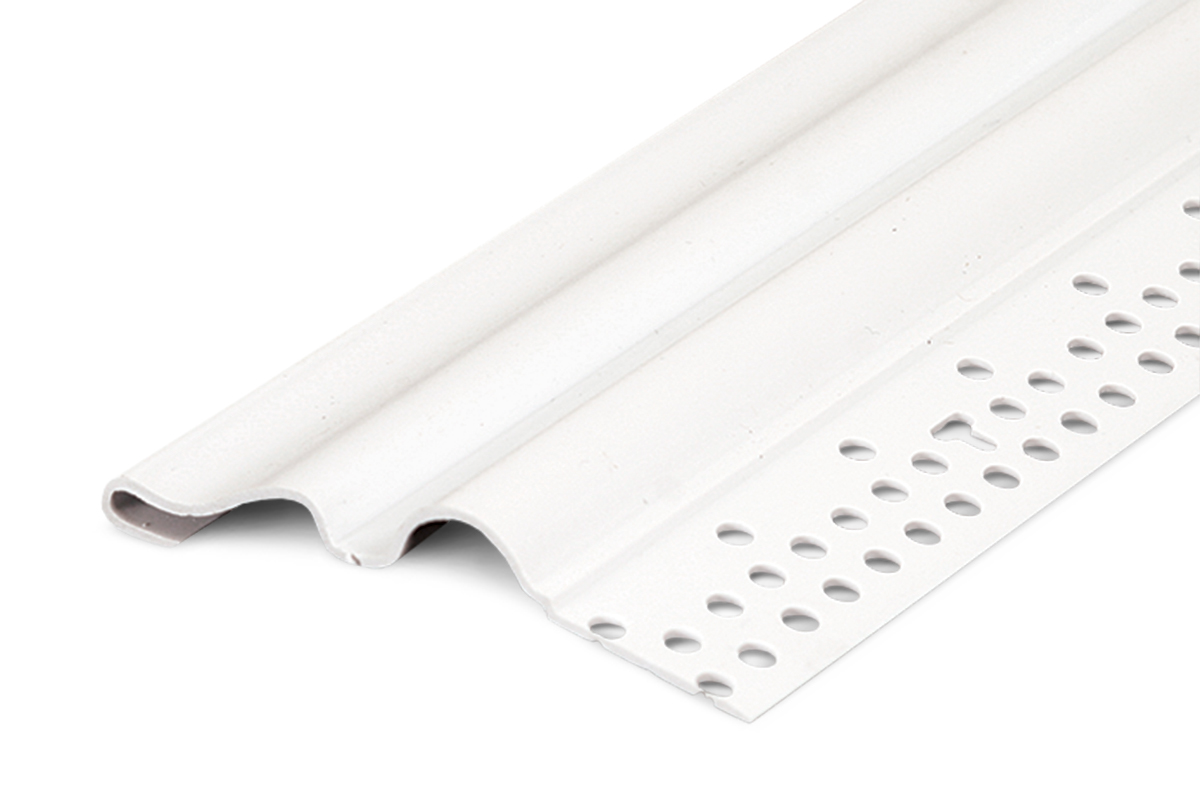
The vinyl bead i use for wainscot is secured with a combination of 1/2-in. divergent staples and spray adhesive. Vinyl bead is a great product for this project because i can easily sand or scrape excess compound off it without causing any damage; it also takes paint well.

installing decorative L bead
Keep it looking straight. In one corner of the room, mark the position of the chair rail, in this case a decorative L bead, on the top rail. Make a corresponding mark in the room’s opposite corner, and snap a line between the points. Hold the chair rail to this line as you glue and staple it to the top rail. Do the same for each panel’s top chamfer stop.

vinyl chamfer
Vinyl chamfer stop frames each panel. Secure the panel’s top piece first; then plumb the vertical pieces with a torpedo level before attaching them. Finally, install the panel’s bottom piece, and fill in any missing staples. They should be spaced about every 12 in.

Choose bead carefully

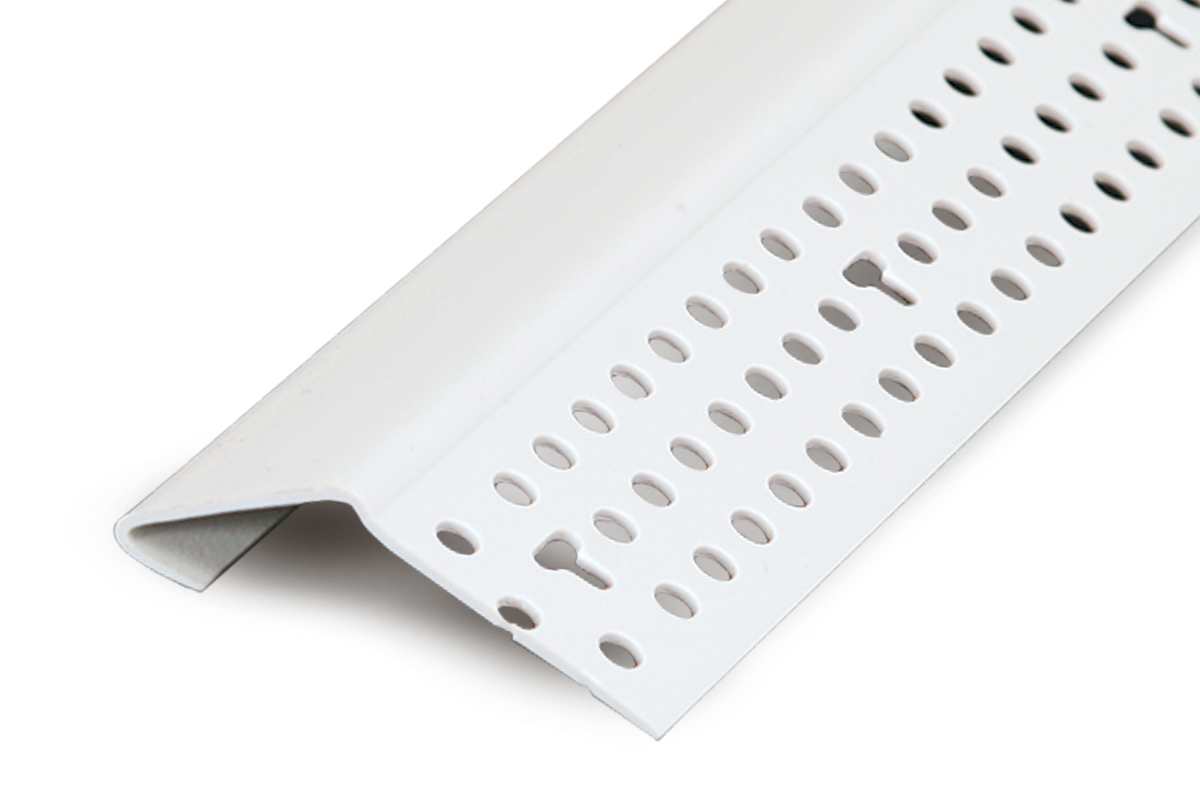
Designed for single or double layers of 1/2-in. or 5/8-in. drywall, Trim-Tex vinyl decorative bead comes in 8-ft. or 10-ft. lengths and a variety of different styles. I use decorative L bead as chair rail because its offset design covers the top edge of the top rail. The chair-rail bead is not an option here because it’s designed to be used only on flat surfaces. Chamfer stop creates a clean, panelized look. Like all vinyl bead, it can be cut on a power miter saw using a plywood blade with the teeth reversed to cut the vinyl cleanly.

Decorative L bead
Decorative L bead

Chair rail
Chair rail

Chamfer stop
Chamfer stop

www.trim-tex.com

Cost: $2 to $5 per piece


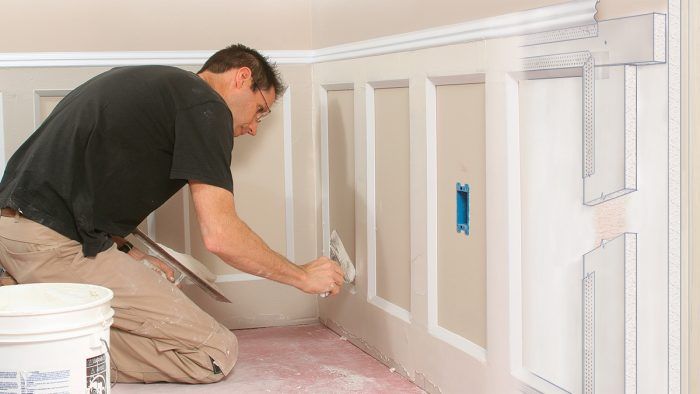
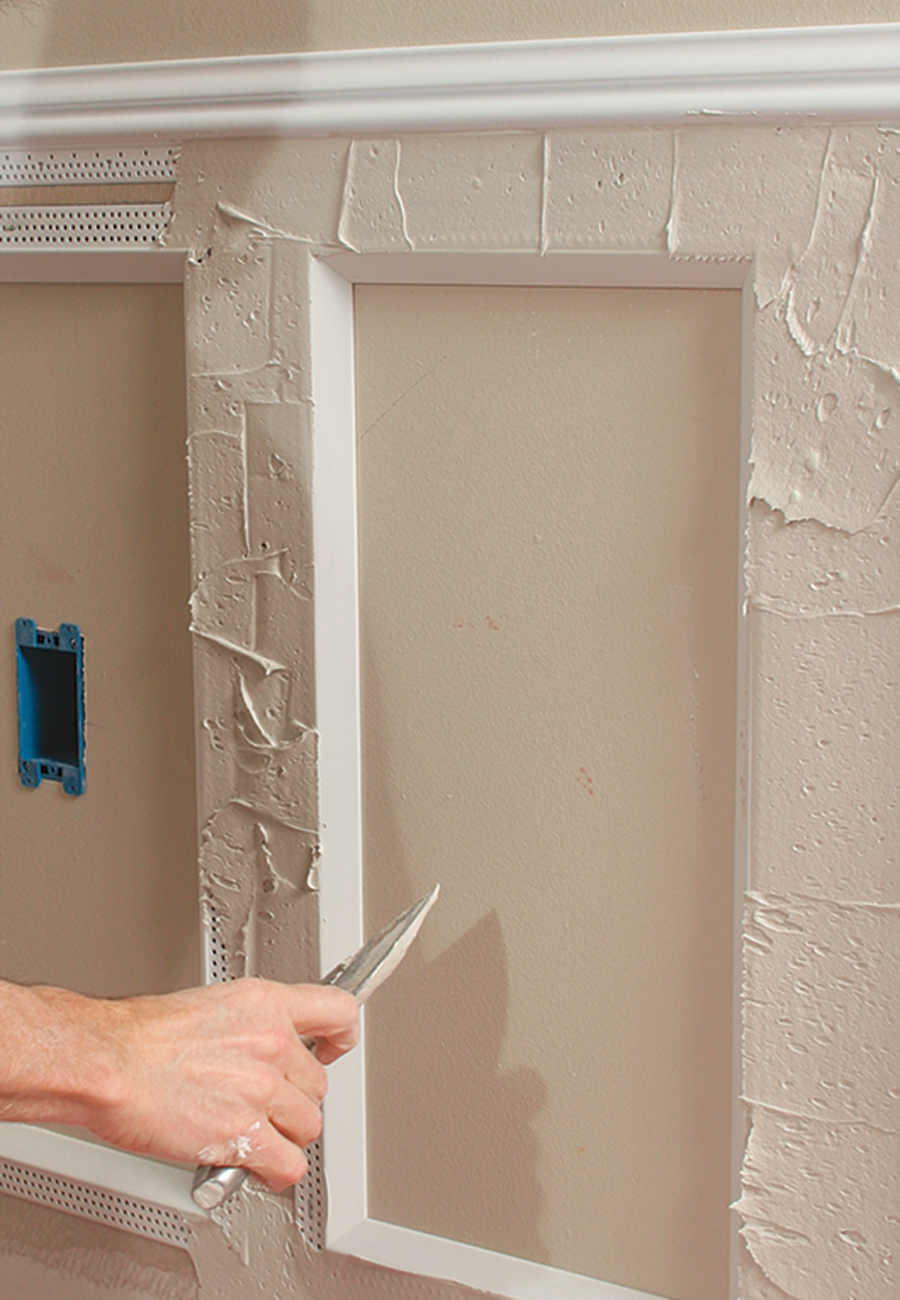
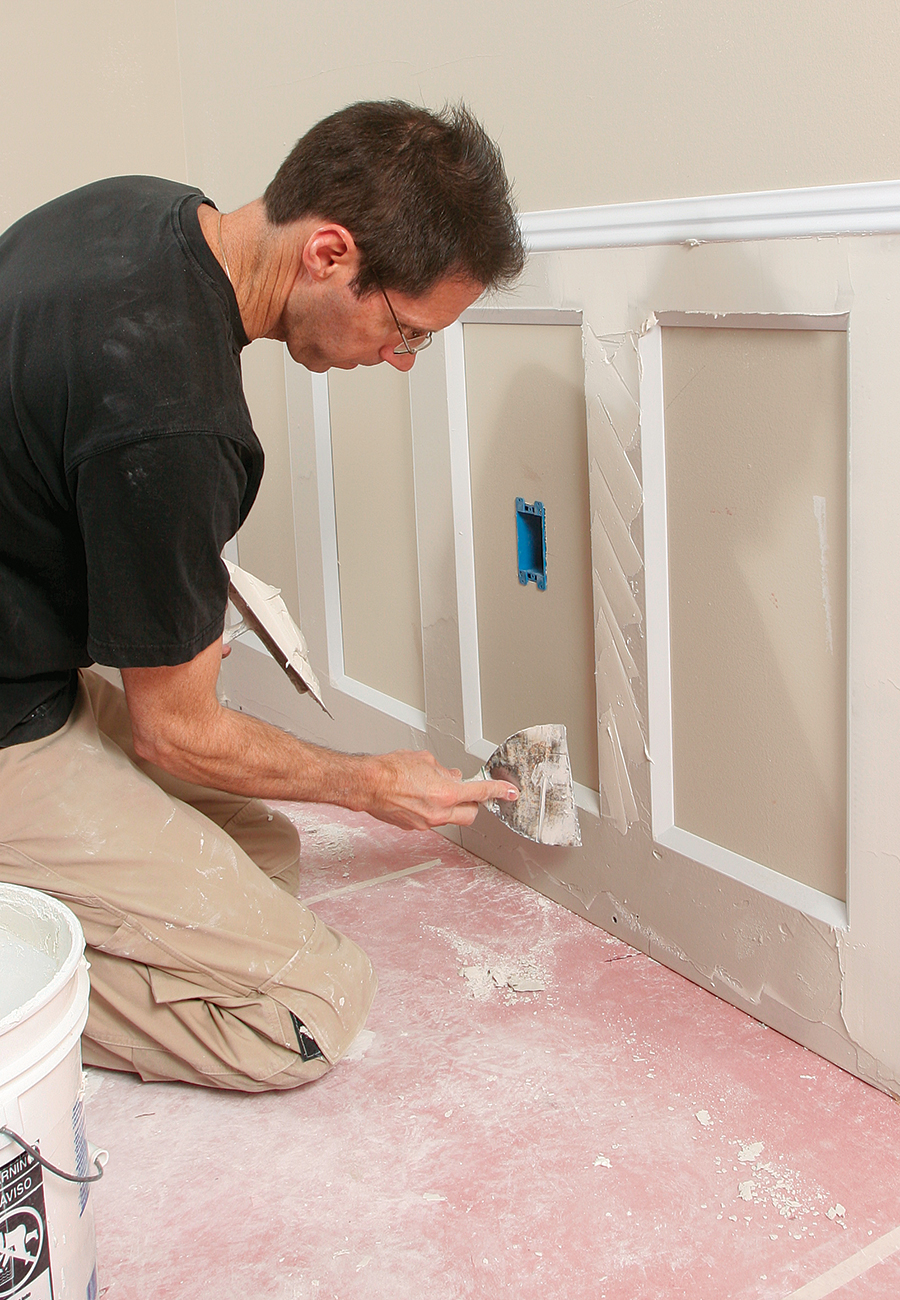
A careful mud job creates a clean finish

I’ve used several different types of joint compound when making wainscot. each type performs fine, but depending on time constraints, you need to choose a specific product. setting-type compound sets up the quickest, and when used for the first coat, it allows you to apply the second coat the same day. otherwise, wait at least 24 hours between coats of compound.

joint compound on wainscot panels
The first coat isn’t pretty. Apply a liberal amount of joint compound to bring the rails and stiles flush to the bead. Smooth the compound as you go, and let it dry.

finishing wainscot paneling
The second and finish coats fill in the remaining low spots. Apply the second and final coats in the same manner as the first, being sure to fill in any low spots on either the rails or the stiles. Sand any high spots or blemishes that you’ve created between each coat with 150-grit sandpaper, and remove excess compound that ended up on the bead material. Now you’re ready to paint.
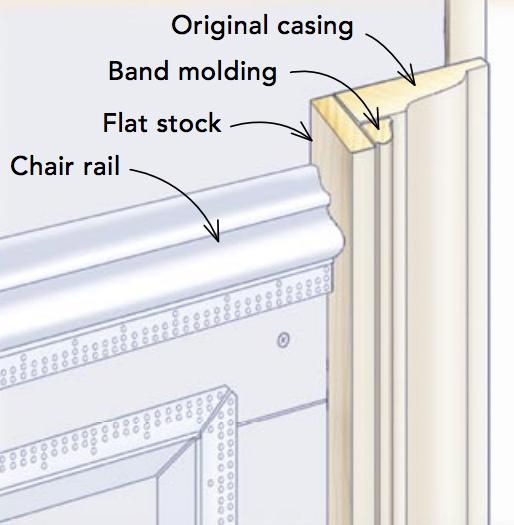
Make casing thicker to accommodate wainscot

Wainscot shouldn’t stand proud where it meets window and door casings. You can build out the thickness of casings with a combination of molding and flat stock. (see “Adding Detail With Built-Up Molding” in FHB #172)

make casing thicker to accommodate wainscot


To view the article as a PDF, click the View PDF button below. 

View PDF
Previous: Layering Drywall

Guide

Drywall

Chapter

Special Installations

Sign up for eletters today and get the latest how-to from Fine Homebuilding, plus special offers.

Signing you up...

This site is protected by reCAPTCHA and the Google Privacy Policy and Terms of Service apply.
See all newsletters
See all newsletters

Log in or create an account to post a comment.

Sign up Log in

Become a member and get full access to FineHomebuilding.com

Drywall

Drywall

Trusted, comprehensive guidance for choosing, hanging, taping, sanding, and repairing drywall—the right way

View Project Guide

View All Project Guides »

Become a member and get unlimited site access, including the Drywall Project Guide.

Start Free Trial

Drywall Basics
  • Types and Uses of Drywall
  • Planning the Job
Tools and Materials
  • Hanging Tools
  • Taping Tools and Materials
  • Sanding and Finishing Tools and Materials
Hanging Drywall
  • Prep for Hanging
  • Measuring and Cutting Drywall
  • Guidelines for Hanging and Fastening Drywall
  • Hanging Ceilings
  • Hanging Walls
  • Hanging Airtight Drywall
  • Trim Accessories/Corner Beads
Taping and Sanding
  • Taping Basics
  • Taping Seams
  • Taping Inside and Outside Corners
  • Sanding
Special Installations
  • Tricky Transitions
  • Curved Surfaces
  • Other Special Installations
  • Decorating with Drywall
Drywall Repairs
  • Patching Holes, Cracks, and More
Plaster
  • Working with Lime Plaster
  • Plaster Repair
  • Classic Plaster Techniques

Fine Home Building

Newsletter Sign-up

  • Fine Homebuilding

    Home building tips, offers, and expert advice in your inbox.

  • Green Building Advisor

    Building science and energy efficiency advice, plus special offers, in your inbox.

  • Old House Journal

    Repair, renovation, and restoration tips, plus special offers, in your inbox.

Signing you up...

This site is protected by reCAPTCHA and the Google Privacy Policy and Terms of Service apply.
See all newsletters

Follow

  • Fine Homebuilding

    Dig into cutting-edge approaches and decades of proven solutions with total access to our experts and tradespeople.

    Start Free Trial Now
    • Facebook
    • Instagram
    • X
    • LinkedIn
  • GBA Prime

    Get instant access to the latest developments in green building, research, and reports from the field.

    Start Free Trial Now
    • Facebook
    • YouTube
  • Old House Journal

    Learn how to restore, repair, update, and decorate your home.

    Subscribe Now
    • Facebook
    • Instagram
    • X

Membership & Magazine

  • Online Archive
  • Start Free Trial
  • Magazine Subscription
  • Magazine Renewal
  • Gift a Subscription
  • Customer Support
  • Privacy Preferences
  • About
  • Contact
  • Advertise
  • Careers
  • Terms of Use
  • Site Map
  • Do not sell or share my information
  • Privacy Policy
  • Accessibility
  • California Privacy Rights

© 2025 Active Interest Media. All rights reserved.

Fine Homebuilding receives a commission for items purchased through links on this site, including Amazon Associates and other affiliate advertising programs.

  • Home Group
  • Antique Trader
  • Arts & Crafts Homes
  • Bank Note Reporter
  • Cabin Life
  • Cuisine at Home
  • Fine Gardening
  • Fine Woodworking
  • Green Building Advisor
  • Garden Gate
  • Horticulture
  • Keep Craft Alive
  • Log Home Living
  • Military Trader/Vehicles
  • Numismatic News
  • Numismaster
  • Old Cars Weekly
  • Old House Journal
  • Period Homes
  • Popular Woodworking
  • Script
  • ShopNotes
  • Sports Collectors Digest
  • Threads
  • Timber Home Living
  • Traditional Building
  • Woodsmith
  • World Coin News
  • Writer's Digest
Active Interest Media logo
X
X
This is a dialog window which overlays the main content of the page. The modal window is a 'site map' of the most critical areas of the site. Pressing the Escape (ESC) button will close the modal and bring you back to where you were on the page.

Main Menu

  • How-To
  • Design
  • Tools & Materials
  • Video
  • Blogs
  • Forum
  • Project Guides
  • Reader Projects
  • Magazine
  • Members
  • FHB House

Podcasts

  • FHB Podcast
  • ProTalk

Webinars

  • Upcoming and On-Demand

Podcasts

  • FHB Podcast
  • ProTalk

Webinars

  • Upcoming and On-Demand

Popular Topics

  • Kitchens
  • Business
  • Bedrooms
  • Roofs
  • Architecture and Design
  • Green Building
  • Decks
  • Framing
  • Safety
  • Remodeling
  • Bathrooms
  • Windows
  • Tilework
  • Ceilings
  • HVAC

Magazine

  • Current Issue
  • Past Issues
  • Magazine Index
  • Subscribe
  • Online Archive
  • Author Guidelines

All Access

  • Member Home
  • Start Free Trial
  • Gift Membership

Online Learning

  • Courses
  • Project Guides
  • Reader Projects
  • Podcast

More

  • FHB Ambassadors
  • FHB House
  • Customer Support

Account

  • Log In
  • Join

Newsletter

Get home building tips, offers, and expert advice in your inbox

Signing you up...

This site is protected by reCAPTCHA and the Google Privacy Policy and Terms of Service apply.
See all newsletters
See all newsletters

Follow

  • X
  • YouTube
  • instagram
  • facebook
  • pinterest
  • Tiktok

Join All Access

Become a member and get instant access to thousands of videos, how-tos, tool reviews, and design features.

Start Your Free Trial

Subscribe

FHB Magazine

Start your subscription today and save up to 70%

Subscribe

You have 1 free article remaining.

Get complete site access, including thousands of videos, how-to tips, tool reviews, and design features.

Start your FREE trial

Already a member? Log in

We hope you’ve enjoyed your free articles. To keep reading, become a member today.

Get complete site access to expert advice, how-to videos, Code Check, and more, plus the print magazine.

Start your FREE trial

Already a member? Log in

Privacy Policy Update

We use cookies, pixels, script and other tracking technologies to analyze and improve our service, to improve and personalize content, and for advertising to you. We also share information about your use of our site with third-party social media, advertising and analytics partners. You can view our Privacy Policy here and our Terms of Use here.

Cookies

Analytics

These cookies help us track site metrics to improve our sites and provide a better user experience.

Advertising/Social Media

These cookies are used to serve advertisements aligned with your interests.

Essential

These cookies are required to provide basic functions like page navigation and access to secure areas of the website.

Delete My Data

Delete all cookies and associated data