Estimating Materials
Whether you're drywalling a single room or the whole house, you'll need to work up an accurate materials list.
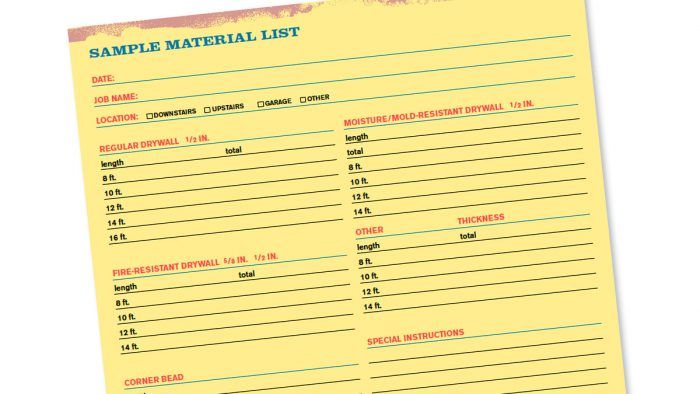
On most drywalling jobs, I figure out a rough material list from the blueprints and job specifications. I use this information to estimate the cost of the job. Once the building is framed, I obtain my exact material list by measuring the actual walls and ceilings.
Measuring the walls and ceilings makes it easier to visualize how to hang the drywall, decide which lengths and types to use, and figure out where to hang them. As I measure each room, I write down exactly what I’ll need on a material list, using a separate list for each story of the building (see the sample material list below). The material list makes it easy to calculate the square footage of drywall, which helps me estimate the cost for the entire job (I usually estimate a job by the square foot). From the square footage, I can calculate the approximate amount of screws, nails, joint tape, joint compound, and paint needed to complete the job.
Sometimes figuring materials for a larger wall or ceiling with a lot of framing issues is difficult. I study the area and as always think about ways to reduce seams, especially butted seams. I am also concerned with seam location more than ever—a seam placed at a transition point in the framing can result in a ridged seam that will be difficult to conceal and may crack as settling and structural movement occur. Don’t simply start at the bottom and work your way up with drywall; you may have to start with a ripped piece so that an upper seam falls in the best location. Remember that on highly visible areas any little bump, ridge, or defect will be on display after the drywall is painted.
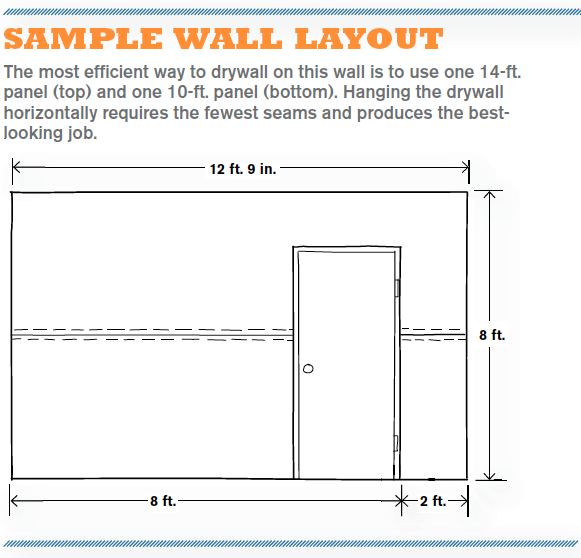
When working up the material list, I usually round lengths of walls and heights of ceilings to the next highest 2-ft.-length panel. For example, if a wall is 12 ft. 9 in. long, I order a 14-ft. panel (see the drawing “Sample Wall Layout”). In this example, the lower 4 ft. of the wall is broken up by a doorway, so I would order a 10-ft. panel to complete each side of the doorway with a minimum amount of waste. Keep in mind that the idea is to use panels that span the entire length of the wall or ceiling whenever possible.
The “Sample Room Estimate” drawing shows how I estimate drywall for an entire room. In this particular example, I can use one length (16 ft.) for the wall with the window, because the window doesn’t go all the way to the ceiling or the floor and the wall is less than 16 ft. long. On the ceiling, I can use either three 16-ft. panels or four 12-ft. panels. In this example, I’d choose the four 12-ft. panels, because it’s preferable to attach the panels perpendicular to the ceiling joists and the shorter lengths are easier to handle.
| WORK SMART: If you are planning to hang drywall vertically on the walls, the on-center spacing of the framing has to be correct and care must be taken not to attach a seam to a crooked stud. This is much more critical than when you’re hanging the drywall horizontally. |
Estimating materials for an entire house
When I’m working up a material list for a job, I usually don’t need to figure out a separate list for each room—I know to use the maximum length possible for each wall. If a room is 12 ft. by 16 ft., I mainly use 12-ft.- or 16-ft.-long panels—unless a doorway allows me to use a shorter length.
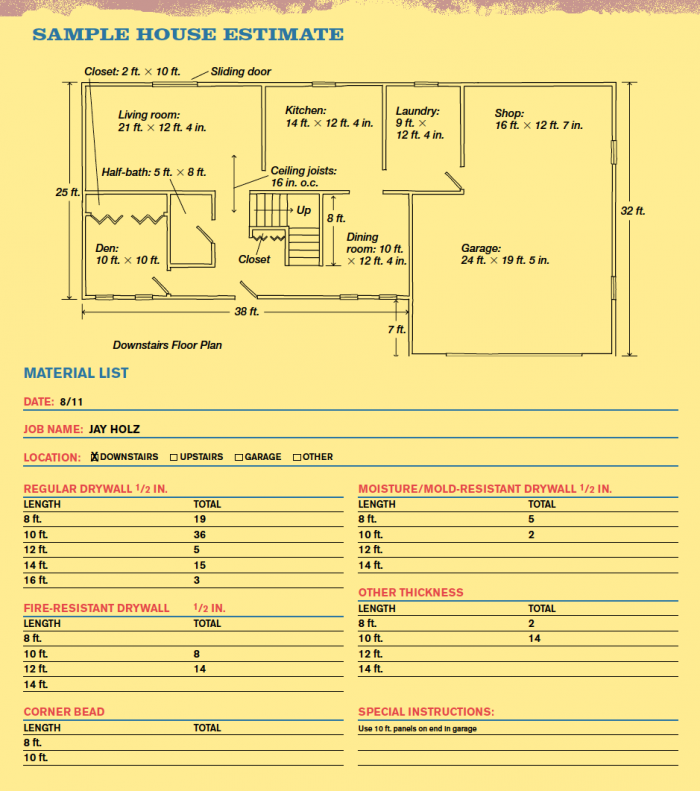
As I walk through a house, I note any rooms that will require special treatment. In the example shown in the plans below, the upstairs master bedroom has a cathedral ceiling, so I need to allow extra drywall for the ceiling and the gable ends. It’s not a good idea to plan a butted seam directly under the ridge beam on the ends of a cathedral ceiling—there could be structural weight and some movement or settling, which would eventually cause the seam to crack—so I figure on spanning the end wall with 16-ft. panels.
 |
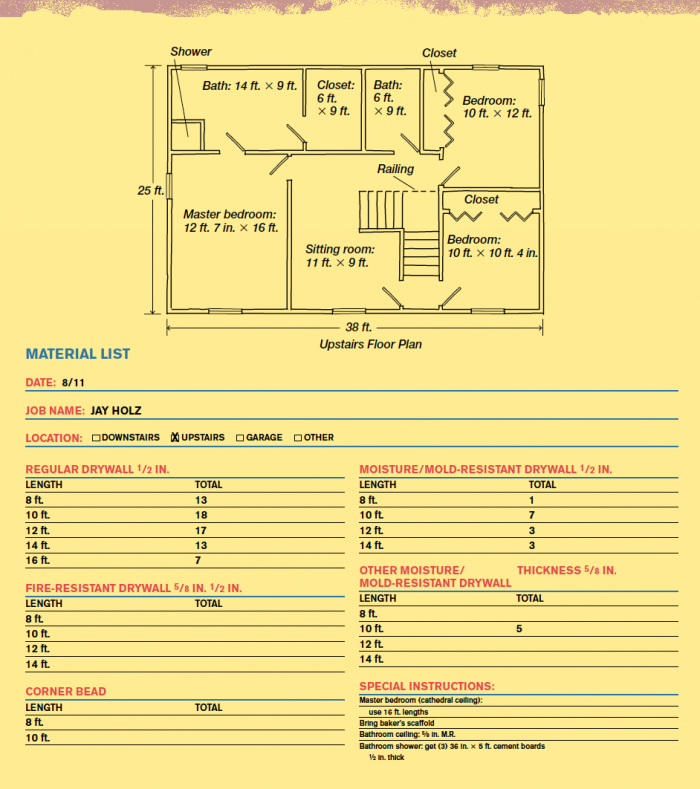 |
In addition, cement board or tile backer will need to be used in the shower area of the master bathroom. I would also plan for the rest of the bathroom walls to be covered with 1/2-in. moisture/mold-resistant drywall—and the ceiling to be covered with 5/8-in. moisture/mold-resistant panels.
The garage ceiling joists are 24 in. o.c., so I would estimate the entire ceiling using 5/8-in. fire-resistant drywall. All the garage walls adjacent to the house will need 5/8-in. fire-resistant drywall, too; for the rest of the garage I could switch over to regular 1/2-in. drywall. The garage walls are 10 ft. high, so I’d stand 10-ft. panels on end to avoid butted seams and to keep the linear footage of seams to a minimum.
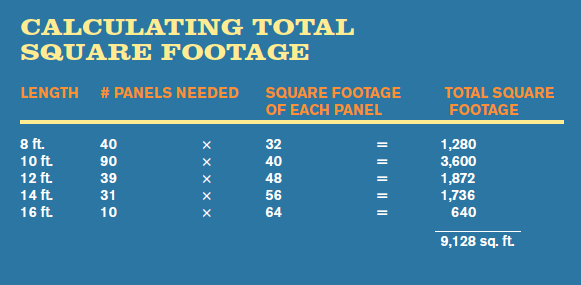
After tallying the number and types of drywall panels needed, the next step is to calculate the total square footage of drywall required. Multiply the number of panels needed for each length by the square footage in one panel, and then add all the totals together. For example, the total square footage of drywall needed for the house shown in the plans is displayed in the chart below.
Rough estimating a house
A quicker but less accurate way to estimate the amount of drywall needed for a house is to multiply the square footage of the living-area floor space for each story by 3.5 (for a home with 8-ft.-high ceilings). I use this method to give a rough estimate over the phone, for example. In the house in our example, multiplying the square footage of the up-stairs and downstairs living areas (1,984 sq. ft.) by 3.5 gives a rough drywall total of 6,944 sq. ft. We also need to add the total for the garage. Multiply the total length of the garage walls by the height (112 ft. 3 10 ft. = 1,120 sq. ft.), and then add the ceiling (approximately 700 sq. ft.): 1,120 + 700 = 1,820 sq. ft.
Using the rough-estimating method, the total square footage of drywall needed for this house works out to be 8,764 sq. ft. (6,944 + 1,820). This figure is reasonably close to the actual square footage needed (9,128 sq. ft.) and a lot quicker to calculate.
For a house with 9-ft.-high ceilings, use 3.82 as the multiplier. Many houses have 8-ft.-high ceilings upstairs and 9-ft.-high ceilings downstairs. In those cases, calculate each floor separately and then add the totals together to obtain the rough estimate.

