FHB Logo Facebook LinkedIn Email Pinterest Twitter X Instagram Tiktok YouTube Plus Icon Close Icon Navigation Search Icon Navigation Search Icon Arrow Down Icon Video Guide Icon Article Guide Icon Modal Close Icon Guide Search Icon Skip to content
Subscribe
Log In
  • How-To
  • Design
  • Tools & Materials
  • Restoration
  • Videos
  • Blogs
  • Forum
  • Magazine
  • Members
  • FHB House
  • Podcast
Log In

Fine Homebuilding Project Guides

Drywall

Guide Home
  • Drywall Basics
  • Tools and Materials
  • Hanging Drywall
  • Taping and Sanding
  • Special Installations
  • Drywall Repairs
  • Plaster
How-To

How to Hang Drywall on a Gable End

This gypsum job is tougher than most, and not just because of the high ceiling.

By Myron R. Ferguson Issue 206
  • X
  • facebook
  • linkedin
  • pinterest
  • email
  • add to favorites Log in or Sign up to save your favorite articles

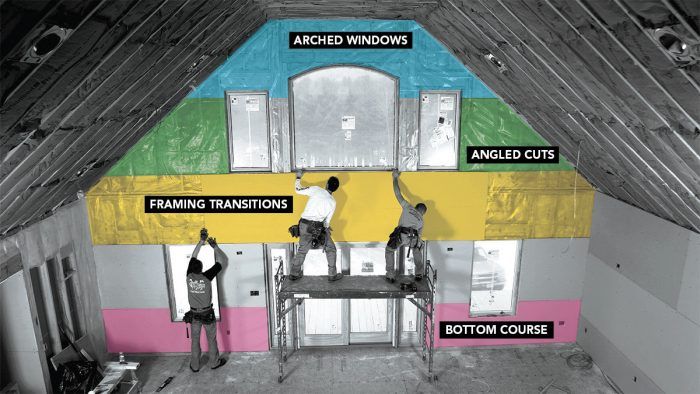
Synopsis: Hanging drywall can be a difficult job to start with, but hanging it on a gable end makes the work even tougher. Drywall guru Myron R. Ferguson describes his process for hanging drywall on a gable end. Ferguson says that it’s OK to start at the bottom of the wall; having a layer of drywall at the bottom provides a surface on which to stack subsequent layers. Ferguson advises taking care with seams and screws. He also outlines his techniques for cutting arches and for cutting angles.


Homeowners love large rooms with high cathedral ceilings and lots of windows, but to a drywall contractor like me, tall gable-end walls are a perfect storm of drywall-hanging obstacles. Never mind the 20-ft.- to 30-ft.-tall ceilings—the gable wall alone involves lots of tricky cuts; structural headers, framing transitions, and solid blocking that create bumps and dips; and an increased chance of structural settling. All these things could lead to drywall cracks, visible seams, and popped fasteners.

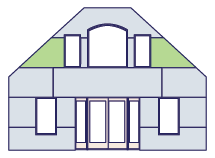
Of course, no two rooms are exactly the same, but the project shown here is a textbook illustration of the potential problems. Even if your gable-end wall looks different from this one, my general guidelines can still be applied. Just plan thoughtfully, and focus on the common trouble spots.

Fewer seams, fewer problems

Taped seams are more likely to crack than drywall itself. Reduce the amount and the length of seams, and you reduce the chance of future problems.

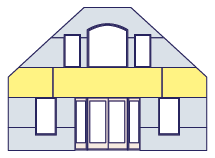
One way to reduce the length of the horizontal seams is to rip the bottom course of drywall to a height that minimizes or eliminates seams running uninterrupted from one end of the wall to the other. In this way, the windows and doors become termination points, and they break up the length of the taped seams.

It’s OK to start at the bottom


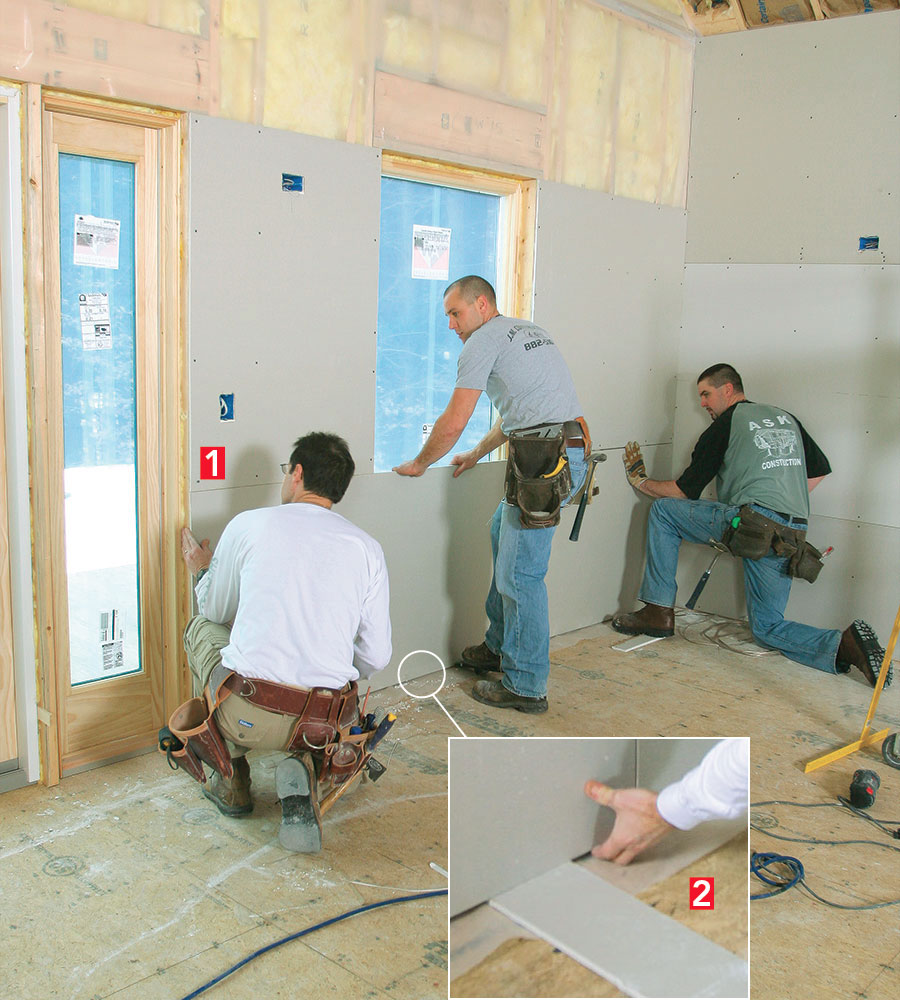
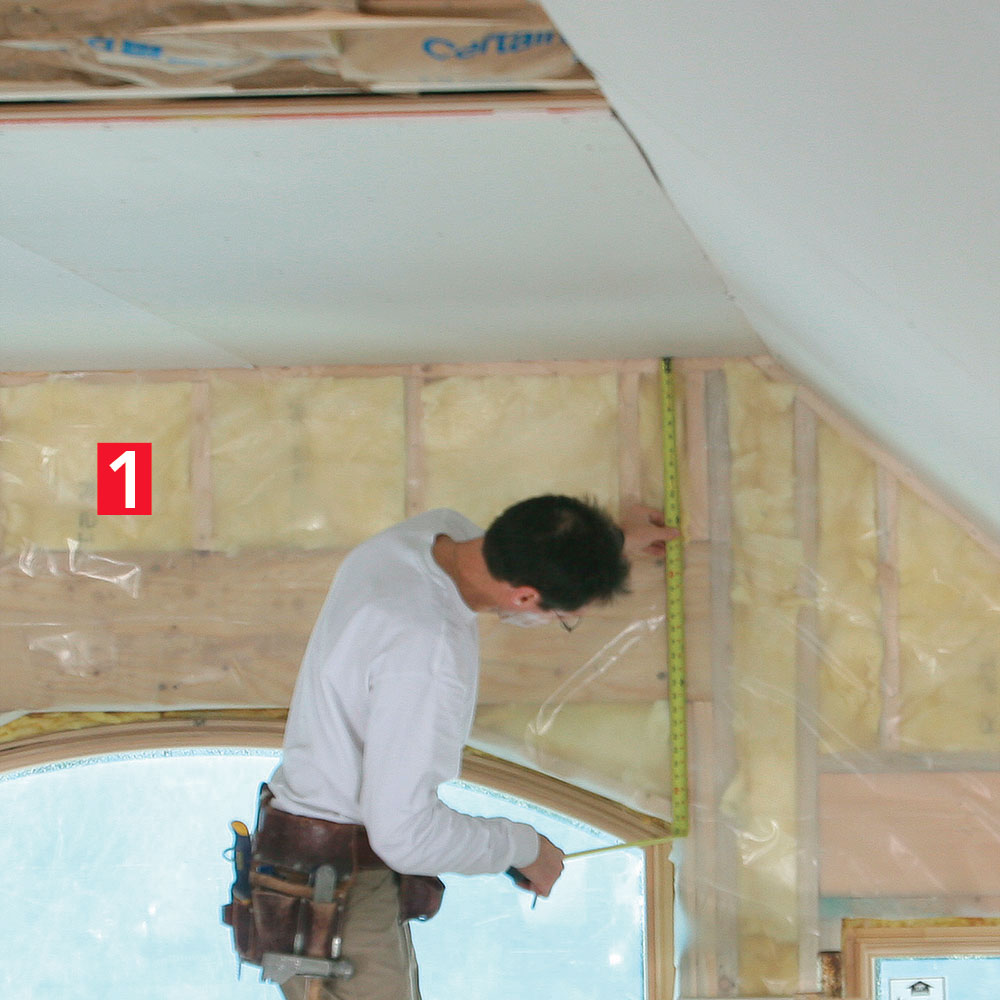
Unlike working in a room with 8-ft. or 9-ft. ceilings, where the first sheet of drywall can be lifted easily to the top of the wall and fastened, (1) stacking the several courses of drywall necessary to cover a tall gable end wall is easier than holding the panels up and working your way down. Also, when measuring for the angled cuts where the wall meets the cathedral ceiling, it’s easier to take measurements from the top edge of a row of panels that is already installed.

The only caution here is to make sure that you leave a space along the floor in case the wall settles. (2) Some scraps of drywall work well to keep the first row of panels off the subfloor.


I got lucky on this job. The distance from the top of the ground-level windows and doors to the bottom edge of the upper windows was 48 in., just the right width for a sheet of drywall and no need for a long horizontal seam. Even if this center section had been less than 48 in., I could still rip a sheet to fit the width. If it were more than 48 in., a 54-in.-wide sheet of drywall could be ripped as necessary. Any wider than 54 in., though, and a horizontal seam is a must.

If you are forced to have a long-running horizontal seam, avoid putting it on or near a framing transition or a row of blocking. These spots are more likely to leave you with an obvious bump in the finished wall.

Long sheets reduce butt joints

Vertical (butt) seams are the next thing to consider. They are hard to fasten and hard to hide, and on a big gable wall that is likely to shift and settle over time, they are the most likely place to crack.

 Be careful with seams and screws


marking drywall

screwing in drywall

Along with all the standard headers and blocking, a wall this big will probably have a framing transition halfway up, too. All these things lead to bumps and dips in the wall—bad places to put seams or lots of fasteners.

To minimize the horizontal and vertical (butt) seams and to span all the areas prone to cracking, strategically locate a horizontal seam at the top of the door and window jambs.

Knowing where you can fasten and where you can’t can become confusing. (1) Before putting sheets in place and losing sight of all the framing, it is helpful to mark out where and where not to place screws. (2) This way, when the sheet is lifted in place, you can clearly see the now-hidden obstacles behind the drywall.


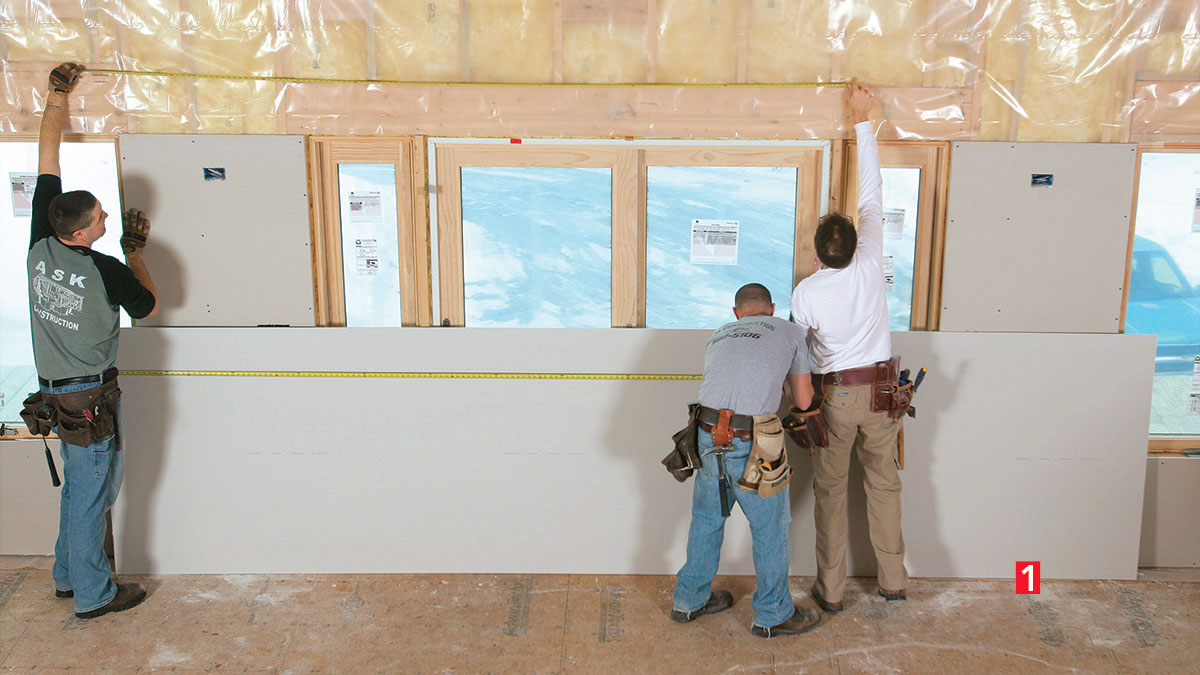
Again, use windows, doors, and angled ceilings as termination points wherever possible. In areas where this isn’t possible, use the longest sheets of drywall that you can manage, and locate butt seams away from the center of the room, where they will be most obvious. If you can cover from one end of the gable wall to the other without any butt seams, perfect.

Fastening location matters, too

Unfortunately, a successful layout doesn’t depend only on seam location. Fastening always seems to be an issue on gable walls. Obviously, each sheet needs to have the appropriate number of fasteners, but with the increased likelihood of settling, lumber shrinkage, and framing transitions not being perfectly flush, I have to be especially careful with screw placement. Careless fastening will just about guarantee popped fasteners within the first year after the job is complete.

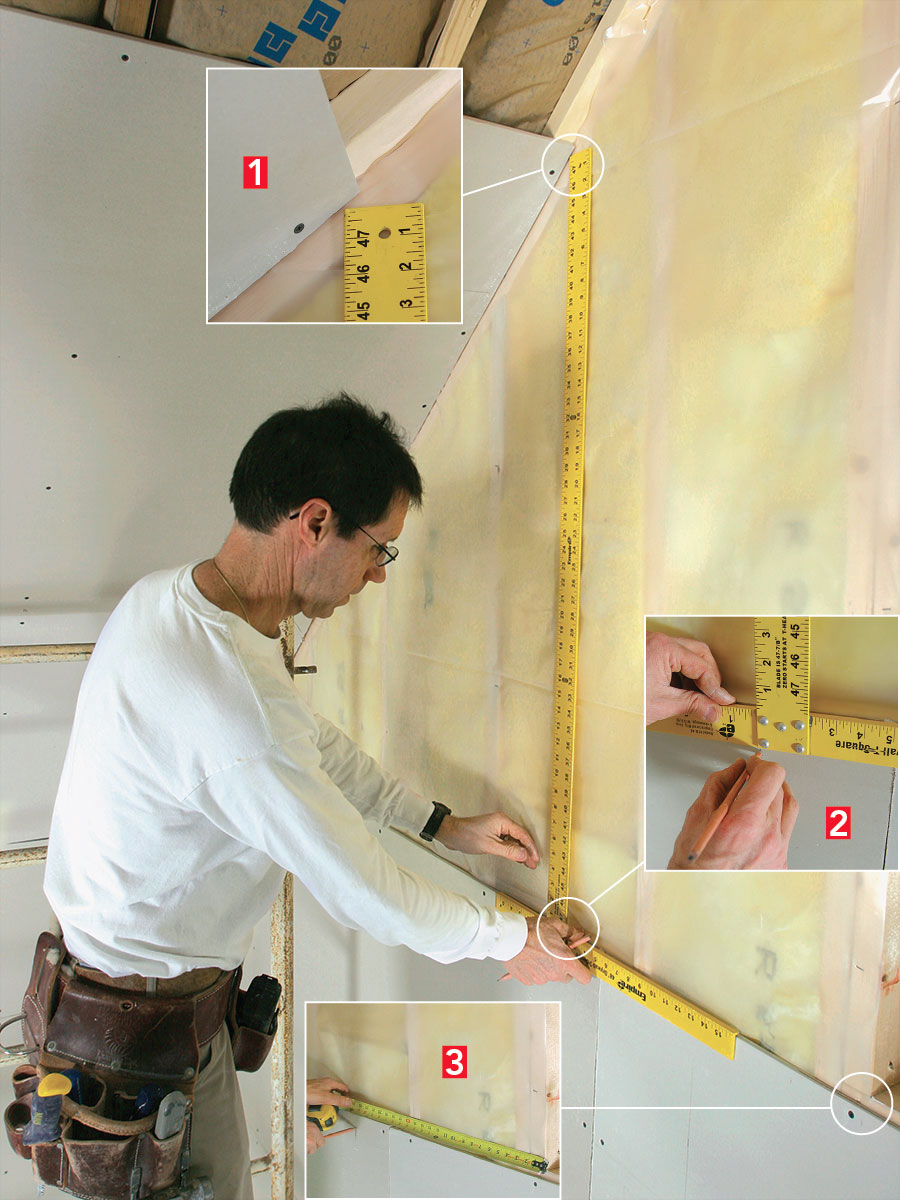
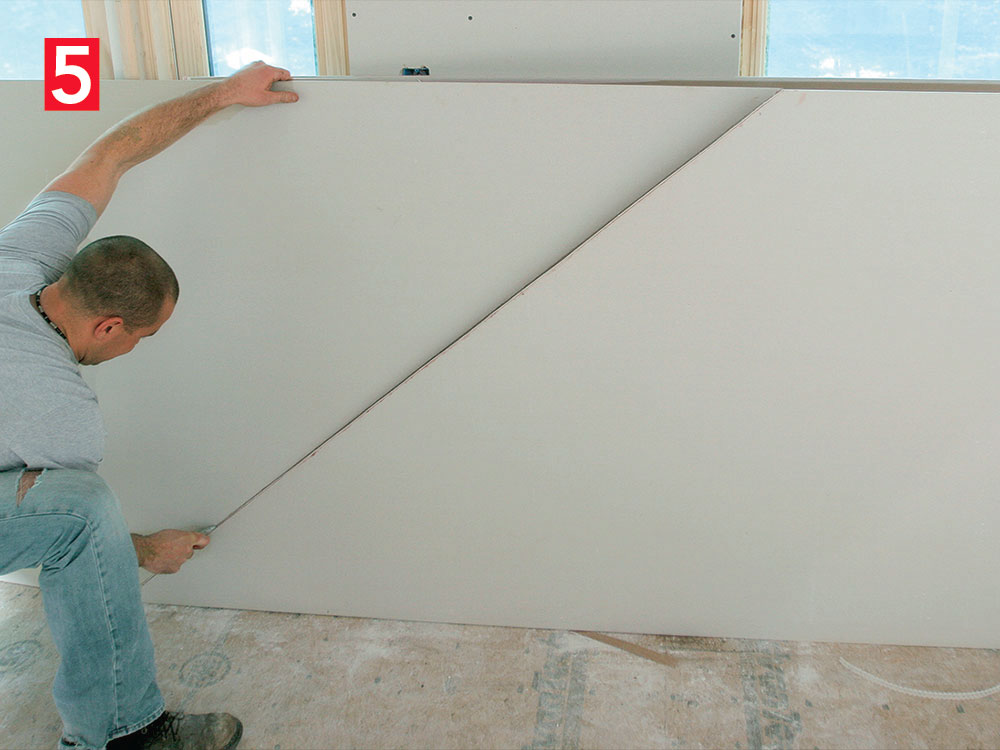
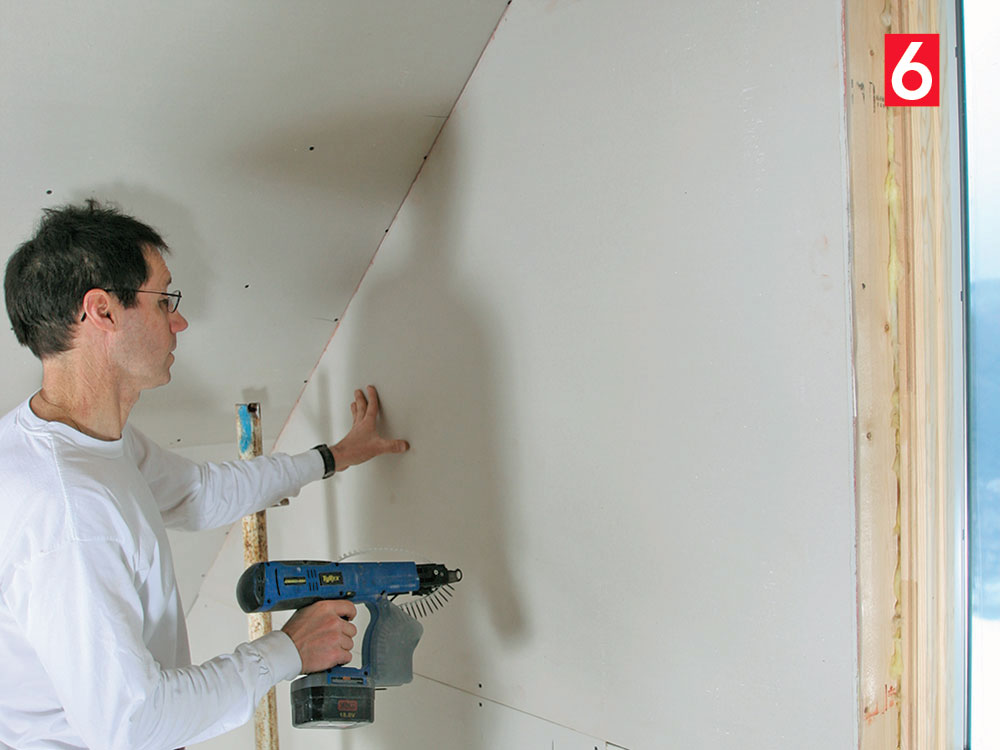
Angles are easy with a T-square and tape


Start by placing a 48-in. T-square upside down on the previously installed sheet, (1) and slide the T-square toward the corner until the end is just shy of touching the drywall on the ceiling; a 1/8-in. to 1/4-in. gap is perfect. If the T-square is touching the drywall on the ceiling, the angled sheet could end up too tight, and the edges might break during installation.

cutting drywall on angles

With the T-square in place, (2) make a pencil line on the drywall at the base of the T-square. (3) Next, measure the distance from this mark to the straight-cut end of the sheet (the window, in this case) for both the top and bottom edges of the piece of drywall to be installed. Finally, measure the distance from the pencil line to the angled corner.

After marking the sheet of drywall to the required overall length—the distance from the angled corner to the window, along the bottom of the sheet—(4) measure and mark the top length. (5) Next, snap a chalkline between these two marks, (6) then score, snap, and install.


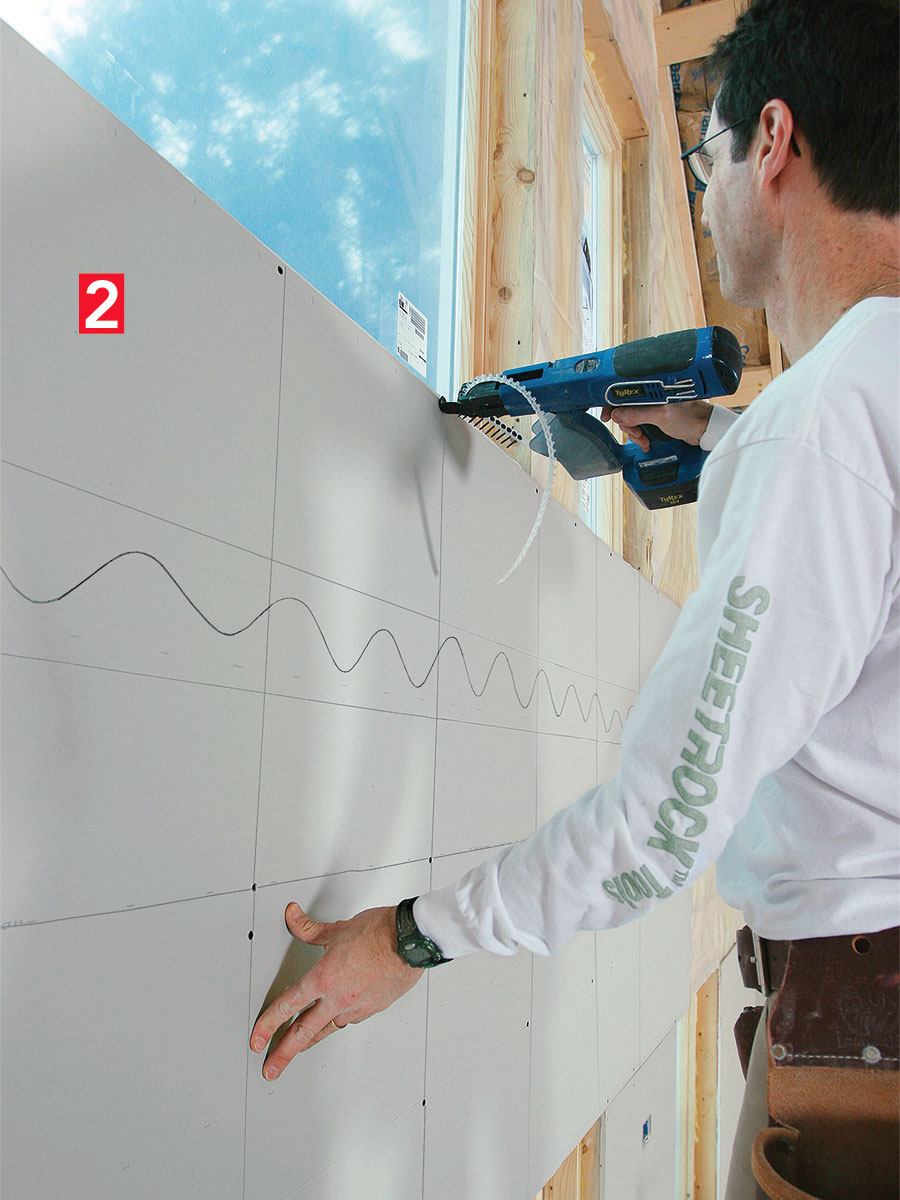
Typically, a thick bead of drywall adhesive lets me get away with using fewer fasteners, and it all but eliminates the chance of popped screws. But if the gable wall is covered with a poly vapor barrier, as it was on this job, using drywall adhesive is not possible. The best option is to use typical 1-1/4-in. coarse-thread drywall screws (no nails, please) set 16 in. on center vertically in each framing member. Like everything else on gable walls, though, there are exceptions to this rule.

I avoid putting more than one horizontal row of screws into structural headers, and I prefer to avoid fastening the drywall to transitions in framing, such as where the upper wall meets the lower wall. These two areas are most likely to move over time, and movement will lead to screw pops. I keep screws about 6 in. down from where the wall meets the ceiling for the same reason.

Work around the room one course at a time

You might think it’s easier to hang the entire gable wall first, then butt the ceiling panels to the wall to hide any sloppy gaps at the angles. I actually prefer to hang the ceiling first so that the wall piece is providing support for the ceiling. Trust me, though, getting a tight joint between the gable wall and the angled ceiling looks far more difficult than it is.

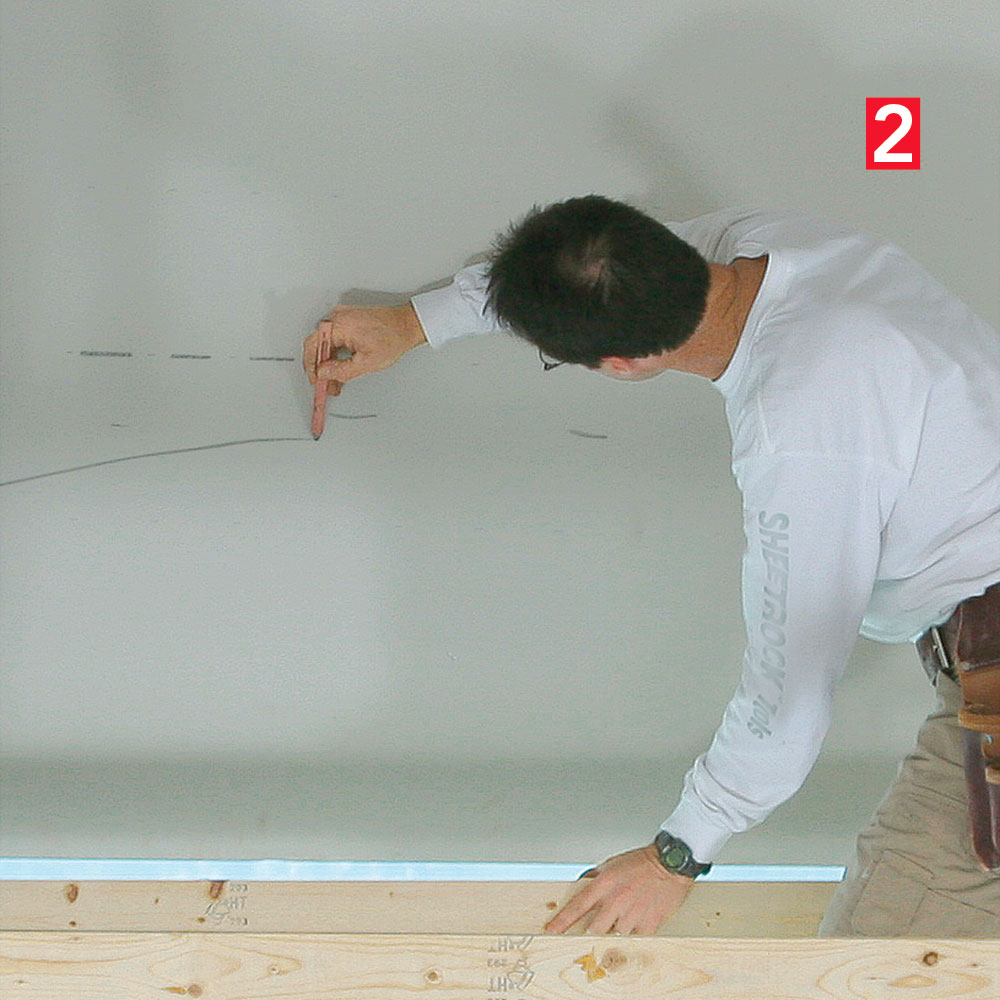
Connect the dots to cut arches


Cutting out rectangular window or door openings in drywall is easy because you can run a utility knife or drywall router along the edge of the rough opening. Arch-top windows, on the other hand, don’t have arched rough openings to use as guides. Instead, (1) take several measurements from the ceiling down to the arched window, marking the measurements on the ceiling as you go. The more measuring points you have, the more accurate your arched cut will be, but at the least, you need to know the high and low points.

measuring arches for drywall

After the sheet is tacked in place, (2) mark the measurements on the drywall, and connect the dots with a pencil. Then it’s as simple as following the pencil line to remove the scrap. You can use a drywall router or a wallboard saw, or you can make several passes with a utility knife. (3) Don’t worry if your arched cut isn’t perfect; the extension jambs and the window casing will even things out later.

drywall arch


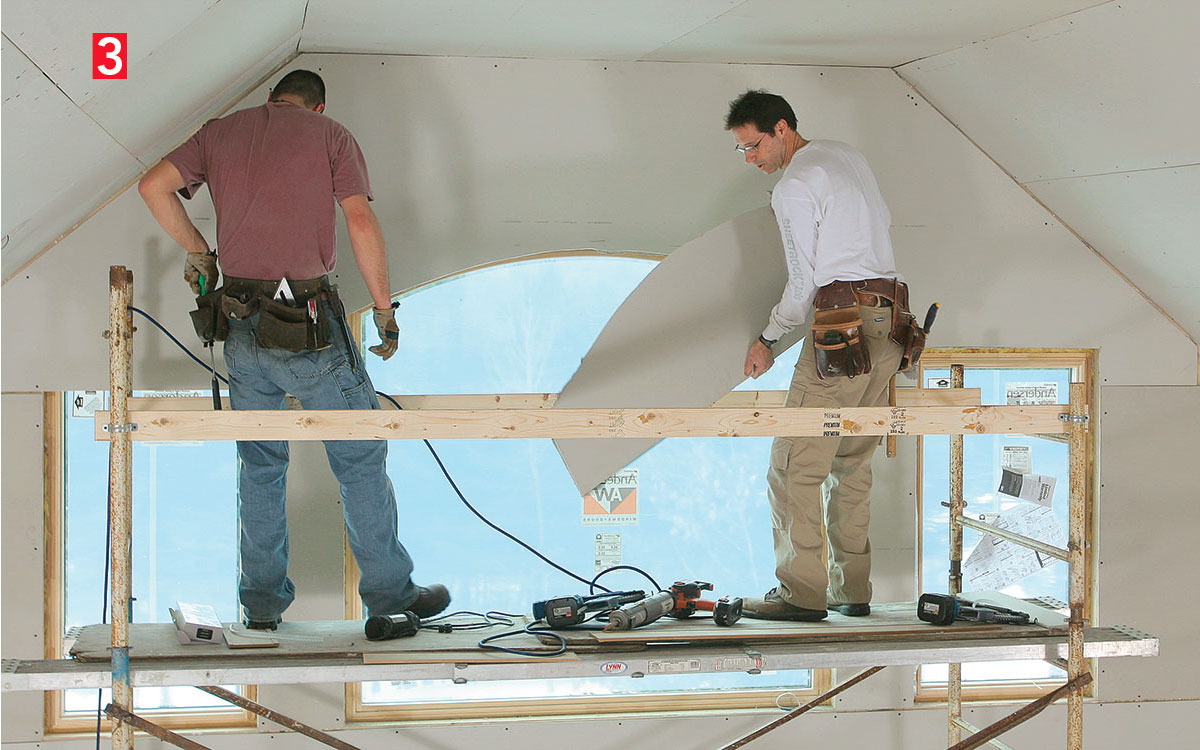
To make the installation run smoothly, I always hang the first two rows of drywall on all four sides of the room while I’m standing on the floor. From there, I prefer to work from scaffolding, again hanging all four sides of the room before bumping the scaffolding up to the next height. I like to have two people on the scaffolding do the drywall hanging and one person on the floor do the cutting. It’s also a huge help to have a drywall lift so that each sheet can be lifted safely to the top of the scaffolding.


Click the View PDF button below to see the article as a PDF:

View PDF
Previous: How to Hang Drywall on Walls Next: Metal Corner Bead Substitutes for Drywall Clips

Guide

Drywall

Chapter

Hanging Drywall

Sign up for eletters today and get the latest how-to from Fine Homebuilding, plus special offers.

Signing you up...

This site is protected by reCAPTCHA and the Google Privacy Policy and Terms of Service apply.
See all newsletters
See all newsletters

Log in or create an account to post a comment.

Sign up Log in

Become a member and get full access to FineHomebuilding.com

Drywall

Drywall

Trusted, comprehensive guidance for choosing, hanging, taping, sanding, and repairing drywall—the right way

View Project Guide

View All Project Guides »

Become a member and get unlimited site access, including the Drywall Project Guide.

Start Free Trial

Drywall Basics
  • Types and Uses of Drywall
  • Planning the Job
Tools and Materials
  • Hanging Tools
  • Taping Tools and Materials
  • Sanding and Finishing Tools and Materials
Hanging Drywall
  • Prep for Hanging
  • Measuring and Cutting Drywall
  • Guidelines for Hanging and Fastening Drywall
  • Hanging Ceilings
  • Hanging Walls
  • Hanging Airtight Drywall
  • Trim Accessories/Corner Beads
Taping and Sanding
  • Taping Basics
  • Taping Seams
  • Taping Inside and Outside Corners
  • Sanding
Special Installations
  • Tricky Transitions
  • Curved Surfaces
  • Other Special Installations
  • Decorating with Drywall
Drywall Repairs
  • Patching Holes, Cracks, and More
Plaster
  • Working with Lime Plaster
  • Plaster Repair
  • Classic Plaster Techniques

Fine Home Building

Newsletter Sign-up

  • Fine Homebuilding

    Home building tips, offers, and expert advice in your inbox.

  • Green Building Advisor

    Building science and energy efficiency advice, plus special offers, in your inbox.

  • Old House Journal

    Repair, renovation, and restoration tips, plus special offers, in your inbox.

Signing you up...

This site is protected by reCAPTCHA and the Google Privacy Policy and Terms of Service apply.
See all newsletters

Follow

  • Fine Homebuilding

    Dig into cutting-edge approaches and decades of proven solutions with total access to our experts and tradespeople.

    Start Free Trial Now
    • Facebook
    • Instagram
    • X
    • LinkedIn
  • GBA Prime

    Get instant access to the latest developments in green building, research, and reports from the field.

    Start Free Trial Now
    • Facebook
    • YouTube
  • Old House Journal

    Learn how to restore, repair, update, and decorate your home.

    Subscribe Now
    • Facebook
    • Instagram
    • X

Membership & Magazine

  • Online Archive
  • Start Free Trial
  • Magazine Subscription
  • Magazine Renewal
  • Gift a Subscription
  • Customer Support
  • Privacy Preferences
  • About
  • Contact
  • Advertise
  • Careers
  • Terms of Use
  • Site Map
  • Do not sell or share my information
  • Privacy Policy
  • Accessibility
  • California Privacy Rights

© 2025 Active Interest Media. All rights reserved.

Fine Homebuilding receives a commission for items purchased through links on this site, including Amazon Associates and other affiliate advertising programs.

  • Home Group
  • Antique Trader
  • Arts & Crafts Homes
  • Bank Note Reporter
  • Cabin Life
  • Cuisine at Home
  • Fine Gardening
  • Fine Woodworking
  • Green Building Advisor
  • Garden Gate
  • Horticulture
  • Keep Craft Alive
  • Log Home Living
  • Military Trader/Vehicles
  • Numismatic News
  • Numismaster
  • Old Cars Weekly
  • Old House Journal
  • Period Homes
  • Popular Woodworking
  • Script
  • ShopNotes
  • Sports Collectors Digest
  • Threads
  • Timber Home Living
  • Traditional Building
  • Woodsmith
  • World Coin News
  • Writer's Digest
Active Interest Media logo
X
X
This is a dialog window which overlays the main content of the page. The modal window is a 'site map' of the most critical areas of the site. Pressing the Escape (ESC) button will close the modal and bring you back to where you were on the page.

Main Menu

  • How-To
  • Design
  • Tools & Materials
  • Video
  • Blogs
  • Forum
  • Project Guides
  • Reader Projects
  • Magazine
  • Members
  • FHB House

Podcasts

  • FHB Podcast
  • ProTalk

Webinars

  • Upcoming and On-Demand

Podcasts

  • FHB Podcast
  • ProTalk

Webinars

  • Upcoming and On-Demand

Popular Topics

  • Kitchens
  • Business
  • Bedrooms
  • Roofs
  • Architecture and Design
  • Green Building
  • Decks
  • Framing
  • Safety
  • Remodeling
  • Bathrooms
  • Windows
  • Tilework
  • Ceilings
  • HVAC

Magazine

  • Current Issue
  • Past Issues
  • Magazine Index
  • Subscribe
  • Online Archive
  • Author Guidelines

All Access

  • Member Home
  • Start Free Trial
  • Gift Membership

Online Learning

  • Courses
  • Project Guides
  • Reader Projects
  • Podcast

More

  • FHB Ambassadors
  • FHB House
  • Customer Support

Account

  • Log In
  • Join

Newsletter

Get home building tips, offers, and expert advice in your inbox

Signing you up...

This site is protected by reCAPTCHA and the Google Privacy Policy and Terms of Service apply.
See all newsletters
See all newsletters

Follow

  • X
  • YouTube
  • instagram
  • facebook
  • pinterest
  • Tiktok

Join All Access

Become a member and get instant access to thousands of videos, how-tos, tool reviews, and design features.

Start Your Free Trial

Subscribe

FHB Magazine

Start your subscription today and save up to 81%

Subscribe

We hope you’ve enjoyed your free articles. To keep reading, become a member today.

Get complete site access to expert advice, how-to videos, Code Check, and more, plus the print magazine.

Start your FREE trial

Already a member? Log in

Privacy Policy Update

We use cookies, pixels, script and other tracking technologies to analyze and improve our service, to improve and personalize content, and for advertising to you. We also share information about your use of our site with third-party social media, advertising and analytics partners. You can view our Privacy Policy here and our Terms of Use here.

Cookies

Analytics

These cookies help us track site metrics to improve our sites and provide a better user experience.

Advertising/Social Media

These cookies are used to serve advertisements aligned with your interests.

Essential

These cookies are required to provide basic functions like page navigation and access to secure areas of the website.

Delete My Data

Delete all cookies and associated data