FHB Logo Facebook LinkedIn Email Pinterest Twitter X Instagram Tiktok YouTube Plus Icon Close Icon Navigation Search Icon Navigation Search Icon Arrow Down Icon Video Guide Icon Article Guide Icon Modal Close Icon Guide Search Icon Skip to content
Subscribe
Log In
  • How-To
  • Design
  • Tools & Materials
  • Restoration
  • Videos
  • Blogs
  • Forum
  • Magazine
  • Members
  • FHB House
  • Podcast
Log In

Fine Homebuilding Project Guides

Finish & Trim Carpentry

Guide Home
  • Trim Design
  • Tools and Materials
  • Interior Trim Basics
  • Window and Door Casings
  • Baseboard and Crown Molding
  • Wainscot and Paneling
  • Mantels and Fireplace Surrounds
  • Coffered Ceilings
Design

A Crown-Mold Concrete Mantel

A stock crown profile and quarter-round form the mold for an inexpensive and unique fireplace surround.

By Charles Miller Issue 221
  • X
  • facebook
  • linkedin
  • pinterest
  • email
  • add to favorites Log in or Sign up to save your favorite articles

Synopsis: When he was getting ready to make a fireplace surround for his living room, special-issues editor Charles Miller went with a nontraditional choice: concrete. That material fit the requirements he’d outlined: It could be shaped to reflect the other trim details in the room; it was affordable (less than $30 in materials for the mantel and two pilasters); and it was fireproof. Miller attached the mantel and pilasters to the wall framing with 6-in. TimberLok screws. The mantel does not rest directly on the pilasters. To make sure the concrete work would match the room, Miller built molds with shapes that would relate to the rest of the room. To ensure easy disassembly of the concrete parts, he coated the mold surfaces with slippery housewrap tape. The concrete is ready-mix, with no additives.


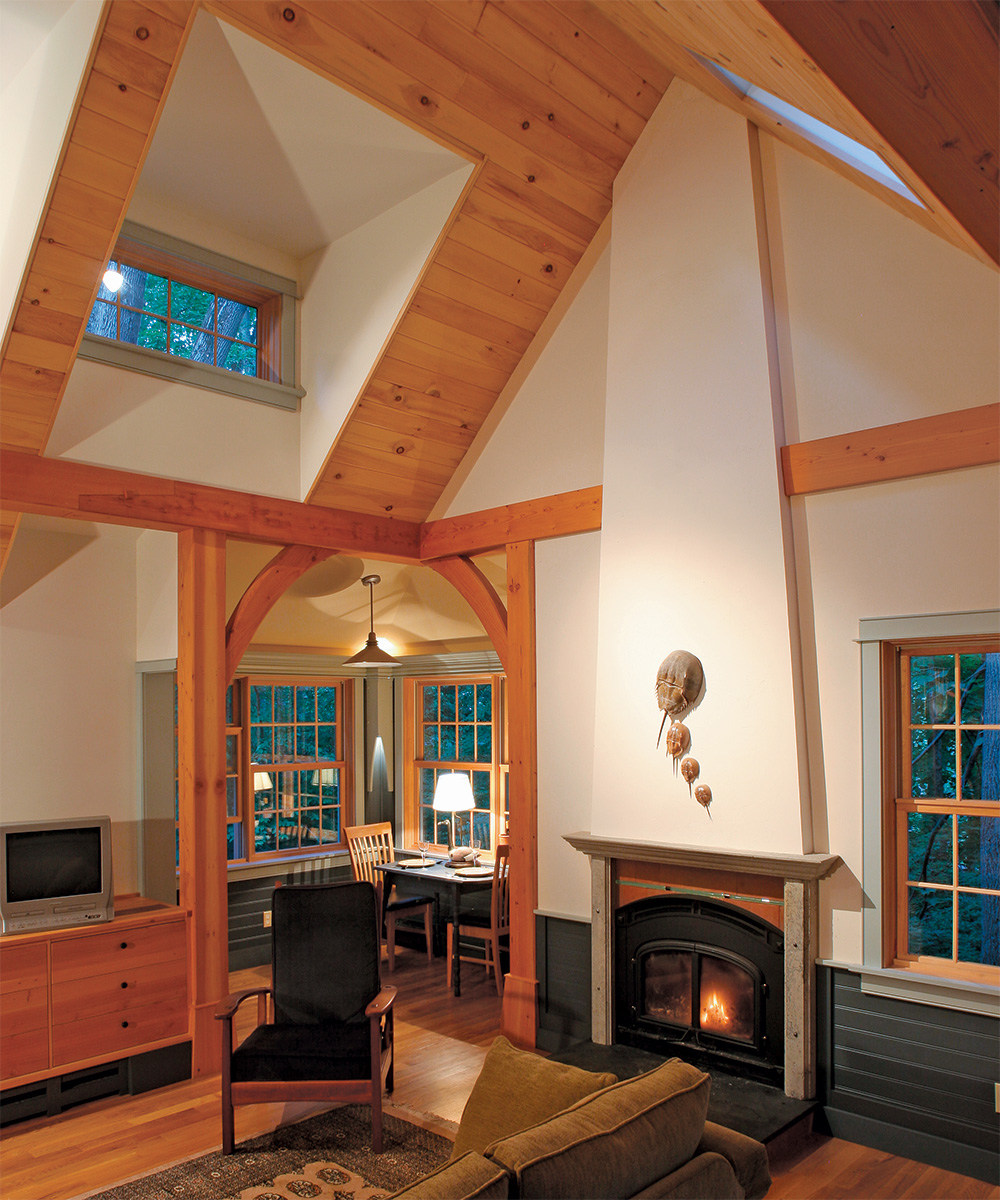
I had three goals in mind when I started designing our living room’s fireplace surround. First, it had to reflect the other trim details in the room; second, it had to be affordable; and third, it had to be unmistakably fireproof. Concrete seemed like the clear choice, giving me a good excuse to put together a small-scale concrete pour. I really like this kind of low-anxiety concrete project. It’s devoid of the handwringing scenarios that often accompany a visit by the transit-mix truck, and you can’t beat the price tag. The mantel and both pilasters cost less than $30 in materials.

Fastening the surround to the wall

finished concrete fireplace

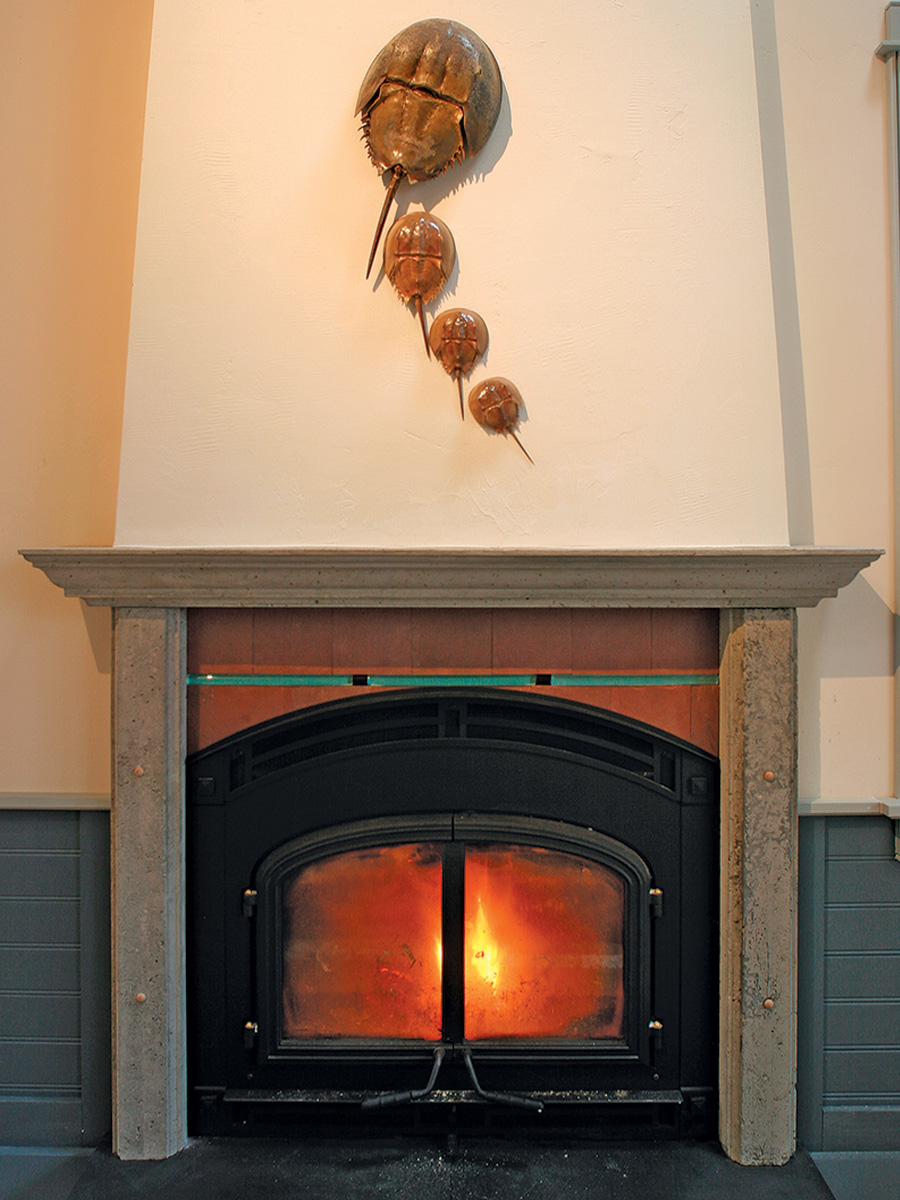
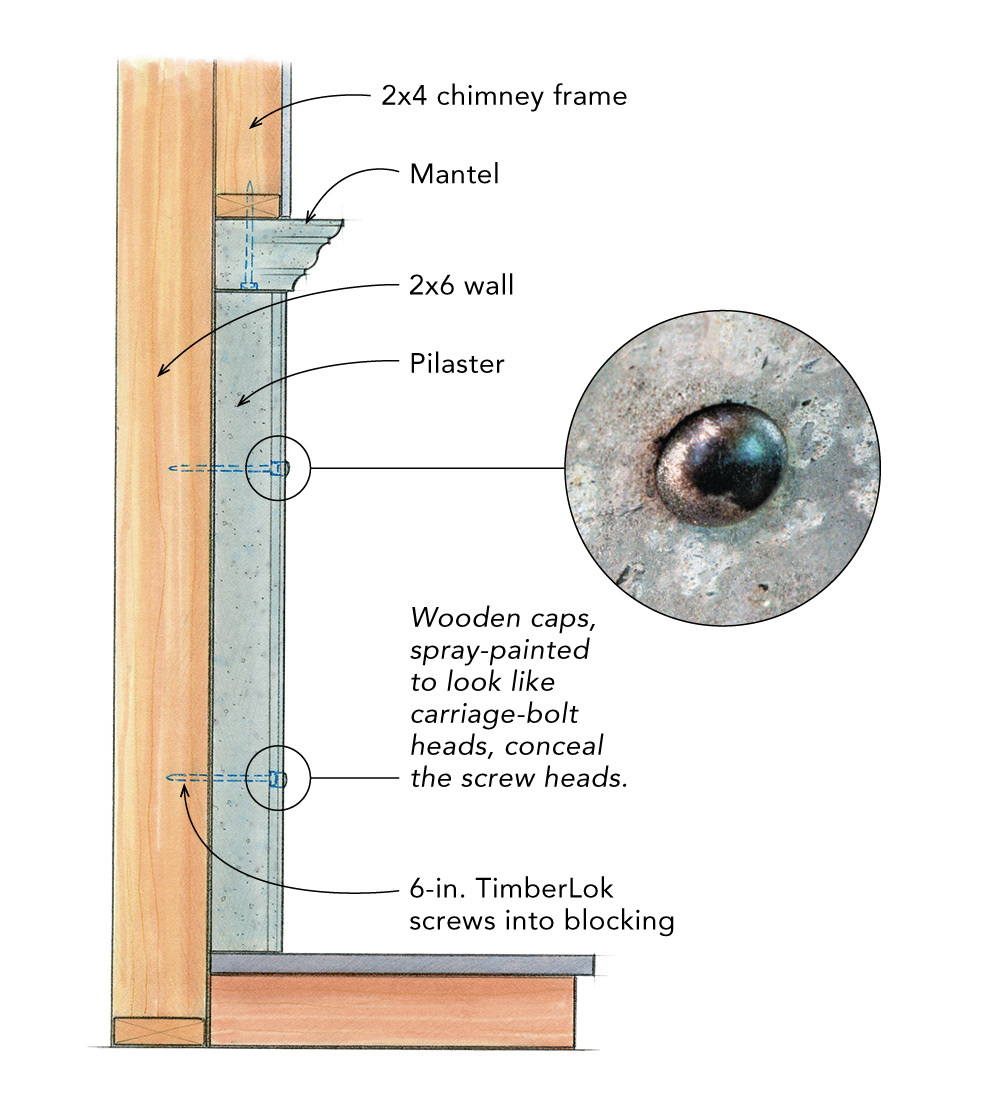
I used long screws to secure both the mantel and the pilasters to the wall framing. As shown in the section drawing, the mantel hangs from the chimney-shaped framing by way of two 6-in. TimberLok screws. The pilasters are screwed to blocking in the walls. The screw heads are concealed by spray-painted wooden caps that look like carriage-bolt heads. Although the pilasters appear to be supporting the mantel, there is actually a 1/16-in. gap between them.

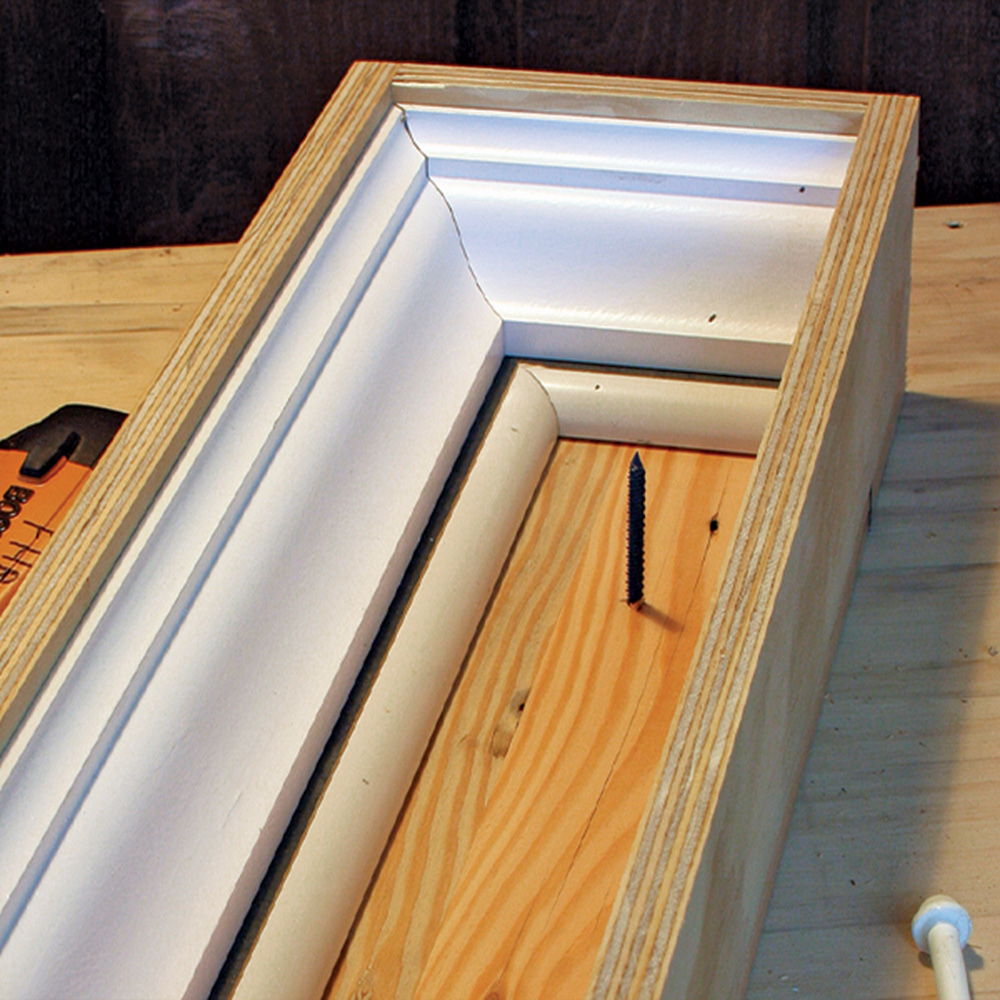
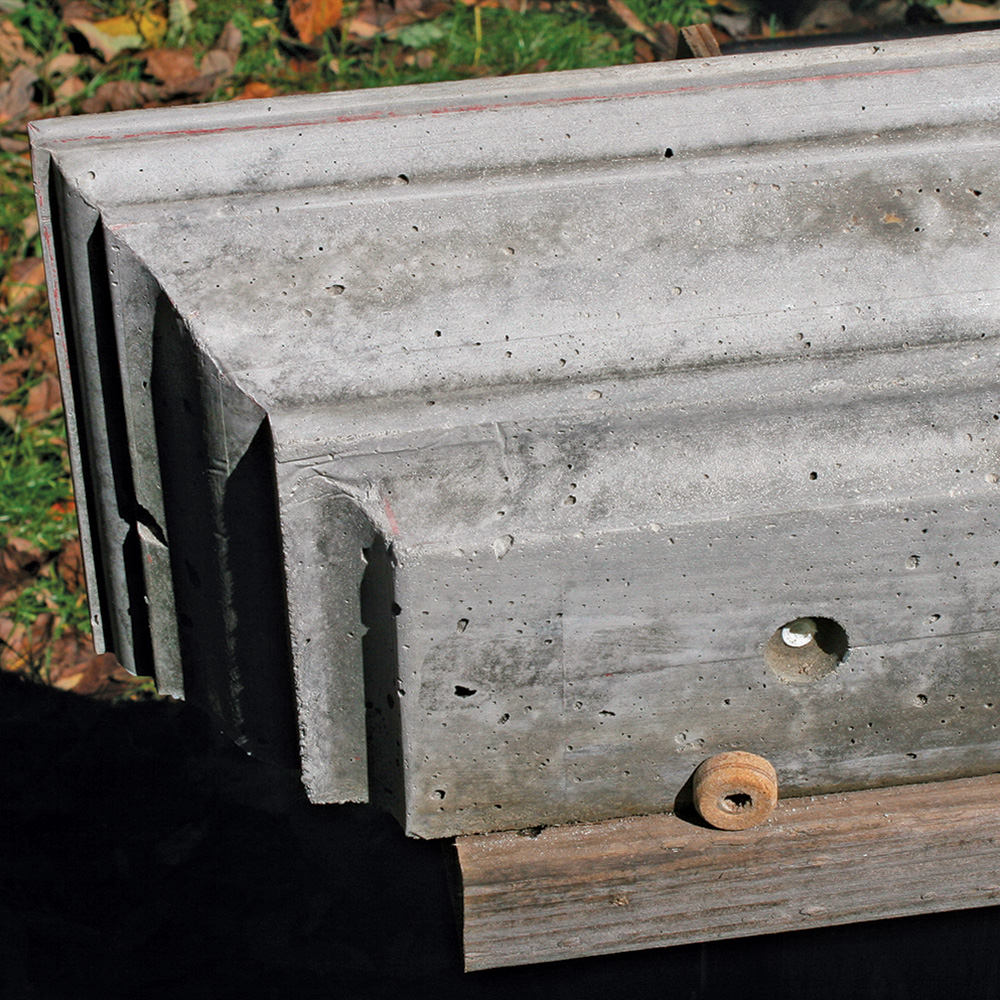
After making the molds for both the mantel and the pilasters out of 3/4-in. plywood, I lined them with moldings that relate to the trim in the rest of the room. For easy disassembly, I applied some slippery polypropylene housewrap tape to all the surfaces that would come in contact with the wet concrete. When I unscrewed the form, the pieces just fell away from the mantel. The resulting surface was a little too shiny for my taste, so I wire-brushed the green concrete to give it a matte finish.


The mantel and both pilasters cost less than $30 in materials

mold for concrete mantel
Inside the mantel form. A 1/4-in.-dia. screw at each end of the form positions sleeves cut from 3/8-in.-O.D. plastic water-supply tubing. Screws that run through these sleeves hang the mantel from the chimney framing. A section cut from a wine cork creates a knockout for the screw head and its washer.

concrete mantel coming out of the mold
Taped for easy release. Lining the mantel form with housewrap tape makes dismantling the form easy. Blue masking tape works equally well.

concrete mantel with holes for screws
Recessed for screw head. Prying out the cork makes room for the heads of the screws. The pilasters conceal these connections.

holes for pilaster screw caps
Holes for pilaster screw caps. A short knockout of 1/2-in.-O.D. plastic tubing pressed onto the 3/8-in.-O.D. sleeves creates a cavity for the screw heads. Running a 7/16-in. spade bit into both the knockout and the sleeve hollows out the recess.
concrete mantel through wall
Section through wall
pieces of mantel mold
Section through mantel form

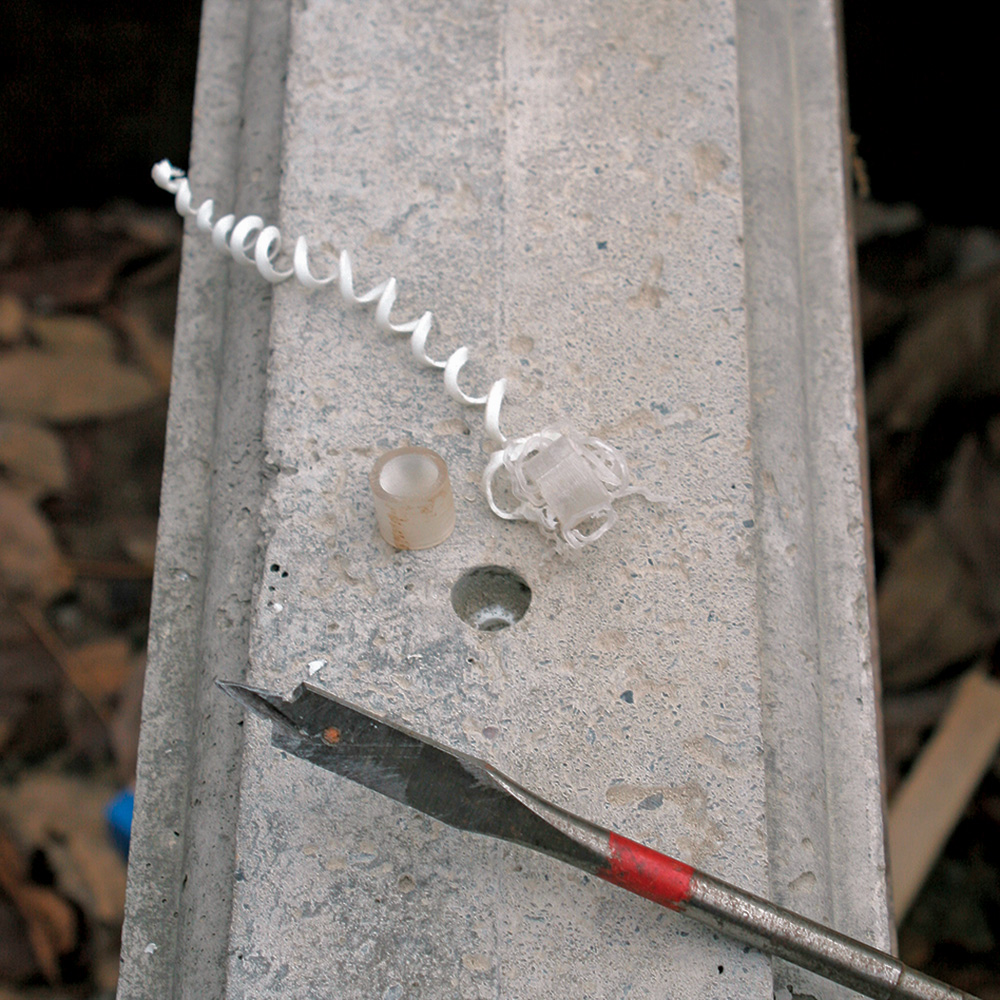
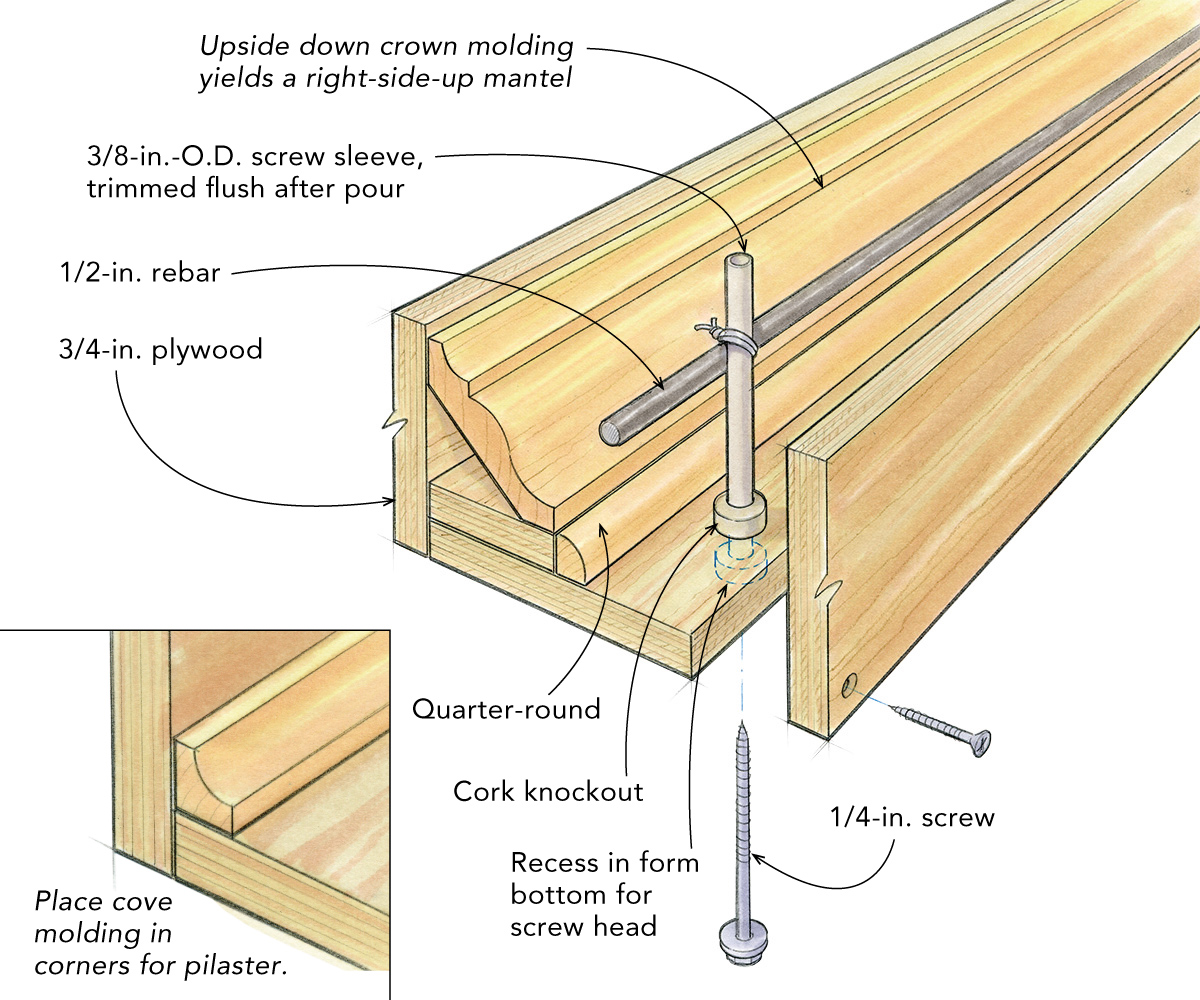
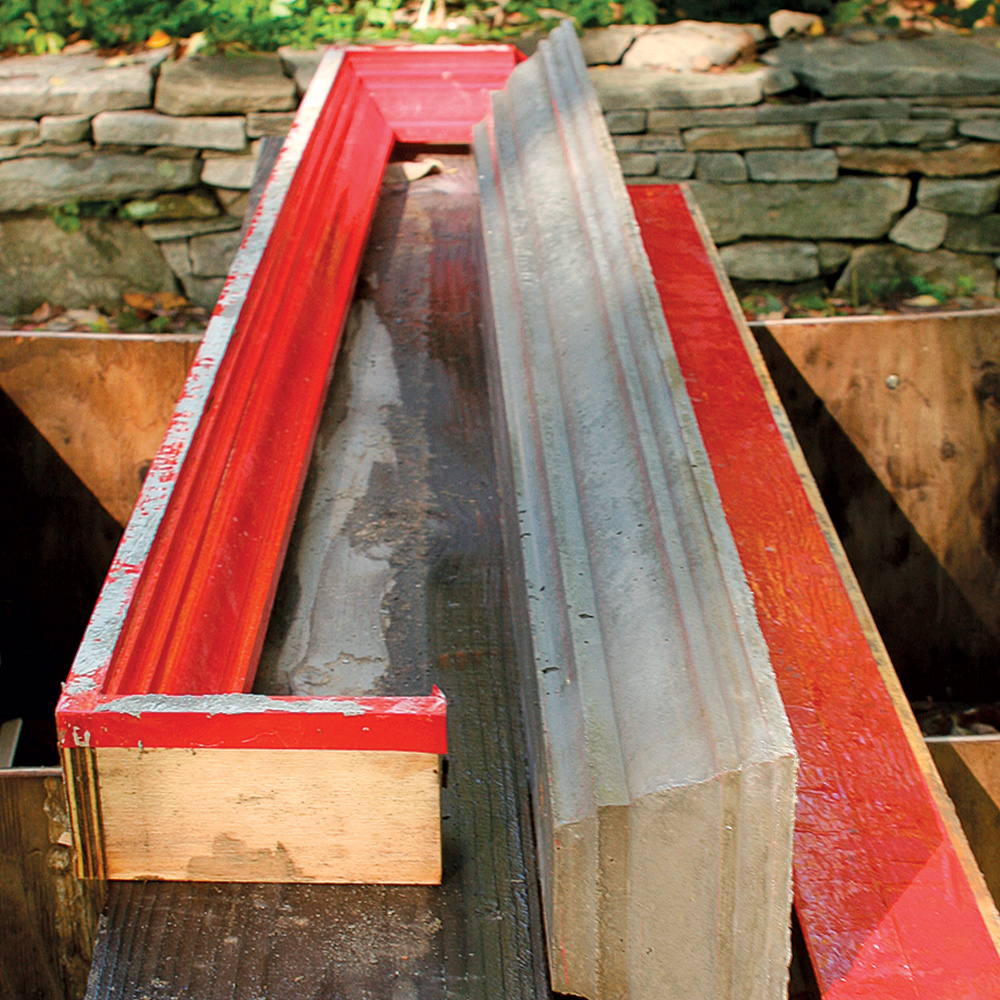
I lined the pilaster form with good ol’ blue masking tape, and it worked just as well as the slippery red stuff. To vibrate the wet concrete into the nooks and crannies of the form, I held the foot of a bladeless reciprocating saw to the sides of the form. (A video in the Fine Homebuilding There’s a Better Way series shows how to do this step.) The concrete is garden-variety ready mix, with no additives.

I covered the filled forms with plastic sheeting, and then kept them covered for five days before unscrewing them. I made sure they were nice and wet by spraying them with water every day. This helped the concrete to cure properly so that it would achieve full strength and minimize cracks.

finished concrete fireplace mantel

Photos by the author

From FineHomebuilding #221

To view the entire article, please click the View PDF button below.

View PDF
Previous: Building a Modern Mantel: Installation

Guide

Finish & Trim Carpentry

Chapter

Mantels and Fireplace Surrounds

Sign up for eletters today and get the latest how-to from Fine Homebuilding, plus special offers.

Signing you up...

This site is protected by reCAPTCHA and the Google Privacy Policy and Terms of Service apply.
See all newsletters
See all newsletters

Log in or create an account to post a comment.

Sign up Log in

Become a member and get full access to FineHomebuilding.com

Finish & Trim Carpentry

Finish & Trim Carpentry

Trusted, comprehensive guidance from the pros for creating perfect trim details in any room of the house

View Project Guide

View All Project Guides »

Become a member and get unlimited site access, including the Finish & Trim Carpentry Project Guide.

Start Free Trial

Trim Design
  • Trim Style and Design
Tools and Materials
  • Tools
  • Materials
Interior Trim Basics
  • Tips and Tricks
  • Techniques
  • Using Jigs
Window and Door Casings
  • Windows
  • Doors
Baseboard and Crown Molding
  • Baseboard
  • Crown Molding
  • Specialty Crown Situations
Wainscot and Paneling
  • Beadboard Wainscot
  • Paneled Wainscot
  • Chair Rails
  • Wall Treatments
Mantels and Fireplace Surrounds
  • Design
  • Installing Mantels and Surrounds
Coffered Ceilings

Fine Home Building

Newsletter Sign-up

  • Fine Homebuilding

    Home building tips, offers, and expert advice in your inbox.

  • Green Building Advisor

    Building science and energy efficiency advice, plus special offers, in your inbox.

  • Old House Journal

    Repair, renovation, and restoration tips, plus special offers, in your inbox.

Signing you up...

This site is protected by reCAPTCHA and the Google Privacy Policy and Terms of Service apply.
See all newsletters

Follow

  • Fine Homebuilding

    Dig into cutting-edge approaches and decades of proven solutions with total access to our experts and tradespeople.

    Start Free Trial Now
    • Facebook
    • Instagram
    • X
    • LinkedIn
  • GBA Prime

    Get instant access to the latest developments in green building, research, and reports from the field.

    Start Free Trial Now
    • Facebook
    • YouTube
  • Old House Journal

    Learn how to restore, repair, update, and decorate your home.

    Subscribe Now
    • Facebook
    • Instagram
    • X

Membership & Magazine

  • Online Archive
  • Start Free Trial
  • Magazine Subscription
  • Magazine Renewal
  • Gift a Subscription
  • Customer Support
  • Privacy Preferences
  • About
  • Contact
  • Advertise
  • Careers
  • Terms of Use
  • Site Map
  • Do not sell or share my information
  • Privacy Policy
  • Accessibility
  • California Privacy Rights

© 2025 Active Interest Media. All rights reserved.

Fine Homebuilding receives a commission for items purchased through links on this site, including Amazon Associates and other affiliate advertising programs.

  • Home Group
  • Antique Trader
  • Arts & Crafts Homes
  • Bank Note Reporter
  • Cabin Life
  • Cuisine at Home
  • Fine Gardening
  • Fine Woodworking
  • Green Building Advisor
  • Garden Gate
  • Horticulture
  • Keep Craft Alive
  • Log Home Living
  • Military Trader/Vehicles
  • Numismatic News
  • Numismaster
  • Old Cars Weekly
  • Old House Journal
  • Period Homes
  • Popular Woodworking
  • Script
  • ShopNotes
  • Sports Collectors Digest
  • Threads
  • Timber Home Living
  • Traditional Building
  • Woodsmith
  • World Coin News
  • Writer's Digest
Active Interest Media logo
X
X
This is a dialog window which overlays the main content of the page. The modal window is a 'site map' of the most critical areas of the site. Pressing the Escape (ESC) button will close the modal and bring you back to where you were on the page.

Main Menu

  • How-To
  • Design
  • Tools & Materials
  • Video
  • Blogs
  • Forum
  • Project Guides
  • Reader Projects
  • Magazine
  • Members
  • FHB House

Podcasts

  • FHB Podcast
  • ProTalk

Webinars

  • Upcoming and On-Demand

Podcasts

  • FHB Podcast
  • ProTalk

Webinars

  • Upcoming and On-Demand

Popular Topics

  • Kitchens
  • Business
  • Bedrooms
  • Roofs
  • Architecture and Design
  • Green Building
  • Decks
  • Framing
  • Safety
  • Remodeling
  • Bathrooms
  • Windows
  • Tilework
  • Ceilings
  • HVAC

Magazine

  • Current Issue
  • Past Issues
  • Magazine Index
  • Subscribe
  • Online Archive
  • Author Guidelines

All Access

  • Member Home
  • Start Free Trial
  • Gift Membership

Online Learning

  • Courses
  • Project Guides
  • Reader Projects
  • Podcast

More

  • FHB Ambassadors
  • FHB House
  • Customer Support

Account

  • Log In
  • Join

Newsletter

Get home building tips, offers, and expert advice in your inbox

Signing you up...

This site is protected by reCAPTCHA and the Google Privacy Policy and Terms of Service apply.
See all newsletters
See all newsletters

Follow

  • X
  • YouTube
  • instagram
  • facebook
  • pinterest
  • Tiktok

Join All Access

Become a member and get instant access to thousands of videos, how-tos, tool reviews, and design features.

Start Your Free Trial

Subscribe

FHB Magazine

Start your subscription today and save up to 81%

Subscribe

We hope you’ve enjoyed your free articles. To keep reading, become a member today.

Get complete site access to expert advice, how-to videos, Code Check, and more, plus the print magazine.

Start your FREE trial

Already a member? Log in

Privacy Policy Update

We use cookies, pixels, script and other tracking technologies to analyze and improve our service, to improve and personalize content, and for advertising to you. We also share information about your use of our site with third-party social media, advertising and analytics partners. You can view our Privacy Policy here and our Terms of Use here.

Cookies

Analytics

These cookies help us track site metrics to improve our sites and provide a better user experience.

Advertising/Social Media

These cookies are used to serve advertisements aligned with your interests.

Essential

These cookies are required to provide basic functions like page navigation and access to secure areas of the website.

Delete My Data

Delete all cookies and associated data