FHB Logo Facebook LinkedIn Email Pinterest Twitter X Instagram Tiktok YouTube Plus Icon Close Icon Navigation Search Icon Navigation Search Icon Arrow Down Icon Video Guide Icon Article Guide Icon Modal Close Icon Guide Search Icon Skip to content
Subscribe
Log In
  • How-To
  • Design
  • Tools & Materials
  • Restoration
  • Videos
  • Blogs
  • Forum
  • Magazine
  • Members
  • FHB House
  • Podcast
Log In

Fine Homebuilding Project Guides

Finish & Trim Carpentry

Guide Home
  • Trim Design
  • Tools and Materials
  • Interior Trim Basics
  • Window and Door Casings
  • Baseboard and Crown Molding
  • Wainscot and Paneling
  • Mantels and Fireplace Surrounds
  • Coffered Ceilings
How-To

Baseboard Done Better

A veteran carpenter shows how to achieve first-class results with timesaving techniques running baseboard.

By Gary M. Katz Issue 174
  • X
  • facebook
  • linkedin
  • pinterest
  • email
  • add to favorites Log in or Sign up to save your favorite articles

Synopsis: Think you know everything there is to know about running baseboard? Read Gary Katz’s article on the topic and you’re sure to pick up some great tips, no matter what your skill level. This must-read article shows how to streamline measuring and cutting, and just wait until you see the tip on coping a corner without breaking off that pesky little sliver at the top.


Carpenters new to finish work often cut their teeth on baseboard, and for good reason. Baseboard has many of the basic joints that form the foundation for trim carpentry. Over the years, I’ve shown a lot of carpenters better ways to run baseboard. Whether you’re a veteran or new to the task, I’ll share some tips that will improve both the speed and the quality of your trim work.

Measure once, measure precisely

The first key to installing any trim, especially baseboard, is recording accurate measurements on a cutlist. After years of practice, I’ve learned how to read a measurement when the tape is bent into a corner. But there are several other ways to measure precisely. One method is with a measuring block. For the block, cut a piece of baseboard to an exact length that’s easy to remember and add (4 in. is the length I normally use). Stick the block at one end of a run, measure to it, and add the length of the block.

For measuring to the eased edge of casing, simply lay the block flat and take a precise measurement to the crisp edge of the block. The same strategy works for an outside corner, but make sure to check the angle with a protractor to ensure that the cuts will leave you with a tight joint.

My rules for measuring change slightly depending on the length of the piece. For pieces longer than 6 ft., add about 1/8 in. so that you can spring the piece into place for a tight fit. For pieces shorter than 6 in., subtract a little so that the piece slips in easily between the casing and the corner. For everything else, measure precisely to the nearest 1/32 in.

Measure each length precisely

Accurate measurements translate to tightly fitting trim. If you’re not comfortable reading a tape measure bent into a corner, the techniques shown here yield exact dimensions.

A measuring block makes it easy to get exact inside-corner measurements. Measure to the mark left by the block, then add 4 in.
A block eliminates guesswork. A measuring block makes it easy to get exact inside-corner measurements. Measure to the mark left by the block, then add 4 in.
Eased edges of casing can be tough to measure to, so lay a block flat and measure to the edge.
The rounded edge of drywall corner bead can make measuring an outside corner difficult, so a block works well.
Accurate angles and edges. The rounded edge of drywall corner bead can make measuring an outside corner difficult, so a block works well.
Outside corners aren’t always 90°, so be sure to check the angle of the corner with a protractor.
Whenever I measure long lengths, I grab my laser measuring tool instead of a tape. Despite being bulky and heavy, this highly accurate tool is perfect for measuring into tight corners, and it works great for other trim details as well.
High-tech measuring option. Whenever I measure long lengths, I grab my laser measuring tool instead of a tape. Despite being bulky and heavy, this highly accurate tool is perfect for measuring into tight corners, and it works great for other trim details as well.

Stabila LE 100
Laser distance measuring tool

Stabila LE 100

800-869-7460

www.stabila.com

List price: $439

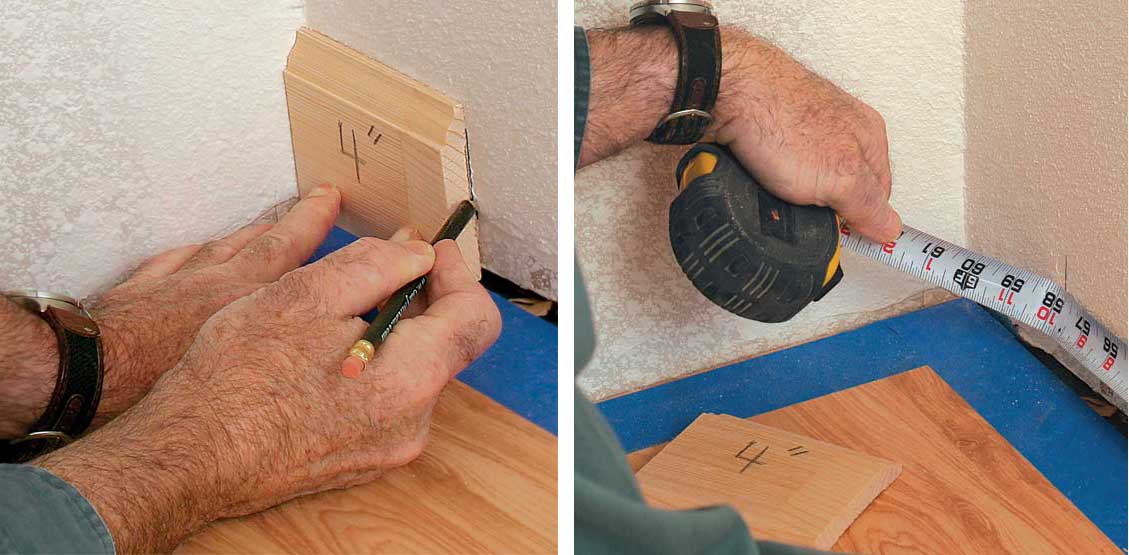
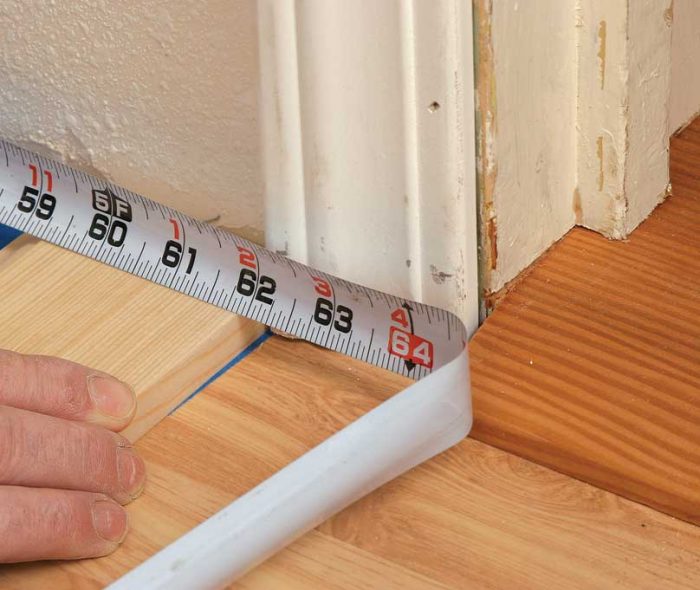
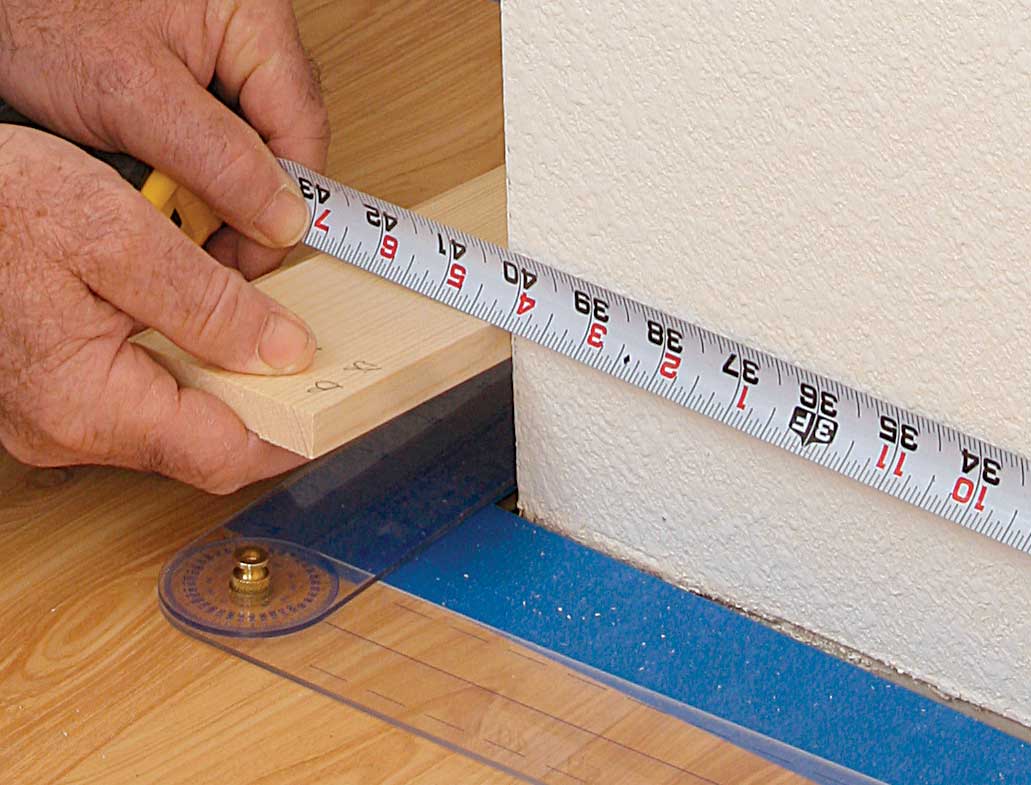
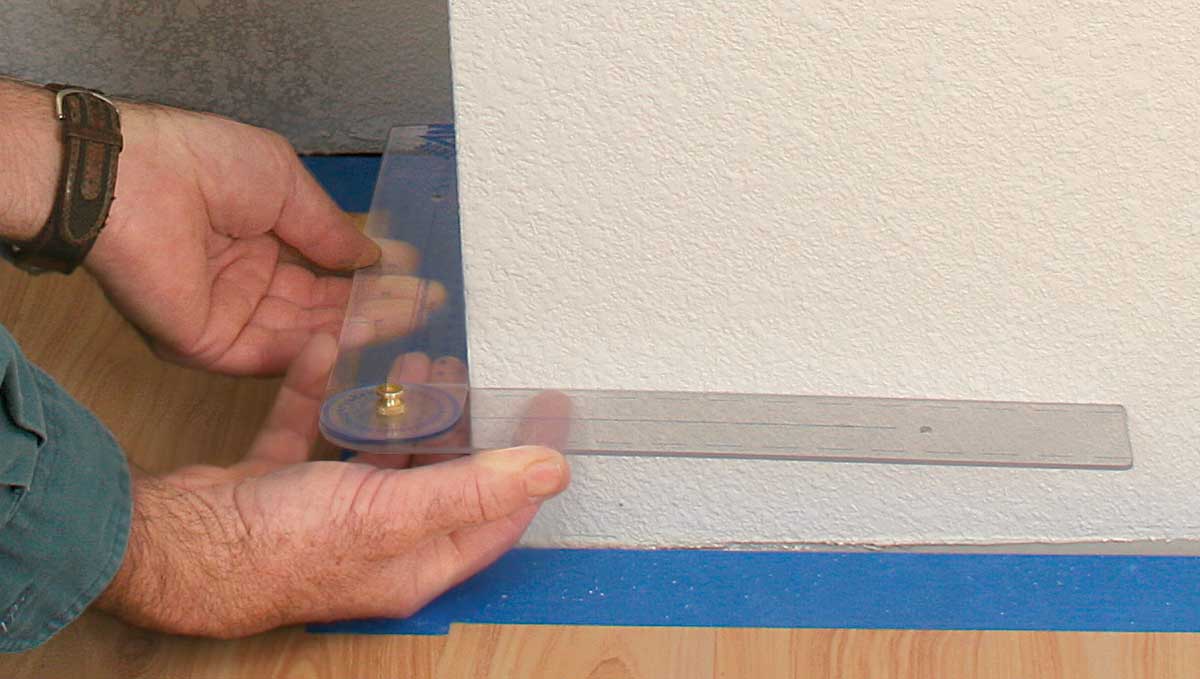
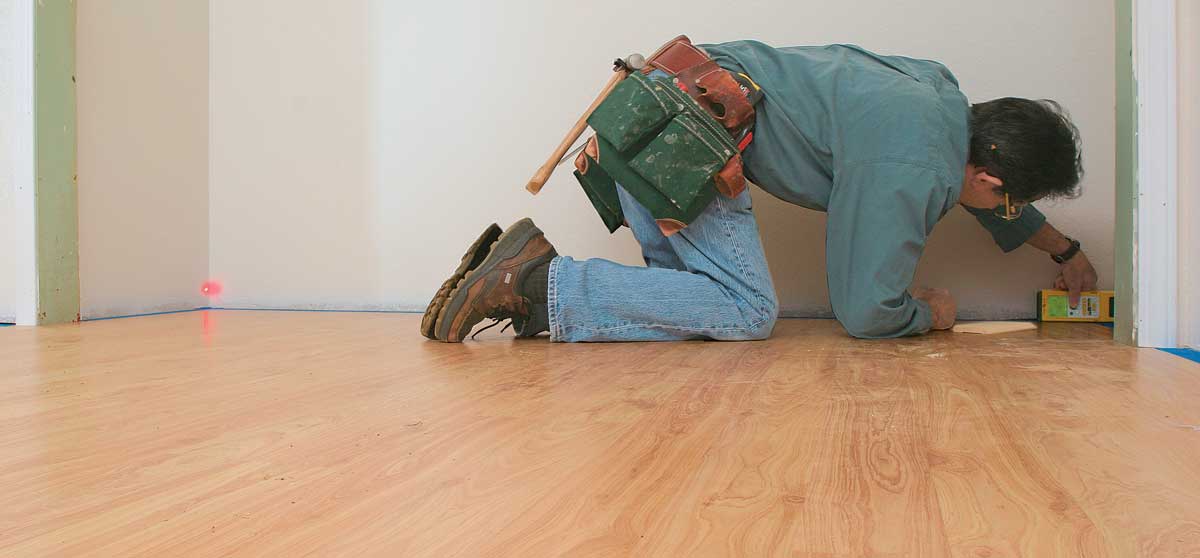
Cutting corners made easy

Once you’ve recorded all your measurements on a cutlist, it’s time to head for the miter saw, which, by the way, should never be on the floor. Working on a stand with support for the work on each side of the saw is more efficient and more accurate. Many commercial stands have built-in wings, or you can go for a homemade version. Whatever the strategy, the wings should support the work so that it stays flat on the saw. I also attach a straight, flat auxiliary fence to the saw. This added fence supports the trim as it’s being cut and serves as a measuring aid, too. Make the auxiliary fence the maximum height your saw will cut, or at least as tall as the trim you’re cutting and slightly longer than the fence on the saw.

You made the cutlist so that you don’t have to visualize the joints as you cut them. Now it’s important to teach yourself which way to swing the head of the saw to make a cut for a corner. Instead of visualizing the joint or the location of the baseboard, you can memorize

two simple rules: For inside corners, the long point is always against the wall and the fence; and for outside corners, the short point is always against the wall and the fence. Armed with these two rules and the cutlist, you’re ready to start cutting.
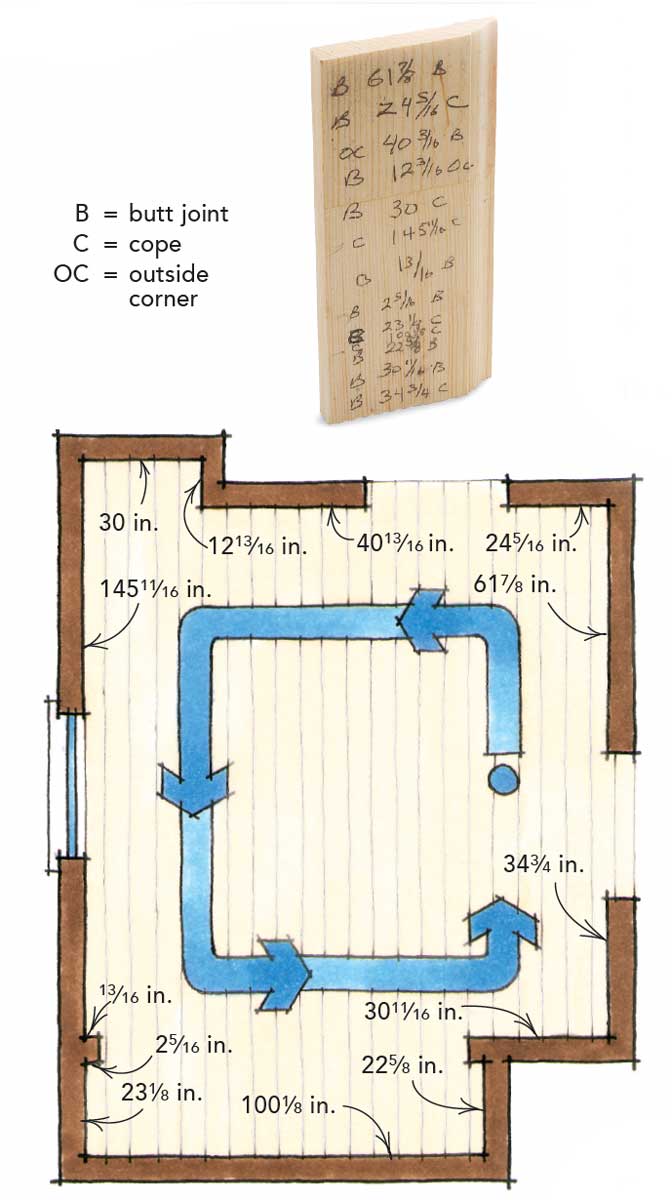
The cutlist shorthand shortcut

Whether it’s printed on paper or on a scrap piece of wood, an accurate cutlist is the work order you take to your chopsaw. Start at a door and work around the room counterclockwise, recording the measurement for each piece and the type of joint for each end. If possible, keep most of the copes on your right side for easier right-handed cutting.

The cutlist shorthand shortcut

The fence helps with measuring 

Measuring from the butt end of a board is easy. After making a square cut, lay the board flat on the saw table, and hook the tape on the end. Laying the board flat minimizes the chance that the end of the tape will slip off. 

Measuring for an inside-corner cut is also simple. Make the 45° mitered cut for the coped end first. Again lay the board flat and face down, and this time, hook your tape measure on the long point of the cut. 

For measuring outside-corner cuts, I put the auxiliary fence to use. Instead of “burning an inch” (measuring from the 1-in. mark), align the short point of the cut with the end of the saw fence, and pull the measurement from the edge of the fence. I spring-clamp longer pieces to the fence before measuring, or I flush the short point with the end of the extension wing, then hook my tape on the extension wing to pull the measurement.

I always use a sharp 25⁄10 pencil to mark measurements. The harder lead keeps the pencil sharper longer, and crisp, clean lines are essential for accurate cutting.  

Measure and cut the stock

The next step in precise trim installation is transferring the numbers from the cutlist to the stock. An auxiliary fence on the chopsaw comes in handy at this stage.
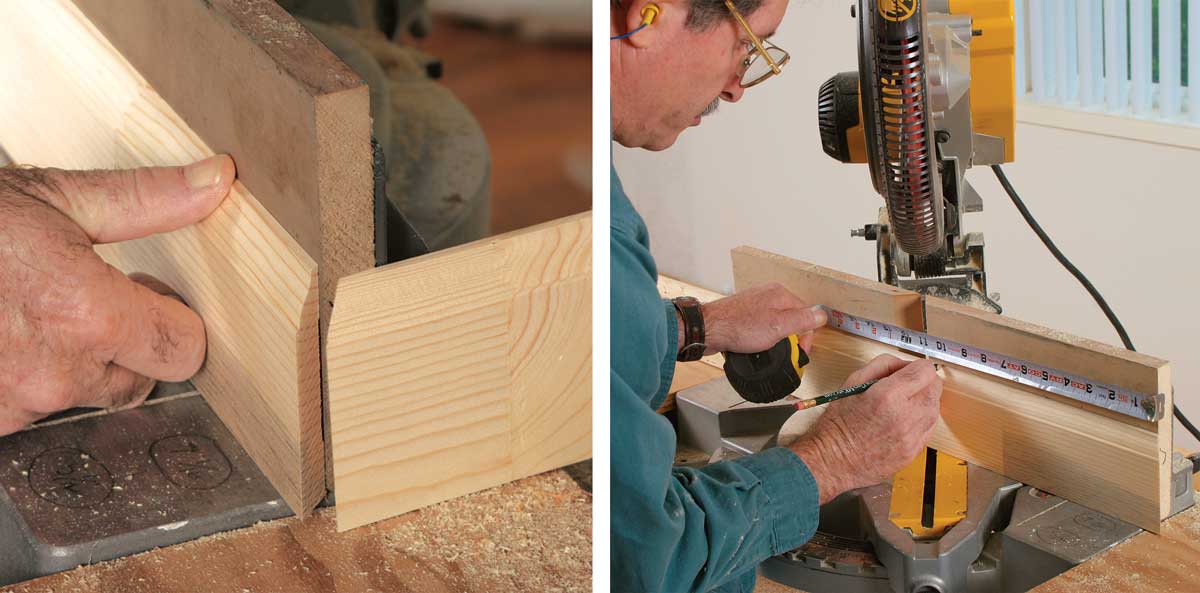
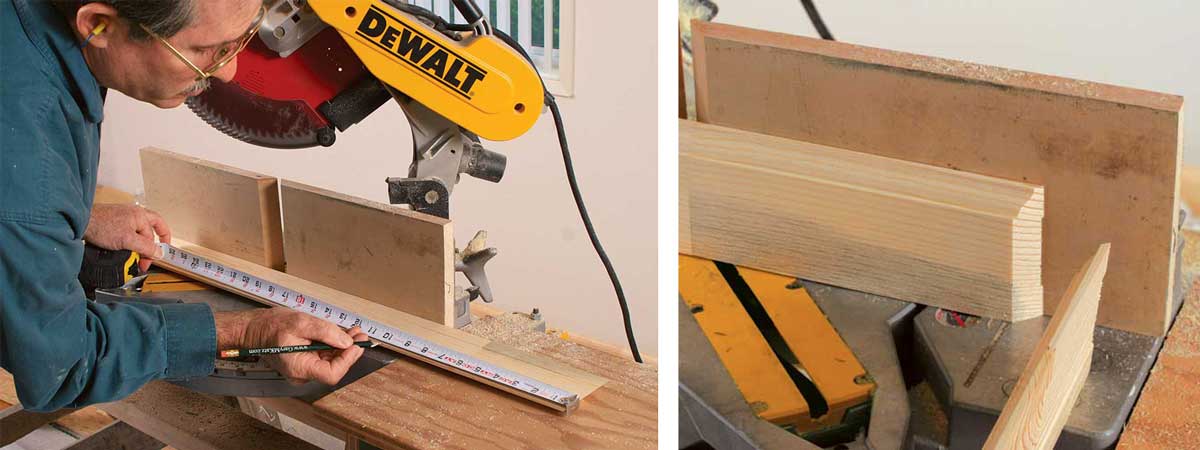
For outside corners, the short point of the miter is always against the fence (photo near right). After making the miter cut, align the short point with the end of the saw fence, then hook your tape on the fence to take the measurement (photo far right). Spring-clamp longer boards to the saw fence before measuring.
Measure for outside corners. For outside corners, the short point of the miter is always against the fence (photo left). After making the miter cut, align the short point with the end of the saw fence, then hook your tape on the fence to take the measurement (photo right). Spring-clamp longer boards to the saw fence before measuring.
For inside corners, the long point is always against the fence (photo above). When pulling a measurement from a square cut or an inside corner, lay the piece flat to keep the tape from slipping off the end (photo left).
Measure for inside corners. For inside corners, the long point is always against the fence (photo right). When pulling a measurement from a square cut or an inside corner, lay the piece flat to keep the tape from slipping off the end (photo left).

Guide the cuts accurately by placing your fingers against the fence and your thumb on the face of the board
Microadjust your cut. Guide the cuts accurately by placing your fingers against the fence and your thumb on the face of the board.

Creep up on the exact cut by making incremental adjustments with your thumb
Creep up on the exact cut by making incremental adjustments with your thumb.

Controlled cuts

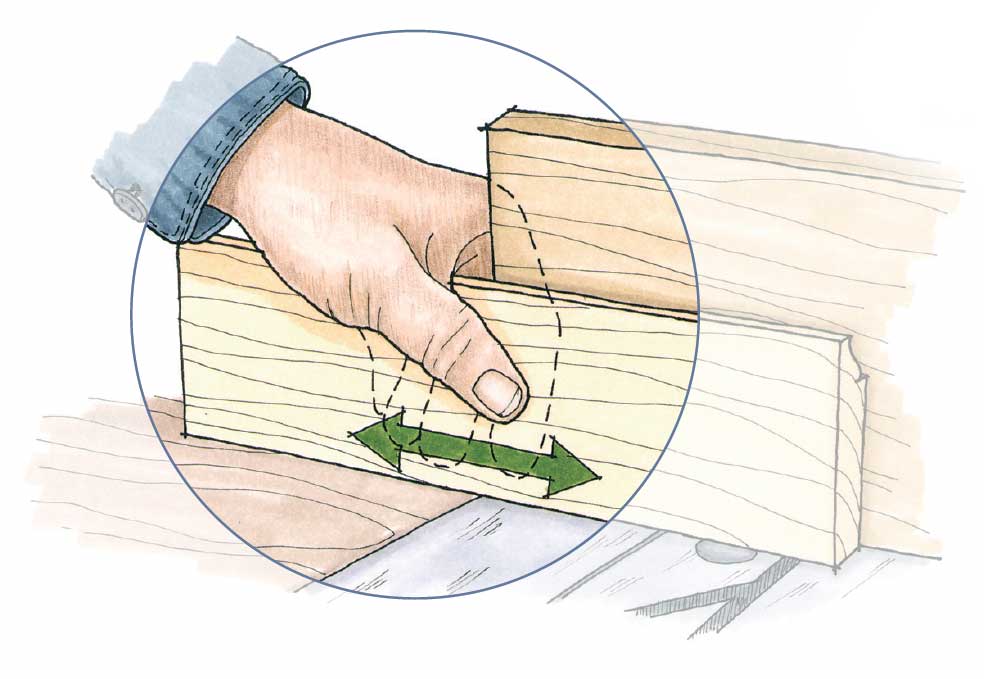
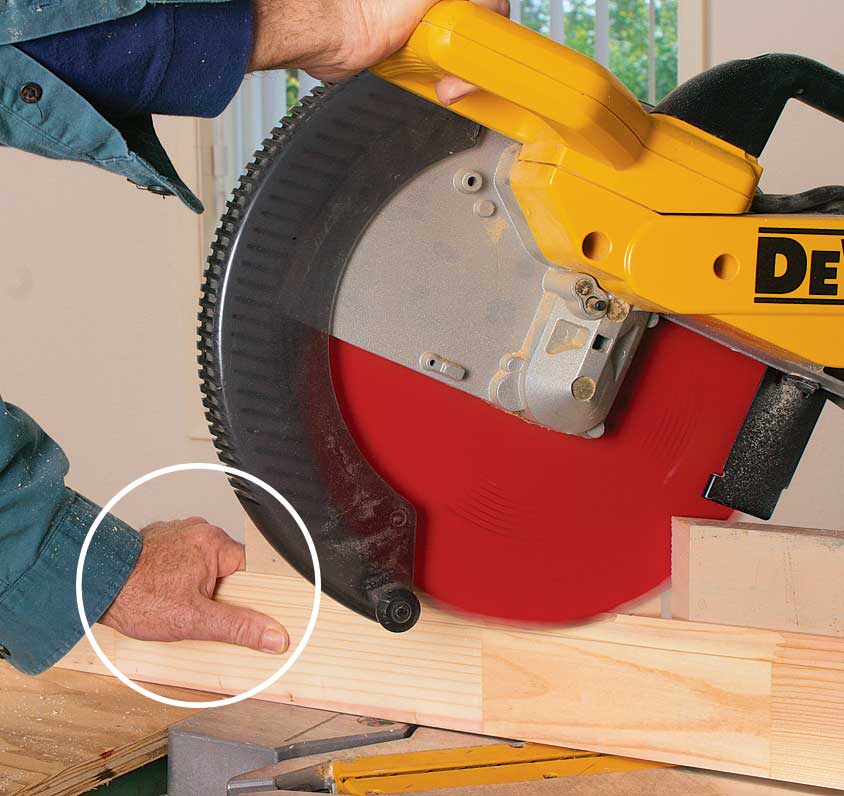
You’re finally ready to cut. Just align the blade on the line and cut away, right? Wrong! It’s imperative that the blade cut exactly at the line, and absolute control of the material and saw is the only way to ensure an accurate cut.

To control the material, keep your free hand locked behind the auxiliary saw fence, with your thumb over the material. Begin the cut with the measurement mark 1⁄8 in. or so away from the blade. Now raise the blade, and using your thumb as a micro-adjuster, slide the material over slightly and let the blade enter the material again. Repeat the process until the blade is exactly at the line, and only then cut through the piece.

A jigsaw makes the best copes 

Here’s where I generate all those nasty letters to the editor: Coped corners are faster and more accurate than miters (45° angle cuts on both pieces). For a crisp joint line, miters have to line up exactly in a corner. If the coped piece is off plumb slightly or not quite square to its neighbor, it’s harder to detect. The extra couple of minutes needed to cope more than makes up for the fussing that most miters require for a good-looking fit.

I still use a coping saw if I’m installing only a piece or two. The key thing you have to remember when using a coping saw is to keep the sawblade moving. Don’t try to cut quickly, and don’t push too hard on the blade. Instead, move the saw at a comfortable machinelike rate that you can maintain throughout the entire cut. 

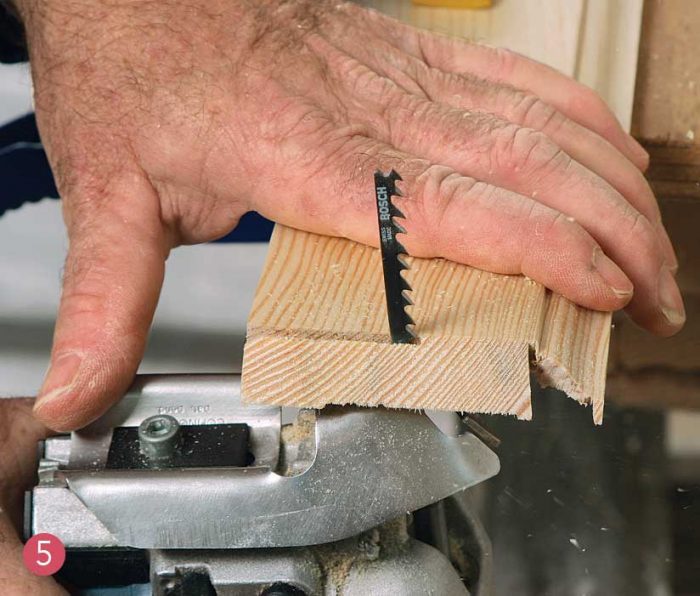
I’ve recently switched to using a jigsaw for copes, but it’s equipped with a Collins Coping Foot (888-838-8988; www.collinstool.com). The coping foot replaces the base, or table, of a jigsaw, and its shape allows you to follow the profile of a molding from the back side of the material while keeping the saw base in contact with the material.

Be sure to use the right blade with the jigsaw. Collins recommends a Bosch 244D blade (877-267-2499; www.boschtools.com). With only 6 teeth per inch and deep gullets, the blade cuts aggressively and clears the kerf of waste quickly. The teeth also have a wide set, so the blade cuts a wide kerf, which allows you to scroll-cut almost any profile. The wide set of the teeth means you also can remove material with the side of the blade to tune the cope.

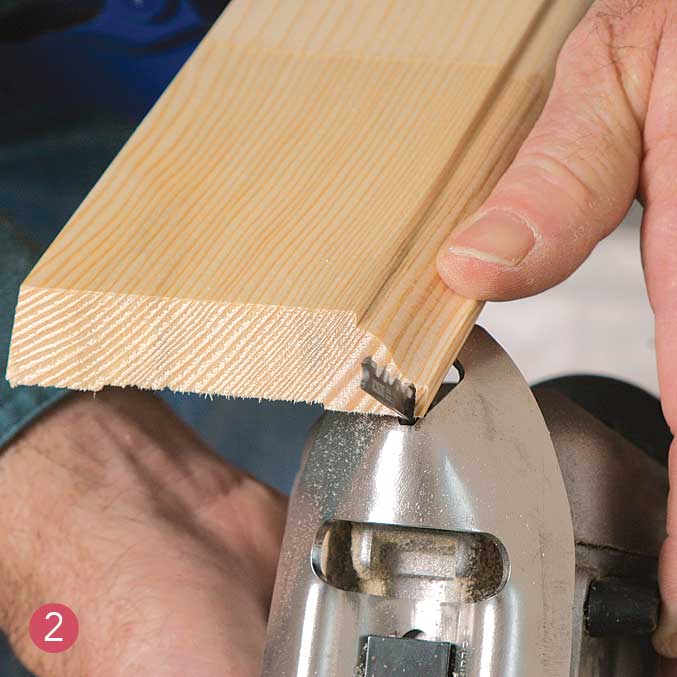
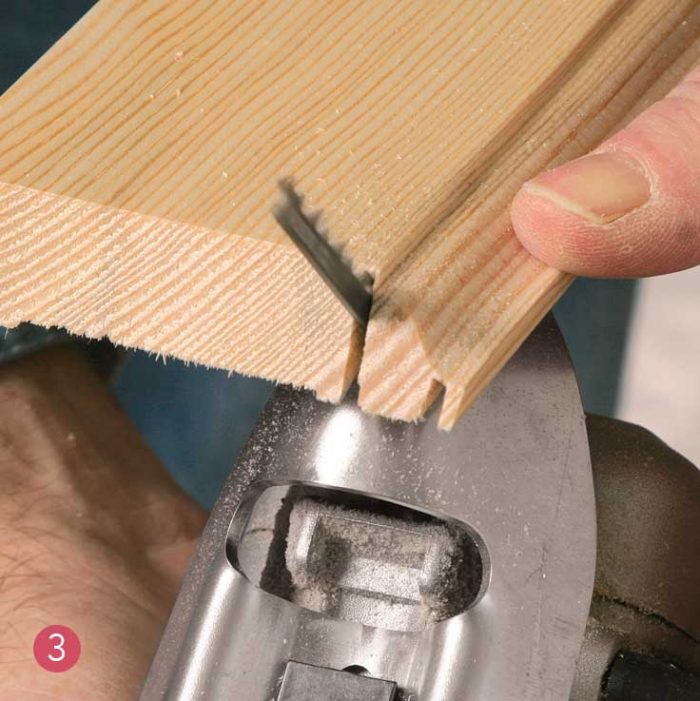
The step-by-step process of coping with a jigsaw is much better illustrated visually. In simplest terms, secure the board, and begin the cope with a series of relief cuts at critical points on the profile. For the colonial baseboard pictured here, I made two cuts. I first cut the sliver that forms the miter at the top of the intersecting pieces—the one that always breaks off before you can get the board nailed in. (I don’t make those little slivers wafer thin anymore. Instead, I leave them at least 1⁄8 in. thick, and then I mortise the intersecting piece of baseboard to accept the overlapping sliver, as you’ll see in the next section). 

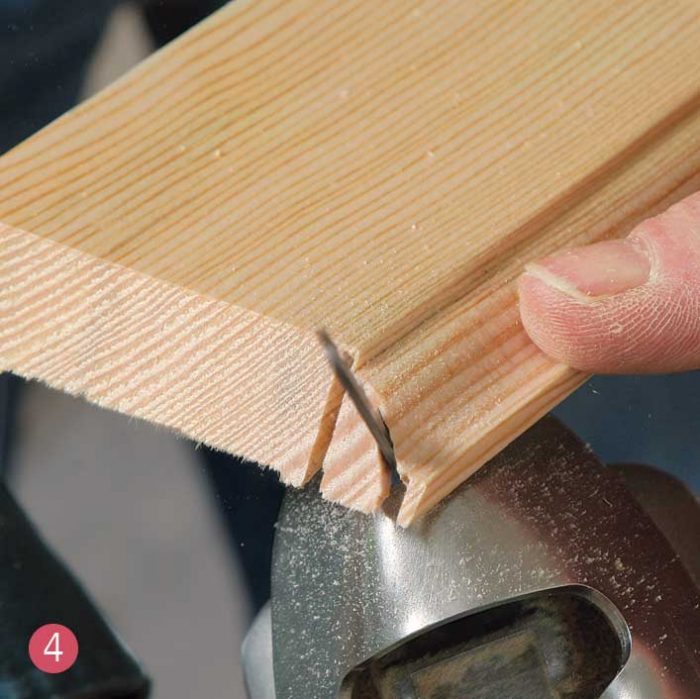
The second cut is to the point where the plinth, or the flat section of the baseboard, meets the curved profile. After making the relief cuts, it’s just a matter of following the profile with the saw held at a slight angle to create a back bevel.

Coping with a jigsaw

the Collins Coping Foot
An odd-looking jigsaw base called the Collins Coping Foot allows you to cope quickly and accurately. Be sure to use an aggressive blade (6 tpi) with a wide set.

Pull the saw toward you to make a relief cut at the top of the miter, leaving the sliver big enough so that it doesn’t break off easily.

The next relief cut is where the profile begins.

Keeping the saw at an angle, follow the top profile.

Switching to a push stroke, cut the flat part of the profile, or the plinth.

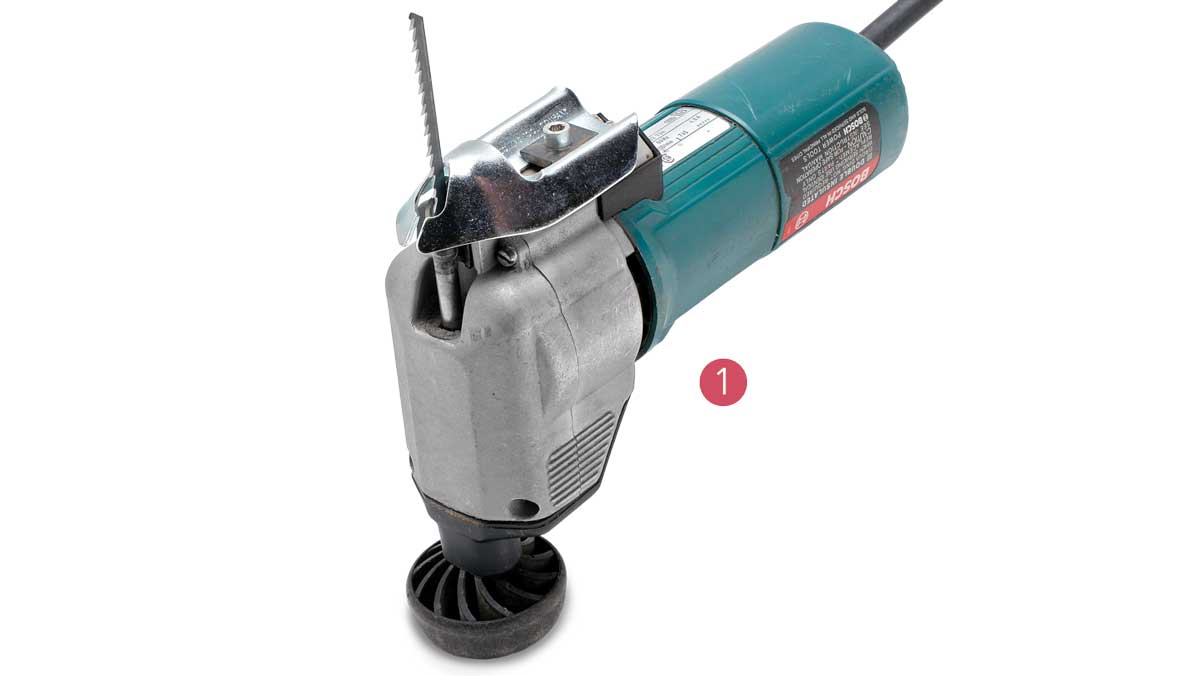
Installation is the easy part

After you’ve run through your list, and cut and coped every piece, spread the pieces around the room close to where they’re going. I generally install baseboard in the same order that I measured and cut it, except that I insert any small pieces (up to about 2 in. wide) first, such as between casing and a corner. Don’t try to nail these small pieces, or they’ll split. Instead, let the intersecting board hold them in place. 

For this type of baseboard, which is only 31⁄2 in. tall, don’t bother trying to locate the studs. The wall plate is usually high enough for me to hit with 21⁄2-in. finish nails. For those areas where I need to nail higher, I simply find a stud with a magnet.

In a coped corner, always install the butt end piece first. Then slip in the coped piece. Pressing the coped piece tightly to the wall, plunge the blade of a utility knife into the top of the butt end using the edge of the miter cut as a guide. Remove the coped piece, and cut a notch deep enough to accept the overlapping sliver on the coped end. 

Now the coped piece can go in permanently. If your copes are accurate, the fit will be tight. Tap the butt end of the coped piece with a block and hammer until the two pieces marry tightly in the corner and the butt end of the coped piece slips into position. 

For outside corners, always test-fit the pieces before nailing them in. When you’re satisfied with the joint, apply glue to the mating surfaces of both pieces. Wipe off the excess glue, taking care not to get glue on the baseboard’s finished face. The glue joins the two pieces and also seals the ends of the boards. For stain-grade installations, sealing keeps the ends from absorbing more stain and

becoming darker than the rest of the board. I preassemble outside-corner joints using a 23-ga. pin nailer that leaves almost invisible nail holes. Then I nail the whole assembly into place.

Install the pieces in order

Spread the cut pieces around the room close to where they will be going. Then work around the room in roughly the same order that you took the measurements. For inside corners, always install the square-cut or butt-end corner pieces first.

Distribute the cut pieces. Place the lengths of baseboard around the room near where they are going to be installed.

Glue up an outside corner. Fitting an inside corner. Fitting small corner pieces.

Glue up an outside corner.
Glue up an outside corner. For outside corners, spread glue evenly along both mating faces. Assemble the joint with 23-ga. pin nails.
Fitting an inside corner
Fitting an inside corner. To fit a coped corner, line up a utility knife along the edge of the miter cut (photo left), and notch the butt end slightly for the top of the miter (photo right). For tight-fitting pieces, tap the coped piece with a hammer and a block until it slips into place.

Fitting small corner pieces. Small pieces go in first and are held in place by adjacent pieces.

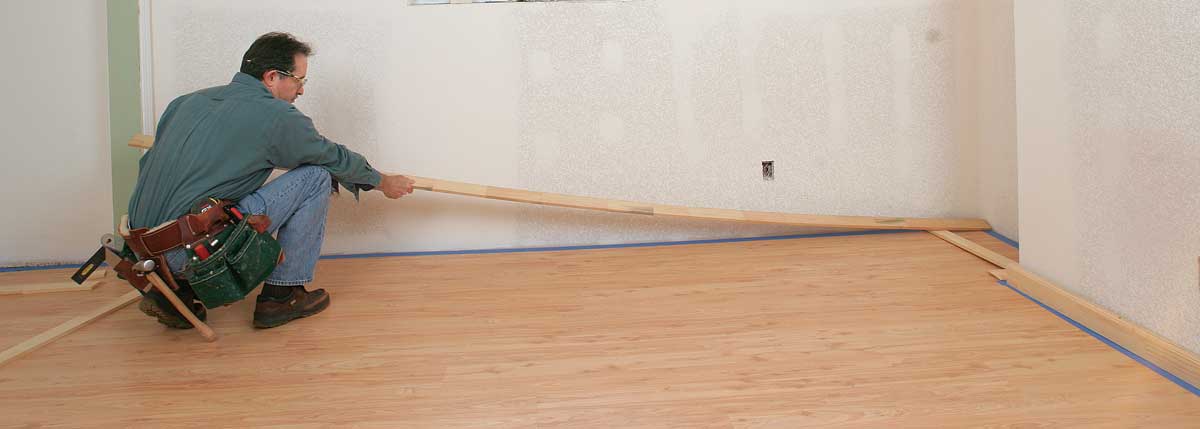
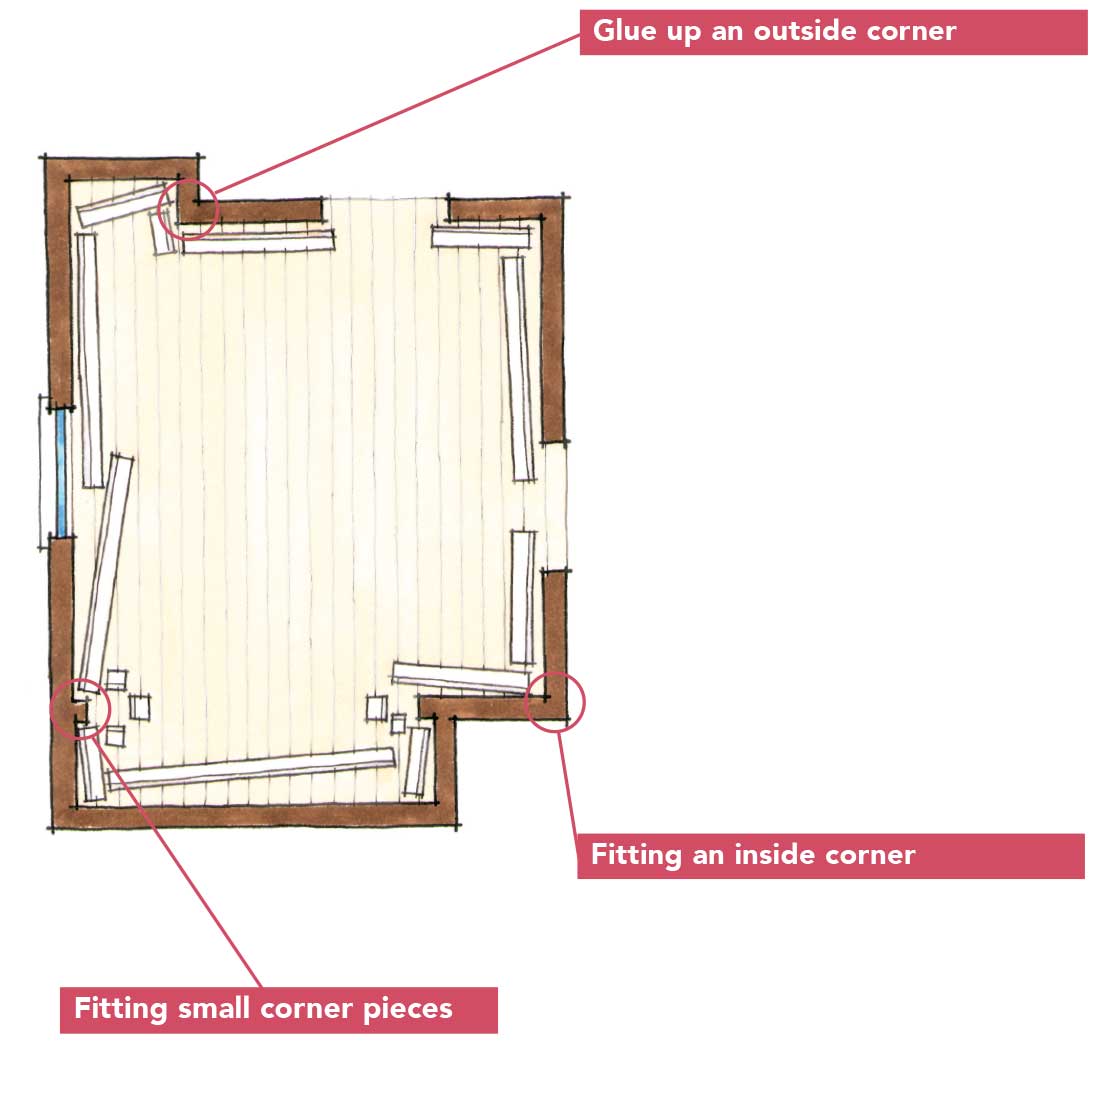
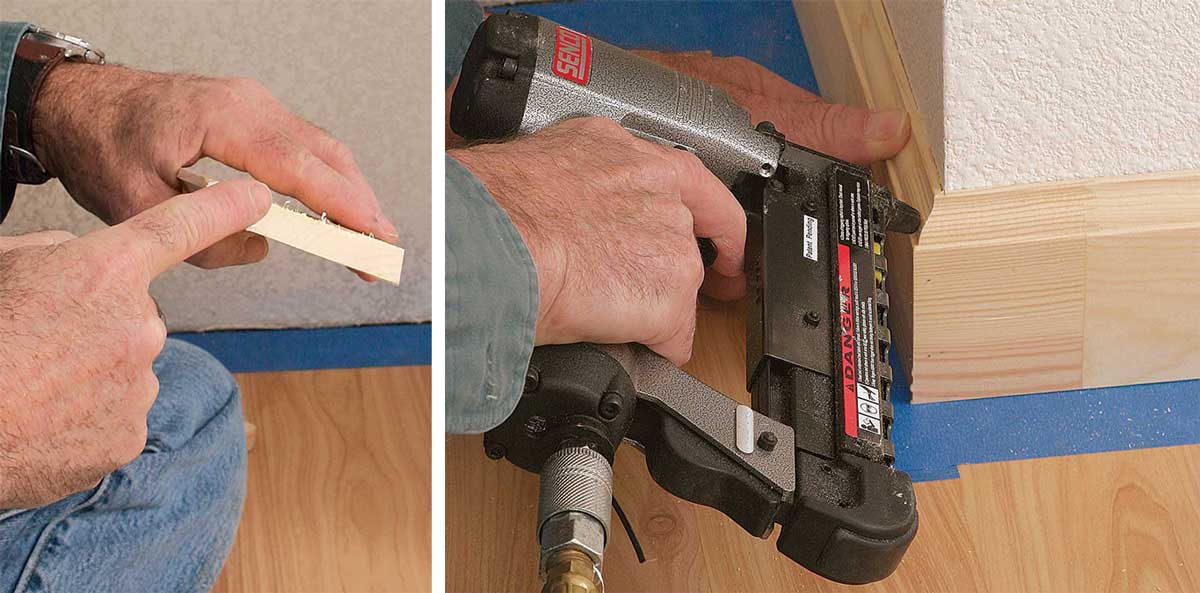
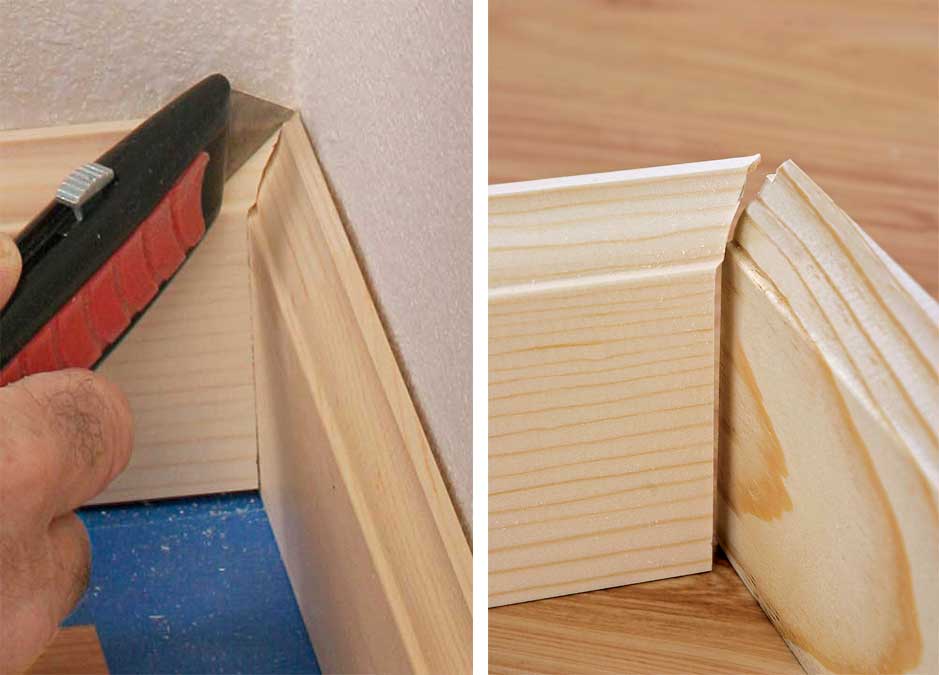
Keep baseboard straight when the walls aren’t

As you can see from my cutlist, I sometimes like to cope both ends of longer pieces. With the little bit of extra length I give them, they spring into place with tight pressure-fit joints at both ends. 

Most carpenters I know just nail the board tight to the wall. If there are any bows or bellies in the wall, though, making a piece of trim conform to them only accents the flaws. It’s a good idea to check long pieces with a string before nailing them in. Shim the baseboard so that it looks straight to the eye, then caulk any gaps between the top and the wall. The straight baseboard will make a crooked wall look straighter. 

Preassemble all short sections, such as around a column, around an end wall, or for a drywall return at a door opening. Again, if the two sides aren’t square to each other, installing an out-of-square joint just makes the return look worse. Instead, make the joint square, shim the short piece, and caulk the top edge.

Finally, in areas where drywall is broken or missing, insert a drywall screw to keep the baseboard straight and plumb. Simply adjust the screw until the head is flush with the surrounding drywall. The screw head backs up the base to keep the joint looking good while the baseboard hides the drywall defect.

Tips for problem spots

Keeping baseboard straight will improve the look of a crooked wall or an out-of-square corner. When drywall is damaged or missing, keeping the board plumb can be tough.

Shim long boards. Longer boards spring into place for tight joints (photo left). Check them with a string, and shim them straight, if necessary (photo right).
Shim corner returns. Shim corner returns square (photo left), and caulk the gap along the top (photo right).
Shim corner returns square (photo left), and caulk the gap along the top (photo right).

Missing drywall in corners.
Missing drywall in corners. Where the drywall is missing, insert a drywall screw to keep the base plumb in the corner (photo left). Adjust the screw until it’s even with the wall (photo right).

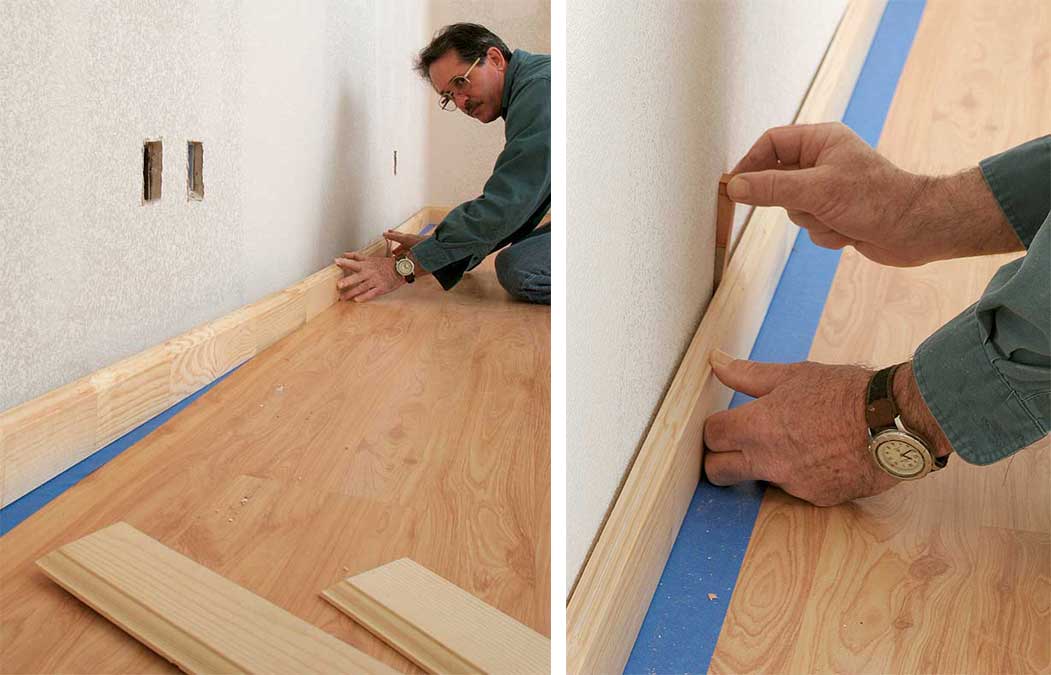
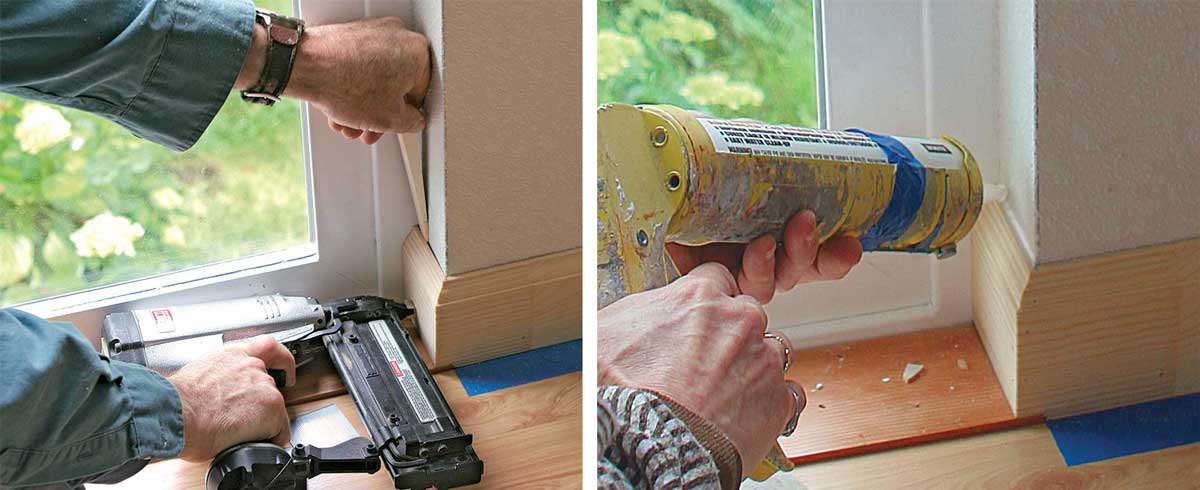
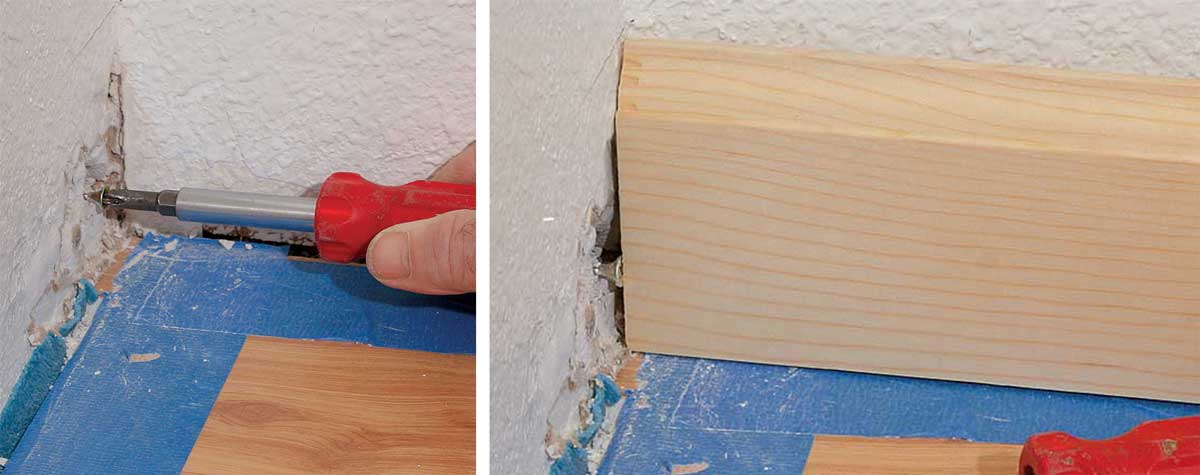
Fine Homebuilding contributing editor Gary M. Katz lives in Reseda, Calif. His Web site is www.garymkatz.com. Photos by Roe A. Osborn.

From Fine Homebuilding #174

View PDF
Previous: Flawless Two-Piece Baseboard Next: Installing Baseboard

Guide

Finish & Trim Carpentry

Chapter

Baseboard and Crown Molding

Sign up for eletters today and get the latest how-to from Fine Homebuilding, plus special offers.

Signing you up...

This site is protected by reCAPTCHA and the Google Privacy Policy and Terms of Service apply.
See all newsletters
See all newsletters

Log in or create an account to post a comment.

Sign up Log in

Become a member and get full access to FineHomebuilding.com

Finish & Trim Carpentry

Finish & Trim Carpentry

Trusted, comprehensive guidance from the pros for creating perfect trim details in any room of the house

View Project Guide

View All Project Guides »

Become a member and get unlimited site access, including the Finish & Trim Carpentry Project Guide.

Start Free Trial

Trim Design
  • Trim Style and Design
Tools and Materials
  • Tools
  • Materials
Interior Trim Basics
  • Tips and Tricks
  • Techniques
  • Using Jigs
Window and Door Casings
  • Windows
  • Doors
Baseboard and Crown Molding
  • Baseboard
  • Crown Molding
  • Specialty Crown Situations
Wainscot and Paneling
  • Beadboard Wainscot
  • Paneled Wainscot
  • Chair Rails
  • Wall Treatments
Mantels and Fireplace Surrounds
  • Design
  • Installing Mantels and Surrounds
Coffered Ceilings

Fine Home Building

Newsletter Sign-up

  • Fine Homebuilding

    Home building tips, offers, and expert advice in your inbox.

  • Green Building Advisor

    Building science and energy efficiency advice, plus special offers, in your inbox.

  • Old House Journal

    Repair, renovation, and restoration tips, plus special offers, in your inbox.

Signing you up...

This site is protected by reCAPTCHA and the Google Privacy Policy and Terms of Service apply.
See all newsletters

Follow

  • Fine Homebuilding

    Dig into cutting-edge approaches and decades of proven solutions with total access to our experts and tradespeople.

    Start Free Trial Now
    • Facebook
    • Instagram
    • X
    • LinkedIn
  • GBA Prime

    Get instant access to the latest developments in green building, research, and reports from the field.

    Start Free Trial Now
    • Facebook
    • YouTube
  • Old House Journal

    Learn how to restore, repair, update, and decorate your home.

    Subscribe Now
    • Facebook
    • Instagram
    • X

Membership & Magazine

  • Online Archive
  • Start Free Trial
  • Magazine Subscription
  • Magazine Renewal
  • Gift a Subscription
  • Customer Support
  • Privacy Preferences
  • About
  • Contact
  • Advertise
  • Careers
  • Terms of Use
  • Site Map
  • Do not sell or share my information
  • Privacy Policy
  • Accessibility
  • California Privacy Rights

© 2025 Active Interest Media. All rights reserved.

Fine Homebuilding receives a commission for items purchased through links on this site, including Amazon Associates and other affiliate advertising programs.

  • Home Group
  • Antique Trader
  • Arts & Crafts Homes
  • Bank Note Reporter
  • Cabin Life
  • Cuisine at Home
  • Fine Gardening
  • Fine Woodworking
  • Green Building Advisor
  • Garden Gate
  • Horticulture
  • Keep Craft Alive
  • Log Home Living
  • Military Trader/Vehicles
  • Numismatic News
  • Numismaster
  • Old Cars Weekly
  • Old House Journal
  • Period Homes
  • Popular Woodworking
  • Script
  • ShopNotes
  • Sports Collectors Digest
  • Threads
  • Timber Home Living
  • Traditional Building
  • Woodsmith
  • World Coin News
  • Writer's Digest
Active Interest Media logo
X
X
This is a dialog window which overlays the main content of the page. The modal window is a 'site map' of the most critical areas of the site. Pressing the Escape (ESC) button will close the modal and bring you back to where you were on the page.

Main Menu

  • How-To
  • Design
  • Tools & Materials
  • Video
  • Blogs
  • Forum
  • Project Guides
  • Reader Projects
  • Magazine
  • Members
  • FHB House

Podcasts

  • FHB Podcast
  • ProTalk

Webinars

  • Upcoming and On-Demand

Podcasts

  • FHB Podcast
  • ProTalk

Webinars

  • Upcoming and On-Demand

Popular Topics

  • Kitchens
  • Business
  • Bedrooms
  • Roofs
  • Architecture and Design
  • Green Building
  • Decks
  • Framing
  • Safety
  • Remodeling
  • Bathrooms
  • Windows
  • Tilework
  • Ceilings
  • HVAC

Magazine

  • Current Issue
  • Past Issues
  • Magazine Index
  • Subscribe
  • Online Archive
  • Author Guidelines

All Access

  • Member Home
  • Start Free Trial
  • Gift Membership

Online Learning

  • Courses
  • Project Guides
  • Reader Projects
  • Podcast

More

  • FHB Ambassadors
  • FHB House
  • Customer Support

Account

  • Log In
  • Join

Newsletter

Get home building tips, offers, and expert advice in your inbox

Signing you up...

This site is protected by reCAPTCHA and the Google Privacy Policy and Terms of Service apply.
See all newsletters
See all newsletters

Follow

  • X
  • YouTube
  • instagram
  • facebook
  • pinterest
  • Tiktok

Join All Access

Become a member and get instant access to thousands of videos, how-tos, tool reviews, and design features.

Start Your Free Trial

Subscribe

FHB Magazine

Start your subscription today and save up to 81%

Subscribe

We hope you’ve enjoyed your free articles. To keep reading, become a member today.

Get complete site access to expert advice, how-to videos, Code Check, and more, plus the print magazine.

Start your FREE trial

Already a member? Log in

Privacy Policy Update

We use cookies, pixels, script and other tracking technologies to analyze and improve our service, to improve and personalize content, and for advertising to you. We also share information about your use of our site with third-party social media, advertising and analytics partners. You can view our Privacy Policy here and our Terms of Use here.

Cookies

Analytics

These cookies help us track site metrics to improve our sites and provide a better user experience.

Advertising/Social Media

These cookies are used to serve advertisements aligned with your interests.

Essential

These cookies are required to provide basic functions like page navigation and access to secure areas of the website.

Delete My Data

Delete all cookies and associated data