Building a Concrete-Free “Slab”-on-Grade Foundation
Omitting the slab in a new house requires rethinking of subfloor details, but it replaces costly concrete with energy-saving insulation.

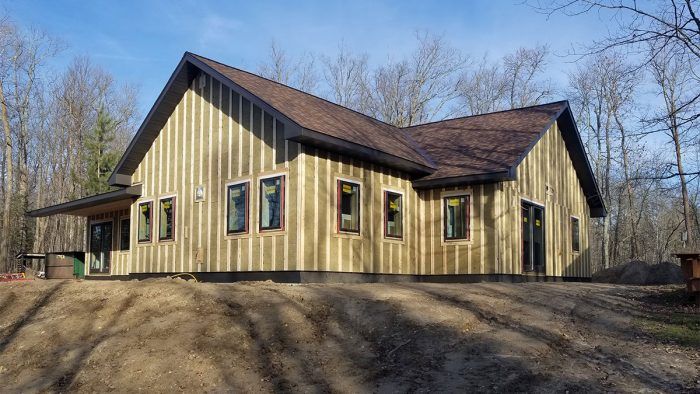
Randy Williams of Willcon Inc. recently contacted me regarding a project he is wrapping up in northern Minnesota. I was intrigued because he has eliminated the concrete slab altogether in his on-grade foundation, which, given the material’s carbon load, is a design decision I fully support. There were additional aspects of his approach that were equally interesting, including his use of cutting-edge products in a residential building market generally unfamiliar with them; his success building directly off insulated concrete forms (ICFs); and his choice of a plenum truss for running ductwork. To inform his decisions, Williams had several conversations with Steve Baczek and Jake Bruton, both of whom are experienced in the science of the “slabless slab.” Ultimately, in lieu of a slab-on-grade foundation, Williams used two layers of 2-in. Type IX EPS, a 6-mil reinforced poly vapor barrier, and two layers of 3/4-in. AdvanTech subfloor.
In large part, Williams’s approach was a response to the clients’ desire for a heated floor. “I wanted a system that didn’t need heat in the floor,” he explains. “In our climate, the heat moves downward and warms the ground, not just the upper living spaces. The system I used creates a warm floor without having to incorporate a heat source.”

Though similar to Michael Maines’s frost-protected shallow foundation, Williams’s approach starts with excavating down 5 ft. Additionally, Maines puts sleepers on top of the EPS foam, and his flooring extends to the exterior walls. Here the floor system butts up to the double bottom plate of the wall framing. “My concern with Maines’s method was moisture,” says Williams. “We couldn’t build it fast enough to get it shelled in before the floor assembly would get wet. With two layers of AdvanTech, two layers of foam, and poly, we would have trapped in all of that moisture. So we built up the stem wall and had everything dried in by the time we set the floor.”
Foundation and floor system
After excavating, Williams compacted the soil using both water and mechanical forces over a three-day period. The site sat for a month before construction got underway, during which time several rainfalls aided compaction. Sand was the substrate of choice. Why not gravel? “We could have used all crushed rock, but the sand compacts more tightly,” Williams notes, adding that it was unwashed and locally sourced. Footings for ICFs were poured and cured, and drainage was handled with corrugated pipe covered with gravel and a filter membrane.
 |
 |
On the interior, a layer of gravel was put down for radon removal, followed by sand topped with rock fines, one layer of 2-in. EPS foam, a layer of 6-mil poly, the second layer of EPS, and two layers of AdvanTech glued and screwed with 2-in. decking screws. A small gap was left around the perimeter to allow for expansion, and the vapor barrier is sealed to the bottom plate.
To achieve an 8-ft. finished ceiling, Williams combined a double bottom plate with insulation over the ICF foundation. He explains that he went over the top plate with tape to connect to the ceiling air barrier. “In this climate, we need something a little more closed than OSB for a vapor barrier, so I chose Intello—its variable-perm rating means it will open, if needed, and still get a decent airtightness value.”
To protect against the possibility of a burst pipe, Williams added floor drains in the wet areas, which included the mechanical room with washer/dryer and water heater. There he laid a porcelain-tile floor over Schluter-DITRA to waterproof the assembly; the edges of the Schluter membrane go up the wall. The same treatment was give to the master bathroom with one difference—he used a curbless shower so water will find its way to the shower drain. And in the kitchen, he added a floor drain beneath the refrigerator.
Wall assembly and insulation details
The basic framing was conventional 2×6 walls on 16-in. centers—where the assembly differed was in building directly off the ICFs. As Williams points out, it’s more common to start framing off a slab or a floor system. Interestingly, the interior walls are not bearing on anything other than the AdvanTech. Asked if there is any concern around that, Williams answers: “There would be if the ground wasn’t compacted enough, then the whole floating slab inside the ICF would drop. That’s why we spent three days compacting.”
 |
 |
Given the climate zone (7a), Williams prioritized vapor and thermal movement. “I knew I wanted to have a vapor-open assembly on the exterior, which is why I chose Rockwool,” he says. “And I wanted to have insulation at the thermal boundary. We don’t do that very often up here, which is unfortunate. Builders aren’t willing to take the chance of putting insulation on the exterior because of the labor and costs.” (Pro Clima’s Intello was used for the interior air/vapor control layer.) Additionally, though aitightness is typically achieved with poly in his region, Williams wanted to move the air-sealing to the interior, so he used ZIP System sheathing. He also went the route of a rainscreen with Cor-A-Vent.
Williams points out another atypical detail: “We strapped the ceiling with 2x4s—which is unheard of in this area of Minnesota—so the electrical wiring in the ceiling didn’t penetrate the air barrier.”
In addition to the continuous exterior insulation of R-8 ComfortBoard, the walls were insulated with R-21 fiberglass batts, and ThermalBuck was installed at the openings to allow windows to be in the same plane with the siding after 2 in. of ComfortBoard 80 was installed.
 |
 |
Air-sealing electrical openings
“I knew we wouldn’t be able to strip the exterior walls to keep any of the electrical inside the building envelope,” Williams notes. “During blower-door tests, I could still feel air moving through those outlets. So I did some research and found AirFoil boxes. They have a slot above and below the box where the electrical wire penetration into the box can be sealed with expanding spray foam. The limitation is that they come only in single two-gang and round models, so if we needed a three- or four-gang amp, we needed a bigger outlet box, so we had to use traditional foam gasket boxes in two places.”
HVAC and mechanicals

Mechanicals included a ducted Mitsubishi air-source heat pump with PVA multiposition air handler, which has a rated capacity of 24,000 Btu, and features an integrated electric strip heater for when the heat pump can’t keep up with heating needs. Williams placed the water heater on an off-peak heating program that the local electricity provider offers; water is heated only in the middle of the night when the electricity rate is less than half the standard rate, and it is controlled by a radio receiver.

To the Leviton load center Williams anticipates installing WiFi-enabled smart breakers to monitor the electrical consumption of the air-source heat pump and plenum heater.
Lessons learned
As with many first-time projects, Williams came away with ideas of how he might do things differently in the future. After applying Prosoco FastFlash for air-sealing between the ZIP sheathing and ICF foundation, for example, he remembered something Mike Guertin had done. “I saw a great detail from Mike that I wish I had done on this assembly,” Williams says. “He added a 3-in. metal plate over the exterior EPS foam on the ICF foundation. “Normally it’s lumpy where the ICFs lock together, and trying to air-seal is tricky. Putting that metal plate there before we poured would have provided a smooth surface to seal to.”
He might also opt to use rigid ComfortBoard under the floor assembly. It is a non–petroleum based and therefore greener product than the Type IX EPS he used—though he notes he would consult an engineer to ensure it would be comparable.
Additionally, upon reflection, he might have gone with a different vapor retarder for the ceiling. “In our climate most builders use poly on both walls and ceilings, but I worry about the walls being able to dry in both directions—that’s why I chose Intello,” he remarks. “This project had a vented attic. In the future, I might use a poly on the ceiling to save on cost. I’m not worried about it being wet up there. If it is, it’s because the roof is leaking. There shouldn’t be a vapor issue up there as long as it is airtight.” He also learned a lesson about the Intello itself: “You can’t use tape on the backside of it; it doesn’t stick. I had to add a second layer of tape. If I had used poly, it wouldn’t have been an issue.”
Of course, the ductwork mishap was lesson-rich. Williams says, “Next time, I will have a hard work plan in place to ensure no ducts need to be run outside the plenum—even if I have to make a box and run them between two trusses.”
Of course, the ductwork mishap was lesson-rich. Williams says, “Next time, I will have a hard work plan in place to ensure no ducts need to be run outside the plenum—even if I have to make a box and run them between two trusses.”
Finally, he adds: “I might choose to do a pressure-treated foundation system—it gets rid of the concrete altogether and it’s carpenter-friendly, meaning you don’t need another crew.”
Despite potential revisions to improve this assembly, it’s commendable that Williams is adopting building science principles in a region where they are not commonly understood.
Photos courtesy of Randy Williams.
For more on foundations:
Frost-Protected Shallow Foundations
Fine Homebuilding Recommended Products
Fine Homebuilding receives a commission for items purchased through links on this site, including Amazon Associates and other affiliate advertising programs.

Foam Gun

Disposable Suit

Caulking Gun


View Comments
It's very useful! thanks for sharing this information!
“[Deleted]”
What about termite protection?? I find it hard to believe that termites will not find an opening or other pathway to wood or wood fiber.
Termites are not present in my climate. We do have carpenter ants but they mostly cause damage to damp above grade wood.
Sorry - can't really see the advantage of the floor design to that of an insulated crawsplace (with a 3" slab) - cost, moisture, access, etc... The rest of the design is a little too high-tech for me - I've weathered many a NH winter in a rambling ranch, and now in Piedmont VA, with just a couple of well placed wood stoves and a low volume circulating fan here and there. Certainly good with the heat-pump though, as central AC and late fall and early spring heat pump is a blessing - but the dead of winter costs with the auxiliary heat system are substantial. As to the off-peak electric - tried that too - can't recommend it, especially if your wife is at home with the children. I recommend putting money in high efficiency windows and doors, that are adequately draft-proofed - drafts are a killer.
Great article,however I question why he digs a 5 foot deep hole only to fill it back up. Why not just a trench, or like I did when I built my home a ballast trench? I simply dug a two foot deep trench around the perimeter of my foundation,lined it with filter fabric,put perforated drain pipe at bottom and filled with compacted pea gravel. Then a conventional footing was poured on top. You could then proceed as the article suggests. I don't see any articles about this old technique but it was used by Frank Loyd Wright so it was good enough for me. 20 years and never a problem. Faster,cheaper and better, what is not to like?
The building codes for this location require a footing depth of 5 feet. We cannot use a trench footing because the irregular surface of the footing gives frost something to grab on to and possibly lift a foundation wall. One of the challenges of building in a very cold climate.
That's great! thanks for sharing this post!
Hi Kiley, great post thanks for sharing...
Thank you for sharing this beautiful information.
Nice! Thanks for sharing this information!
On plenum truss---is that big shallow area in the ceiling the plenum? if so why didn't you have truss made with this false area at factory?
or is it the soffitt on each side?
I wonder how this may work in a more cooling centered zone 3/4 climate such as Raleigh, NC where insulation may not be desired sub slab. The frost line is 12''. Would it work to have just well packed gravel topped by a vapor barrier and advantech or is the EPS needed for stability?
Is my understanding correct that the only way into the plenum to remodel any electrical, plumbing, or HVAC would be to tear down the ceiling drywall?