FHB Logo Facebook LinkedIn Email Pinterest Twitter X Instagram Tiktok YouTube Plus Icon Close Icon Navigation Search Icon Navigation Search Icon Arrow Down Icon Video Guide Icon Article Guide Icon Modal Close Icon Guide Search Icon Skip to content
Subscribe
Log In
  • How-To
  • Design
  • Tools & Materials
  • Restoration
  • Videos
  • Blogs
  • Forum
  • Magazine
  • Members
  • FHB House
  • Podcast
Log In

Fine Homebuilding Project Guides

Foundations and Masonry Work

Guide Home
  • Concrete & Masonry Basics
  • Building Foundations
  • Waterproofing Foundations
  • Retrofits and Add-ons
  • Masonry in the Landscape
  • Brick
How-To

Brick Walkway: Setting the Bricks

Learn how to add a sturdy mortared edge and then fill in the field bricks perfectly flat and flush.

By Cody Macfie
  • X
  • facebook
  • linkedin
  • pinterest
  • email
  • add to favorites Log in or Sign up to save your favorite articles

Adding a Mortared Edge

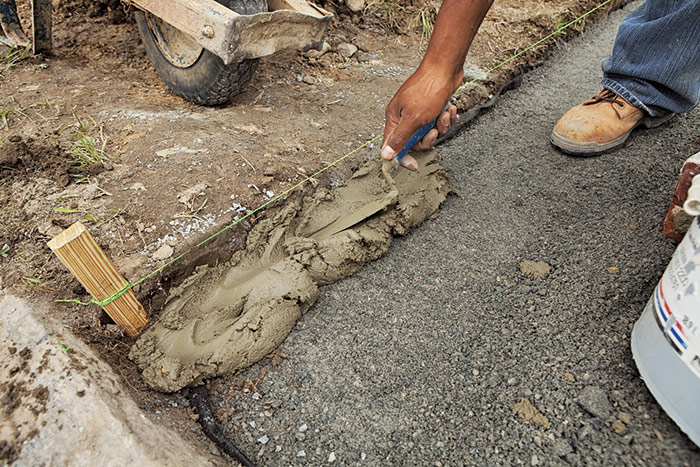
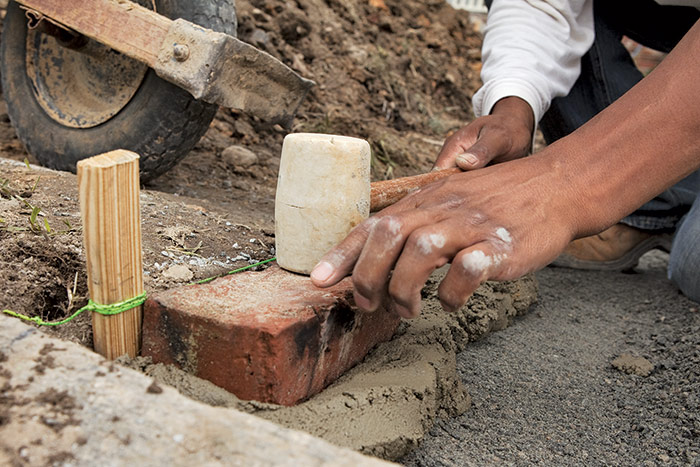
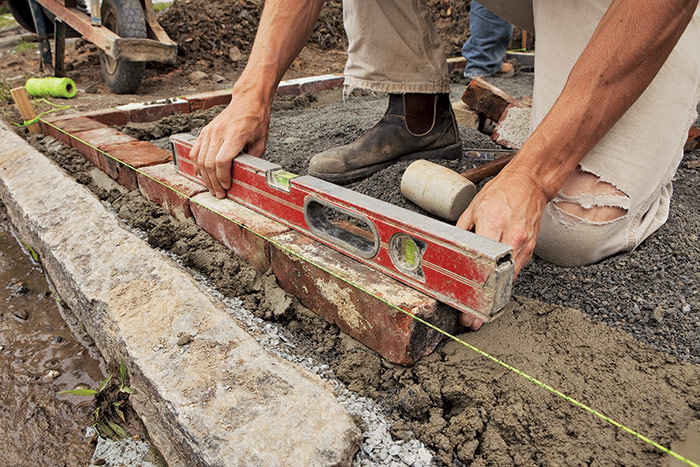
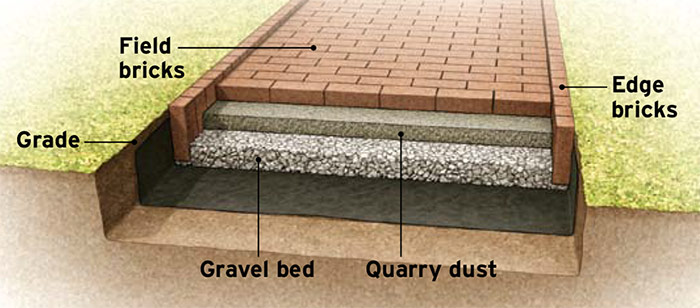
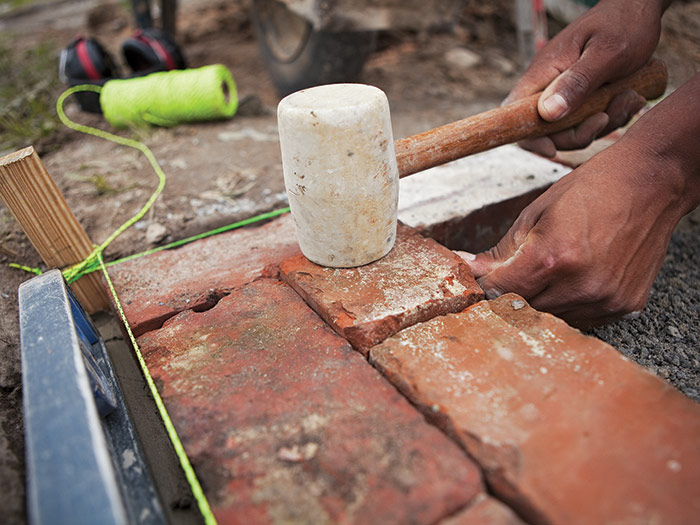
A mortared edge stabilizes a walkway just as a foundation stabilizes a building. It keeps the bricks or pavers from spreading and contains the quarry dust or setting sand, reducing erosion. You can pour a narrow footing (with rebar) to give the edge a solid foundation, but in this case we decided not to because the walkway was sufficiently compacted. Setting the edge in mortar would be adequate. To set the mortared edge, spread a 2-in.-deep layer of mortar along the edge of the walkway 4 in. to 5 in. wide 1. The mortar should be thick enough to hold its shape when you make a channel down the middle. Position the corner brick and gently tap it into the mortar with a rubber mallet 2. Align the brick’s outside edge as close as possible to the twine without touching it.

Spread a wide bed of mortar under the layout stringline
1. Spread a 4-in.- to 5-in.-wide bed of mortar under the layout stringline. Groove the top to make it easier to set the brick.


Set a brick in the mortar
2. Set a brick in the mortar by tapping it with a rubber mallet until the top edge is aligned with the stringline.


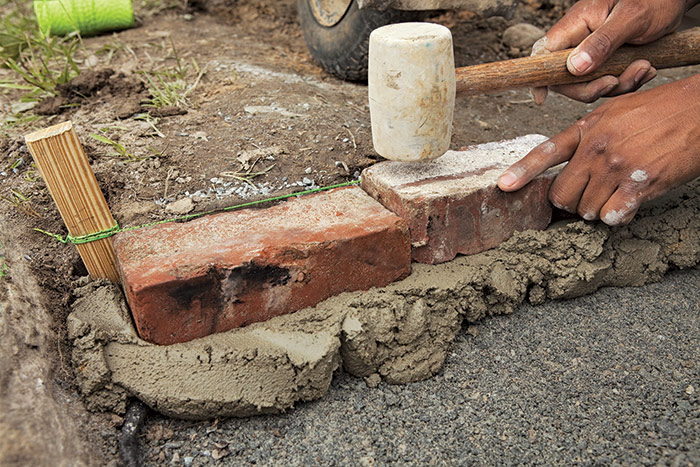
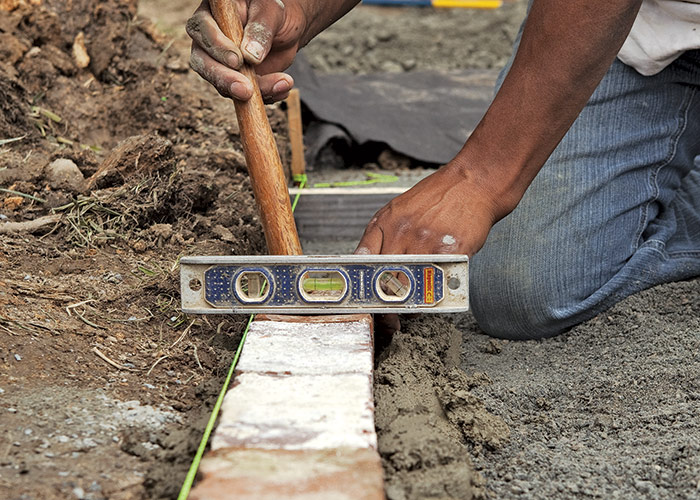
Continue setting bricks along the same row, spreading mortar for a few bricks at a time. Each brick should set about 1⁄2 in. into the mortar without displacing the previous brick just set 3. If a brick sinks into the mortar on its own, or if a set brick moves while setting the next brick, the mortar mix is too wet. As you work, periodically check the bricks for level 4. If the walkway has a slope from side to side, use a mason level to align the brick tops.

Continue setting the edge bricks in mortar
3. Continue setting the edge bricks in mortar. The mortar thickness should allow each brick to set about 1⁄2 in. into the mortar.


flush the brick tops
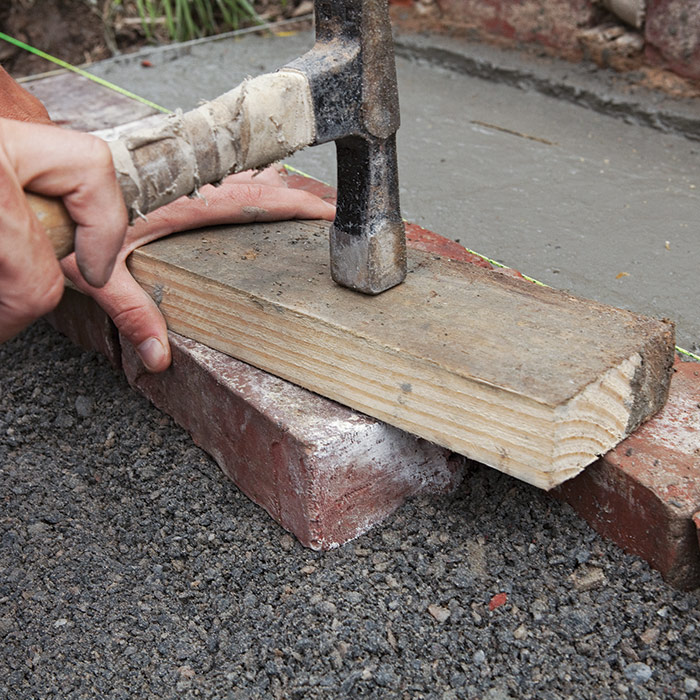
TRADE SECRET: Another way to flush the brick tops as you set them is to use a short board. Place the board so it spans the brick to be set and the adjacent brick already set to the proper height. Hit the top of the board until the bricks are flush. This method is also useful if you don’t have a rubber mallet and don’t want to mar the brick faces.


Check for level across the bricks as you set them
4. Check for level across the bricks as you set them.


WHAT CAN GO WRONG: While the bricks should be aligned with the string, sometimes the string will get hung up or pushed by a misaligned brick. To double-check, place a longer level down the row of bricks to make sure the string is still an accurate guide.


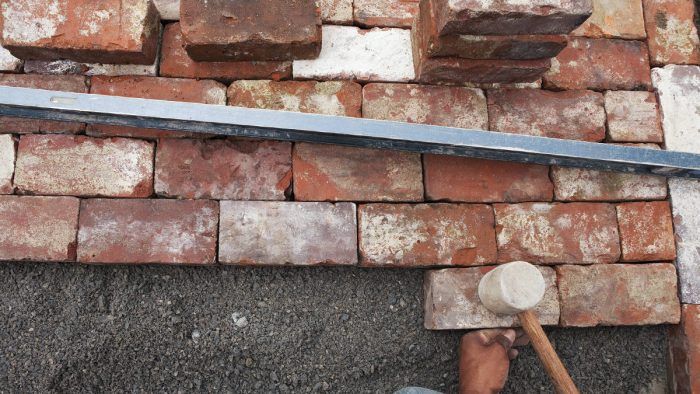
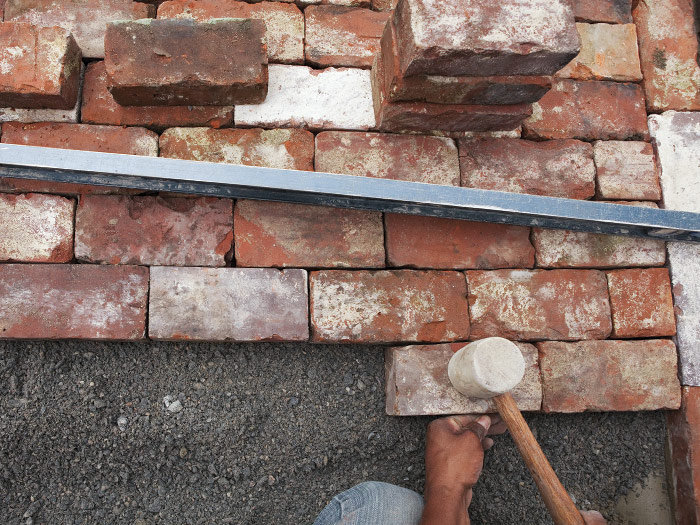
When the two sides of the mortared edge are set, use a mason level to screed the quarry dust 5. Add quarry dust to fill any depressions; use a hand tamper to compact it rather than a motorized compactor. A motorized compactor may shake the bricks you’ve already set out of position 6.

Screed the quarry dust
5. Screed the quarry dust between the edge bricks. Add more quarry dust if necessary to create a slight crown.


compact the quarry dust
6. Compact the quarry dust before spreading mortar, using a hand tamper rather than a motorized compactor.


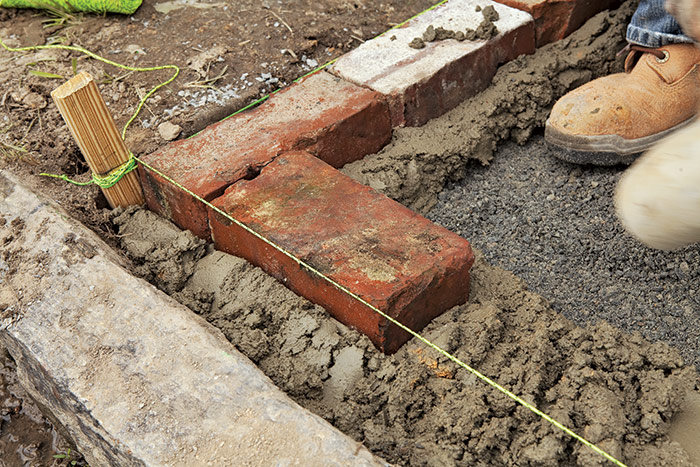
With the surface between the edge bricks flat and compacted, tie mason twine across the end of the walkway at brick height 7. Spread mortar and set the walkway’s end border in the same manner as you set the side borders 8.

set the end bricks
7. Tie mason twine between the end bricks, aligned with the brick’s top edge. Spread mortar and set the end bricks.


use a mason level to align the tops
8. Use a mason level to align the tops. Lay it across several bricks at once, pressing or tapping gently until the tops are flush.


wrap the string around a few bricks to hold it fast
TRADE SECRET:
Stakes aren’t always the best way to secure a string. If the ground won’t allow you to drive a stake or you don’t have one at hand, simply wrap the string around a few bricks to hold it fast.


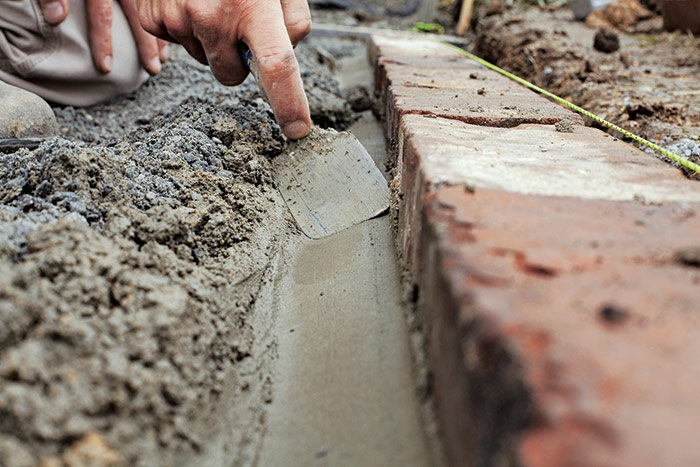
The final step before setting the field bricks is to smooth the mortar base. With a trowel, bevel the mortar along the inside edges of the perimeter bricks and remove excess mortar 9. The bevel provides room for quarry dust and field bricks to be positioned right up to the edge bricks without mortar getting in the way.

keep the mortar bed out of the way
9. Keep the mortar bed out of the way by beveling it away from the bottom inside edge of the bricks with a hand trowel.


A BORDER WITHOUT MORTAR

If you don’t want to set the border in mortar, you can lay the edge bricks on their ends so that they are raised slightly above grade, approximately 1 in. above the walkway. This is called a brick-soldier edging.

Laying the field bricks on their ends, butted against undisturbed soil, will bind them together. If the edge bricks aren’t secure, they are prone to sink. If one brick sinks, it creates a domino effect and adjacent bricks will sink as well. The edge is like a foundation. As long as it is secure, the field will be, too.

a-border-without-mortar


Setting Field Bricks

For this project, we chose a running-bond pattern, meaning the joints in neighboring rows are offset by the length of half a brick. All the field bricks are set parallel to the end border. Once you develop the rhythm of laying bricks, this process will go fairly quickly.

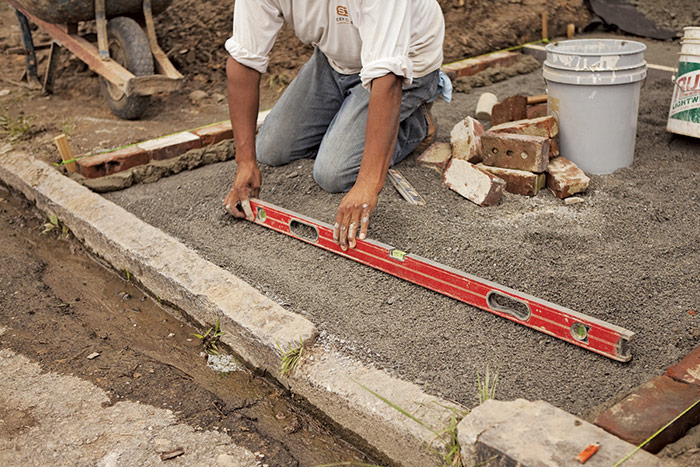
To begin, spread an even layer of loose quarry dust under the bricks to be set. Run full bricks for the first course, and then start the first brick for the second course half a brick away from the edge bricks 1. When you first rest a brick on the quarry dust, the top should be about 1⁄2 in. high. Strike the brick three or four times with a rubber mallet to set it flush to the tops of adjacent bricks 2. If the brick won’t sit flush with the other bricks, scoop out some of the stone dust beneath it. Then reset the brick. It’s easier to gauge the correct amount of quarry dust if you prepare an area for several bricks at once. For best results, hold a long mason level or straightedge over several bricks and the mortared borders as you set them 3. For a wide walk or for a walk that does not have a natural slope, set the bricks with a slight (1⁄2-in.- to 3⁄4-in.-high) center crown to prevent standing water from accumulating later.

Start the second row half a brick away
1. Start the second row half a brick away from the border to form a running-bond pattern. Leave a 1⁄8-in. gap between bricks.


set it flush to the adjacent bricks.
2. Strike the brick with a rubber mallet to set it flush to the adjacent bricks.


align the brick tops
3. Use a mason level to align the brick tops. While gently pressing down on the level, tap the brick until the tops are flush.


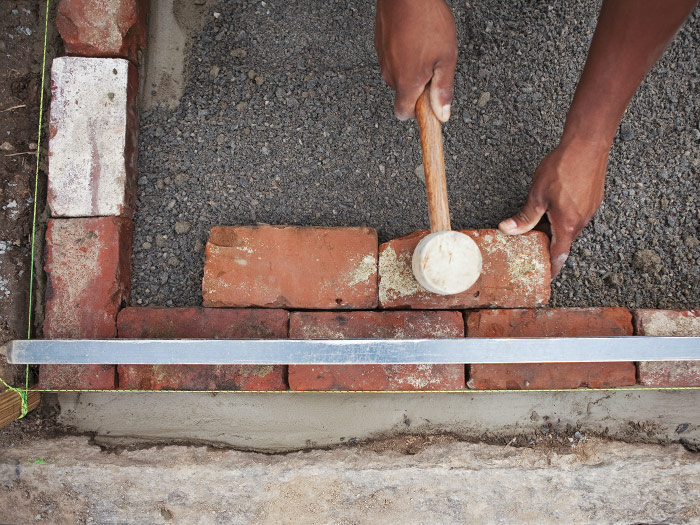
Cut half-bricks at the ends of every other row as you need them, or a few at a time 4. Leave a 1⁄8-in. gap between the bricks so the joints can be filled with sand after all the bricks are set.

cut the end bricks for every other row
4. Cut the end bricks for every other row as you progress. If using a power saw, brace the back of the brick to secure it during the cut.


The best brick setters develop a rhythm that is not too fast and that wastes very little energy. In general, work toward yourself rather than kneeling on the brick and working away from yourself. Keep the area neat and free of extraneous tools and debris 5. A helper can be invaluable, providing a continuous supply of bricks (including cut bricks), quarry dust, and even drinking water.

work toward yourself,
5. Work toward yourself, keeping unnecessary materials and tools out of the way.


After every three or four rows, check for straightness with a mason level or straight board 6. Periodically measure from each side of the row to the end to be sure that one side is not creeping ahead of the other. It’s especially important to check if two people are setting bricks side by side.

check every other row for straightness.
6. Check every other row for straightness. Hold the level against the leading edge and make small adjustments as necessary.


Filling the cracks

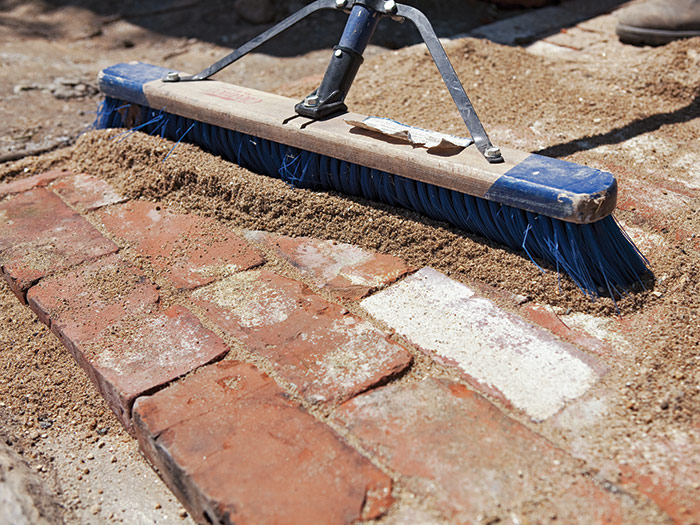
Once the bricks are laid, fill the joints halfway with sand. Make sure the sand you use has been screened multiple times so that no pebbles remain and all the small particles will fall into the joints. Masonry sand should work just fine. Then run water over the walkway to remove air pockets and to pack the sand down. Continue sweeping sand into the joints until they are full. Then run water over the patio again, letting the sand settle 7. Leave a little sand nearby because you might need to add more after a few rains.

work sand into the joints
7. Pour sand over the entire surface and work it into the joints with a broom.


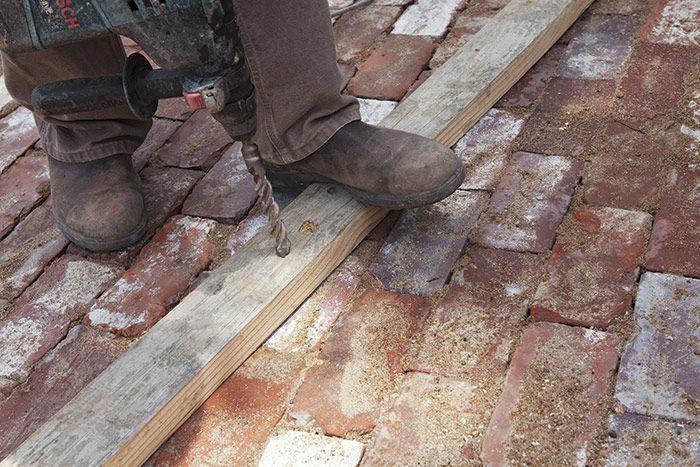
TRADE SECRET: A good way to get sand down into the cracks is to use an impact driver or roto-hammer to vibrate a board set on top of the bricks. This quickly settles the sand into the cracks. Don’t use a motorized compactor or you run the risk of breaking bricks.

get sand down into the cracks


Masonry Complete

Excerpted from Masonry Complete (The Taunton Press, 2012) by Cody Macfie

Available at Amazon.com.

Previous: Brick Walkway: Preparing the Base Next: Brick Walkway: Adding Steps

Guide

Foundations and Masonry Work

Chapter

Brick

Sign up for eletters today and get the latest how-to from Fine Homebuilding, plus special offers.

Signing you up...

This site is protected by reCAPTCHA and the Google Privacy Policy and Terms of Service apply.
See all newsletters
See all newsletters

Log in or create an account to post a comment.

Sign up Log in

Become a member and get full access to FineHomebuilding.com

Foundations and Masonry Work

Foundations and Masonry Work

Trusted, comprehensive guidance from the pros for working with concrete and masonry

View Project Guide

View All Project Guides »

Become a member and get unlimited site access, including the Foundations and Masonry Work Project Guide.

Start Free Trial

Concrete & Masonry Basics
  • Choosing & Mixing Concrete
  • Concrete & Masonry Tools & Techniques
Building Foundations
  • Foundation Basics
  • Foundation Footings
  • Insulated Concrete Forms (ICFs)
Waterproofing Foundations
  • Waterproofing Strategies
  • Foundation Drains
Retrofits and Add-ons
Masonry in the Landscape
  • Patios, Walkways, and Driveways
  • Retaining Walls
  • Dry Stone Walls
  • Fire Pits
Brick

Fine Home Building

Newsletter Sign-up

  • Fine Homebuilding

    Home building tips, offers, and expert advice in your inbox.

  • Green Building Advisor

    Building science and energy efficiency advice, plus special offers, in your inbox.

  • Old House Journal

    Repair, renovation, and restoration tips, plus special offers, in your inbox.

Signing you up...

This site is protected by reCAPTCHA and the Google Privacy Policy and Terms of Service apply.
See all newsletters

Follow

  • Fine Homebuilding

    Dig into cutting-edge approaches and decades of proven solutions with total access to our experts and tradespeople.

    Start Free Trial Now
    • Facebook
    • Instagram
    • X
    • LinkedIn
  • GBA Prime

    Get instant access to the latest developments in green building, research, and reports from the field.

    Start Free Trial Now
    • Facebook
    • YouTube
  • Old House Journal

    Learn how to restore, repair, update, and decorate your home.

    Subscribe Now
    • Facebook
    • Instagram
    • X

Membership & Magazine

  • Online Archive
  • Start Free Trial
  • Magazine Subscription
  • Magazine Renewal
  • Gift a Subscription
  • Customer Support
  • Privacy Preferences
  • About
  • Contact
  • Advertise
  • Careers
  • Terms of Use
  • Site Map
  • Do not sell or share my information
  • Privacy Policy
  • Accessibility
  • California Privacy Rights

© 2025 Active Interest Media. All rights reserved.

Fine Homebuilding receives a commission for items purchased through links on this site, including Amazon Associates and other affiliate advertising programs.

  • Home Group
  • Antique Trader
  • Arts & Crafts Homes
  • Bank Note Reporter
  • Cabin Life
  • Cuisine at Home
  • Fine Gardening
  • Fine Woodworking
  • Green Building Advisor
  • Garden Gate
  • Horticulture
  • Keep Craft Alive
  • Log Home Living
  • Military Trader/Vehicles
  • Numismatic News
  • Numismaster
  • Old Cars Weekly
  • Old House Journal
  • Period Homes
  • Popular Woodworking
  • Script
  • ShopNotes
  • Sports Collectors Digest
  • Threads
  • Timber Home Living
  • Traditional Building
  • Woodsmith
  • World Coin News
  • Writer's Digest
Active Interest Media logo
X
X
This is a dialog window which overlays the main content of the page. The modal window is a 'site map' of the most critical areas of the site. Pressing the Escape (ESC) button will close the modal and bring you back to where you were on the page.

Main Menu

  • How-To
  • Design
  • Tools & Materials
  • Video
  • Blogs
  • Forum
  • Project Guides
  • Reader Projects
  • Magazine
  • Members
  • FHB House

Podcasts

  • FHB Podcast
  • ProTalk

Webinars

  • Upcoming and On-Demand

Podcasts

  • FHB Podcast
  • ProTalk

Webinars

  • Upcoming and On-Demand

Popular Topics

  • Kitchens
  • Business
  • Bedrooms
  • Roofs
  • Architecture and Design
  • Green Building
  • Decks
  • Framing
  • Safety
  • Remodeling
  • Bathrooms
  • Windows
  • Tilework
  • Ceilings
  • HVAC

Magazine

  • Current Issue
  • Past Issues
  • Magazine Index
  • Subscribe
  • Online Archive
  • Author Guidelines

All Access

  • Member Home
  • Start Free Trial
  • Gift Membership

Online Learning

  • Courses
  • Project Guides
  • Reader Projects
  • Podcast

More

  • FHB Ambassadors
  • FHB House
  • Customer Support

Account

  • Log In
  • Join

Newsletter

Get home building tips, offers, and expert advice in your inbox

Signing you up...

This site is protected by reCAPTCHA and the Google Privacy Policy and Terms of Service apply.
See all newsletters
See all newsletters

Follow

  • X
  • YouTube
  • instagram
  • facebook
  • pinterest
  • Tiktok

Join All Access

Become a member and get instant access to thousands of videos, how-tos, tool reviews, and design features.

Start Your Free Trial

Subscribe

FHB Magazine

Start your subscription today and save up to 70%

Subscribe

We hope you’ve enjoyed your free articles. To keep reading, become a member today.

Get complete site access to expert advice, how-to videos, Code Check, and more, plus the print magazine.

Start your FREE trial

Already a member? Log in

Privacy Policy Update

We use cookies, pixels, script and other tracking technologies to analyze and improve our service, to improve and personalize content, and for advertising to you. We also share information about your use of our site with third-party social media, advertising and analytics partners. You can view our Privacy Policy here and our Terms of Use here.

Cookies

Analytics

These cookies help us track site metrics to improve our sites and provide a better user experience.

Advertising/Social Media

These cookies are used to serve advertisements aligned with your interests.

Essential

These cookies are required to provide basic functions like page navigation and access to secure areas of the website.

Delete My Data

Delete all cookies and associated data