FHB Logo Facebook LinkedIn Email Pinterest Twitter X Instagram Tiktok YouTube Plus Icon Close Icon Navigation Search Icon Navigation Search Icon Arrow Down Icon Video Guide Icon Article Guide Icon Modal Close Icon Guide Search Icon Skip to content
Subscribe
Log In
  • How-To
  • Design
  • Tools & Materials
  • Restoration
  • Videos
  • Blogs
  • Forum
  • Magazine
  • Members
  • FHB House
  • Podcast
Log In

Fine Homebuilding Project Guides

Foundations and Masonry Work

Guide Home
  • Concrete & Masonry Basics
  • Building Foundations
  • Waterproofing Foundations
  • Retrofits and Add-ons
  • Masonry in the Landscape
  • Brick
How-To

Build a Concrete Walkway: Smoothing the Surface

Learn how to smooth the concrete surface for a polished finish with the use of bull floats, magnesium floats, trowels, and edging tools.

By Rick Arnold

Video Transcript:

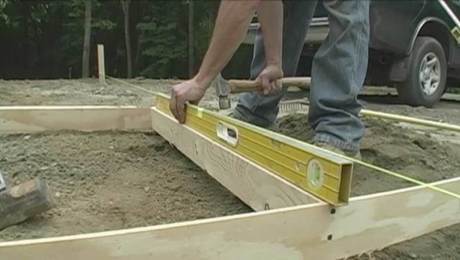
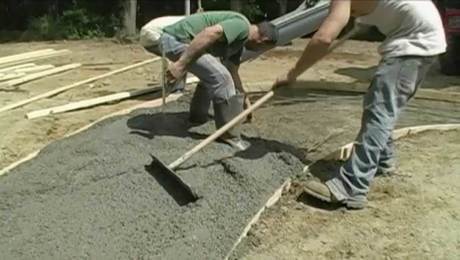
Whether you’re going to finish your walkway with a stamped or textured surface, you will want to get started as soon as the concrete has been poured into the form, and screeded flat.

In this episode, you’ll learn how to use a bull float to initially smooth the surface. Then you will go through the steps of using a magnesium float, a steel finishing trowel, and an edging tool to prep the surface for any finish you may want to add.

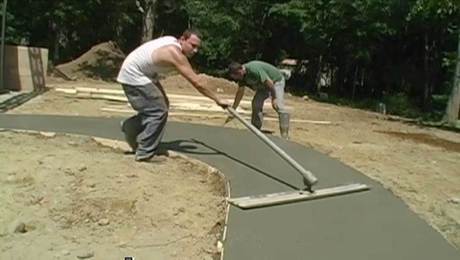
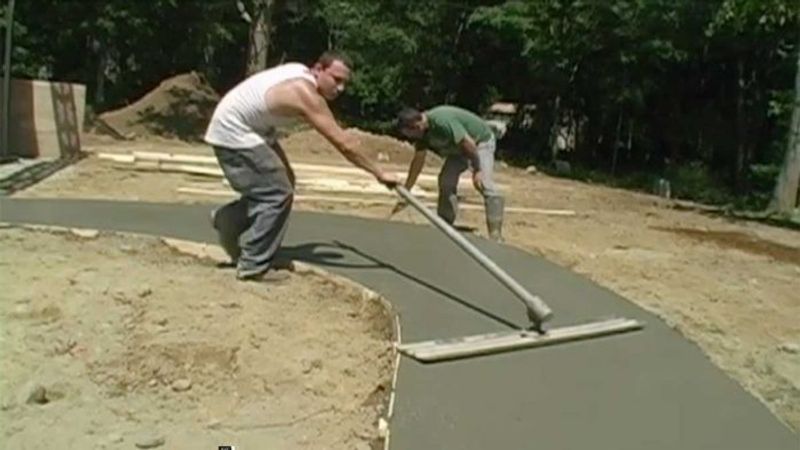
When using any type of trowel or float tool, it’s important to concentrate on keeping the leading edge tilted slight up to avoid digging into the fresh concrete. The first step is to use a bull float over the entire surface. A bull float is a large magnesium float that’s pushed and pulled over the surface using a pole that can be extended by screwing in additional sections. The purpose of the bull float is to flatten out the surface and push the small stone in the mix down. Move the handle either up or down to allow the float to skim across the surface. The magnesium bull float opens up the concrete allowing bleed water to bring up the fines of the mix, creating a creamy consistency on the top.

After bull floating, the surface should look flat and shiny, with perhaps a few lines from the side of the float. A helpful tip is to clean off your concrete tools immediately after every use. Dried, caked on concrete will ruin the working surface and is extremely difficult to remove.

Depending on the mix, you may see quite a bit of bleed water coming to the surface. That’s fine, but you have to wait until that water is gone before moving on to the next step. On a hot day, it may take only five or ten minutes between steps; on cold days you may be waiting an hour or more.

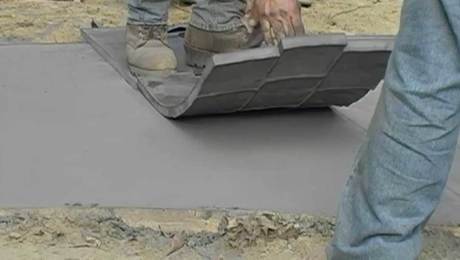
Once the bleed water is gone and the concrete has set enough so that your boot leaves about a ¼ inch depression when you step on the surface, it’s time to get busy. With a hand-held mag float, work the edges to drop more cream, and then follow with the edging tool. The edger rounds the sharp edge of the walkway with a radius of about ½ inch. The eased edge will create a finished look and is less prone to chipping. For best results, keep the edger flat on the surface.

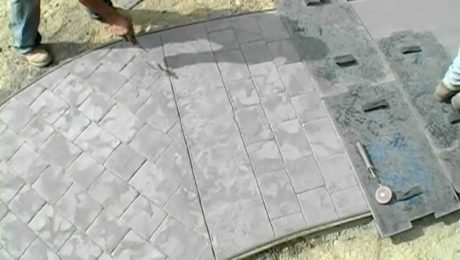
The final tool used at this stage is a large steel trowel or a finish trowel. It’s easier to use a trowel that has at least two curved corners to help it from digging in. The purpose of the steel trowel is to close up the concrete by forcing the cream back down into the surface. This helps to create a hard, smooth, durable finish. Use wide sweeping arcs that overlap slightly. If there are areas that seem too dry, just hit them again with the mag float. Once you’ve finished with the steel trowel, you’re ready for stamping.

Sign up for eletters today and get the latest how-to from Fine Homebuilding, plus special offers.

Signing you up...

This site is protected by reCAPTCHA and the Google Privacy Policy and Terms of Service apply.
See all newsletters
See all newsletters

Videos in the Series

  • Build a Concrete Walkway: Introduction

    Learn how to build forms, install steel reinforcement, pour concrete, use floats and trowels, and stamp a decorative pattern.

  • Build a Concrete Walkway: Building the Form

    All successful concrete projects start with a clear plan, a solid base, and a sturdy form.

  • Build a Concrete Walkway: Adding Reinforcement

    Rebar and wire mesh are the backbone of a durable concrete walkway.

  • Build a Concrete Walkway: Pouring Concrete

    Weather conditions, available help, and type of concrete mix are all important factors for a successful pour.

  • Build a Concrete Walkway: Smoothing the Surface

    Learn how to smooth the concrete surface for a polished finish with the use of bull floats, magnesium floats, trowels, and edging tools.

  • Build a Concrete Walkway: Stamping Patterns and Adding Control Joints

    A stone or brick texture adds character to a plain concrete path.

Previous: Build a Concrete Walkway: Pouring Concrete Next: Build a Concrete Walkway: Stamping Patterns and Adding Control Joints

Guide

Foundations and Masonry Work

Chapter

Masonry in the Landscape

Log in or create an account to post a comment.

Sign up Log in

Become a member and get full access to FineHomebuilding.com

Foundations and Masonry Work

Foundations and Masonry Work

Trusted, comprehensive guidance from the pros for working with concrete and masonry

View Project Guide

View All Project Guides »

Become a member and get unlimited site access, including the Foundations and Masonry Work Project Guide.

Start Free Trial

Concrete & Masonry Basics
  • Choosing & Mixing Concrete
  • Concrete & Masonry Tools & Techniques
Building Foundations
  • Foundation Basics
  • Foundation Footings
  • Insulated Concrete Forms (ICFs)
Waterproofing Foundations
  • Waterproofing Strategies
  • Foundation Drains
Retrofits and Add-ons
Masonry in the Landscape
  • Patios, Walkways, and Driveways
  • Retaining Walls
  • Dry Stone Walls
  • Fire Pits
Brick

Fine Home Building

Newsletter Sign-up

  • Fine Homebuilding

    Home building tips, offers, and expert advice in your inbox.

  • Green Building Advisor

    Building science and energy efficiency advice, plus special offers, in your inbox.

  • Old House Journal

    Repair, renovation, and restoration tips, plus special offers, in your inbox.

Signing you up...

This site is protected by reCAPTCHA and the Google Privacy Policy and Terms of Service apply.
See all newsletters

Follow

  • Fine Homebuilding

    Dig into cutting-edge approaches and decades of proven solutions with total access to our experts and tradespeople.

    Start Free Trial Now
    • Facebook
    • Instagram
    • X
    • LinkedIn
  • GBA Prime

    Get instant access to the latest developments in green building, research, and reports from the field.

    Start Free Trial Now
    • Facebook
    • YouTube
  • Old House Journal

    Learn how to restore, repair, update, and decorate your home.

    Subscribe Now
    • Facebook
    • Instagram
    • X

Membership & Magazine

  • Online Archive
  • Start Free Trial
  • Magazine Subscription
  • Magazine Renewal
  • Gift a Subscription
  • Customer Support
  • Privacy Preferences
  • About
  • Contact
  • Advertise
  • Careers
  • Terms of Use
  • Site Map
  • Do not sell or share my information
  • Privacy Policy
  • Accessibility
  • California Privacy Rights

© 2025 Active Interest Media. All rights reserved.

Fine Homebuilding receives a commission for items purchased through links on this site, including Amazon Associates and other affiliate advertising programs.

X
X
This is a dialog window which overlays the main content of the page. The modal window is a 'site map' of the most critical areas of the site. Pressing the Escape (ESC) button will close the modal and bring you back to where you were on the page.

Main Menu

  • How-To
  • Design
  • Tools & Materials
  • Video
  • Blogs
  • Forum
  • Project Guides
  • Reader Projects
  • Magazine
  • Members
  • FHB House

Podcasts

  • FHB Podcast
  • ProTalk

Webinars

  • Upcoming and On-Demand

Podcasts

  • FHB Podcast
  • ProTalk

Webinars

  • Upcoming and On-Demand

Popular Topics

  • Kitchens
  • Business
  • Bedrooms
  • Roofs
  • Architecture and Design
  • Green Building
  • Decks
  • Framing
  • Safety
  • Remodeling
  • Bathrooms
  • Windows
  • Tilework
  • Ceilings
  • HVAC

Magazine

  • Current Issue
  • Past Issues
  • Magazine Index
  • Subscribe
  • Online Archive
  • Author Guidelines

All Access

  • Member Home
  • Start Free Trial
  • Gift Membership

Online Learning

  • Courses
  • Project Guides
  • Reader Projects
  • Podcast

More

  • FHB Ambassadors
  • FHB House
  • Customer Support

Account

  • Log In
  • Join

Newsletter

Get home building tips, offers, and expert advice in your inbox

Signing you up...

This site is protected by reCAPTCHA and the Google Privacy Policy and Terms of Service apply.
See all newsletters
See all newsletters

Follow

  • X
  • YouTube
  • instagram
  • facebook
  • pinterest
  • Tiktok

Join All Access

Become a member and get instant access to thousands of videos, how-tos, tool reviews, and design features.

Start Your Free Trial

Subscribe

FHB Magazine

Start your subscription today and save up to 70%

Subscribe

You have 1 free article remaining.

Get complete site access, including thousands of videos, how-to tips, tool reviews, and design features.

Start your FREE trial

Already a member? Log in

We hope you’ve enjoyed your free articles. To keep reading, become a member today.

Get complete site access to expert advice, how-to videos, Code Check, and more, plus the print magazine.

Start your FREE trial

Already a member? Log in

Privacy Policy Update

We use cookies, pixels, script and other tracking technologies to analyze and improve our service, to improve and personalize content, and for advertising to you. We also share information about your use of our site with third-party social media, advertising and analytics partners. You can view our Privacy Policy here and our Terms of Use here.

Cookies

Analytics

These cookies help us track site metrics to improve our sites and provide a better user experience.

Advertising/Social Media

These cookies are used to serve advertisements aligned with your interests.

Essential

These cookies are required to provide basic functions like page navigation and access to secure areas of the website.

Delete My Data

Delete all cookies and associated data