Build a Concrete Walkway: Stamping Patterns and Adding Control Joints
A stone or brick texture adds character to a plain concrete path.
Video Transcript:
We’ll cover all the steps for applying a stamped concrete finish, from applying the release agent and orienting the stamping form to creating control joints and curing the concrete.
The release agent is a combination of hydrophobic materials in a powdered pigment form like talcum powder. It’s spread over wet concrete and allows stamps to be removed without pulling or suctioning the concrete. The release agent contains a pigment, which helps to provide depth and shadowing on the walkway surface. Cover the entire surface with an even coating of release agent before you begin stamping. In this case, we used a hand broom. Be careful not to touch the wet concrete with the broom.
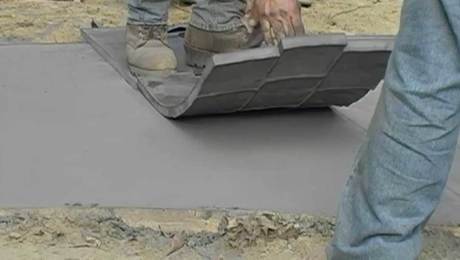
Using a stamping form is not too difficult. However, it’s helpful to wear heavy boots and have a tamper handy. For this job, we’re using a cobblestone pattern with key forms that fit together end to end. You may have to vary your stamping procedure depending on the pattern and style of form you choose. There is a wide variety available at your concrete-supply store.
For this cobbled pattern, begin by orienting the stamp parallel to the end board, and walk along the walkway. After each stamp is positioned, tamp the top of the form to transfer the pattern into the concrete. Tamp the form straight down, and be careful not to overdo it. For this pattern, we staggered the forms to create the cobbled look. Depending on the pattern you choose, you may need to use a roller to complete any areas that have been insufficiently pressed.
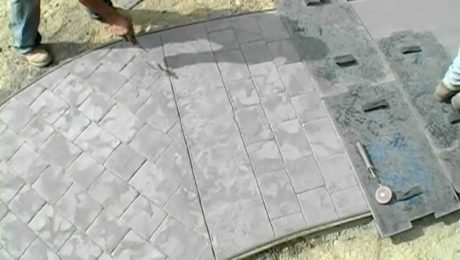
To enable to cobble pattern to be square with both ends of the curving path, we introduced granite textured bands. These bands allow us to easily change the cobbles’ direction and still maintain a natural look. It also provides a convenient place to locate control joints where they will be virtually invisible. To make the bands, simply use the length of 2x and a roller to mark out a 10-in. band across the walkway. Then apply whatever texture stamps you choose to contrast your field’s pattern. Here, we used granite. Finally, with the granite stamp still in place, fill in the field by laying the cobble stamps over the band. You may have to use a roller to clarify the edges after removing the stamp.
As you progress, the concrete will get harder, and you may have to use more force to get the pattern to transfer. Be careful not to tamp too hard as this can create small fissures in the surface. Once the pattern is complete, double-check the surface for any needed touch-ups, especially along the edges and transitions. Don’t cover the surface with plastic, which can cause blotching and discoloration.
After about 24 hours, wash off the release agent. A sprayer on a garden hose with good pressure will work fine. If you use a pressure washer, be careful not to damage the concrete. It’s a good idea to keep the surface wet for a few days to help the curing process, especially in hot weather. Once the surface is dry, it’s a good idea to either spray or roll on a sealer to help protect the walkway and to bring out the richness of the color.

