FHB Logo Facebook LinkedIn Email Pinterest Twitter X Instagram Tiktok YouTube Plus Icon Close Icon Navigation Search Icon Navigation Search Icon Arrow Down Icon Video Guide Icon Article Guide Icon Modal Close Icon Guide Search Icon Skip to content
Subscribe
Log In
  • How-To
  • Design
  • Tools & Materials
  • Restoration
  • Videos
  • Blogs
  • Forum
  • Magazine
  • Members
  • FHB House
  • Podcast
Log In

Fine Homebuilding Project Guides

Foundations and Masonry Work

Guide Home
  • Concrete & Masonry Basics
  • Building Foundations
  • Waterproofing Foundations
  • Retrofits and Add-ons
  • Masonry in the Landscape
  • Brick
How-To

Building a Fire Pit: Freestanding Seat Walls

Make these matching structures to create a cohesive and inviting hang-out space.

By Cody Macfie
  • X
  • facebook
  • linkedin
  • pinterest
  • email
  • add to favorites Log in or Sign up to save your favorite articles

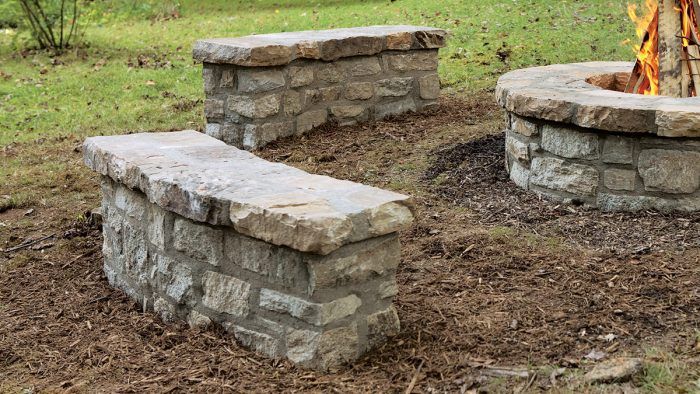
Most of the techniques used to shape and set wall stones and capstones for a fire pit are also used to build seat walls. The seat walls are curved, mortared walls, 12 in. wide and 16 in. to 18 in. high, capped with 3-in.-thick fieldstone or flagstone (we used the latter for our project). That said, there are some key differences that involve a few extra steps with layout, installing the footing, and finishing the ends of the walls.

Pull a Radius to Lay Out Seat Walls

Pull a Radius to Lay Out Seat Walls
Although the seat walls have a longer radius than the inside circle of the fire pit, the curve is still established by rotating from the fire pit’s center.


Orienting walls on a radius curve

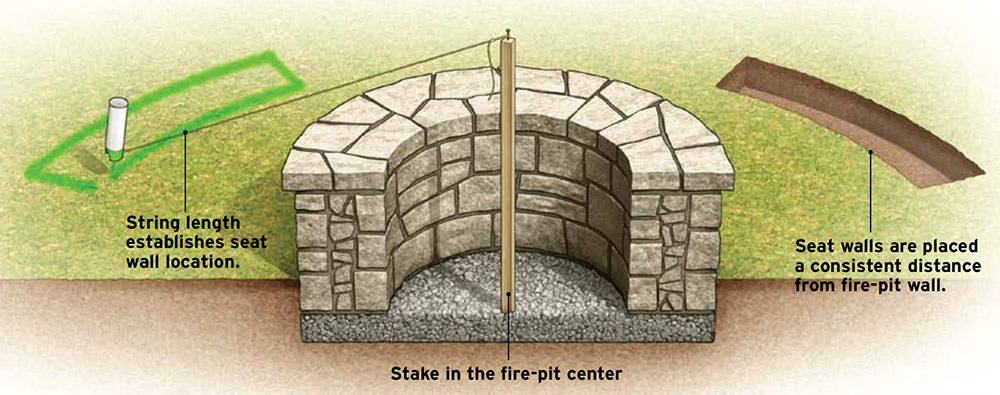
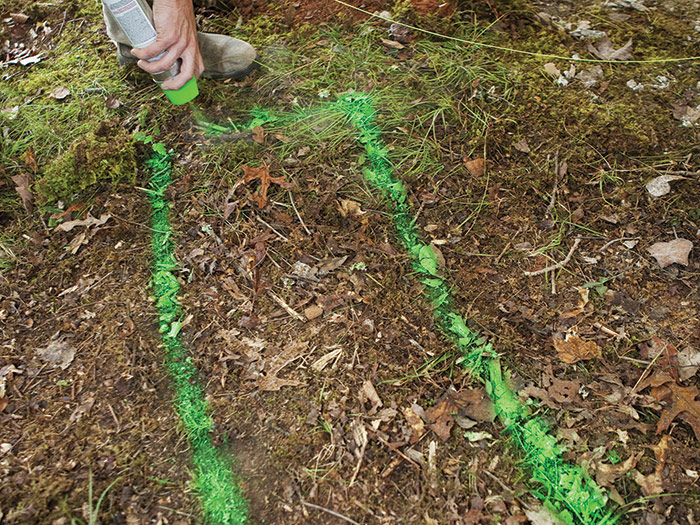
Lay out the curved seat walls using the fire pit’s center to establish a radius. Generally, 3 ft. to 5 ft. between the seat walls and the fire-pit wall allows enough room for people to move around comfortably—and yet still feel the warmth of the fire. However, the exact location of the seat walls really comes down to personal preference. As mentioned earlier, a good way to decide where to put seating is to grab something to sit on 1, and move around until you find a spot where you feel comfortable. Then mark the spot, and lay out seat walls to match the curve of the fire pit wall.

Sit on a bucket
1. Sit on a bucket to verify the seat wall location. Even if the location is already established, it won’t hurt to confirm it’s what you want.


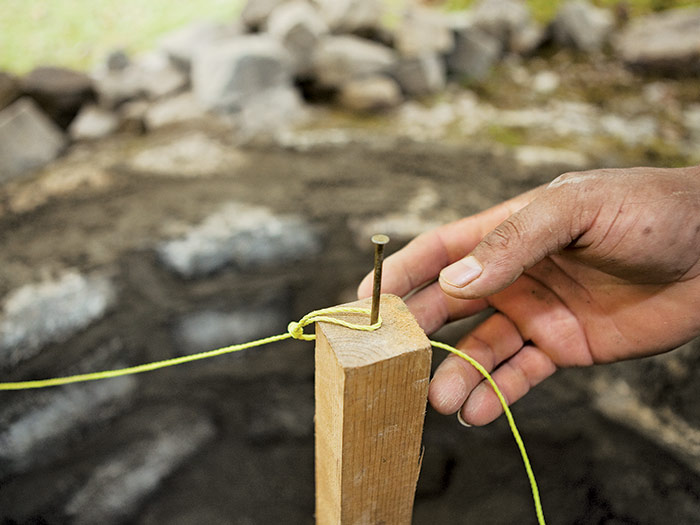
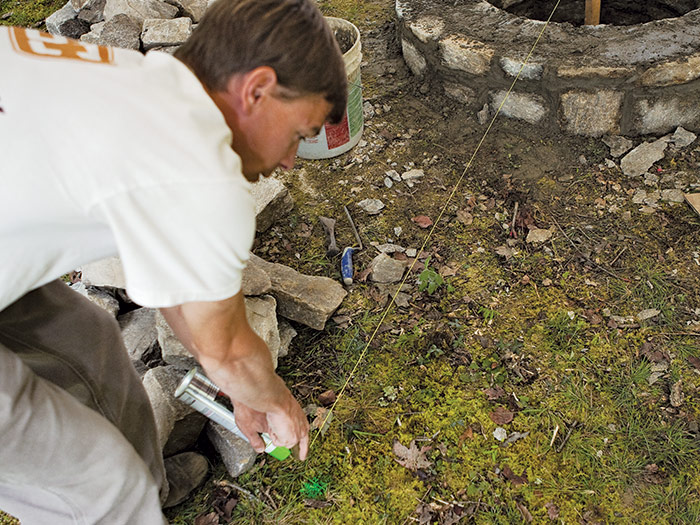
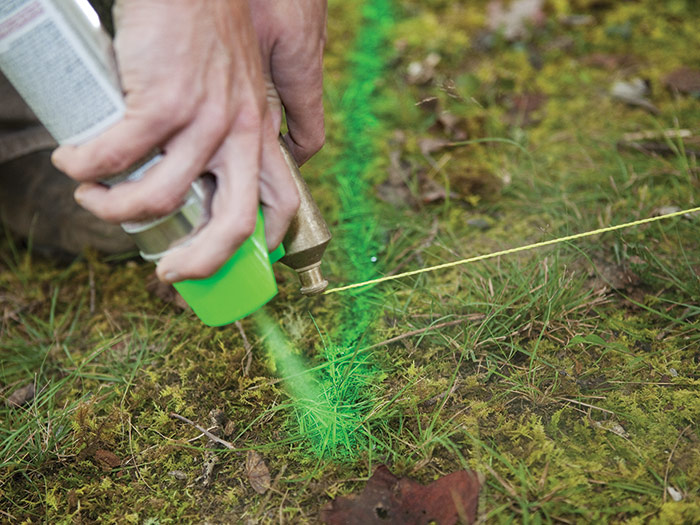
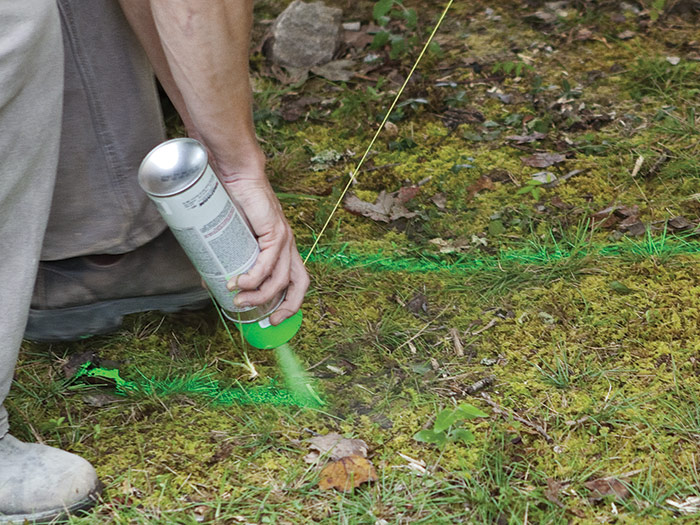
Drive a tall stake into the ground at the center of the fire pit 2. Then drive a nail into the stake, make a loop at the end of a length of twine, and slip it over the nail 3. You can also use the string of a plumb bob. Pull the string to the seat-wall location 4, and hold it taut. Then, holding a marking can at the end of the string, rotate around the stake and mark an arc 5. This line represents the front of the seat wall 6. Mark a second arc for the back of the seat wall 12 in. from the first 7. Last, carefully square the ends at the length you desire 8.

Drive a stake into the fire pit’s center
2. Drive a stake into the fire pit’s center. Make sure the stake is secure and extends above the fire-pit wall.


Drive a nail into the center of the stake
3. Drive a nail into the center of the stake and attach string to it. Avoid tying the string to the nail; it will need to rotate freely.


Pull the string to the seat-wall location
4. Pull the string to the seat-wall location and mark the ground with marking spray.


rotate (swing) while spraying
5. Hold the marking spray nozzle and twine end together, with the twine taut, and rotate (swing) while spraying.


Mark an arc
6. Mark an arc equal to the wall’s length. Check that the line doesn’t wiggle. Any irregularities will transmit to the wall.


mark another arc
7. Measure 12 in. farther away and mark another arc. This represents the seat wall’s outside edge.


Square the wall’s ends
8. Square the wall’s ends. Repeat this process for each wall in your project. For this project, we outlined two walls.


 Installing the Footing

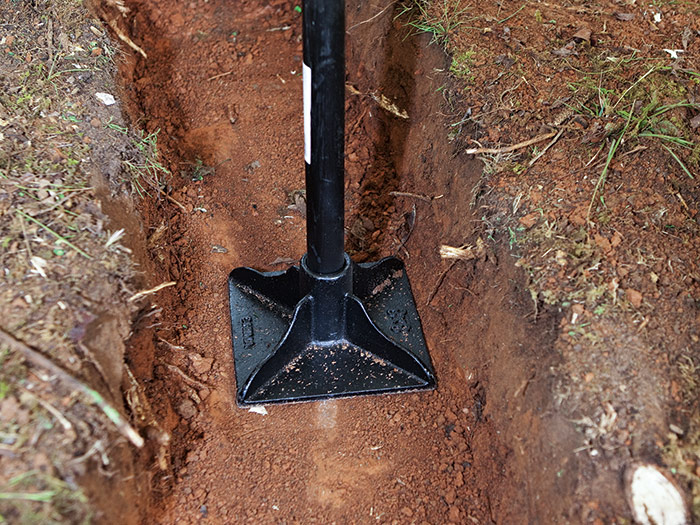
An earth-formed concrete footing adds stability to a small wall that might otherwise shift or tilt. There usually isn’t a need to add rebar. If you locate a seat wall adjacent to a driveway, where it may get bumped, consider adding rebar with vertical ties.

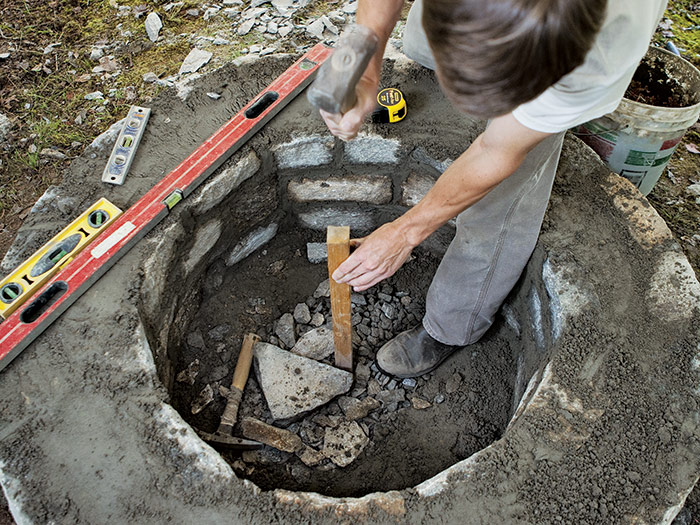
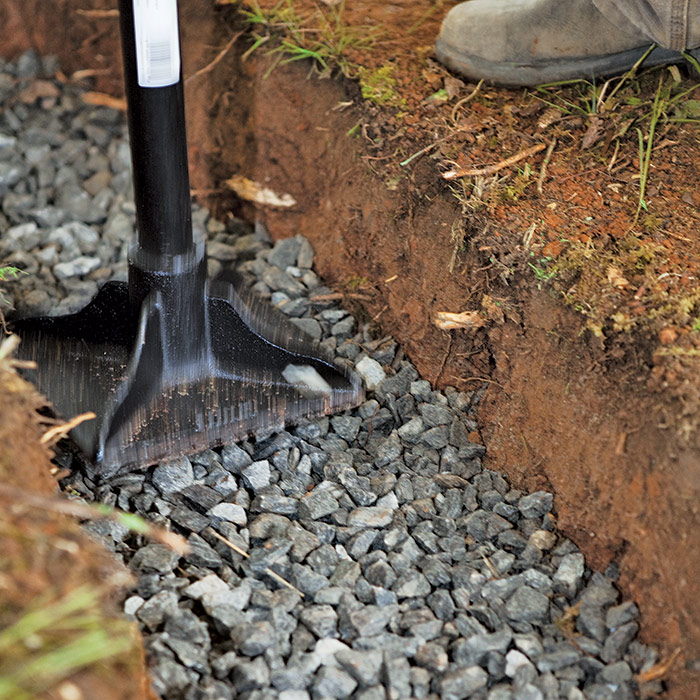
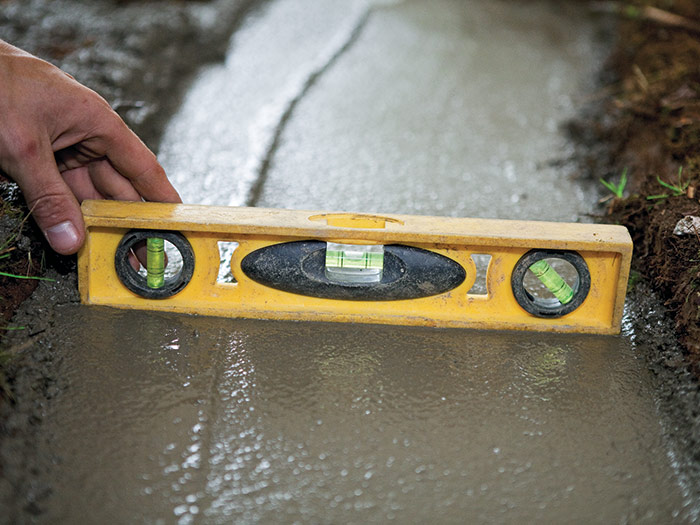
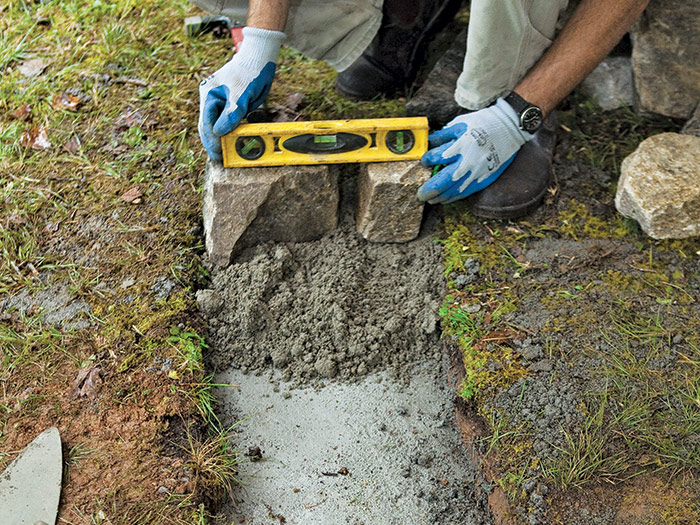
Carefully dig the footing trench following the marked lines as closely as possible 1. Dig to a depth of 8 in. and then square the sides and level the bottom of the trench. Use a tamper to compact the soil 2. Add 3 in. of gravel and use the tamper again to compact the gravel thoroughly 3. Mix and add concrete until it fills the trench to 1 in. below grade (2 to 3 bags of premixed concrete). The surface does not need to be pretty, so you can flatten it with the back of a square shovel. However, it does need to be level in two directions 4. Let the footing cure for 24 hours before building the wall.

Dig the footing trench using the line as a guide
1. Dig the footing trench using the line as a guide.


Compact the footing base with a hand tamper
2. Compact the footing base with a hand tamper. Keep the walls as vertical as possible and square at the base.


Evenly spread 3 in. of gravel in the footing trench and compact thoroughly.
3. Evenly spread 3 in. of gravel in the footing trench and compact thoroughly.


Fill the trench with concrete and check for level.
4. Fill the trench with concrete to 1 in. below grade. Smooth the surface with a trowel or square shovel and check for level.


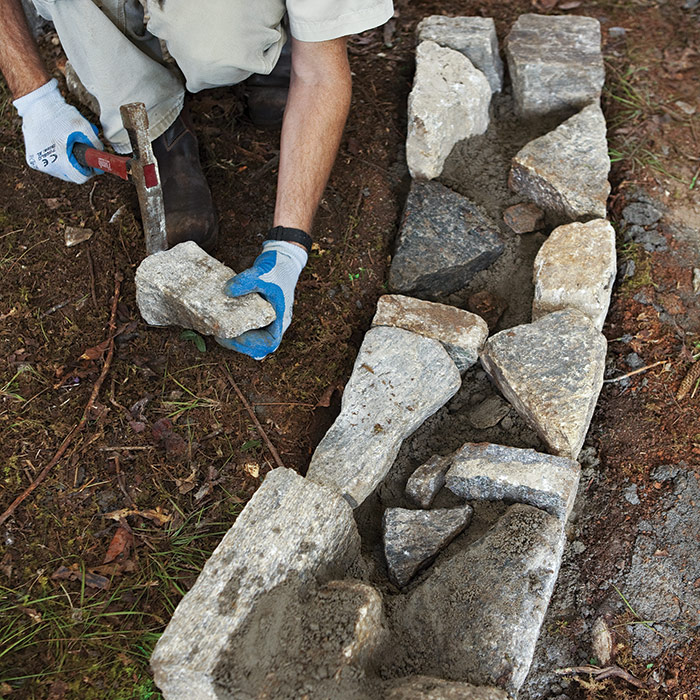
Building Mortared Walls

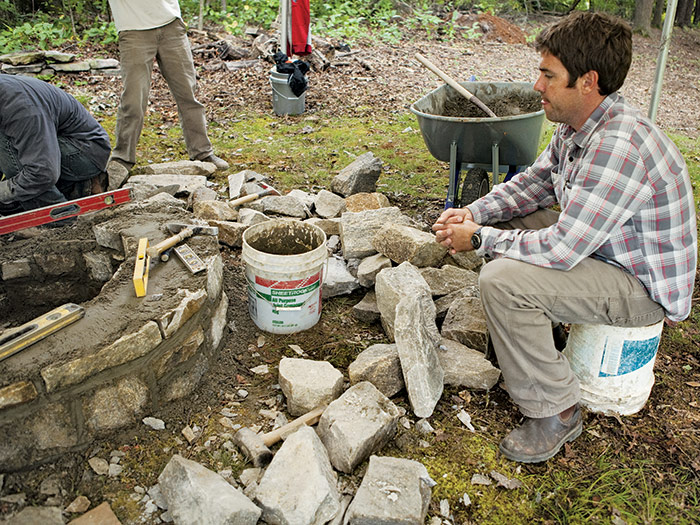
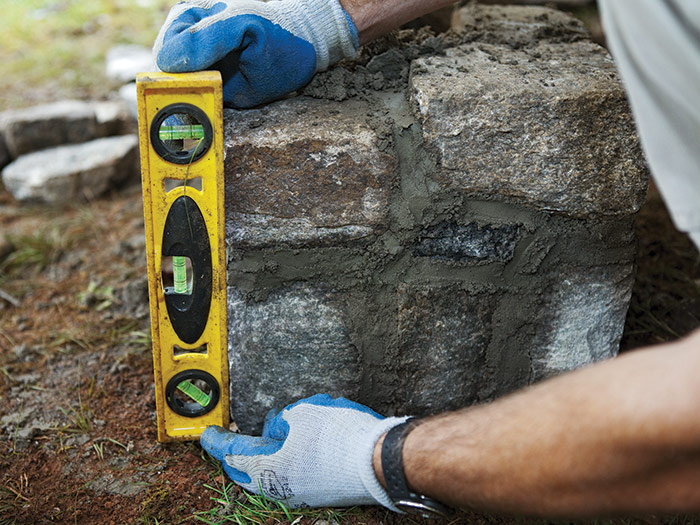
The easiest way to build a short, mortared wall is to build the ends first and then build the sides for each course. Spread a 2-in. layer of mortar for the end stones 1. Set two corner stones the width of the wall apart 2. Fill the space in between them with another stone, creating approximately 1-in. joints. Stabilize the stones by packing mortar behind them 3. Tap the stones into the mortar to fully set them, and level their tops 4.

Spread mortar 2 in. thick on the footing for the end stones
1. Spread mortar 2 in. thick on the footing for the end stones


set corner stones to the wall width
2. Use a measuring tape to set corner stones to the wall width. The tops should be level but do not have to be the same elevation.


Set a stone between the corner stones
3. Set a stone between the corner stones, sized to provide a 1-in. joint; secure all three stones by packing mortar behind them.


Tap until the tops are level
4. Tap the stones into the mortar bed to fully set them. Tap until the tops are level.


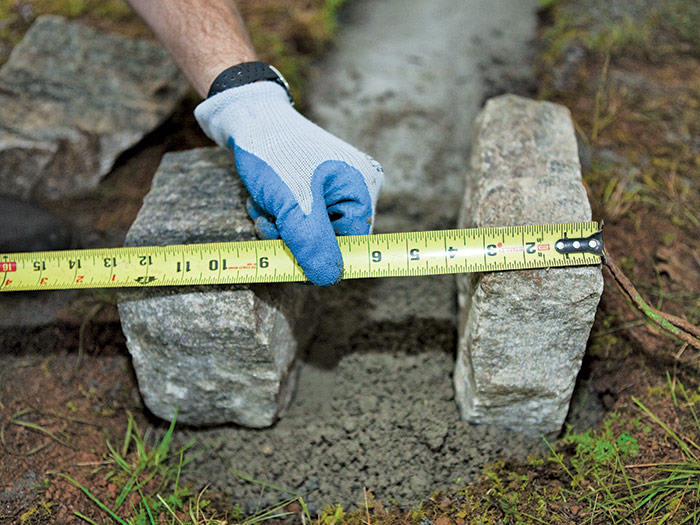
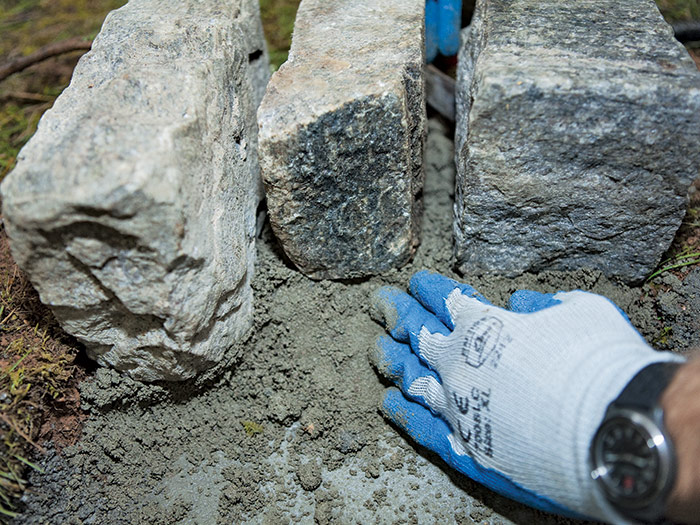
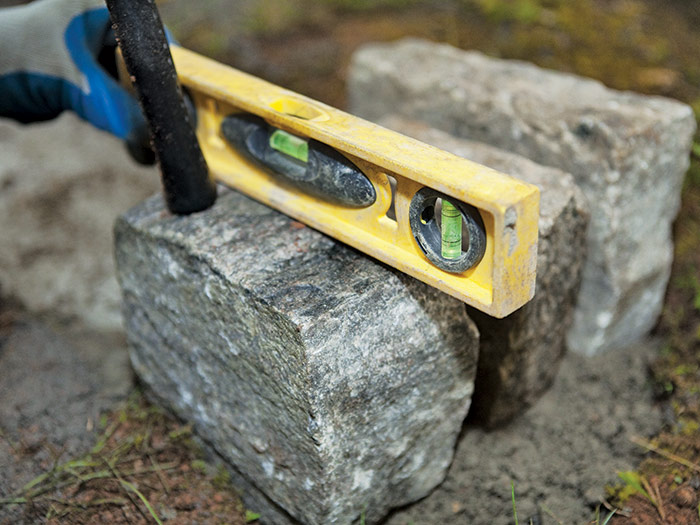
Repeat these steps at the other end of the wall 5. Then, lay the first course between the ends in the same manner as you laid the fire-pit walls (set the inner and outer stones and fill with rubble and mortar) 6. As you build the wall, check that each corner remains straight and plumb 7. Pack mortar in the joints for each course before you lay the next course. Scrape the joints flush once they have dried a bit but before they set up. At the top of the last course, 13 in. to 15 in. above grade, level the stones. Then pack the wall’s interior with mortar and level the top 8.

Set the seat wall’s other end
5. Set the seat wall’s other end in the same manner. In this case, we used two stones to make up the corner, instead of three.


create an even curve
6. Spread mortar and set the first course of stones between the end stones; try to create an even curve.


The eye is naturally drawn to the corners
7. The eye is naturally drawn to the corners, so make them as straight and plumb as possible.


Pack the wall with mortar
8. Pack the wall with mortar; then flatten and smooth the top before shaping the capstones.


avoiding lumps, bumps, and dips on stone faces
WARNING: 
You or your guests may not be as sensitive as the princess who couldn’t sleep on a pea, but sitting on even a small bump can get uncomfortable during a crisp spring night. Treat yourself right by aligning stones carefully and avoiding lumps, bumps, and dips on stone faces.


Setting the Seat Capstones

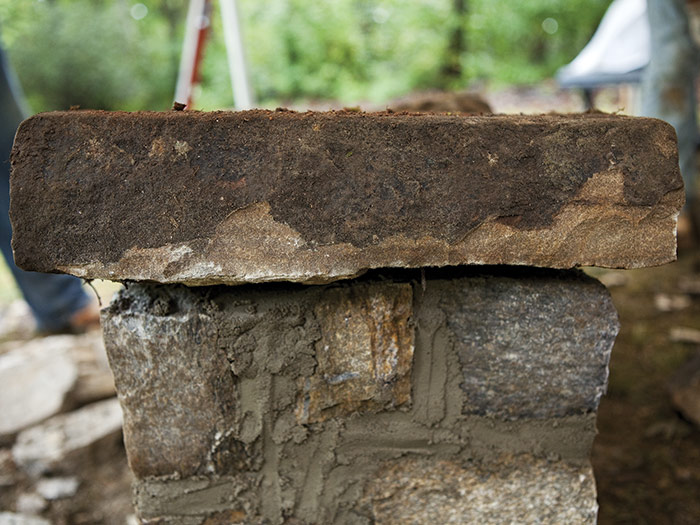
Setting capstones for a curved bench top is similar to setting capstones for a circular fire pit. Pay extra attention, however, to the surface of candidate stones before selecting them. Small protrusions, bumps, or dips that would otherwise go unnoticed are uncomfortable to sit on. When setting stones, aim for a smooth surface without height changes at joints.

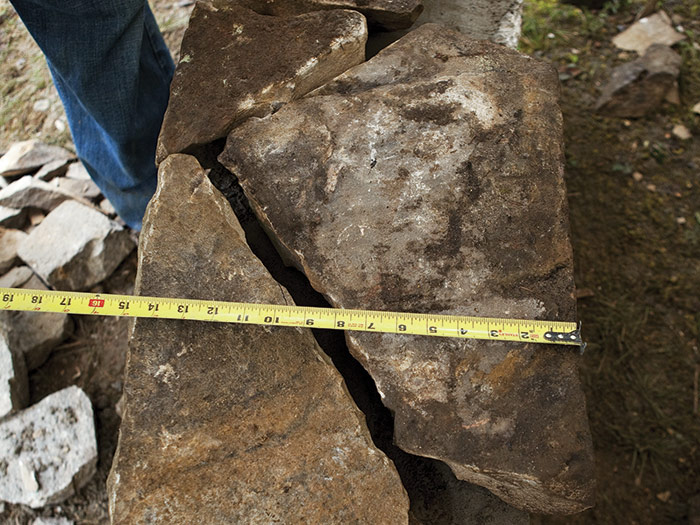
Cut all the caps and dry fit them on the ground before mixing mortar. This makes it easier to make slight adjustments and will prevent the setting mortar from drying while you make the cuts. Try to arrange the stones so at least a couple will span across the top of the wall and avoid a running joint. End stones are good candidates for this 1. Stones that have a diagonal side can make fitting easier. Set stones with opposing diagonals across from each other, and shift them slightly to change the overall width while keeping the joint width consistent 2.

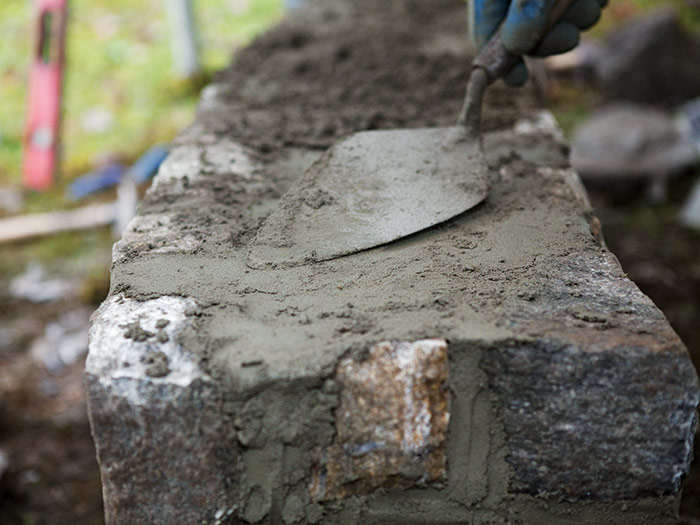
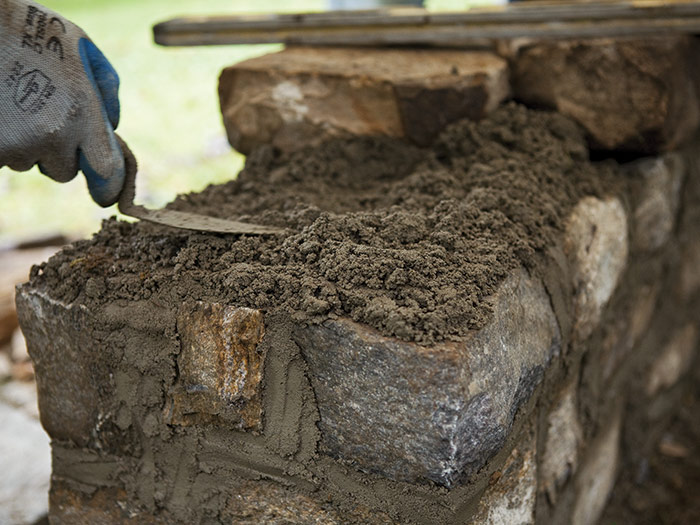
Use the same mortar recipe for setting caps as you did to build the walls, but add a little extra water. This recipe creates a less-porous mortar that helps prevent water from seeping into the wall and efflorescence from leaching out. Spread a 1-in. layer on the walls 3 and set the caps perfectly level in two directions. 4. Even a slight slope will be noticeable after sitting on it for a few minutes.

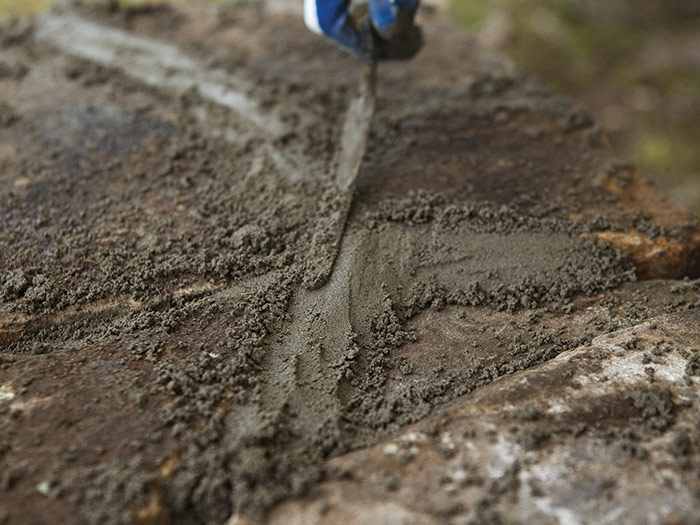
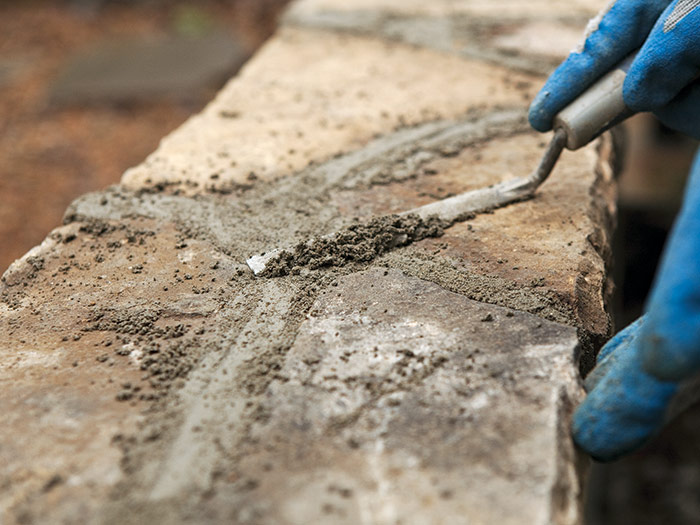
Once the capstones are set, use a pointing trowel to pack mortar into the joints, letting it mound up slightly on the edges 5. Let the mortar dry until you can scrape it without leaving stains on the capstones—but before the mortar has set 6. Scrape the mortar flush and sweep away the excess.

Span the entire wall width with capstones
1. Span the entire wall width with capstones at least a couple of times.


Create some diagonal joints
2. Create some diagonal joints. They break up the monotony of parallel joints.


Spread mortar for the capstones
3. Spread a 1-in.-thick mortar bed for the capstones.


Level the capstones in all directions
4. Level the capstones in all directions.


Pack mortar into the joints with a pointing trowel
5. Pack mortar into the joints with a pointing trowel.


Scrape the joints flush to the capstones
6. Scrape the joints flush to the capstones.


Masonry Complete

Excerpted from Masonry Complete (The Taunton Press, 2012) by Cody Macfie

Available at Amazon.com.

Previous: Building a Fire Pit: Installing Capstones

Guide

Foundations and Masonry Work

Chapter

Masonry in the Landscape

Sign up for eletters today and get the latest how-to from Fine Homebuilding, plus special offers.

Signing you up...

This site is protected by reCAPTCHA and the Google Privacy Policy and Terms of Service apply.
See all newsletters
See all newsletters

Log in or create an account to post a comment.

Sign up Log in

Become a member and get full access to FineHomebuilding.com

Foundations and Masonry Work

Foundations and Masonry Work

Trusted, comprehensive guidance from the pros for working with concrete and masonry

View Project Guide

View All Project Guides »

Become a member and get unlimited site access, including the Foundations and Masonry Work Project Guide.

Start Free Trial

Concrete & Masonry Basics
  • Choosing & Mixing Concrete
  • Concrete & Masonry Tools & Techniques
Building Foundations
  • Foundation Basics
  • Foundation Footings
  • Insulated Concrete Forms (ICFs)
Waterproofing Foundations
  • Waterproofing Strategies
  • Foundation Drains
Retrofits and Add-ons
Masonry in the Landscape
  • Patios, Walkways, and Driveways
  • Retaining Walls
  • Dry Stone Walls
  • Fire Pits
Brick

Fine Home Building

Newsletter Sign-up

  • Fine Homebuilding

    Home building tips, offers, and expert advice in your inbox.

  • Green Building Advisor

    Building science and energy efficiency advice, plus special offers, in your inbox.

  • Old House Journal

    Repair, renovation, and restoration tips, plus special offers, in your inbox.

Signing you up...

This site is protected by reCAPTCHA and the Google Privacy Policy and Terms of Service apply.
See all newsletters

Follow

  • Fine Homebuilding

    Dig into cutting-edge approaches and decades of proven solutions with total access to our experts and tradespeople.

    Start Free Trial Now
    • Facebook
    • Instagram
    • X
    • LinkedIn
  • GBA Prime

    Get instant access to the latest developments in green building, research, and reports from the field.

    Start Free Trial Now
    • Facebook
    • YouTube
  • Old House Journal

    Learn how to restore, repair, update, and decorate your home.

    Subscribe Now
    • Facebook
    • Instagram
    • X

Membership & Magazine

  • Online Archive
  • Start Free Trial
  • Magazine Subscription
  • Magazine Renewal
  • Gift a Subscription
  • Customer Support
  • Privacy Preferences
  • About
  • Contact
  • Advertise
  • Careers
  • Terms of Use
  • Site Map
  • Do not sell or share my information
  • Privacy Policy
  • Accessibility
  • California Privacy Rights

© 2025 Active Interest Media. All rights reserved.

Fine Homebuilding receives a commission for items purchased through links on this site, including Amazon Associates and other affiliate advertising programs.

  • Home Group
  • Antique Trader
  • Arts & Crafts Homes
  • Bank Note Reporter
  • Cabin Life
  • Cuisine at Home
  • Fine Gardening
  • Fine Woodworking
  • Green Building Advisor
  • Garden Gate
  • Horticulture
  • Keep Craft Alive
  • Log Home Living
  • Military Trader/Vehicles
  • Numismatic News
  • Numismaster
  • Old Cars Weekly
  • Old House Journal
  • Period Homes
  • Popular Woodworking
  • Script
  • ShopNotes
  • Sports Collectors Digest
  • Threads
  • Timber Home Living
  • Traditional Building
  • Woodsmith
  • World Coin News
  • Writer's Digest
Active Interest Media logo
X
X
This is a dialog window which overlays the main content of the page. The modal window is a 'site map' of the most critical areas of the site. Pressing the Escape (ESC) button will close the modal and bring you back to where you were on the page.

Main Menu

  • How-To
  • Design
  • Tools & Materials
  • Video
  • Blogs
  • Forum
  • Project Guides
  • Reader Projects
  • Magazine
  • Members
  • FHB House

Podcasts

  • FHB Podcast
  • ProTalk

Webinars

  • Upcoming and On-Demand

Podcasts

  • FHB Podcast
  • ProTalk

Webinars

  • Upcoming and On-Demand

Popular Topics

  • Kitchens
  • Business
  • Bedrooms
  • Roofs
  • Architecture and Design
  • Green Building
  • Decks
  • Framing
  • Safety
  • Remodeling
  • Bathrooms
  • Windows
  • Tilework
  • Ceilings
  • HVAC

Magazine

  • Current Issue
  • Past Issues
  • Magazine Index
  • Subscribe
  • Online Archive
  • Author Guidelines

All Access

  • Member Home
  • Start Free Trial
  • Gift Membership

Online Learning

  • Courses
  • Project Guides
  • Reader Projects
  • Podcast

More

  • FHB Ambassadors
  • FHB House
  • Customer Support

Account

  • Log In
  • Join

Newsletter

Get home building tips, offers, and expert advice in your inbox

Signing you up...

This site is protected by reCAPTCHA and the Google Privacy Policy and Terms of Service apply.
See all newsletters
See all newsletters

Follow

  • X
  • YouTube
  • instagram
  • facebook
  • pinterest
  • Tiktok

Join All Access

Become a member and get instant access to thousands of videos, how-tos, tool reviews, and design features.

Start Your Free Trial

Subscribe

FHB Magazine

Start your subscription today and save up to 70%

Subscribe

This is your last free article.

Don't miss another expert tip or technique from building pros. Start your free trial today.

Start your FREE trial

Already a member? Log in

We hope you’ve enjoyed your free articles. To keep reading, become a member today.

Get complete site access to expert advice, how-to videos, Code Check, and more, plus the print magazine.

Start your FREE trial

Already a member? Log in

Privacy Policy Update

We use cookies, pixels, script and other tracking technologies to analyze and improve our service, to improve and personalize content, and for advertising to you. We also share information about your use of our site with third-party social media, advertising and analytics partners. You can view our Privacy Policy here and our Terms of Use here.

Cookies

Analytics

These cookies help us track site metrics to improve our sites and provide a better user experience.

Advertising/Social Media

These cookies are used to serve advertisements aligned with your interests.

Essential

These cookies are required to provide basic functions like page navigation and access to secure areas of the website.

Delete My Data

Delete all cookies and associated data