
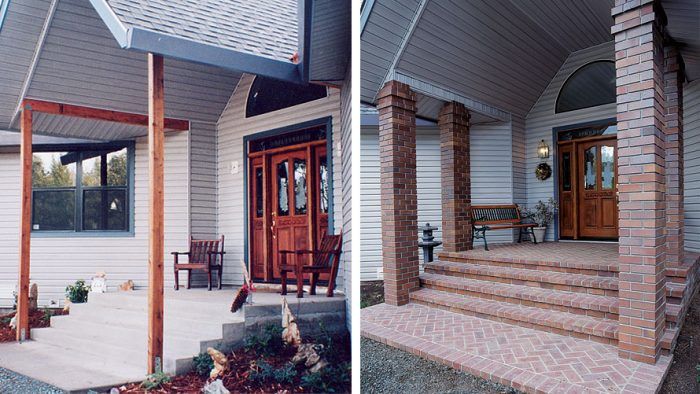
Refacing Concrete Steps With Brick
A level may be a mason's best friend, but to cover up an unsightly set of concrete steps, an experienced eye takes over.
Synopsis: The author and his partner are asked to cover a set of concrete steps and a pair of wood posts with brick. This article explains the process, including how they overcame problems such as finding risers of uneven height. Two short companion articles detail the brick herringbone pattern they used and the process of turning wood posts into brick columns.
Some masons guard their levels more closely than their wallets. No one, not even their apprentices, is allowed to touch them. Because so much depends on a level, it must be kept pristine and true. A mason’s level should be used only to check alignment of materials and never used to force those materials into place.
However, there are times when this tool must be set aside, even when setting brick. Because of their uniform shape, you’d think that bricks should always be set level and plumb. But unless you want a helter-skelter appearance, the rule is that bricks should look level and plumb, even if they aren’t.
So many questions, so many bricks
Trying to maintain a level look gets even trickier and more challenging when several intersecting, irregular, sloping surfaces come into play. On this project, my partner and I were asked to set a brick veneer over an existing concrete entryway with a bottom landing and three steps up to a large top landing. At first glance, it seemed simple. After all, a good, solid foundation for the brick was already in place.
But a closer look revealed many complications. First, the risers for the stairs varied from 6 in. to 6 1/2 in. We could compensate for the uneven concrete surfaces with the mortar layer, but the overall size of the slab had been set without considering the finished dimensions of any veneering material. So we needed to make the brick fit the existing dimensions of the concrete. A cut brick inserted into an odd gap could look like a mistake or an afterthought.
To complicate matters further, our clients also asked us to surround 4×4 wooden posts so that the hefty roof over the entry would appear to be supported by substantial brick columns. The idea was good in theory, but the concrete ledge outside the posts was too narrow to support even the width of a brick.
Last, we had to anticipate how the brick would meet the house at both the siding and at the door threshold. All these questions had to be answered before we set the first brick.
Sides are veneered first
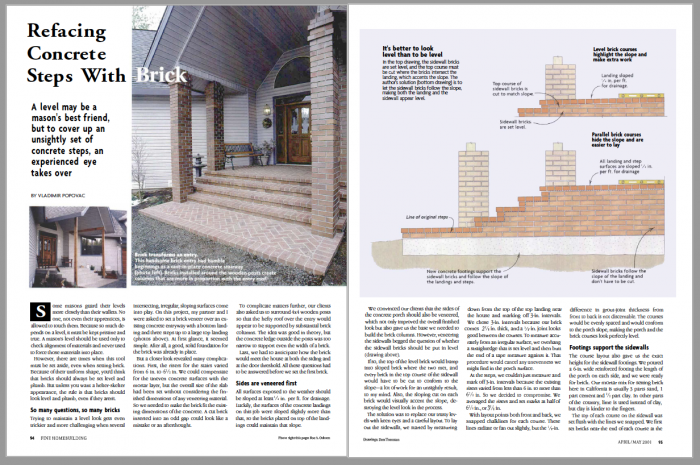
All surfaces exposed to the weather should be sloped at least 1/4 in. per ft. for drainage. Luckily, the surfaces of the concrete landings on this job were sloped slightly more than that, so the bricks placed on top of the landings could maintain that slope.
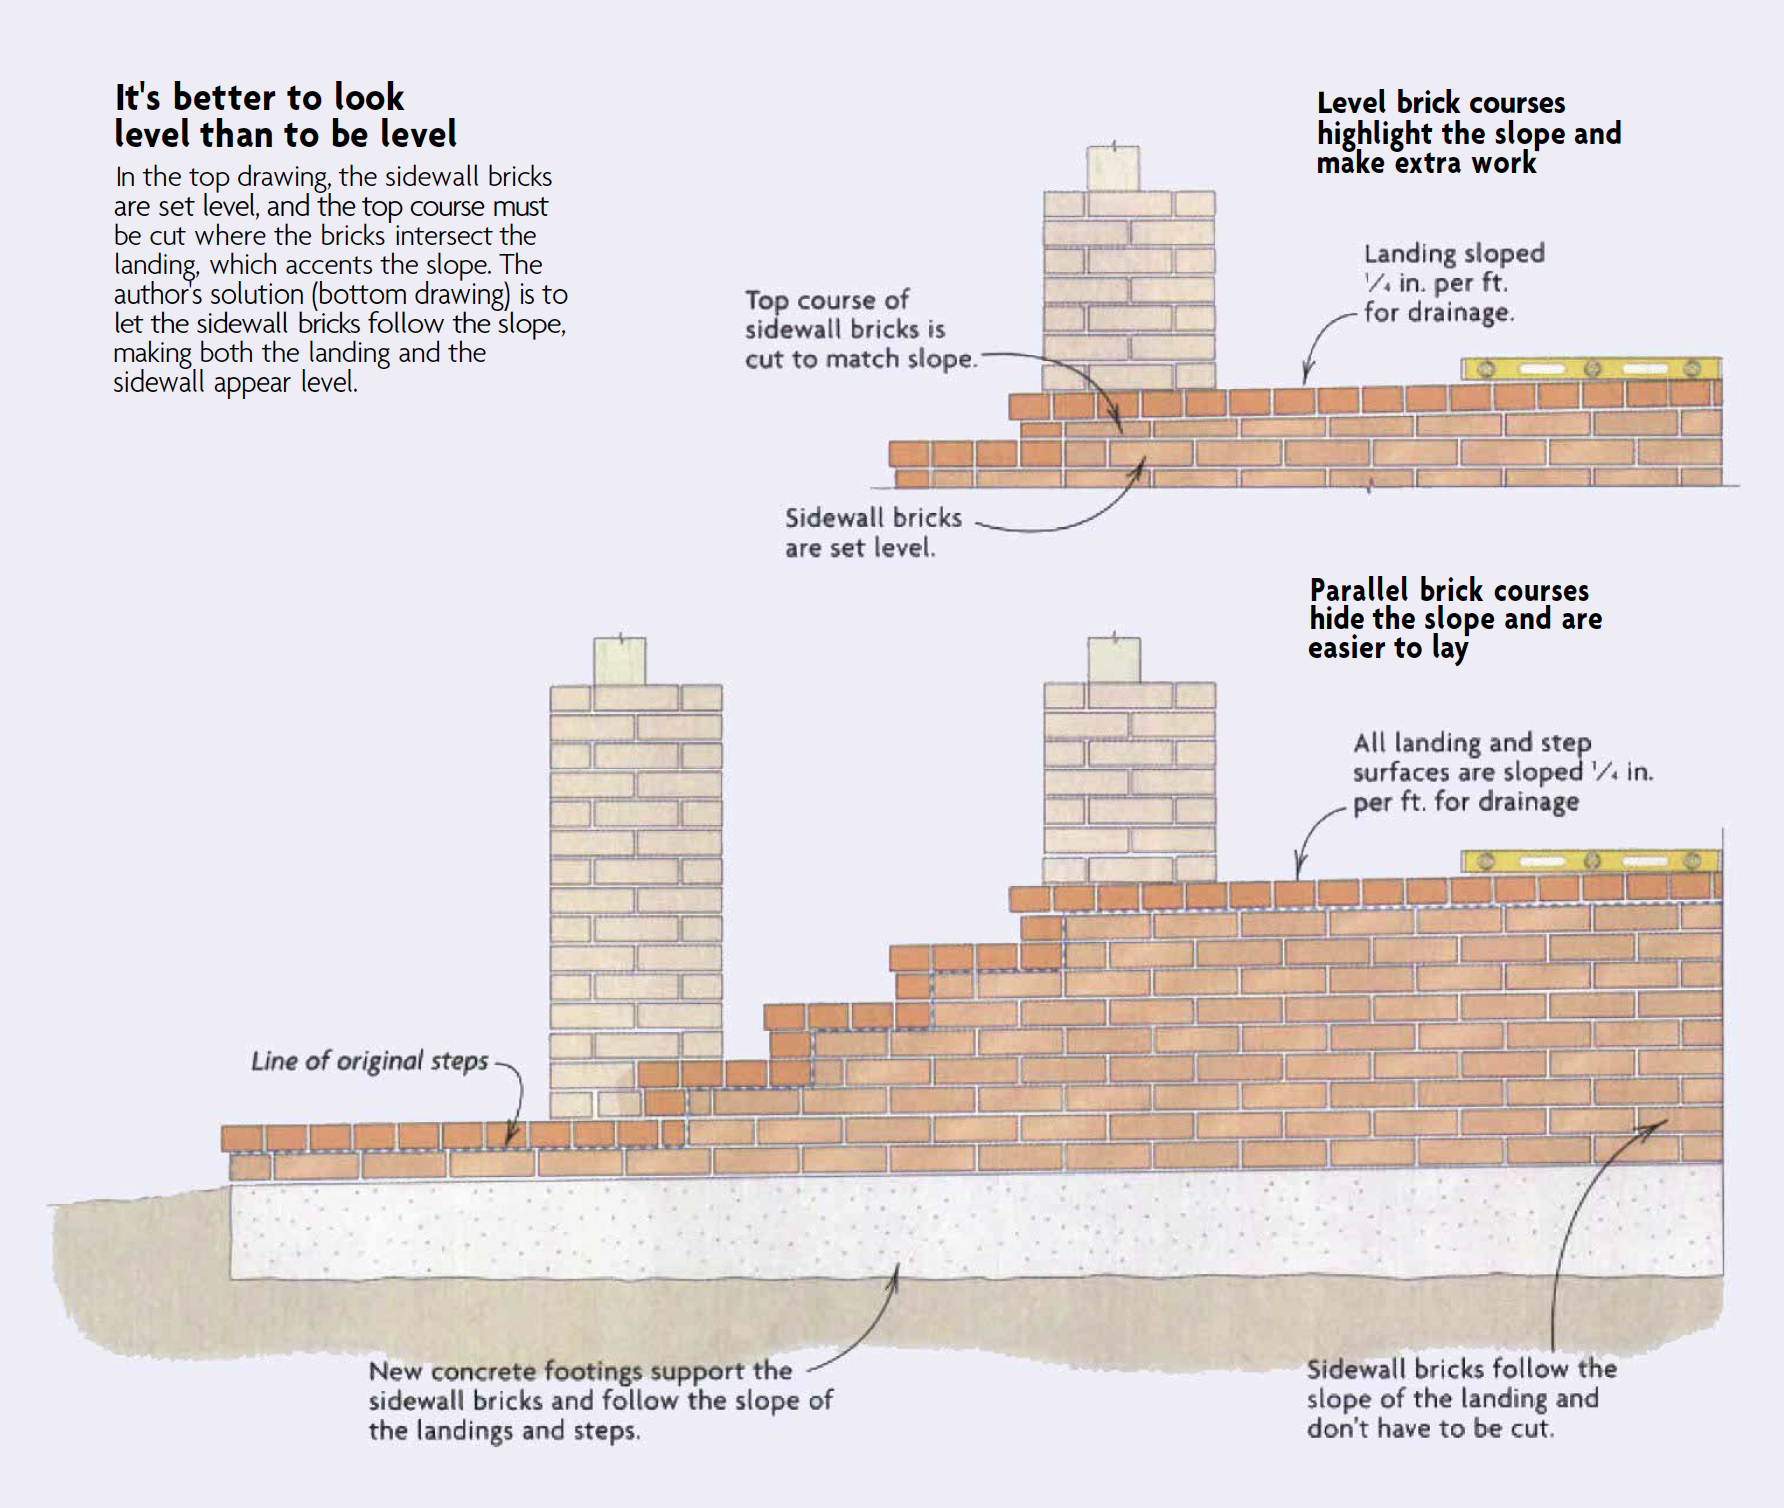
We convinced our clients that the sides of the concrete porch should also be veneered, which not only improved the overall finished look but also gave us the base we needed to build the brick columns. However, veneering the sidewalls begged the question of whether the sidewall bricks should be put in level.
If so, the top of the level brick would bump into sloped brick where the two met, and every brick in the top course of the sidewall would have to be cut to conform to the slope—a lot of work for an unsightly result, to my mind. Also, the sloping cut on each brick would visually accent the slope, destroying the level look in the process.
The solution was to replace our trusty levels with keen eyes and a careful layout. To lay out the sidewalls, we started by measuring down from the top of the top landing near the house and marking off 3-in. intervals. We chose 3-in. intervals because our brick comes 25/8 in. thick, and a 3/8-in joint looks good between the courses. To measure accurately from an irregular surface, we overhang a straightedge that is set level and then butt the end of a tape measure against it. That procedure would cancel any unevenness we might find in the porch surface.
At the steps, we couldn’t just measure and mark off 3-in. intervals because the existing risers varied from less than 6 in. to more than 61/2 in. So we decided to compromise. We averaged the risers and set marks at half of 61/4 in., or 31/8 in.
With layout points both front and back, we snapped chalklines for each course. These lines radiate or fan out slightly, but the 1/8-in. difference in grout-joint thickness from front to back is not discernable. The courses would be evenly spaced and would conform to the porch slope, making the porch and the brick courses look perfectly level.
Footings support the sidewalls
The course layout also gave us the exact height for the sidewall footings. We poured a 6-in. wide reinforced footing the length of the porch on each side, and we were ready for brick. Our mortar mix for setting brick here in California is usually 3 parts sand, 1 part cement and 1/2 part clay. In other parts of the country, lime is used instead of clay, but clay is kinder to the fingers.
The top of each course on the sidewall was set flush with the lines we snapped. We first set bricks near the end of each course at the proper level. A straightedge then spanned between the starter bricks, and we filled in the remaining bricks, nudging or tapping them into line with a trowel handle.
In short runs such as these, we fill in the head joints between the bricks only after each course is set and aligned, which allows us more leeway to adjust the spacing between the bricks. We did try to keep the head joints aligned vertically every other course, and wherever possible, we kept the end bricks flush with the face of the risers.
A border makes setting the field bricks easier
In this case, the border was simply bricks placed lengthwise and overhanging the edges of the landings and steps with mitered corners. First, we dry-fit the border bricks along the edge of the bottom landing.
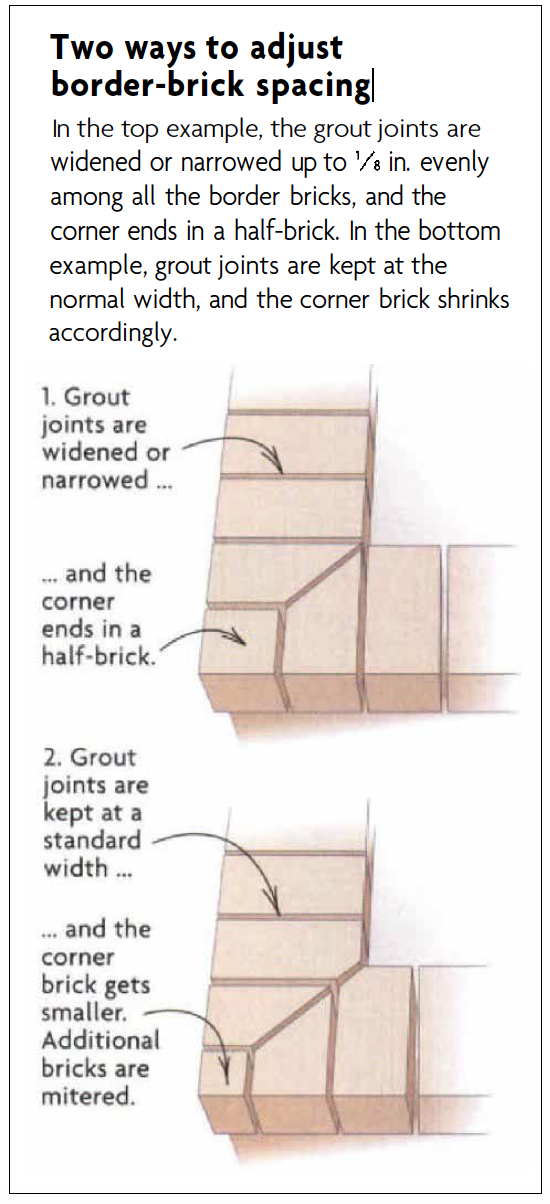
Border bricks rarely fit exactly how we’d like, but there are two ways to make the spacing come out right (drawing right). Either the design of the corners can be altered, or the spacing of the bricks between the corners can be widened or narrowed. Here, we opened the spacing slightly and were left with a full-width brick at each corner. We made guide marks in pencil on the concrete around the corner bricks and along the run to maintain the spacing while the bricks were set.
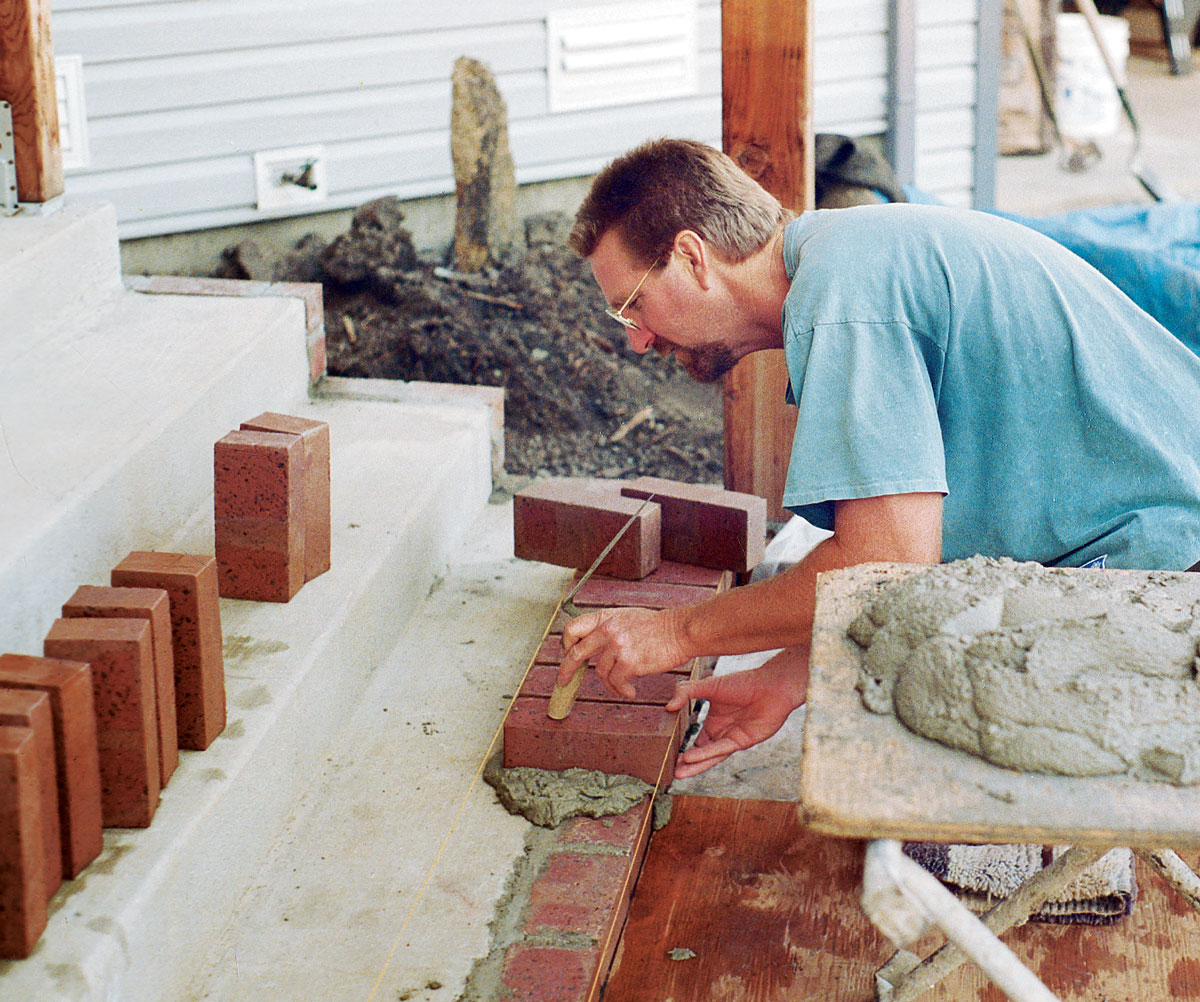
On each level, the first border bricks to go in were the starter bricks, to which I attached stringlines as guides for setting the rest of the bricks. We avoid starting with the actual corner bricks because they are usually smaller pieces that are less stable and need fine-tuning. Instead, we set the first couple of bricks in from each corner for starters.
To give the starter bricks the right slope, we first set a brick temporarily at the proper elevation at the back of the landing or step. A straightedge placed on the temporary brick sets the starter brick at the right slope. Once these starter bricks are in place, we grout their joints halfway up and let them set up. Whenever possible, we set starter bricks for the next day before leaving the site at the end of the day.
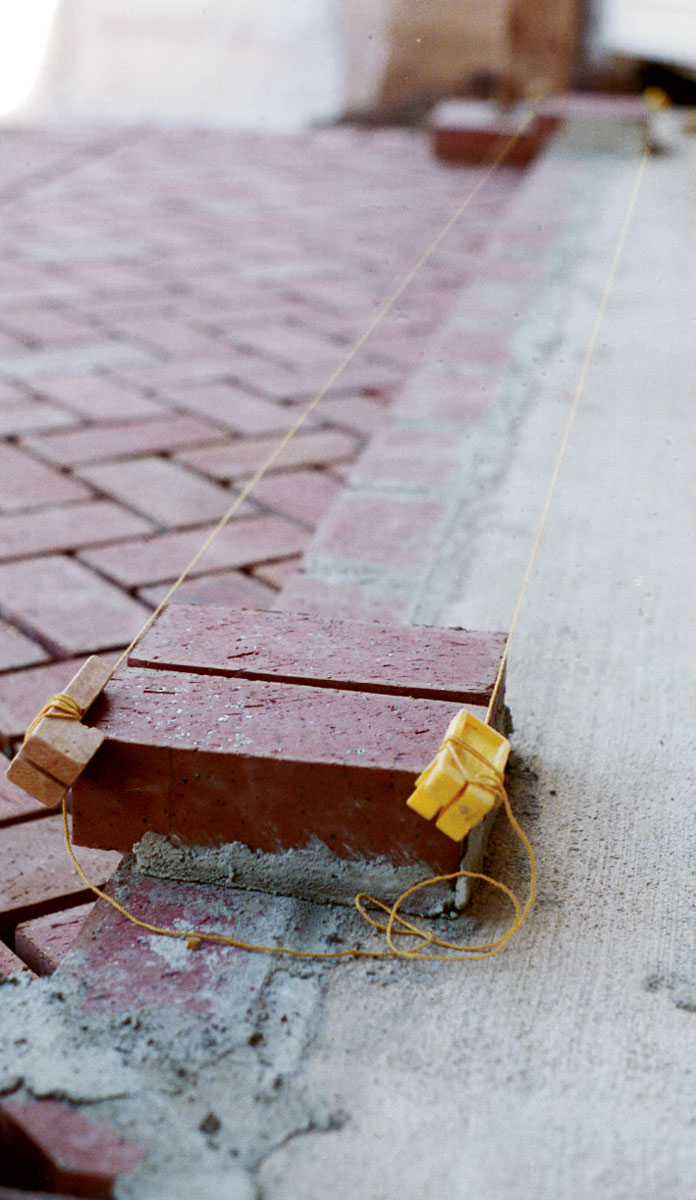
When the starter bricks are firmly in place, we stretch strings from both the front and the back corners using line blocks (above). Next, we set the remaining border bricks using our marks to set the spacing and the strings to set the slope (below). We set the bricks in their bed joints, leaving only the joints between bricks to be grouted after the field is set.
Setting the field
After the border was finished on each level, we turned our attention to setting the field brick for that level, whether landing or step. For this job, we chose a herringbone pattern, which is easy to lay out and to set evenly when bricks are slightly irregular, as they were in this case.
As field bricks are installed, we use a straightedge frequently not only to check on all alignments but also to set the slope. As with the border, we set a few temporary bricks along the back edge at the proper elevation as a guide for the straightedge.
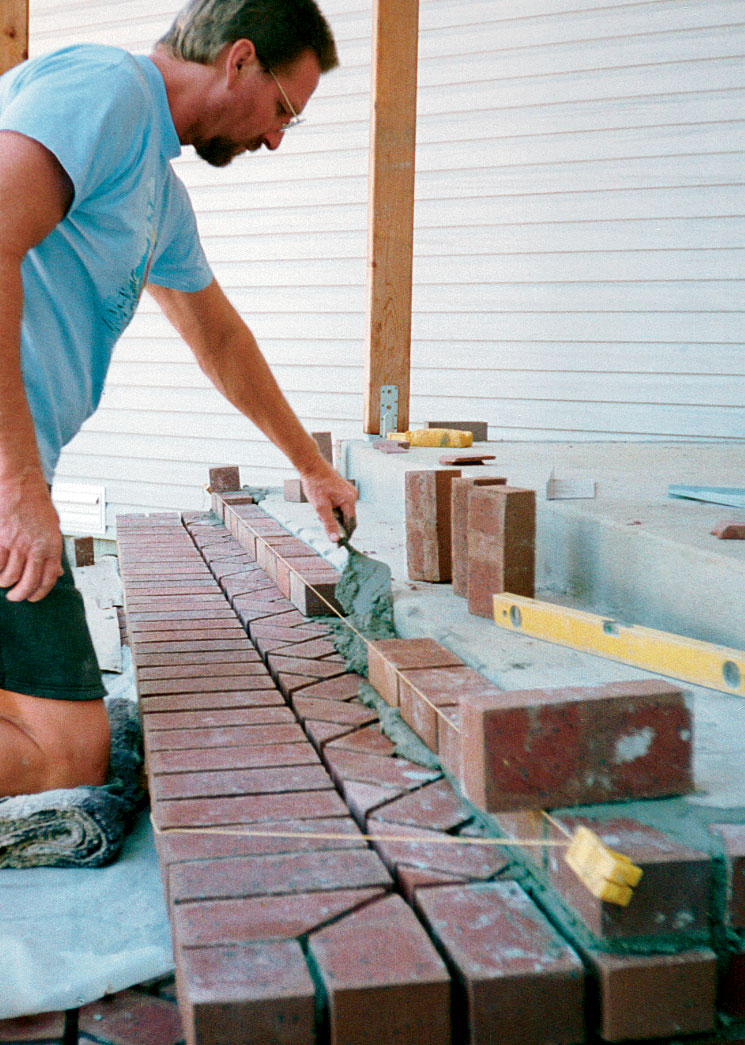
course of riser bricks was set flush with
the top of the step above to support the
border of that step. Minor differences in
riser height were made up in the joint between
courses.
When each level is completed, we set the bricks for the riser above. We incorporated the first courses for the brick columns into the riser on the bottom step.
The columns also interrupted the border bricks on the bottom step. Other than that, each step was treated like a small landing with the border set first and the field filled in after. The field for the steps was so small that all those bricks had to be cut.
On the top landing, we set border bricks around the perimeter at 3 in. up from the slab, giving us a correct elevation guide in every direction. The walls of the house flared out from a recessed entry door, and the rear border had to be cut and fit accordingly. The rear border bricks fit nicely under the entry threshold but butted into the J-channel for the vinyl siding on each side. Ordinarily, we would have cut the siding back and flashed the joint, but because the joint was so well sheltered by the wide porch-roof overhangs and the flared house walls, we just grouted and caulked the joint to save money.
The herringbone pattern for the top landing was laid out the same as it was for the bottom landing. And again, to keep the field brick at the proper slope, we spanned between the front and back borders with long aluminum straightedges.
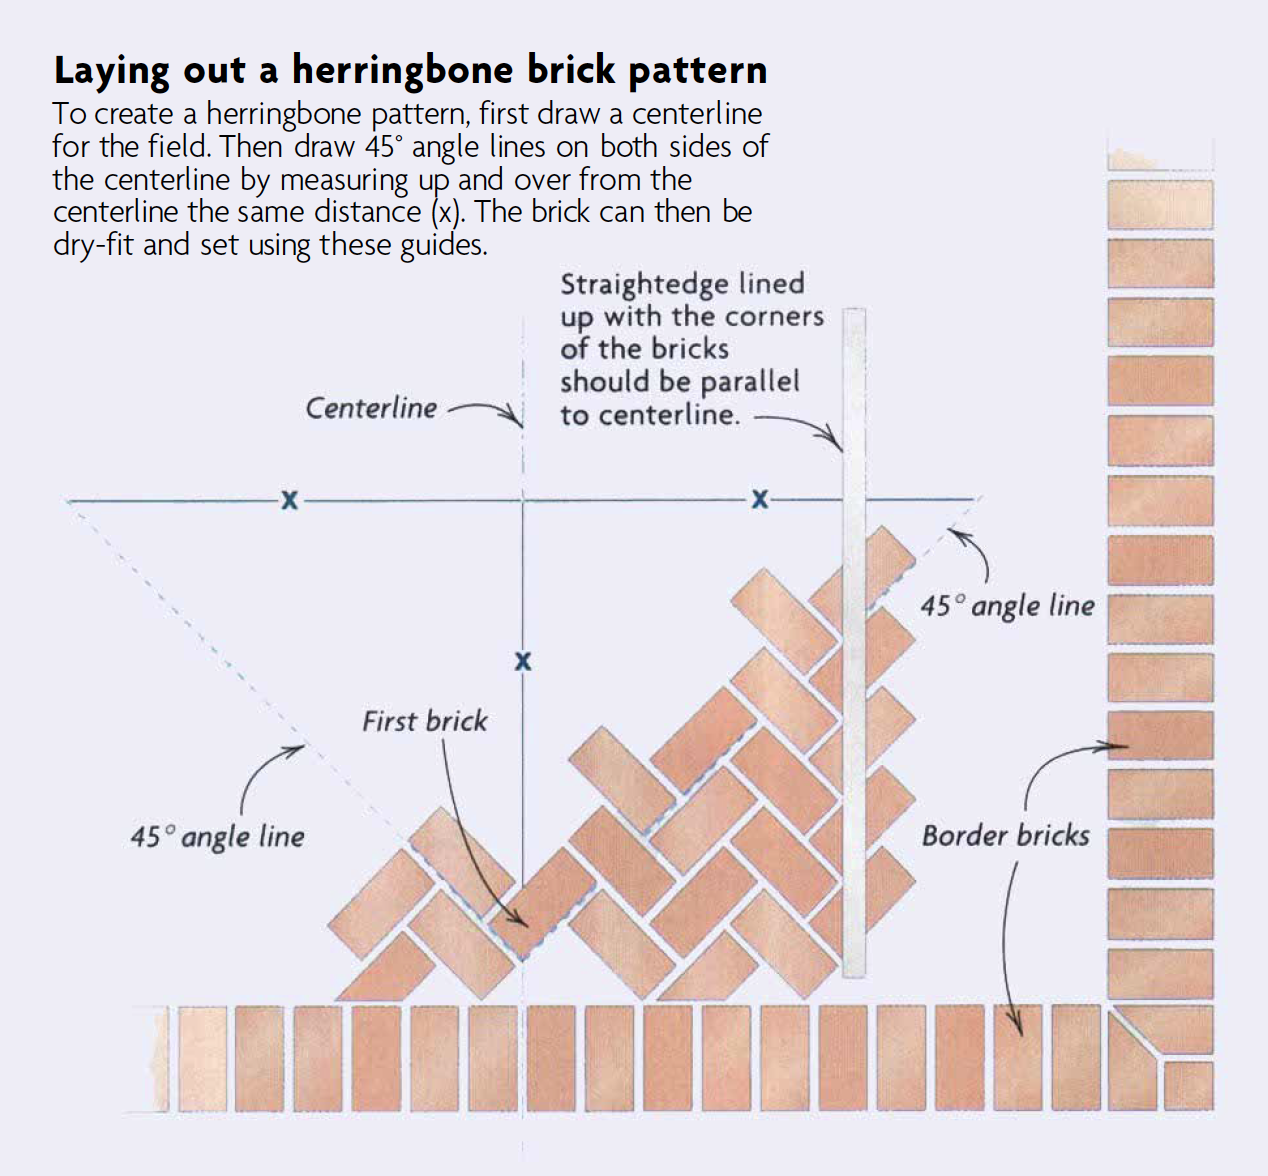
Creating a herringbone brick patternMy partner and I both like the look of a herringbone pattern when we’re installing field brick, especially when the field is wrapped by a strong border as in this project. The pattern begins with a single centerline that bisects the field front to back. Next, a field brick is set on this line, 45° to it near the border. We mark where the brick crosses the centerline and extend 45° lines out from that point. The best way to ensure that this line is at exactly 45° is to square up and over the same distance to a second point. A line drawn from that point to the starting point will be at 45°. With these three guidelines drawn or snapped, we dry-set a few more bricks at right angles and parallel to the first following the herringbone pattern. The border neatly embraces any size piece we end up with. And opposite field corners do not have to be identical. While the bricks are dry-fit, we take a close look at the pattern. We check the gaps between the full field bricks and the border. If any adjustments are needed, now is the time. When we’re satisfied, we remove the bricks and get ready to set them in mortar. 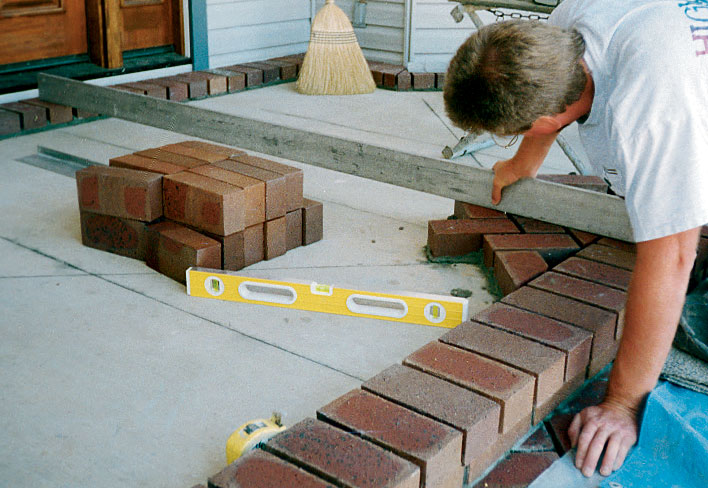 As the bricks are set, we work out from the centerline using a straightedge to maintain the slope. The corners of adjacent bricks should fall into lines parallel to the centerline. We fill in the gaps left along the border as we proceed. Once the cut pieces are set, we adjust the alignment of the full bricks. The brick is cut with a 10-in. diamond blade in a wet saw. To cut 45° angles, we simply set a Speed Square on the rolling table, holding the brick against it. As long as the field pattern is kept correctly aligned, the angle cuts along the border should stay the same size. If the size of the pieces starts to vary by more than in., the alignment is probably off. 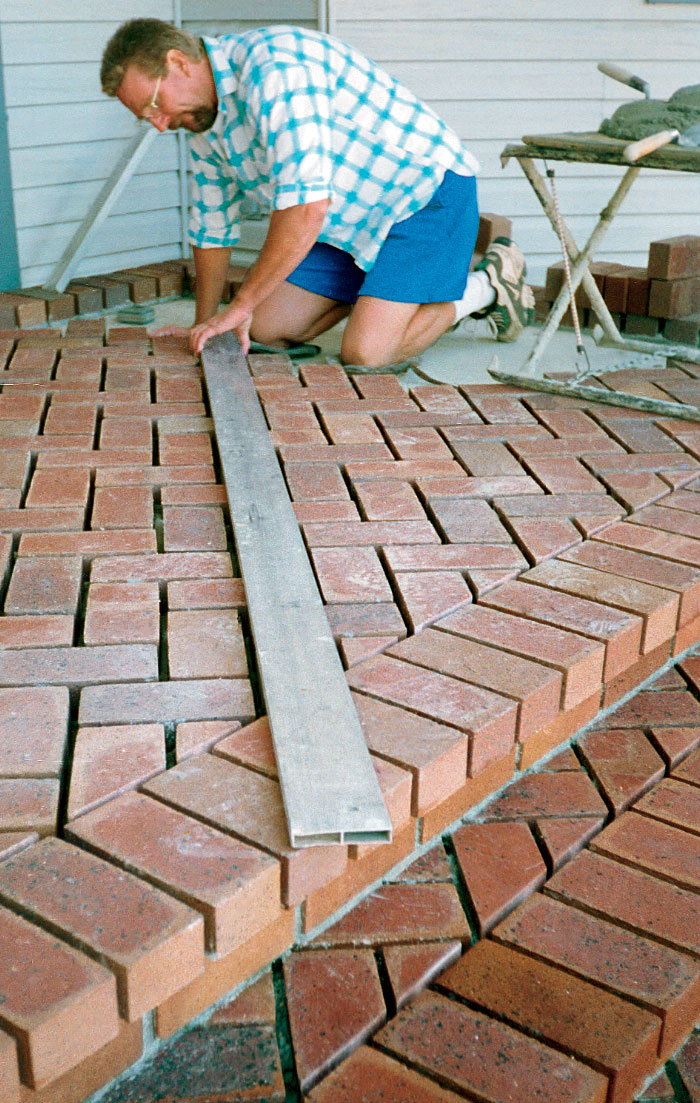 If an error is found, we go back and check the field carefully. One sure way to check the alignment of the field brick is by laying a straightedge along a diagonal row of bricks. Any deviation shows up quickly. —V. P. |
Fill in the joints with a grout bag
The final step is grouting, or filling in the joints between the bricks. The grout mix we use is the same proportions as our mortar mix except that we make it a little wetter, which lets the mixture slip through the grout bag and between the bricks more easily.
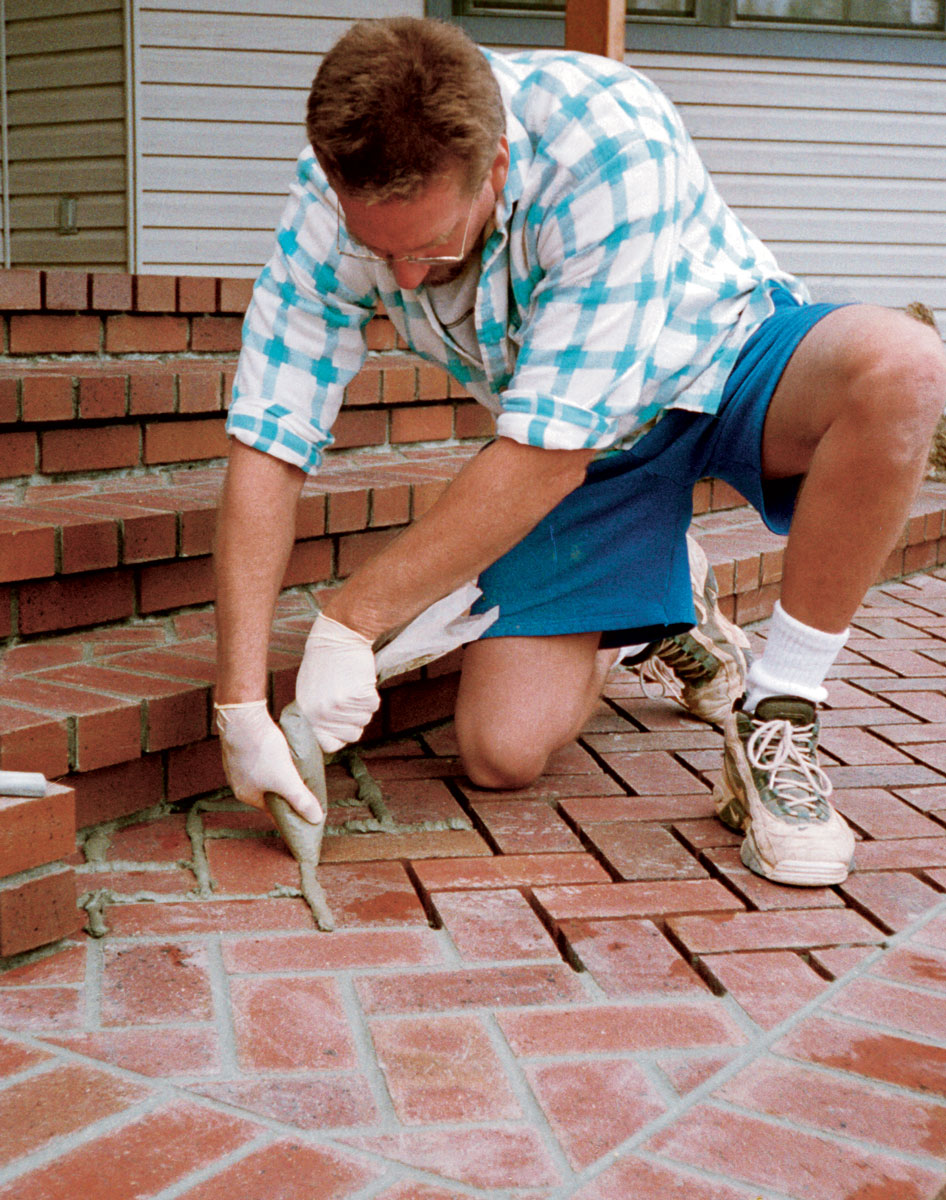
Grouting can become messy if you’re not careful, but a few precautions keep the mess to a minimum. First, we moisten the grout bag before we fill it. Next, we turn down the top edges of the bag to keep it open and clean as it is filled. Then, to squeeze out the grout, the bag should be twisted, not rolled up (bottom photo, facing page).
We grout each area slowly, making sure that the grout fills the joints. The mortar is allowed to set up to an easily crushable stiffness; then we strike the joints with a convex jointer (named for the shape of the tool blade, not the shape of the joint it leaves). Excess mortar is scraped off the bricks with a trowel, and then every last crumb is swept away with a soft brush. We finish the cleanup by giving the bricks a rinse with a clean, damp sponge, avoiding the joints as much as possible.
I lied. Grouting isn’t the last step. We recommend sealing the brick after the mortar in the joints has cured a few days. The masonry sealer we’ve had good luck with is Glaze ‘N Seal’s Multi-Purpose Clear Penetrating Seale (949) 250-9104 ; www.glaze-n-seal.com), which the clients opted to apply themselves.
When the brick veneer was finished, we tarped everything for protection and built the four brick columns. In the end, we finished the job using a level only to confirm the slope and to keep the courses of the columns aligned. Instead, the strong parallel lines of the brick courses fool the eye into believing that the surfaces are level.
Brick columns hide wood postsThe 4×4 pressure-treated wood posts looked too spindly for the heavy porch roof, so we decided to encase them with bricks. The posts were surprisingly plumb, so we had a choice of using levels or measuring tapes to keep the courses even as we went up. The tapes proved easier as we simply set the outside edges of the bricks equidistant from the post. 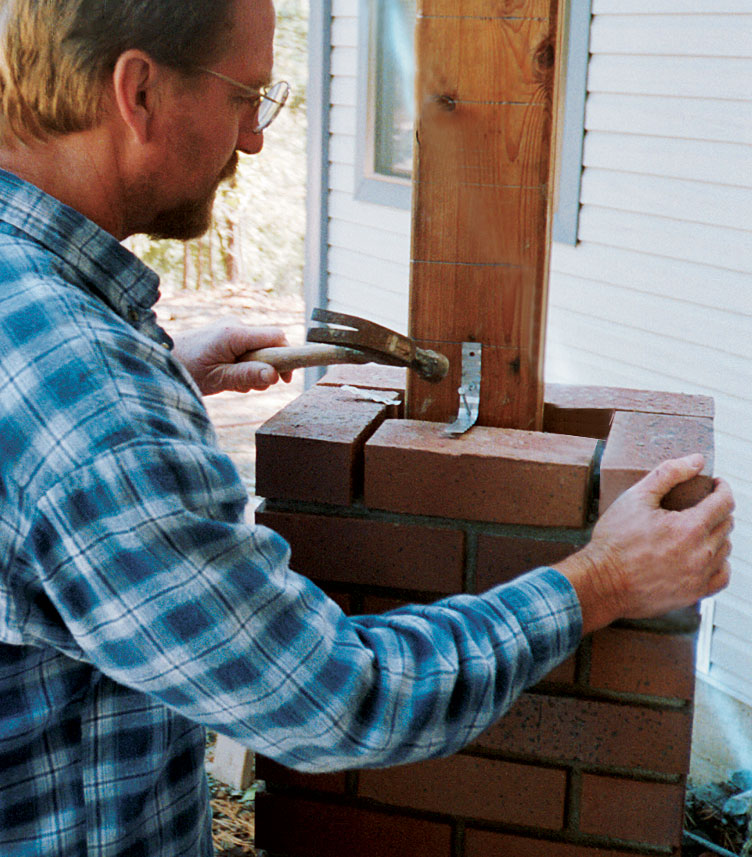 To make the columns go more quickly, each course was made with full-size bricks, the footprint of each column being a 2-brick by 11/2-brick rectangle. The space between the post and the brick ( in. on three sides and 4 in. in the back) was left hollow to let the post move inside without cracking the brick. At every fourth course, we nailed corrugated-metal brick ties to the post. The ties were set into the bed joints to provide both stability and flexibility. The first course of brick at the base of the columns was set at the same slope as the porch. Then gradually, over six courses, we brought the courses all up to level. We then marked off 3-in. intervals on one of the back posts up to the height of the crown design. Next, the distance to the top was measured and transferred to the other three posts from the top down. To make sure that the crowns on the longer front columns were at the same level as the back, we leveled over from a finished course on the back post and made a mark. Any remaining difference was divided equally and added to each course to bring the front and back columns into alignment. The crowns on the columns consisted of two staggered courses of brick that overhang the faces of the columns. The overhanging bricks were temporarily supported with small wooden wedges until the mortar had a chance to set up. We decided to rake the joints on the columns, which produces a better-looking, more sharply defined finish than striking them with a convex jointer. 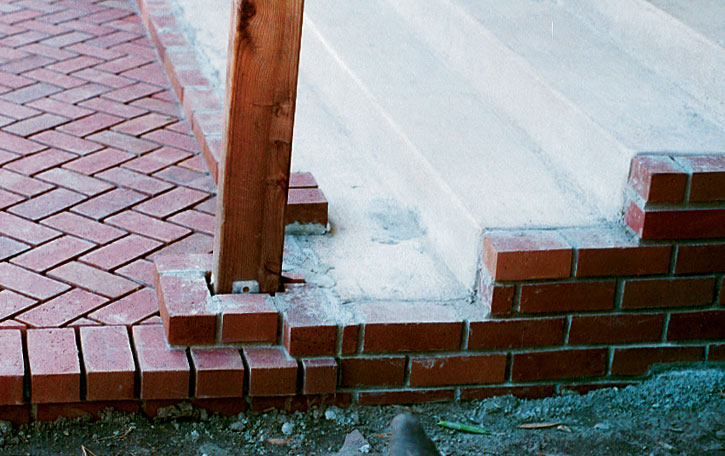 Raking simply means knocking the mortar out of the joint to an even depth of about 1/4 in. It can be done with a screwdriver or a tool called a skate-wheel joint raker that has two wheels that ride on the bricks beside the mortar joint while a nail set head down between the wheels scrapes the joint to an even depth. Raked joints can be easily brushed and washed, and a wet sponge won’t smear the grout. —V. P. |
Vladimir Popovac and his partner, Marshall Dunn, are masons in Sonora,
Drawings: Dan Thornton
From Fine Homebuilding #138
For more photos, drawings, and details, click the View PDF button below:
Fine Homebuilding Recommended Products
Fine Homebuilding receives a commission for items purchased through links on this site, including Amazon Associates and other affiliate advertising programs.

Large-Capacity Lightweight Miter Saw

Bosch Wall Scanner (GMS 120)

Makita Top-Handle Jigsaw (4350FCt)
